2019 MERCEDES-BENZ GLE COUPE check engine
[x] Cancel search: check enginePage 38 of 370
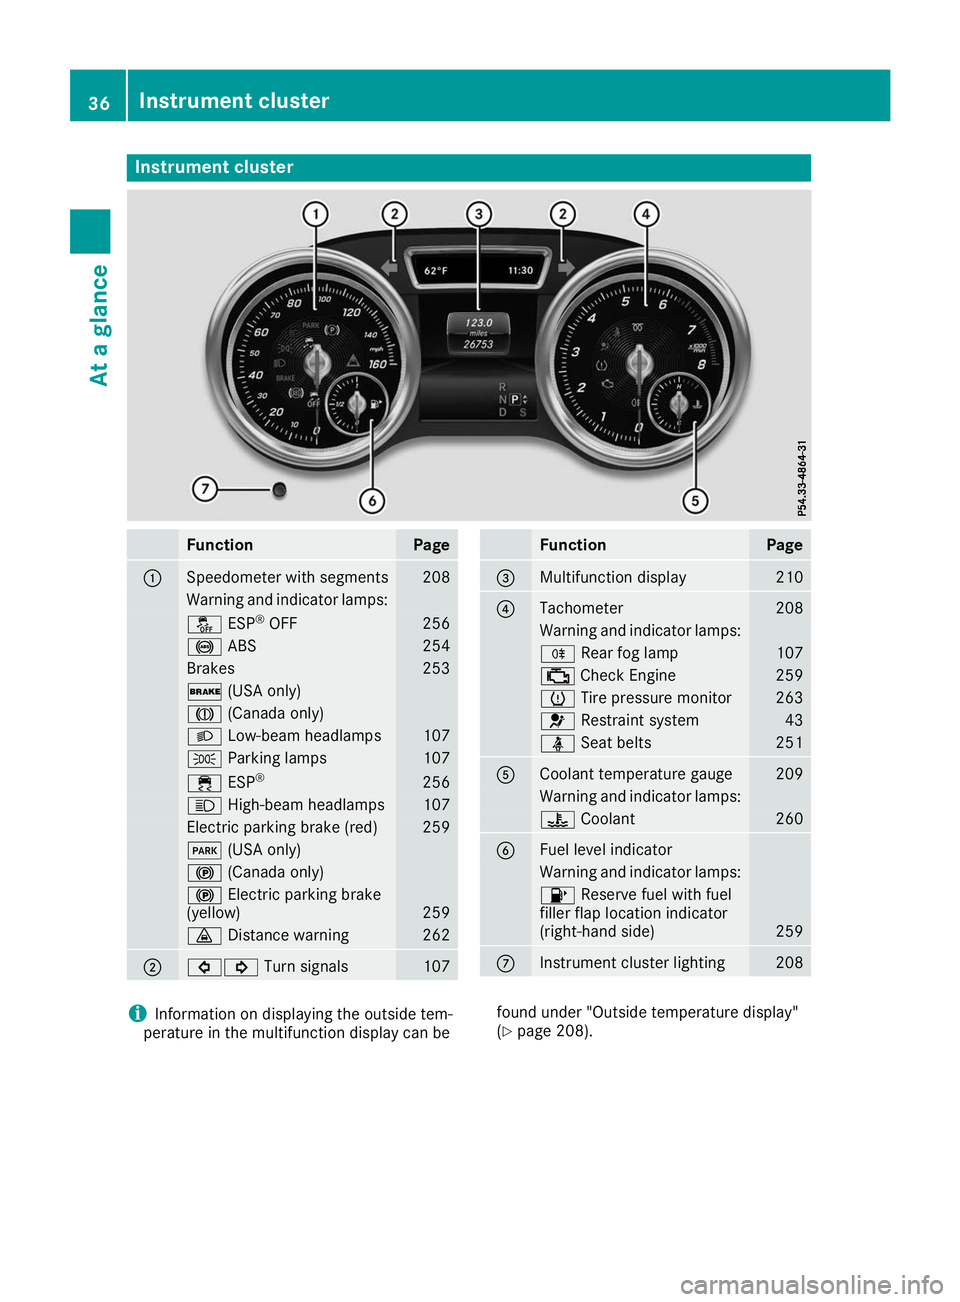
Instrument cluster
Function Page
0043
Speedometer with segments 208
Warning and indicator lamps:
00BB
ESP®
OFF 256
0025
ABS 254
Brakes 253
0027
(USA only) 004D
(Canada only) 0058
Low-beam headlamps 107
0060
Parking lamps 107
00E5
ESP® 256
0057
High-beam headlamps 107
Electric parking brake (red) 259
0049
(USA only) 0024
(Canada only) 0024
Electric parking brake
(yellow) 259
00BA
Distance warning 262
0044
003E003D
Turn signals 107 Function Page
0087
Multifunction display 210
0085
Tachometer 208
Warning and indicator lamps:
005E
Rear fog lamp 107
00B9
Check Engine 259
0077
Tire pressure monitor 263
0075
Restraint system 43
00E9
Seat belts 251
0083
Coolant temperature gauge 209
Warning and indicator lamps:
00AC
Coolant 260
0084
Fuel level indicator
Warning and indicator lamps:
00B6
Reserve fuel with fuel
filler flap location indicator
(right-hand side) 259
006B
Instrument cluster lighting 208
i
Information on displaying the outside tem-
perature in the multifunction display can be found under "Outside temperature display"
(Y
page 208). 36
Instrument clusterAt a glance
Page 45 of 370
Restraint system warning lamp
The functions of the restraint system are
checked after the ignition is switched on and at
regular intervals while the engine is running.
Therefore, malfunctions can be detected in
good time.
The 0075 restraint system warning lamp on the
instrument cluster lights up when the ignition is switched on. It goes out no later than a few sec-
onds after the vehicle is started. The compo-
nents of the restraint system are in operational
readiness.
A malfunction has occurred if the 0075restraint
system warning lamp:
R does not light up after the ignition is switched
on
R does not go out after a few seconds with the
engine running
R lights up again while the engine is running G
WARNING
If the restraint system is malfunctioning,
restraint system components may be trig-
gered unintentionally or may not deploy as
intended during an accident. This can affect
for example the Emergency Tensioning
Device or the air bag. This poses an increased risk of injury or even fatal injury.
Have the restraint system checked and
repaired in a qualified specialist workshop as
soon as possible. PASSENGER AIR BAG indicator lamp
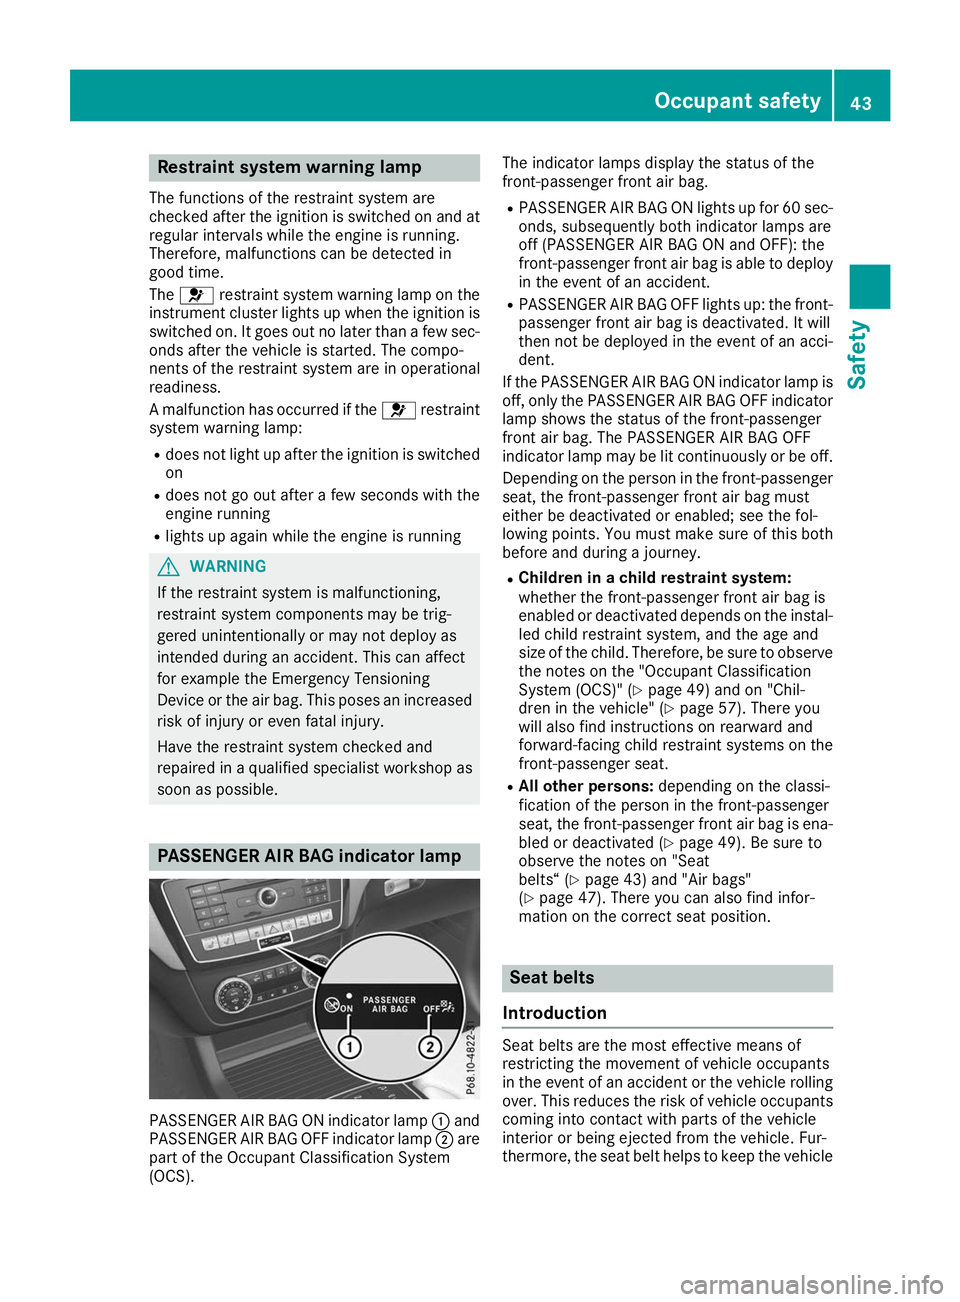
PASSENGER AIR BAG ON indicator lamp
0043and
PASSENGER AIR BAG OFF indicator lamp 0044are
part of the Occupant Classification System
(OCS). The indicator lamps display the status of the
front-passenger front air bag.
R PASSENGER AIR BAG ON lights up for 60 sec-
onds, subsequently both indicator lamps are
off (PASSENGER AIR BAG ON and OFF): the
front-passenger front air bag is able to deploy in the event of an accident.
R PASSENGER AIR BAG OFF lights up: the front-
passenger front air bag is deactivated. It will
then not be deployed in the event of an acci-
dent.
If the PASSENGER AIR BAG ON indicator lamp is
off, only the PASSENGER AIR BAG OFF indicator lamp shows the status of the front-passenger
front air bag. The PASSENGER AIR BAG OFF
indicator lamp may be lit continuously or be off.
Depending on the person in the front-passenger seat, the front-passenger front air bag must
either be deactivated or enabled; see the fol-
lowing points. You must make sure of this both
before and during a journey.
R Children in a child restraint system:
whether the front-passenger front air bag is
enabled or deactivated depends on the instal-
led child restraint system, and the age and
size of the child. Therefore, be sure to observe
the notes on the "Occupant Classification
System (OCS)" (Y page 49) and on "Chil-
dren in the vehicle" (Y page 57). There you
will also find instructions on rearward and
forward-facing child restraint systems on the
front-passenger seat.
R All other persons: depending on the classi-
fication of the person in the front-passenger
seat, the front-passenger front air bag is ena-
bled or deactivated (Y page 49). Be sure to
observe the notes on "Seat
belts“ (Y page 43) and "Air bags"
(Y page 47). There you can also find infor-
mation on the correct seat position. Seat belts
Introduction Seat belts are the most effective means of
restricting the movement of vehicle occupants
in the event of an accident or the vehicle rolling
over. This reduces the risk of vehicle occupants
coming into contact with parts of the vehicle
interior or being ejected from the vehicle. Fur-
thermore, the seat belt helps to keep the vehicle Occupant safety
43Safety Z
Page 66 of 370
Driving safety systems
Overview of driving safety systems
In this section, you will find information about
the following driving safety systems:
R ABS (Anti-lock BrakingSystem)
(Y page 64)
R BAS (Brake AssistSystem) (Y page 65)
R Active Brake Assist (Y page 65)
R ESP ®
(E lectronic StabilityProgram)
(Y page 68)
R EBD (Electronic Brake forceDistribution)
(Y page 69)
R ADAPTIVE BRAKE (Y page 70)
R Active Brake Assist with cross-traffic function
(Y page 70)
R Active Steering Assist STEER CONTROL
(Y page 72) Important safety notes
If you fail to adapt your driving style or if you are
inattentive, the driving safety systems can nei-
ther reduce the risk of an accident nor override the laws of physics. Driving safety systems are
merely aids designed to assist driving. You are
responsible for maintaining the distance to the
vehicle in front, for vehicle speed, for braking in
good time, and for staying in lane. Always adapt your driving style to suit the prevailing road and
weather conditions and maintain a safe distance from the vehicle in front. Drive carefully.
The driving safety systems described only work
as effectively as possible when there is ade-
quate contact between the tires and the road
surface. Pay particular attention to the informa- tion regarding tires, recommended minimum
tire tread depths etc. in the "Wheels and tires"
section (Y page 327).
In wintry driving conditions, always use winter
tires (M+S tires )and if necessary, snow chains.
Only in this way will the driving safety systems
described in this section work as effectively as
possible. ABS (Anti-lock Braking System)
General information ABS regulates brake pressure in such a way that
the wheels do not lock when you brake. This
allows you to continue steering the vehicle when braking.
The 0025 ABS warning lamp in the instrument
cluster lights up when the ignition is switched
on. It goes out when the engine is running.
ABS works from a speed of about 5 mph
(8 km/h), regardless of road-surface conditions.
ABS works on slippery surfaces, even when you only brake gently.
Important safety notes i
Observe the "Important safety notes" sec-
tion (Y page 64). G
WARNING
If ABS is faulty, the wheels could lock when
braking. The steerability and braking charac-
teristics may be severely impaired. Addition-
ally, further driving safety systems are deac-
tivated. There is an increased danger of skid- ding and accidents.
Drive on carefully. Have ABS checked imme-
diately at a qualified specialist workshop.
When ABS is malfunctioning, other systems,
including driving safety systems, will also
become inoperative. Observe the information
on the ABS warning lamp (Y page 254) and dis-
play messages which may be shown in the
instrument cluster (Y page 224).
Brakes X
If ABS intervenes: continue to depress the
brake pedal vigorously until the braking sit-
uation is over.
X To make a full brake application: depress
the brake pedal with full force.
If ABS intervenes when braking, you will feel a
pulsing in the brake pedal.
The pulsating brake pedal can be an indication
of hazardous road conditions, and functions as a
reminder to take extra care while driving. 64
Driving safety systemsSafety
Page 70 of 370
Important safety notes
G
WARNING
If ESP ®
is malfunctioning, ESP ®
is unable to
stabilize the vehicle. Additionally, further driv- ing safety systems are deactivated. This
increases the risk of skidding and an accident.
Drive on carefully. Have ESP ®
checked at a
qualified specialist workshop.
! Only operate the vehicle for a maximum of
ten seconds on a brake test dynamometer.
Switch off the ignition.
Application of the brakes by ESP ®
may oth-
erwise destroy the brake system.
! A function or performance test should only
be carried out on a two-axle dynamometer.
Before you operate the vehicle on such a
dynamometer, please consult a qualified
workshop. You could otherwise damage the
drive train or the brake system.
! Do not tow vehicles with 4MATIC with the
front or rear axle raised.
ESP ®
is only deactivated if the 00BBwarning
lamp is lit continuously.
If the 00E5 warning lamp and the 00BBwarning
lamp are lit continuously, ESP ®
is not available
due to a malfunction.
Observe the information on warning lamps
(Y page 256) and display messages which may
be shown in the instrument cluster
(Y page 224).
i Only use wheels with the recommended tire
sizes. Only then will ESP ®
function properly.
Characteristics of ESP ®General information
If the 00E5 ESP warning lamp goes out before
beginning the journey, ESP ®
is automatically
active.
If ESP ®
intervenes, the 00E5ESP®
warning lamp
flashes in the instrument cluster. If ESP
®
intervenes:
X Do not deactivate ESP ®
under any circum-
stances.
X Only depress the accelerator pedal as far as
necessary when pulling away.
X Adapt your driving style to suit the prevailing
road and weather conditions.
ECO start/stop function
The ECO start/stop function switches the
engine off automatically when the vehicle stops moving. The engine starts automatically when
the driver wants to pull away again. ESP ®
remains in its previously selected status, e.g. if
ESP ®
was deactivated before the engine was
automatically switched off.
Deactivating/activating ESP ® Important safety notes
i Observe the "Important safety notes" sec-
tion (Y page 64).
You can select between the following states of
ESP ®
:
R ESP ®
is activated.
R ESP ®
is deactivated. G
WARNING
If you deactivate ESP ®
, ESP ®
no longer sta-
bilizes the vehicle. There is an increased risk
of skidding and an accident.
Only deactivate ESP ®
in the situations descri-
bed in the following.
It may be best to deactivate ESP ®
in the follow-
ing situations:
R when using snow chains
R in deep snow
R on sand or gravel
Spinning the wheels results in a cutting action
which provides better grip.
i Activate ESP ®
as soon as the situations
described above no longer apply. ESP ®
will
otherwise not be able to stabilize the vehicle if
the vehicle starts to skid or a wheel starts to
spin. 68
Driving safety systemsSafety
Page 77 of 370
If activated in the multimedia system, the loca-
tor lighting also lights up in the dark (see the
Digital Operator's Manual).
X To open the tailgate automatically from
outside the vehicle: press and hold the0054
button until the tailgate opens.
Vehicles with KEYLESS-GO: X To close the tailgate automatically from
outside the vehicle:
if the SmartKey is loca-
ted in the immediate vicinity of the vehicle,
press the 0054button on the SmartKey.
When the tailgate closes you can then release
the button. KEYLESS-GO
General notes Bear in mind that the engine can be started by
any of the vehicle occupants if there is a KEY-
LESS-GO key in the vehicle (Y page 129).
Locking/unlocking centrally You can start, lock or unlock the vehicle using
KEYLESS-GO. To do this, you only need carry the
SmartKey with you. You can combine the func-
tions of KEYLESS-GO with those of a conven-
tional SmartKey. Unlock the vehicle by using
KEYLESS-GO, for instance, and lock it using the 0037 button on the SmartKey.
The driver's door and the door at which the han- dle is used, must both be closed. The SmartKey
must be outside the vehicle. When locking or
unlocking with KEYLESS-GO, the distance
between the SmartKey and the corresponding
door handle must not be greater than 3 ft (1 m).
KEYLESS-GO checks whether a valid SmartKey
is in the vehicle by periodically establishing a
radio connection between the vehicle and the
SmartKey. This happens:
R when starting the engine
R while driving
R when the external door handles are touched
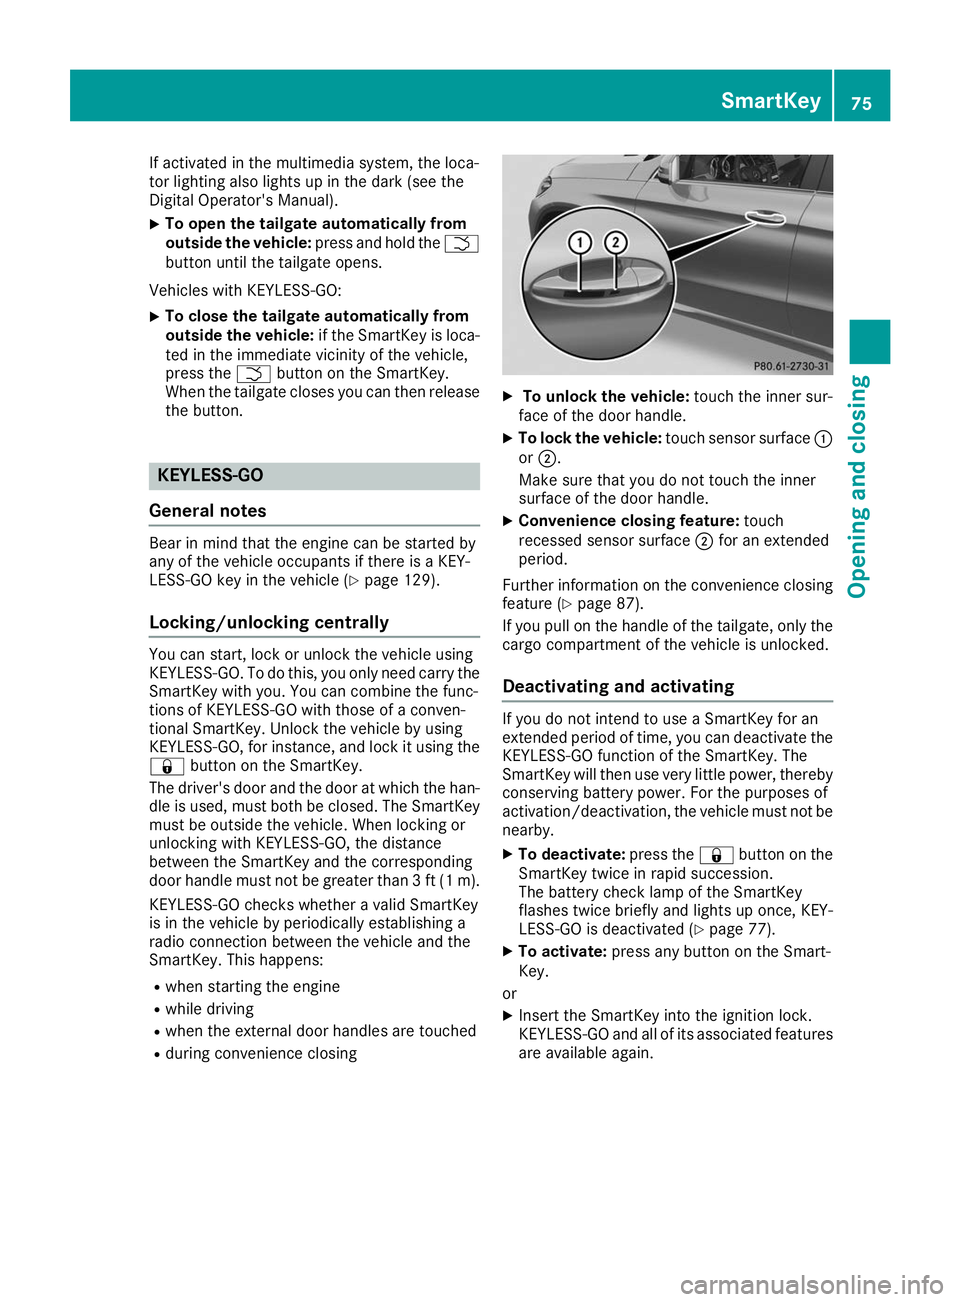
R during convenience closing X
To unlock the vehicle: touch the inner sur-
face of the door handle.
X To lock the vehicle: touch sensor surface 0043
or 0044.
Make sure that you do not touch the inner
surface of the door handle.
X Convenience closing feature: touch
recessed sensor surface 0044for an extended
period.
Further information on the convenience closing
feature (Y page 87).
If you pull on the handle of the tailgate, only the cargo compartment of the vehicle is unlocked.
Deactivating and activating If you do not intend to use a SmartKey for an
extended period of time, you can deactivate the
KEYLESS-GO function of the SmartKey. The
SmartKey will then use very little power, thereby conserving battery power. For the purposes of
activation/deactivation, the vehicle must not be
nearby.
X To deactivate: press the0037button on the
SmartKey twice in rapid succession.
The battery check lamp of the SmartKey
flashes twice briefly and lights up once, KEY-
LESS-GO is deactivated (Y page 77).
X To activate: press any button on the Smart-
Key.
or X Insert the SmartKey into the ignition lock.
KEYLESS-GO and all of its associated features
are available again. SmartKey
75Opening and closing Z
Page 78 of 370
KEYLESS-GO start function
General notes Bear in mind that the engine can be started by
any of the vehicle occupants if there is a Smart-
Key in the vehicle (Y page 129).Changing the settings of the locking
system
You can change the settings of the locking sys-
tem. This means that only the driver's door and
the fuel filler flap are unlocked when the vehicle is unlocked. This is useful if you frequently travelalone.
X To change the setting: press and hold down
the 0036 and0037 buttons simultaneously
for about six seconds until the battery indica-
tor lamp flashes twice (Y page 77).
If the setting of the locking system is changed
within the signal range of the vehicle, pressing
the 0037 or0036 button:
R locks or
R unlocks the vehicle
The SmartKey now functions as follows:
X To unlock: press the0036button once.
X To unlock centrally: press the0036button
twice.
X To lock centrally: press the0037button.
The KEYLESS-GO function is changed as fol-
lows:
X To unlock the driver's door: touch the inner
surface of the door handle on the driver's
door.
X To unlock centrally: touch the inner surface
of the door handle on the front-passenger
door or the rear door.
X To lock centrally: touch the outer sensor
surface on one of the door handles
(Y page 75).
X To restore the factory settings: press and
hold down the 0036and0037 buttons simul-
taneously for approximately six seconds until
the battery check lamp flashes twice
(Y page 77). Mechanical key
General notes If the vehicle can no longer be locked or
unlocked with the SmartKey or with KEYLESS-
GO, use the mechanical key.
If you use the mechanical key to unlock and
open the driver's door, the anti-theft alarm sys- tem will be triggered. Switch off the alarm
(Y page 73).
If you unlock the vehicle using the mechanical
key, the fuel filler flap will not be unlocked auto-
matically.
X To unlock the fuel filler flap: insert the
SmartKey into the ignition lock.
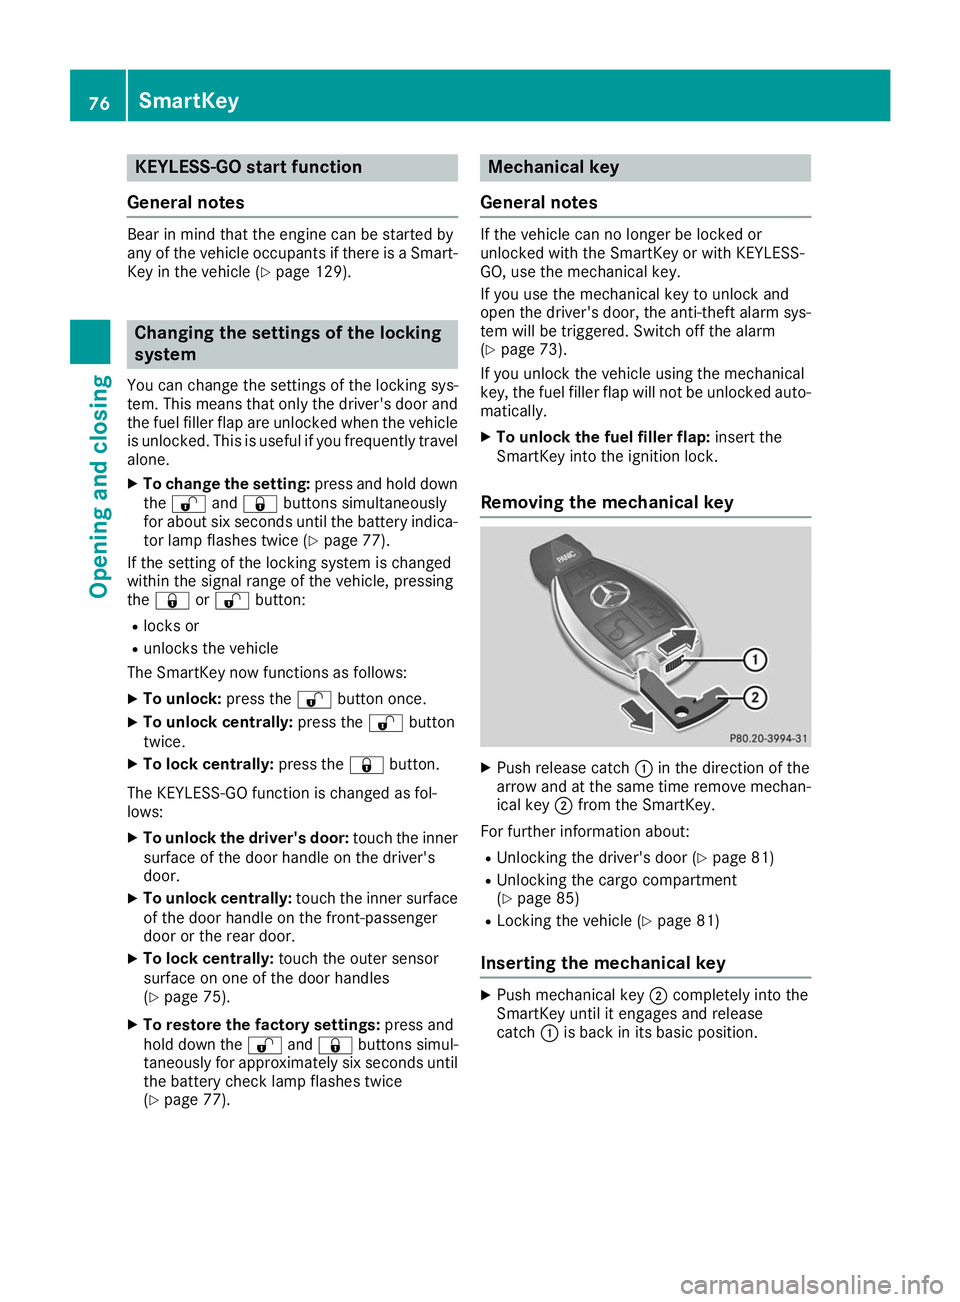
Removing the mechanical key X
Push release catch 0043in the direction of the
arrow and at the same time remove mechan- ical key 0044from the SmartKey.
For further information about:
R Unlocking the driver's door (Y page 81)
R Unlocking the cargo compartment
(Y page 85)
R Locking the vehicle (Y page 81)
Inserting the mechanical key X
Push mechanical key 0044completely into the
SmartKey until it engages and release
catch 0043is back in its basic position. 76
SmartKeyOpening and closing
Page 81 of 370

Problem
Possible causes/consequences and
0050
0050Solutions There is interference from a powerful source of radio waves.
X Unlock (Y page 81) or lock (Y page 81) the vehicle using the
mechanical key. KEYLESS-GO is malfunctioning.
X Lock/unlock the vehicle using the remote control function of the
SmartKey.
X Have the vehicle and SmartKey checked at a qualified specialist
workshop.
If the vehicle can also not be locked/unlocked using the remote con-
trol function:
X Unlock (Y page 81) or lock (Y page 81) the vehicle using the
mechanical key.
X Have the vehicle and SmartKey checked at a qualified specialist
workshop. The engine cannot be
started using the Smart-
Key. The on-board voltage is too low.
X Switch off non-essential consumers, e.g. seat heating or interior
lighting, and try to start the engine again.
If this does not work:
X Check the starter battery and charge it if necessary (Y page 317).
or X Jump-start the vehicle (Y page 318).
or X Consult a qualified specialist workshop. The engine cannot be
started using the Start/
Stop button. The Smart-
Key is in the vehicle. The vehicle is locked.
X Unlock the vehicle and try to start the vehicle again. The SmartKey battery is discharged or nearly discharged.
X Check the SmartKey battery (Y page 77) and replace it if necessary
(Y page 77).
If this does not work: X Start your vehicle with the SmartKey in the ignition lock. There is interference from a powerful source of radio waves.
X Start your vehicle with the SmartKey in the ignition lock. You have lost a Smart-
Key. X
Have the SmartKey deactivated at a qualified specialist workshop.
X Report the loss immediately to the vehicle insurers.
X If necessary, have the locks changed as well. You have lost the
mechanical key. X
Report the loss immediately to the vehicle insurers.
X If necessary, have the locks changed as well. SmartKey
79Opening and closing Z
Page 116 of 370
Problems with the windshield wipers
Problem
Possible causes/consequences and
0050
0050Solutions The windshield wipers
are jammed. Leaves or snow, for example, may be obstructing the windshield wiper
movement. The wiper motor has been deactivated.
X For safety reasons, you should remove the SmartKey from the igni-
tion lock.
or X Switch off the engine using the Start/Stop button and open the
driver's door.
X Remove the cause of the obstruction.
X Switch the windshield wipers back on. The windshield wipers
fail completely. The windshield wiper drive is malfunctioning.
X Select another wiper speed on the combination switch.
X Have the windshield wipers checked at a qualified specialist work-
shop. 114
Windshield wipersLights and windshield wipers