2019 MERCEDES-BENZ GLE COUPE open hood
[x] Cancel search: open hoodPage 14 of 370
Fuse box under rear bench sea
t.... 326
Important safety notes .................. 324 G
Garage door opener Clearing the memory ..................... 295
General notes ................................ 292
Important safety notes .................. 292
Opening/closing the garage doo r..2 95
Problems when programming ....... .294
Programming (button in the rear-
view mirror) ................................... 293
Synchronizing the rolling code ....... 293
Gear indicator (on-board com-
puter, Mercedes-AMG vehicles) ....... 220
Genuine parts ...................................... 26
Glove box .......................................... .273
Google™ Local Search
see also Digital Operator's Man-
ual ................................................. .264
GTW (Gross Trailer Weight) (defini-
tion) .................................................... 346 H
Hazard warning lamps ......................108
Head restraints
Adjusting ......................................... 96
Adjusting (electrically) ..................... 96
Adjusting (rear) ................................ 97
Installing/removing (rear) ................ 97
Luxury .............................................. 97
Headlamps
Fogging up ..................................... 110
see Automatic headlamp mode
Heating
see Climate control
High beam flasher .............................107
High-beam headlamps
Adaptive Highbeam Assist ............. 109
Display message ............................ 235
Switching on/off ........................... 107
Highway mode ................................... 109
Hill start assist .................................. 130
HOLD function
Deactivating ................................... 166
Display message ............................ 240 Function/notes ............................
.165
Home address
see also Digital Operator's Man-
ual ................................................. .264
Hood
Closing .......................................... .297
Display message ............................ 249
Important safety notes .................. 296
Opening ......................................... 296
Horn ...................................................... 35
Hydroplaning ..................................... 150 I
Ignition lock see Key positions
Immobilizer .......................................... 73
Indicator and warning lamps
Active Distance Assist
DISTRONIC ................................... .262
Indicator lamps
see Warning and indicator lamps
Indicators
see Turn signals
Insect protection on the radiator .... 297
Instrument cluster
Overview .......................................... 36
Warning and indicator lamps ........... 36
Instrument cluster lighting .............. 208
Intelligent Light System
Activating/deactivating ................. 218
Display message ............................ 235
Overview ........................................ 108
Interior lighting
Automatic control .......................... 110
Emergency lighting ........................ 110
General notes ................................ 110
Manual control ............................... 110
Overview ........................................ 110
Reading lamp ................................. 110
iPod ®
see also Digital Operator's Man-
ual ................................................. .264 J
Jack Storage location ............................ 310 12
Index
Page 37 of 370

Cockpit
Function Page
0043
Steering wheel paddle shifter 139
0044
Combination switch 107
0087
Instrument cluster 36
0085
Horn
0083
DIRECT SELECT lever 135
0084
Parking Assist PARKTRONIC
warning display
174
006B
Overhead control panel 40
006C
Climate control systems 115
006D
Ignition lock 127
Start/Stop button 127 Function Page
006E
Adjusts the steering wheel
manually
99
006F
Adjusts the steering wheel
electrically
99
Steering wheel heating 100
0070
Cruise control lever 156
0071
Opens the hood 296
0072
Diagnostics connection 30
0073
Electric parking brake 145
0074
Light switch 106Cockpit
35At a glance
Page 75 of 370

No steering assistance is provided from STEER
CONTROL, if:
R ESP ®
is deactivated
R ESP ®
is malfunctioning
R the steering is malfunctioning
If ESP ®
is malfunctioning, you will be assisted
further by the electrical power steering. Protection against theft
Immobilizer
X To activate with the SmartKey: remove the
SmartKey from the ignition lock.
X To activate with KEYLESS-GO: switch the
ignition off and open the driver's door.
X To deactivate: switch on the ignition.
The immobilizer prevents your vehicle from
being started without the correct SmartKey.
When leaving the vehicle, always take the
SmartKey with you and lock the vehicle. Anyone
can start the engine if a valid SmartKey has been left inside the vehicle.
i The immobilizer is always deactivated when
you start the engine.
In the event that the engine cannot be started (yet the vehicle's battery is charged), the sys-
tem is not operational. Contact an authorized Mercedes-Benz Center or call
1-800 FOR-MERCEDES (in the USA) or
1-800-387-0100 (in Canada). ATA (anti-theft alarm system) X
To arm: lock the vehicle with the SmartKey or
KEYLESS-GO.
Indicator lamp 0043flashes. The alarm system
is armed after approximately 15 seconds.
X To disarm: unlock the vehicle with the Smart-
Key or KEYLESS-GO.
or X Insert the SmartKey into the ignition lock.
A visual and audible alarm is triggered if the
alarm system is armed and you open: R a door
R the vehicle with the mechanical key
R the tailgate
R the hood
X To switch the alarm off with the Smart-
Key:
press the 0036or0037 button on the
SmartKey.
The alarm is stopped.
or
X Remove the Start/Stop button from the igni-
tion lock.
X Insert the SmartKey into the ignition lock.
The alarm is stopped.
X To stop the alarm using KEYLESS-GO:
grasp the outside door handle. The SmartKey
must be outside the vehicle.
The alarm is stopped.
or
X Press the Start/Stop button on the dash-
board. The SmartKey must be inside the vehi-
cle.
The alarm is stopped.
The alarm is not switched off, even if you close
the open door that triggered it, for example.
i If the alarm continues for more than
30 seconds, the mbrace emergency call sys-
tem automatically notifies the Customer
Assistance Center. This is done either by text
message or data connection. The emergency call system sends the message or data provi-
ded that:
R you have subscribed to the mbrace service.
R the mbrace service has been activated
properly.
R the necessary mobile phone network is
available. Protection against theft
73Safety Z
Page 114 of 370
Always switch off the windshield wipers and
ignition before changing the wiper blades.
! Always position the windshield wiper arms
vertically before folding them away from the
windshield. By doing so, you will avoid dam-
age to the hood.
! To avoid damaging the wiper blades, make
sure that you touch only the wiper arm of the wiper.
! Never open the hood if a windshield wiper
arm has been folded away from the wind-
shield.
Never fold a windshield wiper arm without a
wiper blade back onto the windshield.
Hold the windshield wiper arm firmly when
you change the wiper blade. If you release the
windshield wiper arm without a wiper blade
and it falls onto the windshield, the windshield may be damaged by the force of the impact.
Mercedes-Benz recommends that you have
the wiper blades changed at a qualified spe-
cialist workshop.
Replacing the wiper blades (standard
wiper blades) Moving the wiper arms to a vertical posi-
tion
On vehicles without KEYLESS-GO:
X Turn the SmartKey to position 0092in the igni-
tion lock (Y page 127).
X Set the windshield wiper to position 00AAon
the combination switch.
X Turn the SmartKey to position 0047in the igni-
tion lock (Y page 127).
X As soon as the wiper arms are vertical to the
hood, turn the SmartKey to position 0092in the
ignition lock (Y page 127).
X Remove the SmartKey.
X Fold the wiper arms away from the windshield
until you feel them snap into place.
On vehicles with KEYLESS-GO:
X Switch off the engine.
X Remove your foot from the brake pedal.
X Set the windshield wiper to the 00AAposition.
X Press the Start/Stop button repeatedly until
the windshield wiper starts. X
When the wiper arms are vertical to the hood,
press the Start/Stop button repeatedly until
the windshield wiper stops.
X Fold the wiper arms away from the windshield
until you feel them snap into place.
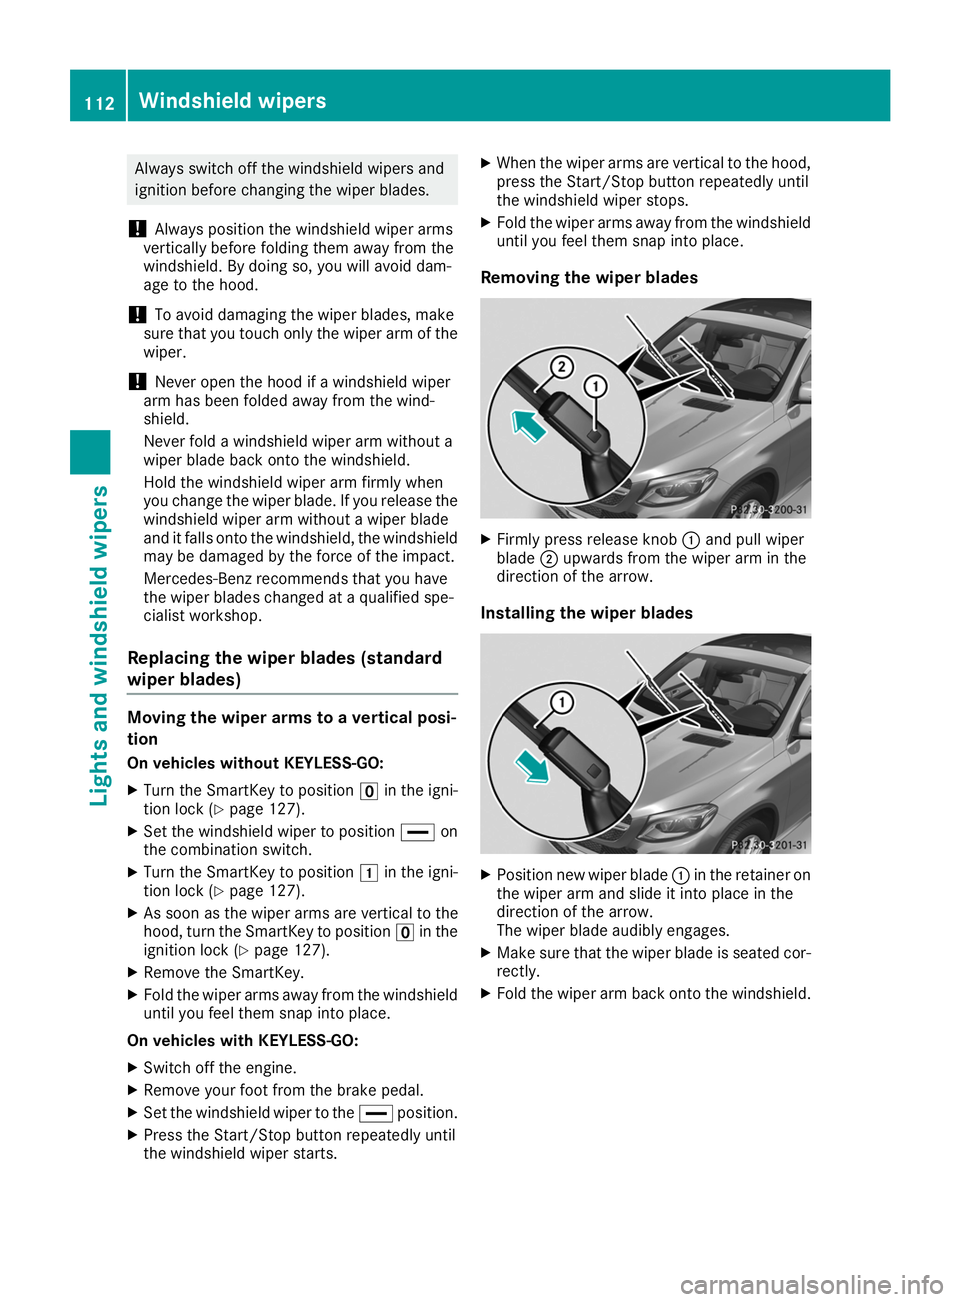
Removing the wiper blades X
Firmly press release knob 0043and pull wiper
blade 0044upwards from the wiper arm in the
direction of the arrow.
Installing the wiper blades X
Position new wiper blade 0043in the retainer on
the wiper arm and slide it into place in the
direction of the arrow.
The wiper blade audibly engages.
X Make sure that the wiper blade is seated cor-
rectly.
X Fold the wiper arm back onto the windshield. 112
Windshield wipersLights and
windshield wipers
Page 126 of 370
i
If you activate the residual heat function at
high temperatures, only the ventilation will be
activated. The blower runs at medium speed.
X To deactivate: press the004Bor0056 but-
ton.
The indicator lamp in the 004Bor0056 button
goes out.
Residual heat is deactivated automatically:
R after approximately 30 minutes
R when the ignition is switched on
R if the battery voltage drops Ionization
Ionization is used to purify the air in the vehicle interior and attain an improved interior climate.
The ionization of the interior air is odorless and
cannot be perceived directly in the vehicle inte- rior.
You can switch ionization on and off via the mul-
timedia system (see the Digital Operator's Man- ual).
Ionization can only be operated when the auto-
matic climate control is switched on. The side air
vent on the driver's side must be open. Setting the air vents
Important safety notes
G
WARNING
Very hot or very cold air can flow from the air vents. This could result in burns or frostbite in the immediate vicinity of the air vents. There
is a risk of injury.
Make sure that all vehicle occupants always
maintain a sufficient distance to the air out-
lets. If necessary, redirect the airflow to
another area of the vehicle interior.
In order to ensure the direct flow of fresh air
through the air vents into the vehicle interior,
please observe the following notes:
R keep the air inlet grille on the hood and in the
engine compartment on the front-passenger side free of blockages, such as ice, snow or
leaves.
R never cover the air vents or air intake grilles in
the vehicle interior.
i For virtually draft-free ventilation, adjust the
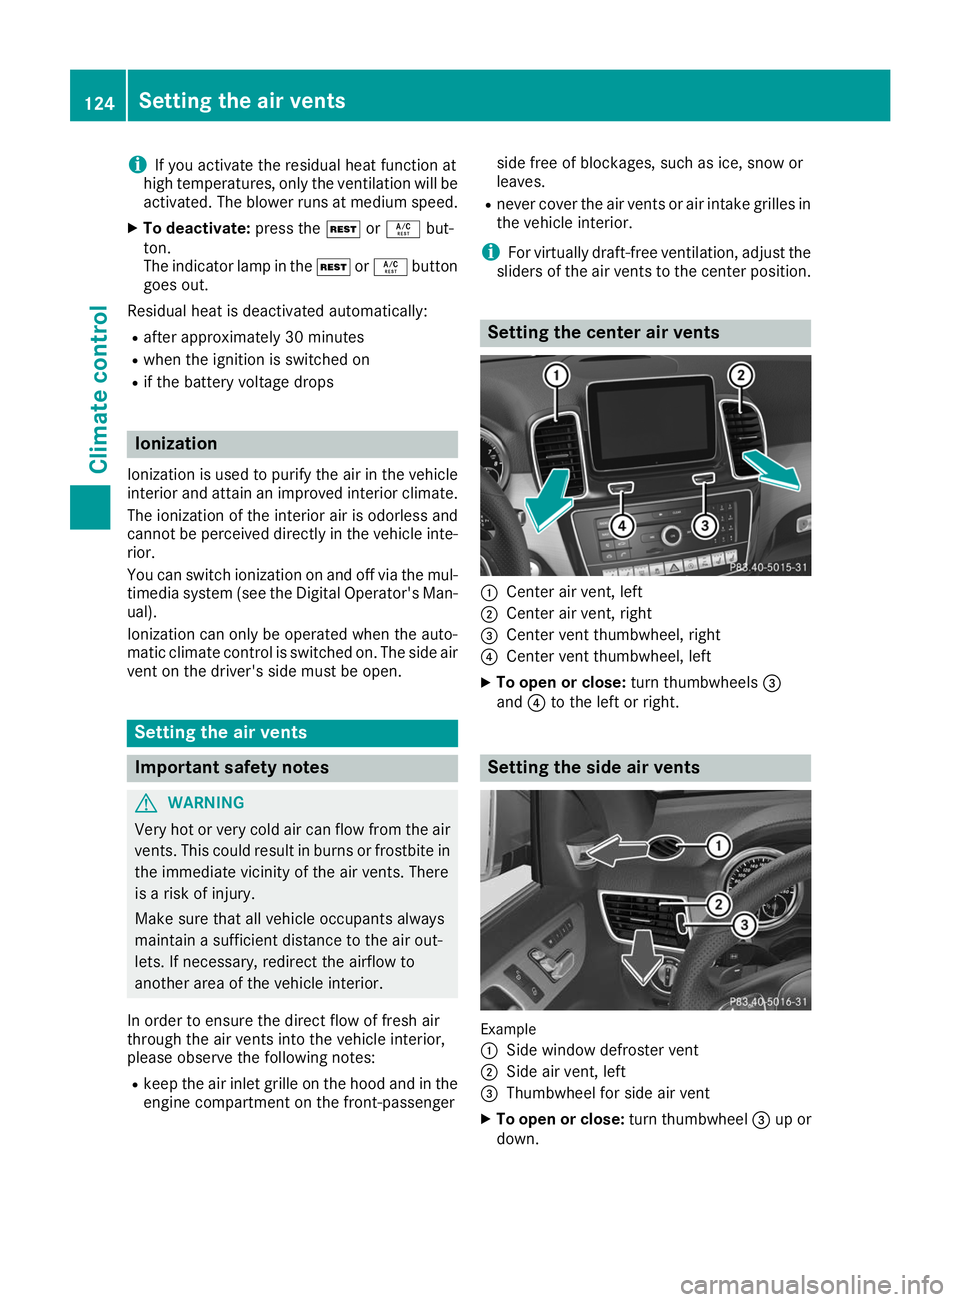
sliders of the air vents to the center position. Setting the center air vents
0043
Center air vent, left
0044 Center air vent, right
0087 Center vent thumbwheel, right
0085 Center vent thumbwheel, left
X To open or close: turn thumbwheels0087
and 0085to the left or right. Setting the side air vents
Example
0043
Side window defroster vent
0044 Side air vent, left
0087 Thumbwheel for side air vent
X To open or close: turn thumbwheel0087up or
down. 124
Setting the air ventsClimate control
Page 132 of 370
Make sure that the engine cannot be started via
your smartphone before carrying out mainte-
nance or repairs. You can prevent an engine
start via your smartphone if you:
R switch on the hazard warning lamps
R do not lock the doors
R open the hood Pulling away
General notes G
WARNING
If the engine speed is above the idling speed
and you engage transmission position 003A
or 0046, the vehicle could pull away suddenly.
There is a risk of an accident.
When engaging transmission position 003Aor
0046, always firmly depress the brake pedal
and do not simultaneously accelerate.
Depress the accelerator carefully when pulling
away.
The vehicle locks centrally once you have pulled
away. The locking knobs in the doors drop down.
You can open the doors from the inside at any
time.
You can also deactivate the automatic locking
feature (Y page 219).
It is possible to shift the transmission from posi-
tion 005Dto the desired position only if you
depress the brake pedal. Only then is the park-
ing lock released. If you do not depress the
brake pedal, the DIRECT SELECT lever can still
be moved but the parking lock remains
engaged.
i Upshifts take place at higher engine speeds
after a cold start. This helps the catalytic con- verter to reach its operating temperature
more quickly.
Information on the automatic release of the
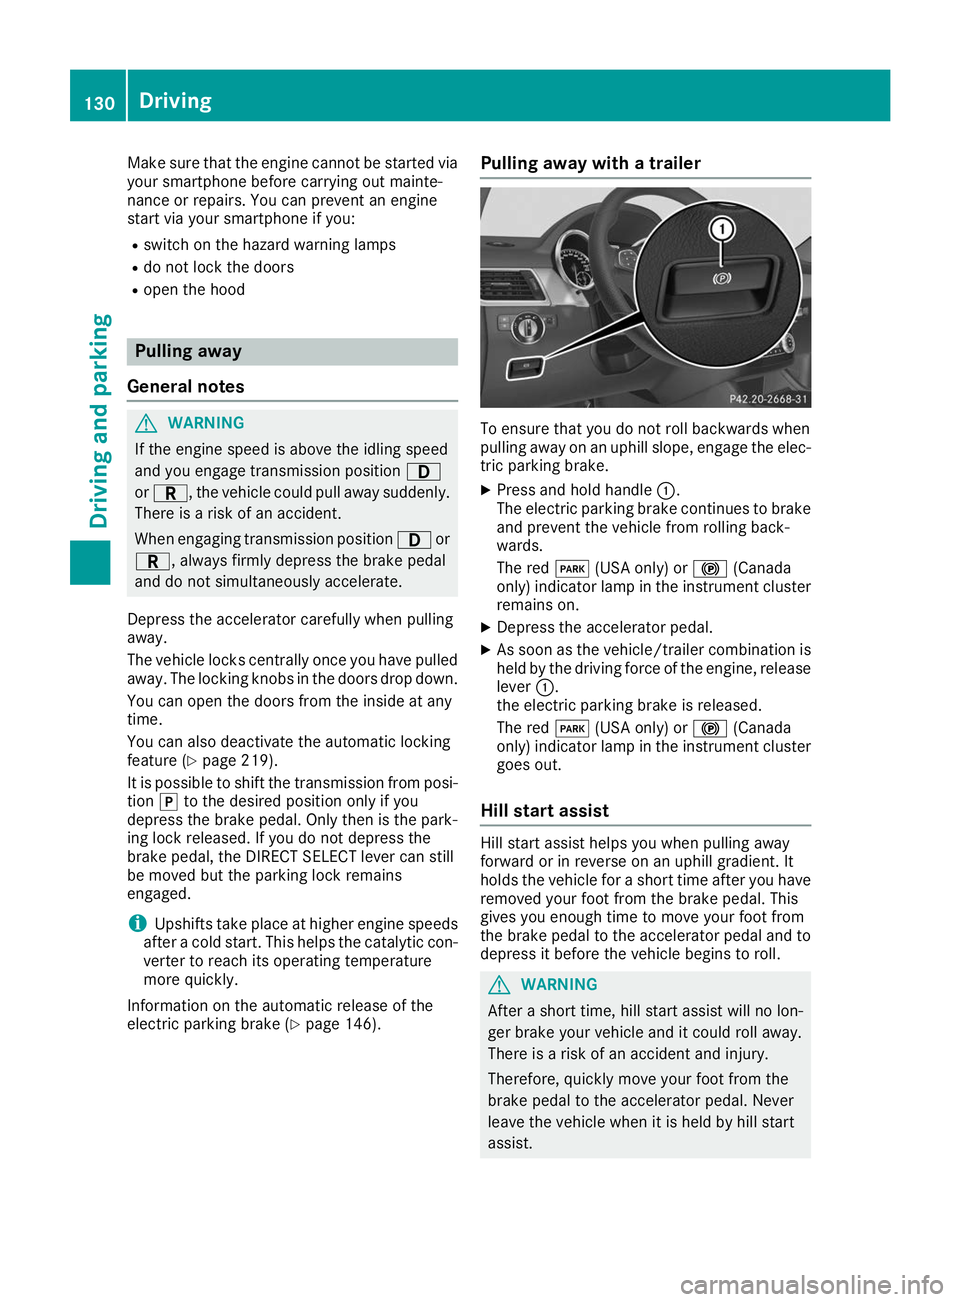
electric parking brake (Y page 146).Pulling away with a trailer To ensure that you do not roll backwards when
pulling away on an uphill slope, engage the elec-
tric parking brake.
X Press and hold handle 0043.
The electric parking brake continues to brake
and prevent the vehicle from rolling back-
wards.
The red 0049(USA only) or 0024(Canada
only) indicator lamp in the instrument cluster remains on.
X Depress the accelerator pedal.
X As soon as the vehicle/trailer combination is
held by the driving force of the engine, release lever 0043.
the electric parking brake is released.
The red 0049(USA only) or 0024(Canada
only) indicator lamp in the instrument cluster
goes out.
Hill start assist Hill start assist helps you when pulling away
forward or in reverse on an uphill gradient. It
holds the vehicle for a short time after you have removed your foot from the brake pedal. This
gives you enough time to move your foot from
the brake pedal to the accelerator pedal and to
depress it before the vehicle begins to roll. G
WARNING
After a short time, hill start assist will no lon-
ger brake your vehicle and it could roll away.
There is a risk of an accident and injury.
Therefore, quickly move your foot from the
brake pedal to the accelerator pedal. Never
leave the vehicle when it is held by hill start
assist. 130
DrivingDriving and parking
Page 211 of 370
There is a short delay before a change in outside
temperature appears in the multifunction dis-
play. Coolant temperature gauge
G
WARNING
Opening the hood when the engine is over-
heated or when there is a fire in the engine
compartment could expose you to hot gases
or other service products. There is a risk of
injury.
Let an overheated engine cool down before
opening the hood. If there is a fire in the
engine compartment, keep the hood closed
and contact the fire department.
! A display message is shown if the coolant
temperature is too high.
If the coolant temperature is over 248 ‡
(120 †), do not continue driving. The engine
will otherwise be damaged.
The coolant temperature gauge is in the instru-
ment cluster on the right-hand side (Y page 36).
Under normal operating conditions and with the specified coolant level, the coolant temperature
may rise to 248 ‡ (120 †). Operating the on-board computer
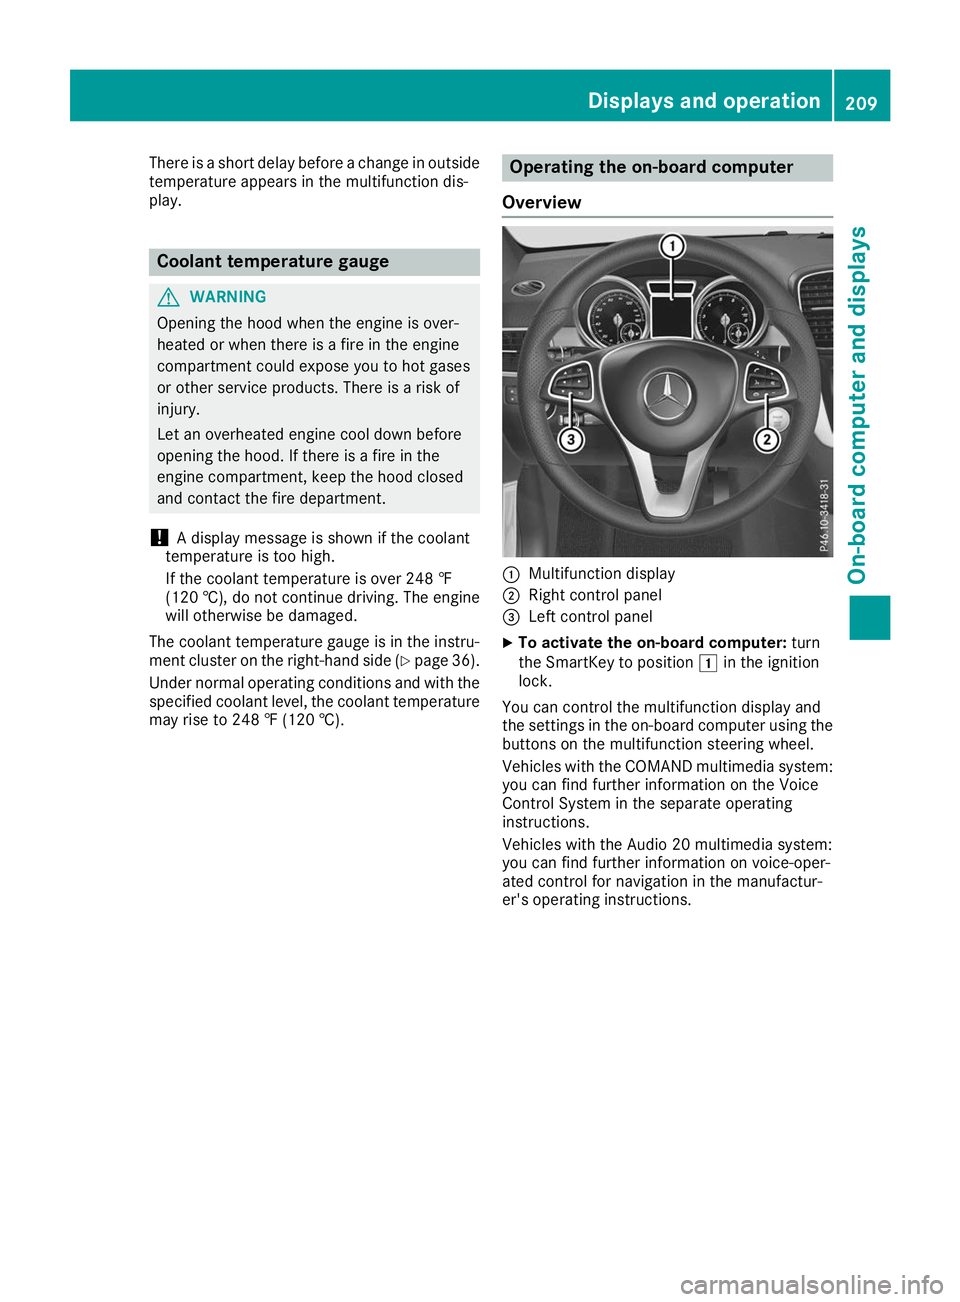
Overview 0043
Multifunction display
0044 Right control panel
0087 Left control panel
X To activate the on-board computer: turn
the SmartKey to position 0047in the ignition
lock.
You can control the multifunction display and
the settings in the on-board computer using the buttons on the multifunction steering wheel.
Vehicles with the COMAND multimedia system: you can find further information on the Voice
Control System in the separate operating
instructions.
Vehicles with the Audio 20 multimedia system:
you can find further information on voice-oper-
ated control for navigation in the manufactur-
er's operating instructions. Displays and operation
209On-board computer and displays Z
Page 239 of 370
Display messages
Possible causes/consequences and
0050
0050Solutions 00AC
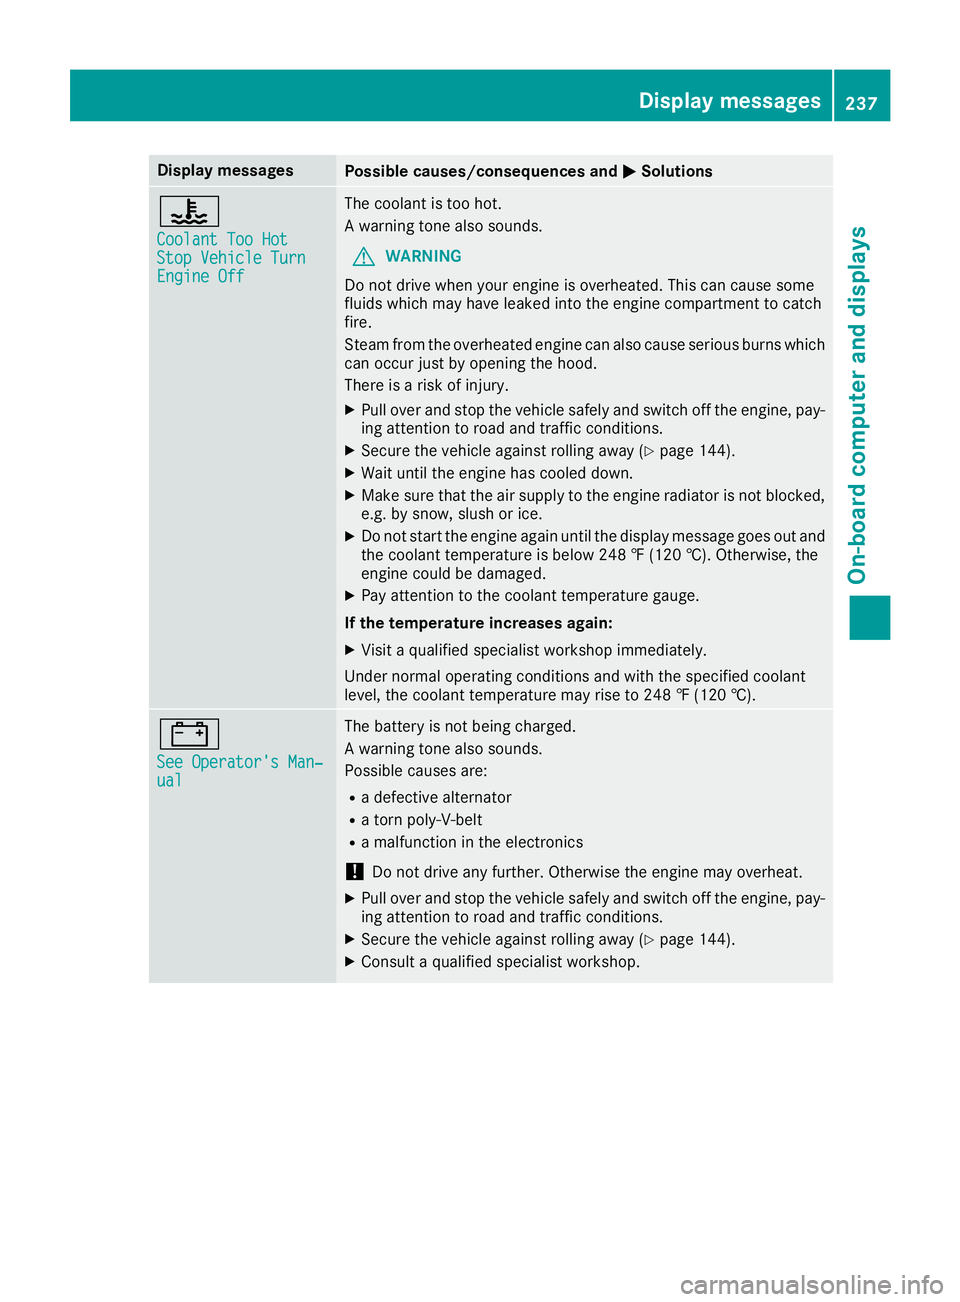
Coolant Too Hot Coolant Too Hot
Stop Vehicle Turn Stop Vehicle Turn
Engine Off Engine Off The coolant is too hot.
A warning tone also sounds.
G WARNING
Do not drive when your engine is overheated. This can cause some
fluids which may have leaked into the engine compartment to catch
fire.
Steam from the overheated engine can also cause serious burns which can occur just by opening the hood.
There is a risk of injury.
X Pull over and stop the vehicle safely and switch off the engine, pay-
ing attention to road and traffic conditions.
X Secure the vehicle against rolling away (Y page 144).
X Wait until the engine has cooled down.
X Make sure that the air supply to the engine radiator is not blocked,
e.g. by snow, slush or ice.
X Do not start the engine again until the display message goes out and
the coolant temperature is below 248 ‡ (120 †). Otherwise, the
engine could be damaged.
X Pay attention to the coolant temperature gauge.
If the temperature increases again: X Visit a qualified specialist workshop immediately.
Under normal operating conditions and with the specified coolant
level, the coolant temperature may rise to 248 ‡ (120 †). 003D
See Operator's Man‐ See Operator's Man‐
ual ual The battery is not being charged.
A warning tone also sounds.
Possible causes are:
R a defective alternator
R a torn poly-V-belt
R a malfunction in the electronics
! Do not drive any further. Otherwise the engine may overheat.
X Pull over and stop the vehicle safely and switch off the engine, pay-
ing attention to road and traffic conditions.
X Secure the vehicle against rolling away (Y page 144).
X Consult a qualified specialist workshop. Display
messages
237On-board computer and displays Z