2019 MERCEDES-BENZ GLC SUV change time
[x] Cancel search: change timePage 153 of 673
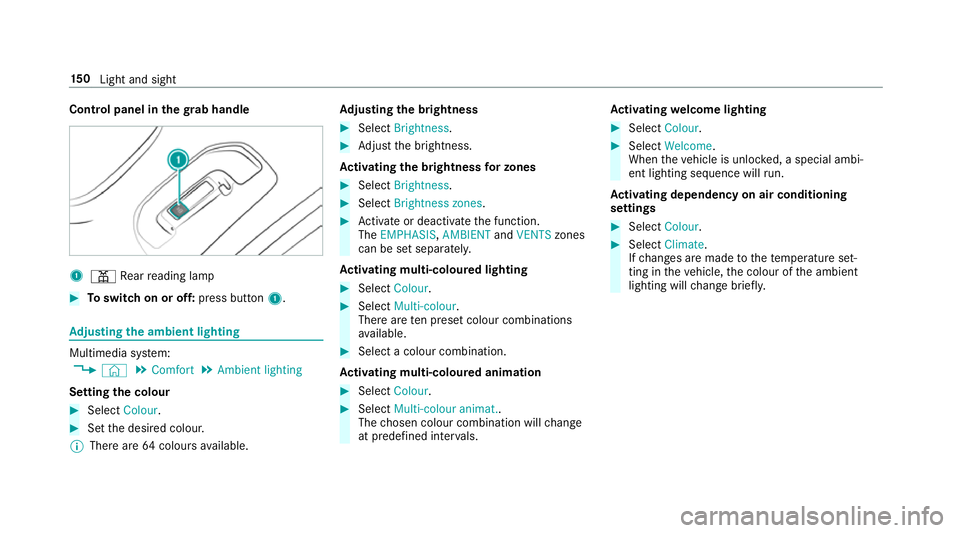
Control panel in
thegr ab handle 1
p Rear reading lamp #
Toswitch on or off: press button1. Ad
justing the ambient lighting Multimedia sy
stem:
4 © 5
Comfort 5
Ambient lighting
Setting the colour #
Select Colour. #
Set the desired colour.
% There are 64colours available. Ad
justing the brightness #
Select Brightness . #
Adjust the brightness.
Ac tivating the brightness for zones #
Select Brightness . #
Select Brightness zones . #
Activate or deacti vate the function.
The EMPHASIS, AMBIENTandVENTS zones
can be set separatel y.
Ac tivating multi-coloured lighting #
Select Colour. #
Select Multi-colour.
The reare ten preset colour combinations
av ailable. #
Select a colour combination.
Ac tivating multi-coloured animation #
Select Colour. #
Select Multi-colour animat..
The chosen colour combination will change
at predefined inter vals. Ac
tivating welcome lighting #
Select Colour. #
Select Welcome.
When theve hicle is unloc ked, a special ambi‐
ent lighting sequence will run.
Ac tivating dependency on air conditioning
settings #
Select Colour. #
Select Climate.
If ch anges are made tothete mp erature set‐
ting in theve hicle, the colour of the ambient
lighting will change brief ly. 15 0
Light and sight
Page 165 of 673
#
Select First row of seats orSecond row of
seats. #
Call up theCLIMATE MODE menu.#
Select a climate style. Overview of
the air distribution settings The symbols on
the display indicate which vents
th e air flow is being directed thro ugh:
¯ def
rost ervents
P centre and side air
vents
O fo
ot we llve nts
S centre, side and
foot we llve nts
a defros
ter and foot we llve nts
_ all
vents
b defros
ter,middle and side air vents
W au
tomatic air distribution Setting
the air distribution #
Call up the air conditioning menu
(/ page 161). #
Select First row of seats orSecond row of
seats. #
Toset the air distribution: select¯,
P orO. #
Set the air flow.
% Several air distribution options can be selec‐
te d at the same time, forex ample toset the
te mp erature/air conditioning forth e wind‐
screen and thefo ot we lls simultaneousl y.
The ¯ climate contro lfo rth e windscreen
can only be selected forth efirs t seat row. Ac
tivating/deactivating the climate control
syn chro nisation function via the control
panel The climate control can be operated centrally
using
the synchronisation function. The temp era‐
ture and air distribution setting forth e driver
side is adop ted automatically forth e front
passenger side. #
Press the 0 button. The synchronisation function is deactivated if
th
e settings for one of theot her climate zones
are changed. Ac
tivating/deactivating the climate control
syn chro nisation function using the multime‐
dia sy stem Climate control can be set centrally using
the
synchronisation function. The driver's settings
fo rte mp erature, air quantity and air distribution
are adop ted automatically for all clima tezones. #
Call up the air conditioning menu
(/ page 161). #
Select First row of seats . #
Select SYNC.
Depending on the pr evious status, the func‐
tion is activated or deactivated. Demisting
the windo ws Wi
ndo wsmis ted up on the inside #
Press the ¿ orà button. 16 2
Climate cont rol
Page 168 of 673
R
Ifth e outside temp erature changes, ventila‐
tion mode au tomatical lyswitches toheating
mode or heating mode automatically
switches toventilation mode.
The stationary heater and theex haust gas outlet
are situated at theright-hand front wheel.
Switching thest ationary heater / stationary
ve ntilation on/off via the control panel &
DANG ER Risk of fata l injury due topoi‐
sonous exhaust gases
If th eta ilpipe is bloc ked or suf ficient ventila‐
tion is not possible, poisonous exhaust gases
such as carbon monoxide may enter theve hi‐
cle. This is the case in enclosed spaces or if
th eve hicle gets stuck in sn ow,fo rex ample. #
Alw ays switch thest ationary heater off
in enclosed spaces without an air
ex traction sy stems, e.g. in garage s. #
Keep theta ilpipe and the area around
th eve hicle free from snow when the
engine or thest ationary heater are run‐
ning. #
Open a window on the windward side of
th eve hicle toensure an adequate sup‐
ply of fresh air. &
WARNING Risk offire due tohot station‐
ary heater components
When thest ationary heater is swit ched on,
parts of theve hicle can become very hot,
e.g. thest ationary heater exhaust sy stem.
Flammable materials such as lea ves, grass or
twigs may ignite if they come into contact
wi th:
R hot parts of thest ationary heater exhaust
sy stem
R theex haust gas itself
There is a risk of fire. #
When thest ationary heater is swit ched
on, make sure that:
R hot vehicle parts do not come into
contact with flammable materials. R
theex haust gas can flow out of the
st ationary heater exhaust pipe
unhindered.
R theex haust gas does not come into
contact with flammable materials. *
NO
TEBattery discharge caused bysta‐
tionary heater or stationary ventilation
operation Ope
rating thest ationary heater or stationary
ve ntilation drains the batter y. #
After heating or ventilating theve hicle
twice, drive for a longer period of time. Re
quirements:
R The fuel tank is filled toat least reser vefuel
le ve l. Climate control
16 5
Page 170 of 673
#
Press and hold theu button.
Setting the departu retime #
Brie fly press theu button. #
Press the, or. button repeatedly
until the time tobe changed appears on the
displa y. #
Press theu and^ buttons simultane‐
ousl y.
The Îsymbol on there mo tecontrol displ ay
fl ashes. #
Press the, and. buttons toset the
desired departure time. #
Press theu and^ buttons simultane‐
ousl y.
The new departure time will be stored.
Up tothre e departure times can be stored. #
Toactivate the departu retime: select the
desired departure time and press and hold
th eu button.
The Ísymbol, the departure time and,
depending on the selected departure time,
th e letter A, BorCappear on the displa y. #
Todeactivate the departure time: select
th e desired departure time and press and
hold the^ button.
OFF will appear on the displa y. #
Tocheck thest atus of thest ationary
heater: briefly press theu button.
Switching off immediately #
Press and hold the^ button.
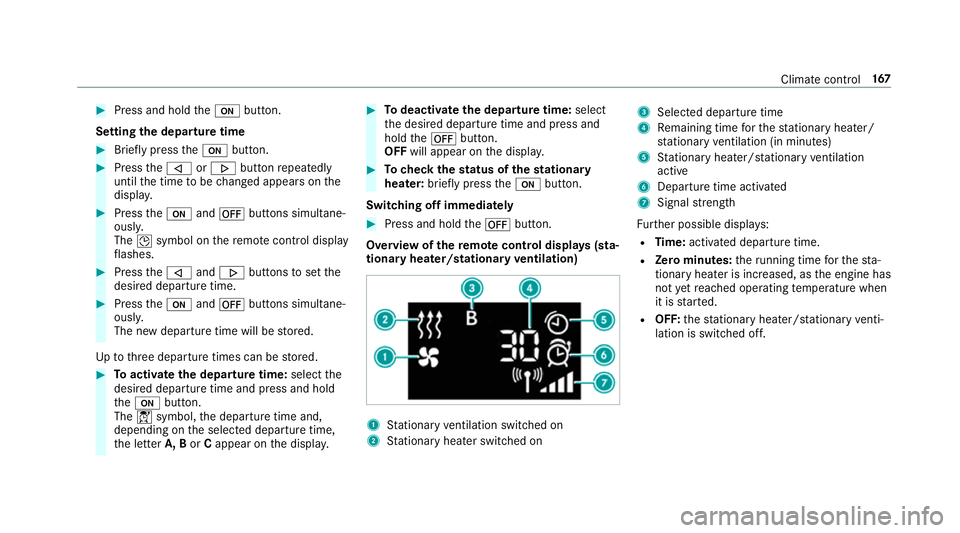
Overview of there mo tecont rol displa ys(sta‐
tiona ryheater/stationary ventilation) 1
Stationary ventilation switched on
2 Stationary heater swit ched on 3
Selected departure time
4 Remaining time forth est ationary heater/
st ationary ventilation (in minu tes)
5 Stationary heater/ stationary ventilation
acti ve
6 Departure time acti vated
7 Signal stre ngth
Fu rther possible displa ys:
R Time: activated departure time.
R Zero minutes: theru nning time forth est a‐
tionary heater is inc reased, as the engine has
not yetre ached operating temp erature when
it is star ted.
R OFF: thest ationary heater/ stationary venti‐
lation is switched off. Clima
tecontrol 167
Page 189 of 673
ECO Assi
stis only an aid. The driver is responsi‐
ble forke eping a safe dis tance totheve hicle in
front, forve hicle speed and for braking in good
time. The driver must be ready tobrake at all
times ir respective of whe ther the sy stem inter‐
ve nes.
The sy stem may be impaired or may not function
in thefo llowing situations:
R If visibility is poor (e.g. due toinsuf ficient illu‐
mination of thero ad, high lyvariable shade
conditions, rain, sno w,fog or heavy spr ay).
R Ifth ere is glare (e.g. from oncoming traf fic,
di re ct sunlight or reflections).
R Ifth ere is dirt on the windscreen in the vicin‐
ity of the multifunction camera or the camera
is mis ted up, damaged or obscured.
R If tra ffic signs are hard todiscern (e.g. due to
dirt, snow or insuf ficient lighting, or because
th ey are obscured).
R Ifth e information on the navigation sy stem's
digital map is incor rect or out of da te.
R Ifth e signs are ambiguous (e.g. traf fic signs
in roadwor ksor in adjacent lanes). Displaying ECO Assist
On-board computer:
4 Assistance DY
NA MIC SELECT switch Fu
nction of theDY NA MIC SELECT switch Plug-in
hybrid: obser vethe no tes in the Supple‐
ment. Otherwise, you may failto recognise dan‐
ge rs.
Mercedes-AMG vehicles: observeth e no tes in
th e Supplement. Otherwise, you may failto rec‐
ognise dangers.
Use theDY NA MIC SELECT switch tochange
between thefo llowing drive programs:
= (Individual) : individual settings
B (Sport +): particularly sporty driving style
C (Sport): sporty driving style
A (Comfort): comfortable and economical
driving style
; (Eco):particularly economical driving
st yle Ve
hicles with Off-road pac kage:
F Offroad: driving on less demanding off-
ro ad terrain
G (Offroad +): driving on dif ficult off-road
te rrain
% The drive prog ram selected appears in the
multifunction display of the on-board com‐
puter.
Depending on the drive prog ram, thefo llowing
sy stems change their characteristics:
R drive
-
engine and transmission management
- Active Dis tance Assi stDISTRONIC
R ESP ®
R vehicles with AIR BODY CONT ROL or
DY NA MIC BODY CONT ROL:suspension
R electric po werst eering Note
s onthero of load display Cer
tain drive programs and ESP ®
settings are
unsuitable for transporting a roof load. 18 6
Driving and pa rking
Page 226 of 673
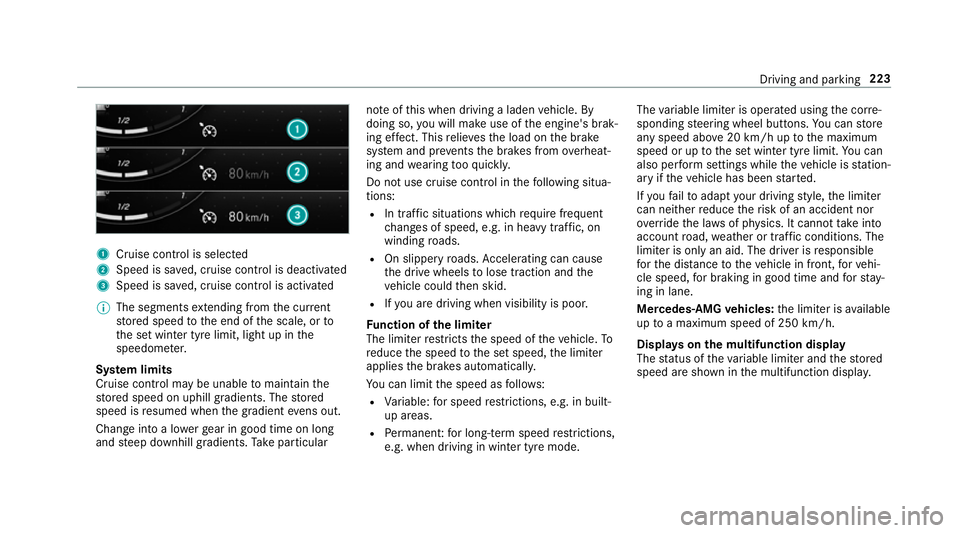
1
Cruise cont rol is selec ted
2 Speed is sa ved, cruise control is deactivated
3 Speed is sa ved, cruise control is activated
% The segments extending from the cur rent
st ored speed tothe end of the scale, or to
th e set winter tyre limit, light up in the
speedome ter.
Sy stem limits
Cruise control may be unable tomaintain the
st ored speed on uphill gradients. The stored
speed is resumed when the gradient evens out.
Change into a lo werge ar in good time on long
and steep downhill gradients. Take particular no
te ofthis when driving a laden vehicle. By
doing so, you will make use of the engine's brak‐
ing ef fect. This relie vesth e load on the brake
sy stem and pr events the brakes from overheat‐
ing and wearing tooqu ickl y.
Do not use cruise control in thefo llowing situa‐
tions:
R In traf fic situations whi chrequ ire frequent
ch anges of speed, e.g. in heavy traf fic, on
winding roads.
R On slippe ryroads. Accelerating can cause
th e drive wheels tolose traction and the
ve hicle could then skid.
R Ifyo u are driving when visibility is poor.
Fu nction of the limi ter
The limiter restricts the speed of theve hicle. To
re duce the speed tothe set speed, the limiter
applies the brakes automaticall y.
Yo u can limit the speed as follo ws:
R Variable: for speed restrictions, e.g. in built-
up areas.
R Perm anen t:for long-term speed restrictions,
e.g. when driving in winter tyre mode. The
variable limiter is operated using the cor re‐
sponding steering wheel buttons. You can store
any speed abo ve20 km/h up tothe maximum
speed or up tothe set winter tyre limit. You can
also per form settings while theve hicle is station‐
ary if theve hicle has been star ted.
If yo ufa ilto adapt your driving style, the limiter
can neither reduce therisk of an accident nor
ov erride the la wsof ph ysics. It cannot take into
account road, weather or traf fic conditions. The
limiter is only an aid. The driver is responsible
fo rth e dis tance totheve hicle in front, forve hi‐
cle speed, for braking in good time and forst ay‐
ing in lane.
Mercedes‑AMG vehicles: the limiter is available
up toa maximum speed of 250 km/h.
Displ ays on the multifunction display
The status of theva riable limiter and thestored
speed are shown in the multifunction displa y. Driving and pa
rking 223
Page 229 of 673
%
Ifyo u brake, deactivate ESP ®
or if ESP ®
inter venes, cruise control is deacti vated. The
va riable limiter is not deactivated.
Pe rm anent limi ter
If th eve hicle should ne verexc eed a specific
speed (e.g. for driving in winter tyre mode), you
can set this speed with the permanent limiter.
Yo u do this by limiting the speed toava lue
between 160 km/h and 240 km/h in the multi‐
media sy stem (/ page 226).
Shortly before the set speed is reached, it
appears in the multifunction displa y.When you
confirm the message with %, display mes‐
sages no longer appear until you swit choff the
ve hicle. The speed will only be displa yed again
once theve hicle has been restar ted or if the set
speed is changed.
The permanent limiter does not swit chtopas‐
sive mode even du ring kickdown and the driven
speed remains below the set speed. Setting
the speed limitation for winter tyres
Multimedia sy stem:
4 © 5
Settings 5
Vehicle
5 Winter tyres limit #
Select a speed or deactivate the function. DSR (Downhill Speed
Regulation) Fu
nction of DSR (Downhill Speed Regulation)
DSR is an aid toassist you when driving down‐
hill. It keeps the speed of tr avel at the selected
ta rget speed. The steeper the downhill gradient,
th e greater the DSR braking ef fect on theve hi‐
cle. On flat stre tches of road and uphill gradi‐
ents, the DSR brakes theve hicle minimally or
not at all.
When DSR is activated and the transmission is in
position h,kori, DSR controls the driving
speed. The target speed can be set toava lue
between 2 km/h and 18km/h. By braking or
accele rating, you can drive at a higher or lo wer
speed than theta rget speed at any time.
DSR is deactivated automatically if you drive at
speeds greater than 45 km/h. The DSRsymbol appears in
the multifunction display with the
messa geoff. The status indicator in the multi‐
function display disappears. You also hear a
wa rning tone.
In fo rm ation on DSR &
WARNING Risk of skidding and having
an accident when DSR is acti vated on
slippery road sur faces
If th e speed driven and theta rget speed dif‐
fe r, and you activate DSR on a slippery road
sur face, the wheels may lose traction. #
Take into account thero ad sur face and
th e dif fere nce between the driving
speed and target speed before activat‐
ing DSR. If
yo ufa ilto adapt your driving style, DSR can
neither reduce therisk of an accident nor over‐
ri de the la wsof ph ysics. It cannot take into
account road, weather or traf fic conditions. DSR
is only an aid. You are responsible for maintain‐
ing a safe dis tance totheve hicle in front, for226
Driving and parking
Page 235 of 673
Fu
nction of Active Speed Limit Assi st%
The following function is countr y-dependent
and only available in conjunction with the
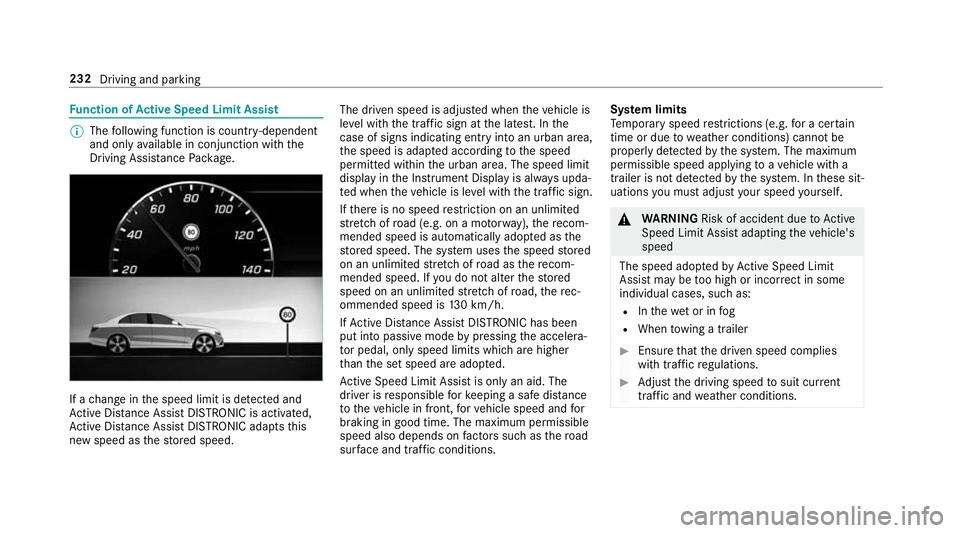
Driving Assi stance Package. If a
change in the speed limit is de tected and
Ac tive Dis tance Assi stDISTRONIC is acti vated,
Ac tive Dis tance Assi stDISTRONIC adapts this
new speed as thestored speed. The driven speed is adjus
ted when theve hicle is
le ve l with the traf fic sign at the latest. In the
case of signs indicating entry into an urban area,
th e speed is adap ted according tothe speed
permitted within the urban area. The speed limit
display in the Instrument Display is alw ays upda‐
te d when theve hicle is le vel with the tra ffic sign.
If th ere is no speed restriction on an unlimi ted
st re tch of road (e.g. on a mo torw ay),th ere com‐
mended speed is au tomatical lyadop ted as the
st ored speed. The sy stem uses the speed stored
on an unlimited stre tch of road as there com‐
mended speed. If you do not alter thestored
speed on an unlimited stre tch of road, there c‐
ommended speed is 130 km/h.
If Ac tive Dis tance Assi stDISTRONIC has been
put into passi vemode bypressing the accelera‐
to r pedal, only speed limits which are higher
th an the set speed are adop ted.
Ac tive Speed Limit Assi stis only an aid. The
driver is responsible forke eping a safe dis tance
to theve hicle in front, forve hicle speed and for
braking in good time. The maximum permissible
speed also depends on factors su chasthero ad
sur face and traf fic conditions. Sy
stem limits
Te mp orary speed restrictions (e.g. for a cer tain
time or due towe ather conditions) cannot be
proper ly detected bythe sy stem. The maximum
permissible speed applying toave hicle with a
trailer is not de tected bythe sy stem. In these sit‐
uations you must adjust your speed yourself. &
WARNING Risk of accident due toActive
Speed Limit Assi stadapting theve hicle's
speed
The speed adop tedby Active Speed Limit
Assi stmay be too high or incor rect in some
individual cases, su chas:
R Inthewe t or in fog
R When towing a trailer #
Ensure that the driven speed complies
with traf fic re gulations. #
Adjust the driving speed tosuit cur rent
traf fic and weather conditions. 232
Driving and parking