2019 MERCEDES-BENZ GLB SUV ignition
[x] Cancel search: ignitionPage 490 of 689
&
WARNING Risk of inju ryfrom touching
co mp onent parts under voltage
The ignition sy stem and the fuel injection
sy stem workunder high voltage. If youto uch
co mp onent parts which are under voltage,
yo u could recei vean electric shoc k. #
Neverto uch co mponents of the ignition
sy stem or the fuel injection sy stem
when the ignition is switched on. &
WARNING Risk of bu rns from hot com‐
ponent parts in the engine compartment
Cer tain components in the engine compart‐
ment can be very hot, e.g. the engine, the
ra diator and parts of theex haust sy stem. #
Allow the engine tocool down and only
to uch co mponent parts described in
th efo llowing. &
WARNING Risk of inju ryfrom using the
windscreen wipers while the engine bon‐
net is open
When the engine bonn etis open, and the
windscreen wipers are set in motion, you can
be trapped bythe wiper linkage. #
Alw ays switch off the windscreen wip‐
ers and ignition before opening the
engine bonn et. #
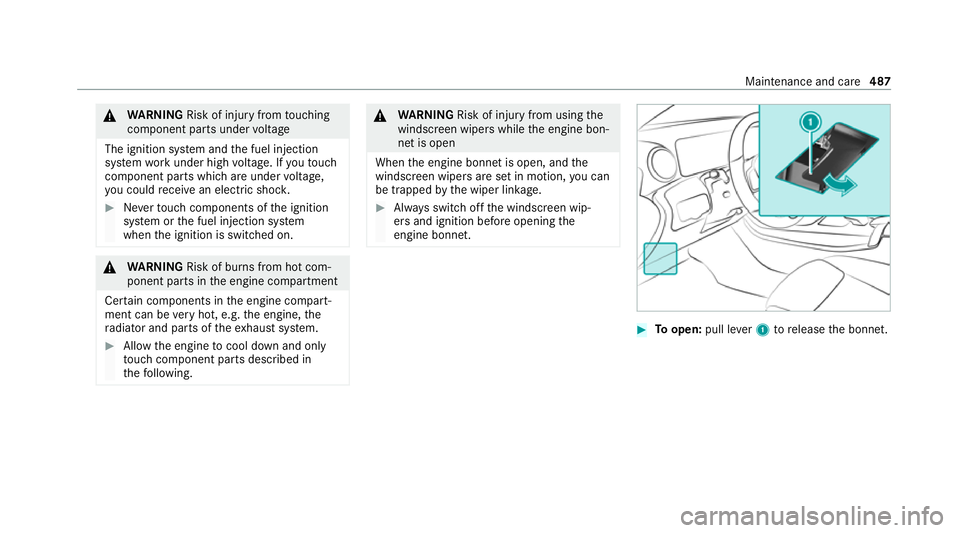
Toopen: pull lever1 torelease the bonn et. Maintenance and care
487
Page 491 of 689
#
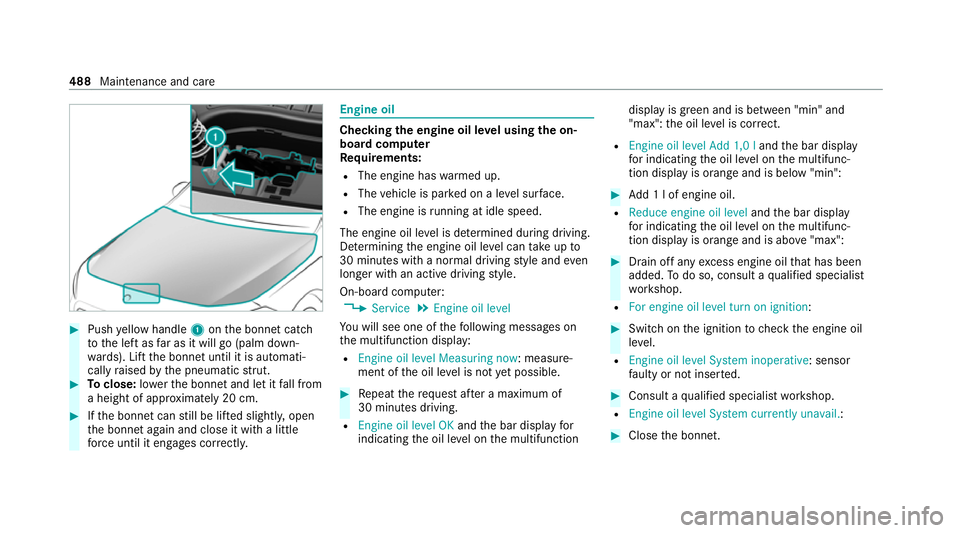
Push yellow handle 1onthe bonn etcatch
to the left as far as it will go (palm down‐
wa rds). Lift the bonn etuntil it is automati‐
cally raised bythe pneumatic stru t. #
Toclose: lowe rth e bonn etand let it fall from
a height of appr oximately 20 cm. #
Ifth e bonn etcan still be lif ted slightl y,open
th e bonn etagain and close it with a little
fo rc e until it engages cor rectl y. Engine oil
Checking
the engine oil le vel using the on-
board compu ter
Re quirements:
R The engine has warmed up.
R The vehicle is par ked on a le vel sur face.
R The engine is running at idle speed.
The engine oil le vel is de term ined during driving.
De term ining the engine oil le vel can take up to
30 minutes with a normal driving style and even
longer with an active driving style.
On-board computer: 4 Service 5
Engine oil level
Yo u will see one of thefo llowing messages on
th e multifunction display:
R Engine oil level Measuring now : measure‐
ment of the oil le vel is not yet possible. #
Repeat there qu est af ter a maximum of
30 minutes driving.
R Engine oil level OK andthe bar display for
indicating the oil le vel on the multifunction display is green and is between "min" and
"max": the oil le vel is cor rect.
R Engine oil level Add 1,0 l andthe bar display
fo r indicating the oil le vel on the multifunc‐
tion display is orange and is below "min": #
Add 1 l of engine oil.
R Reduce engine oil level andthe bar display
fo r indicating the oil le vel on the multifunc‐
tion display is orange and is abo ve"max": #
Drain off any excess engine oil that has been
added. Todo so, consult a qualified specialist
wo rkshop.
R For engine oil level turn on ignition: #
Switch on the ignition tocheck the engine oil
le ve l.
R Engine oil level System inoperative : sensor
fa ulty or not inser ted. #
Consult a qualified specialist workshop.
R Engine oil level System currently unavail. : #
Close the bonn et. 488
Maintenance and care
Page 500 of 689
Note
s on care of car parts &
WARNING Risk of entrapment if the
windscreen wipers are swit ched on while
th e windscreen is being cleaned
If th e windscreen wipers are set in motion
while you are cleaning the windscreen or
wiper blades, you can be trapped bythe
wiper arm. #
Alw ays switch off the windscreen wip‐
ers and the ignition before cleaning the
windscreen or wiper blades. &
WARNING Risk of bu rns from theta il‐
pipe and tailpipe trims
The exhaust tailpipe and tailpipe trims can
become very hot. If you come into contact with
these parts of theve hicle, you could
burn yourself. #
Alw ays be particular lycareful around
th eta ilpipe and theta ilpipe trims and
supervise children especially closely in
th is area. #
Allow vehicle parts tocool down before
to uching them. Obser
vethefo llowing information: Note
s on cleaning and car eA voiding vehicle damage
Wheels/rims Usewate r and acid-free wheel cleaners. R
Do not use acidic wheel cleaners toremo vebrake dust.
This could damage wheel bolts and brake components.
R Toavoid cor rosion of the brake discs and brakepads, drive
th eve hicle for a few minutes af ter cleaning before parking
it. The brake discs and brakepads warm up and dry out.
Wi ndo ws
Clean windowsinside and outside with a damp clo thand with
a cleaning agent recommended for Mercedes-Benz. Do not use dry clo
ths or abrasive or sol vent-based cleaning
agents toclean the inside of windo ws.
Wi per blades
Fold out the wiper blades and clean them using a damp clo th.D o not clean the wiper blades too of ten. Maintenance and care
497
Page 510 of 689
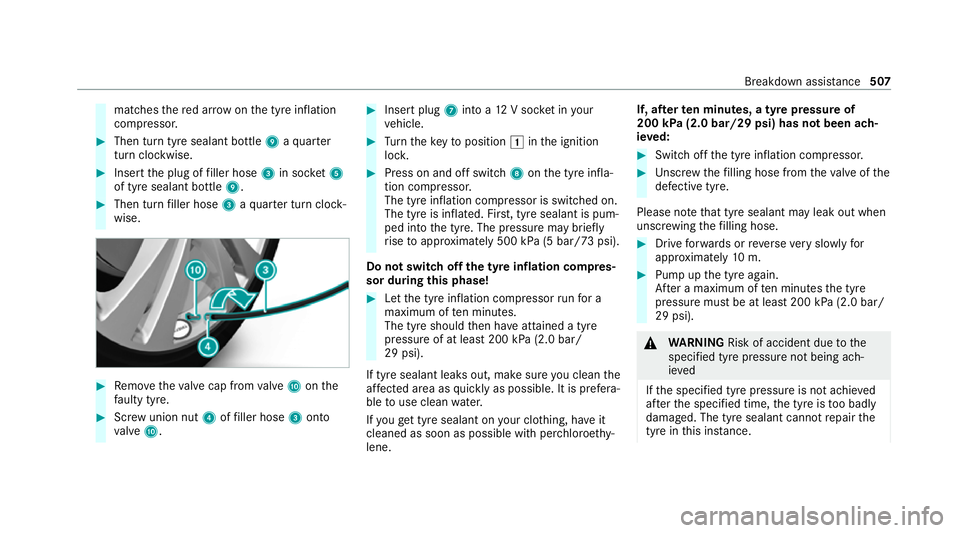
matches
there d ar row on the tyre inflation
compressor. #
Then turn tyre sealant bottle 9aqu arter
turn clo ckwise. #
Insert the plug of filler hose 3in soc ket5
of tyre sealant bottle 9.#
Then turn filler hose 3aqu arter turn clock‐
wise. #
Remo vetheva lve cap from valve A onthe
fa ulty tyre. #
Screw union nut 4offiller hose 3onto
va lve A. #
Insert plug 7into a 12V soc ket in your
ve hicle. #
Turn theke yto position 1inthe ignition
loc k. #
Press on and off switch 8onthe tyre infla‐
tion compressor.
The tyre inflation compressor is switched on.
The tyre is inflated. Fir st, tyre sealant is pum‐
ped into the tyre. The pressure may brief ly
ri se toappr oximately 500 kPa (5 bar/73 psi).
Do not switch off the ty reinflation compres‐
sor during this phase! #
Let the tyre inflation compressor runfo r a
maximum of ten minu tes.
The tyre should then ha veattained a tyre
pressure of at least 200 kPa (2.0 bar/
29 psi).
If tyre sealant leaks out, make sure you clean the
af fected area as quickly as possible. It is prefera‐
ble touse clean water.
If yo uge t tyre sealant on your clo thing, ha veit
cleaned as soon as possible with per chloroe thy‐
lene. If, af
terte n minutes, a tyre pressure of
200 kPa (2.0 bar/29 psi) has not been ach‐
ie ve d: #
Switch off the tyre inflation compressor. #
Unscr ew thefilling hose from theva lve of the
defective tyre.
Please no tethat tyre sealant may leak out when
unscr ewing thefilling hose. #
Drive forw ards or reve rseve ry slowly for
appr oximately 10m. #
Pump up the tyre again.
Af ter a maximum of ten minu testh e tyre
pressure must be at least 200 kPa (2.0 bar/
29 psi). &
WARNING Risk of accident due tothe
specified tyre pressure not being ach‐
ie ved
If th e specified tyre pressure is not achie ved
af te rth e specified time, the tyre is too badly
damaged. The tyre sealant cannot repair the
tyre in this ins tance. Breakdown assi
stance 507
Page 516 of 689
R
Keep away from fire and naked flames.
R Do not lean overth e batter y.
Obser vethe additional following points when
ch arging the battery:
R Only use battery charge rs tested and
appr oved for Mercedes-Benz.
R Read the battery charge r's operating instruc‐
tions before charging the batter y.
Obser vethe additional following points during
st arting assis tance:
R Forst arting assis tance, only use batteries
wi th a nominal voltage of 12V.
R The vehicles must not touch.
R Petrol engine: only acceptstarting assis‐
ta nce if the engine and exhaust sy stem are
cold. St
arting assi stance and charging the12 V
battery Requ
irements: R
The vehicle is secured with the electric park‐
ing brake.
R Automatic transmission: the transmission
is in position j.
R Manual transmission: the transmission is in
neutral.
R The ignition and all electrical consumers are
switched off.
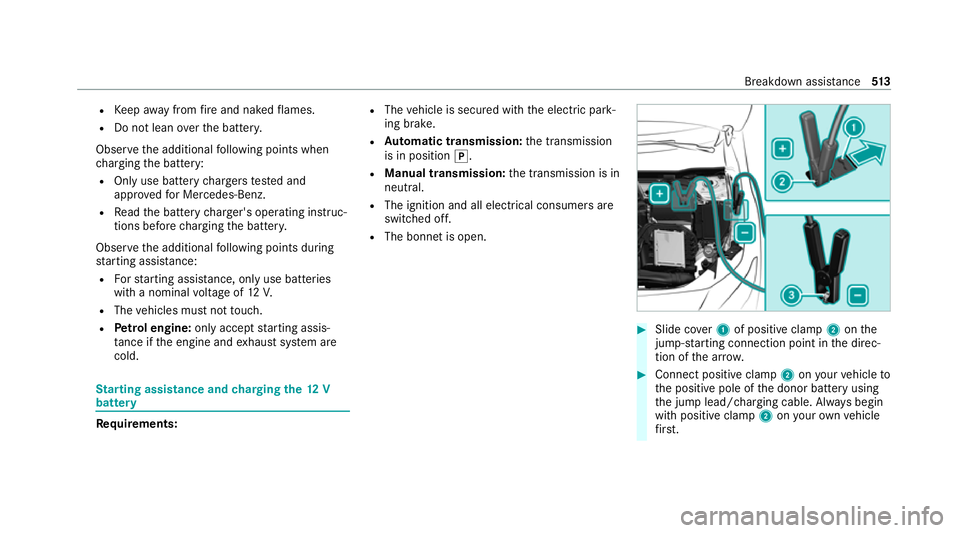
R The bonn etis open. #
Slide co ver1 of positive clamp 2onthe
jump-s tarting connection point in the direc‐
tion of the ar row. #
Connect positive clamp 2onyour vehicle to
th e positive pole of the donor battery using
th e jump lead/charging cable. Alw ays begin
with positive clamp 2onyour ow nve hicle
fi rs t. Breakdown assi
stance 513
Page 518 of 689
Fo
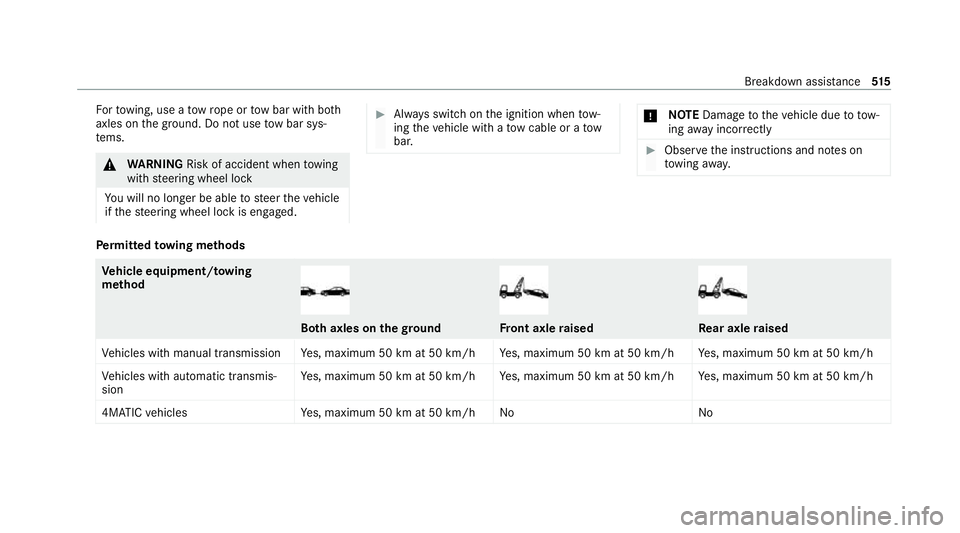
rto wing, use a tow rope or tow bar with bo th
axles on the ground. Do not use tow bar sys‐
te ms. &
WARNING Risk of accident when towing
with steering wheel lock
Yo u will no lon ger be able tosteer theve hicle
if th esteering wheel lock is engaged. #
Alw ays switch on the ignition when tow‐
ing theve hicle with a tow cable or a tow
bar. *
NO
TEDama getotheve hicle due to tow‐
ing away incor rectly #
Obser vethe instructions and no tes on
to wing away. Pe
rm itted towing me thods Ve
hicle equipment/ towing
me thod Bo
th axles on thegr ound Fr
ont axle raised Re
ar axle raised
Ve hicles with manual transmission Yes, maximum 50 km at 50 km/h Yes, maximum 50 km at 50 km/h Yes, maximum 50 km at 50 km/h
Ve hicles with automatic transmis‐
sion Ye
s, maximum 50 km at 50 km/h Yes, maximum 50 km at 50 km/h Yes, maximum 50 km at 50 km/h
4MATIC vehicles Yes, maximum 50 km at 50 km/h No No Breakdown assis
tance 515
Page 520 of 689
#
Deactivate the automatic locking mechanism
(/ page 90). #
Do not activate the HOLD function. #
Deactivate tow- aw ay protection
(/ page 108). #
Deactivate Active Brake Assi st
( / page 237). #
Vehicles with automatic transmission:
shift the automatic transmission toposition
i. #
Vehicles with manual transmission: shift
to neutral i. #
Release the electric parking brake. &
WARNING Risk of accident due tolimi‐
te d saf ety-re lated functions during the
to wing process
Saf ety-re lated functions are limited or no lon‐
ge rav ailable in thefo llowing situations:
R the ignition is switched off. R
the brake sy stem or po werst eering sys‐
te m is malfunctioning.
R the energy supply or the on-board electri‐
cal sy stem is malfunctioning.
When your vehicle is then towe daw ay, signif‐
icantly more ef fort may be requ ired tosteer
and brake than is no rmally requ ired. #
Use a tow bar. #
Make sure that thesteering wheel can
mo vefreely, before towing theve hicle
aw ay. *
NO
TEDama gedue toexcessive tracti ve
po wer If
yo u pull away sharpl y,the tractive po wer
may be too high and theve hicles could be
damaged. #
Pull away slowly and smoo thly. Loading the
vehicle for transport #
Obser vethe no tes on towing away
( / page 516). #
Connect theto w bar totheto wing eye in
order toload theve hicle.
% You can also attach theto w bar tothe trailer
hitch. #
Vehicles with automatic transmission:
shift the automatic transmission toposition
i.
% Ve
hicles with automatic transmission:
th e automatic transmission may be loc ked in
position jintheeve nt of dama getothe
electrical sy stem. Toshift toi , pr ovide the
on-board electrical sy stem with po wer
( / page 513). #
Vehicles with manual transmission: shift
to neutral. #
Load theve hicle onto the transpor ter. #
Vehicles with automatic transmission:
shift the automatic transmission toposition
j. Breakdown assis
tance 517
Page 523 of 689
#
Vehicles with automatic transmission
must not be tow- star ted. #
Vehicles with automatic transmission must
not be tow- star ted.
Ve hicles with manual transmission #
Obser vethe no tes on towing away
( / page 516). #
If necessa ry, allow the engine and exhaust
sy stem tocool down. #
Switch the ignition on. #
Enga gesecond gear. #
Release the electric parking brake. #
Tow- start theve hicle while the clutch pedal
is fully depressed. #
Slowly release the clutch pedal. #
Immediately shift toneutral if the engine
st arts. #
Pull over and stop theve hicle, paying atten‐
tion toroad and traf fic conditions. #
Remo vetheto w bar. #
Remo vetheto wing eye. #
Have theve hicle checked at a qualified spe‐
cialist workshop. Electrical fuses
Note
s on electrical fuses &
WARNING Risk of accident and inju ry
due to ov erloaded lines
If yo u manipulate or bridge a faulty fuse or if
yo ure place it with a fuse with a higher
amperage, the electric line could be overloa‐
ded.
This could result in a fire. #
Alw aysre place faulty fuses with speci‐
fi ed new fuses conta iningthe cor rect
amperage. *
NO
TEDama gedue toincor rect fuses Electrical components or sy
stems may be
damaged byincor rect fuses, or their func‐
tionality may be significant lyimpaired. #
Only use fuses that ha vebeen appr oved
by Mercedes-Benz and which ha vethe
cor rect fuse rating. Blown fuses mu
stbe replaced with fuses of the
same rating, which you can recognise bythe col‐
our and fuse rating. The fuse ratings and fu rther
information tobe obser ved can be found in the
fuse assignment diagram.
Fu se assignment diag ram: onthe fuse box in
th e engine compartment (/ page 521).
* NO
TEDama geor malfunctions caused
by moisture Moisture may cause dama
getothe electrical
sy stem or cause it tomalfunction. #
When the fuse box is open, make sure
th at no moisture can enter the fuse
box. #
When closing the fuse box, make sure
th at the seal of the lid is positioned cor‐
re ctly on the fuse box. 520
Breakdown assis tance