2019 MERCEDES-BENZ GLB SUV lock
[x] Cancel search: lockPage 131 of 689
#
Turn the emer gency key a quarter turn clock‐
wise 2(to lock) or anti-clockwise 1(to
unlock). Expanding
the load compa rtment byfolding
th e front-passenger seat backrest forw ards &
WARNING Risk of becoming trapped
when adjusting the seats
When you adjust a seat, you or other vehicle
occupants could become trapped, e.g. on the
seat guide rail. #
When adjusting a seat, make sure that
no one has any body parts in the sweep
of the seat. Obser
vethe saf ety no tes on "Airbags" and "Chil‐
dren in theve hicle". &
WARNING Risk of inju rydue toseat
backrest folded forw ards
If th e front-passen ger seat backrest is folded
fo rw ards, persons in there ar compartment could collide with parts of
the seat adjust‐
ment mechanism, particular lyin theev ent of
an accident, sudden braking or an abrupt
ch ange of direction. #
Ifth ere is a passenger in theve hicle
and the front-passen ger seat backrest
is folded forw ards, the passenger must
sit on there ar seat behind the driver. The backrest of
the front-passen ger seat can be
fo lded forw ards toinc rease the luggage com‐
partment capacity.
Re quirements:
R The rear seat behind the front-passen ger
seat backrest that is folded forw ards and the
re ar centre seat are unoccupied. #
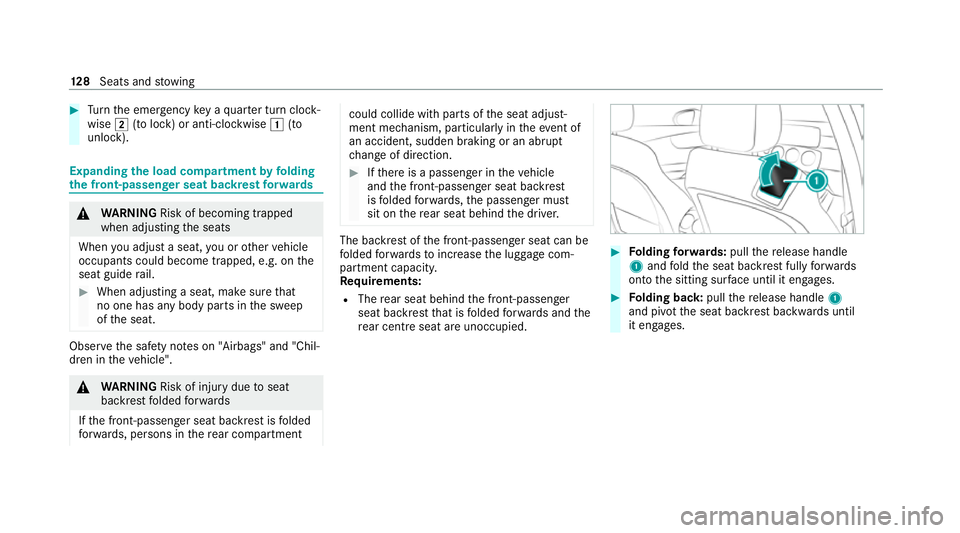
Folding forw ards: pullthere lease handle
1 and fold the seat backrest fully forw ards
on to the sitting sur face until it engages. #
Folding back: pullthere lease handle 1
and piv otthe seat backrest backwards until
it engages. 12 8
Seats and stowing
Page 144 of 689
#
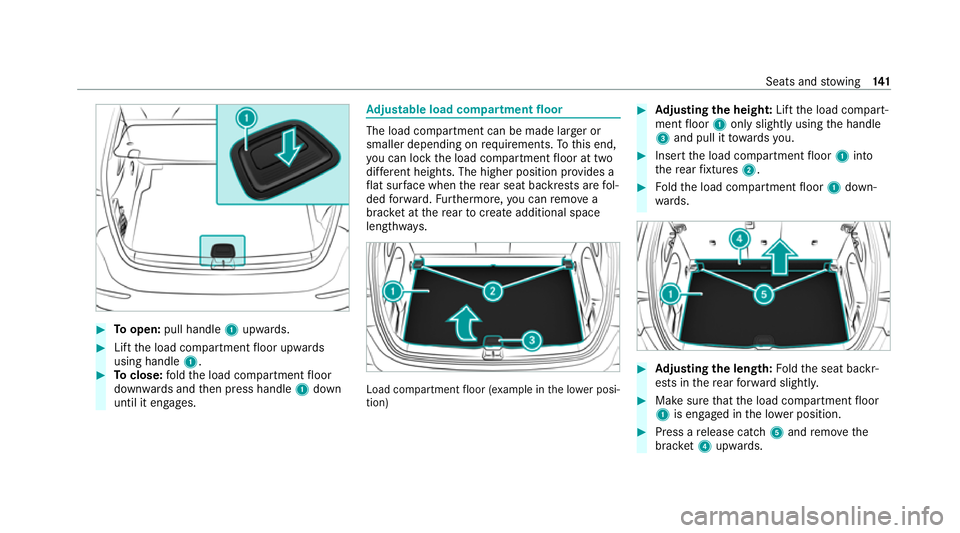
Toopen: pull handle 1upwards. #
Lift the load compartment floor upwards
using handle 1. #
Toclose: fold the load compartment floor
down wards and then press handle 1down
until it engages. Ad
justable load co mpartment floor The load compartment can be made larg
er or
smaller depending on requ irements. Tothis end,
yo u can lock the load compartment floor at two
dif fere nt heights. The higher position pr ovides a
fl at sur face when there ar seat backrests are fol‐
ded forw ard. Furthermore, you can remo ve a
brac ket at there ar to crea teadditional space
lengthw ays. Load compartment
floor (e xamp le in the lo wer posi‐
tion) #
Adjusting the height: Lift the load compart‐
ment floor 1only slightly using the handle
3 and pull it towa rdsyo u. #
Insert the load compartment floor 1into
th ere ar fixtures 2. #
Foldthe load compartment floor 1down‐
wa rds. #
Adjusting the length: Foldthe seat backr‐
ests in there ar forw ard slightl y. #
Make sure that the load compartment floor
1 is engaged in the lo wer position. #
Press a release cat ch5 and remo vethe
brac ket4 upwa rds. Seats and
stowing 141
Page 156 of 689
R
The mobile phone is suitable for wireless
ch arging. You can find a li stof compatible
mobile phones at:
https://www.mercedes-benz-mobile.com #
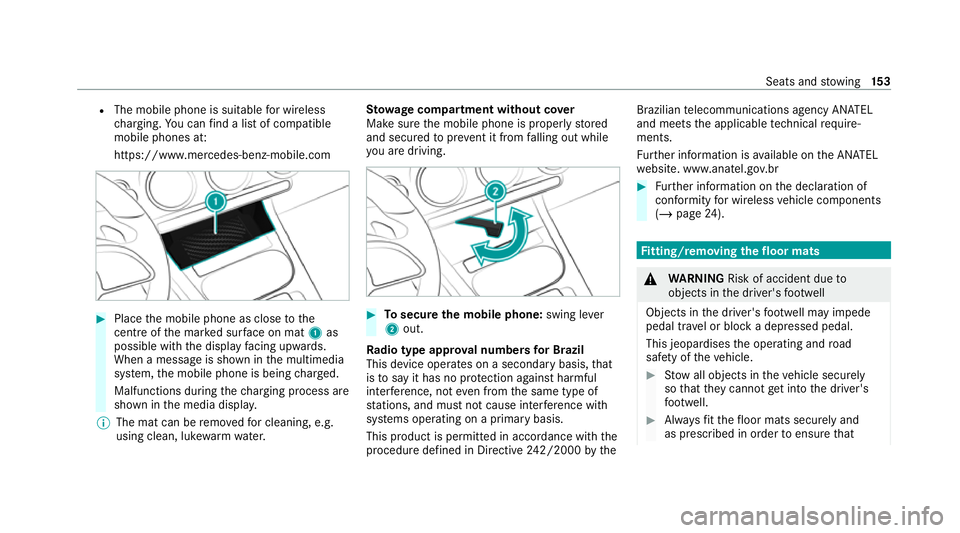
Place the mobile phone as close tothe
centre of the mar ked sur face on mat 1as
possible wi th the display facing up wards.
When a message is shown in the multimedia
sy stem, the mobile phone is being charge d.
Malfunctions during thech arging process are
shown in the media displa y.
% The mat can be remo vedfo r cleaning, e.g.
using clean, luk ewarmwate r. St
ow age comp artment with out cover
Make sure the mobile phone is proper lystored
and secured topreve nt it from falling out while
yo u are driving. #
Tosecure the mobile phone: swing lever
2 out.
Ra dio type appr oval numbers for Brazil
This device operates on a secondary basis, that
is to say it has no pr otection against harmful
inter fere nce, not even from the same type of
st ations, and must not cause inter fere nce wi th
sy stems operating on a primary basis.
This product is permitted in accordance with the
procedure defined in Directive 242/2000 bythe Brazilian
telecommunications agency AN ATEL
and meets the applicable tech nical requ ire‐
ments.
Fu rther information is available on the AN ATEL
we bsite. www.anatel.go v.br #
Further information on the declaration of
confo rmity for wireless vehicle components
(/ page 24). Fi
tting/ removing the floormats &
WARNING Risk of accident due to
objects in the driver's foot we ll
Objects in the driver's foot we ll may impede
pedal tr avel or block a depressed pedal.
This jeopardises the operating and road
saf ety of theve hicle. #
Stow all objects in theve hicle securely
so that they cannot getinto the driver's
fo ot we ll. #
Alw aysfit th efloor mats securely and
as prescribed in order toensure that Seats and
stowing 15 3
Page 170 of 689
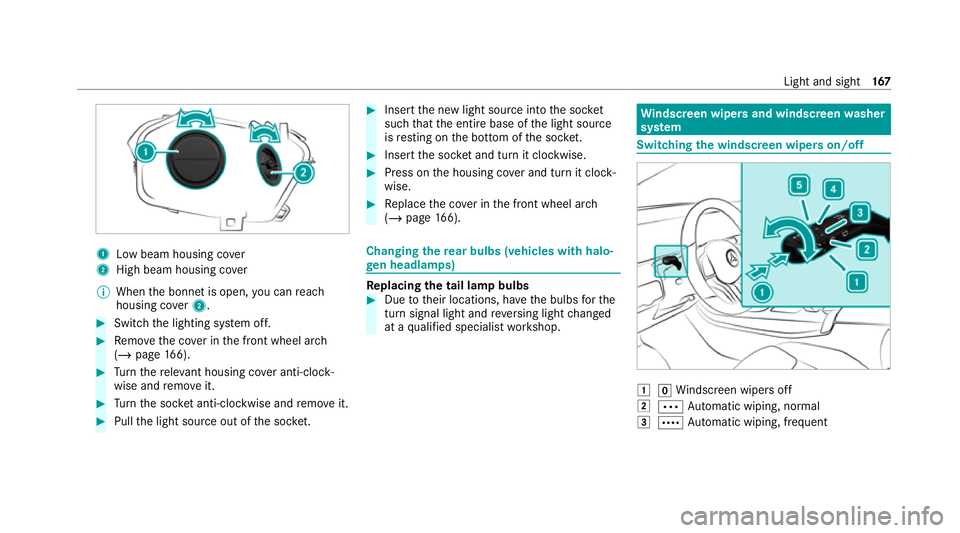
1
Low beam housing co ver
2 High beam housing co ver
% When the bonn etis open, you can reach
housing co ver2. #
Switch the lighting sy stem off. #
Remo vethe co ver in the front wheel ar ch
( / page 166). #
Turn there leva nt housing co ver anti-clock‐
wise and remo veit. #
Turn the soc ket anti-clo ckwise and remo veit. #
Pull the light source out of the soc ket. #
Inse rtthe new light source into the soc ket
such that the entire base of the light source
is resting on the bottom of the soc ket. #
Inse rtthe soc ket and turn it clo ckwise. #
Press on the housing co ver and turn it clock‐
wise. #
Replace the co ver in the front wheel ar ch
( / page 166). Changing
there ar bulbs (vehicles with halo‐
ge n headla mps) Re
placing the tail lamp bulbs #
Due totheir locations, ha vethe bulbs forthe
turn signal light and reve rsing light changed
at a qualified specialist workshop. Wi
ndscreen wipers and windscreen washer
sy stem Switching
the windscreen wipers on/off 1
gWindsc reen wipers off
2 Ä Automatic wiping, normal
3 Å Automatic wiping, frequent Light and sight
167
Page 172 of 689
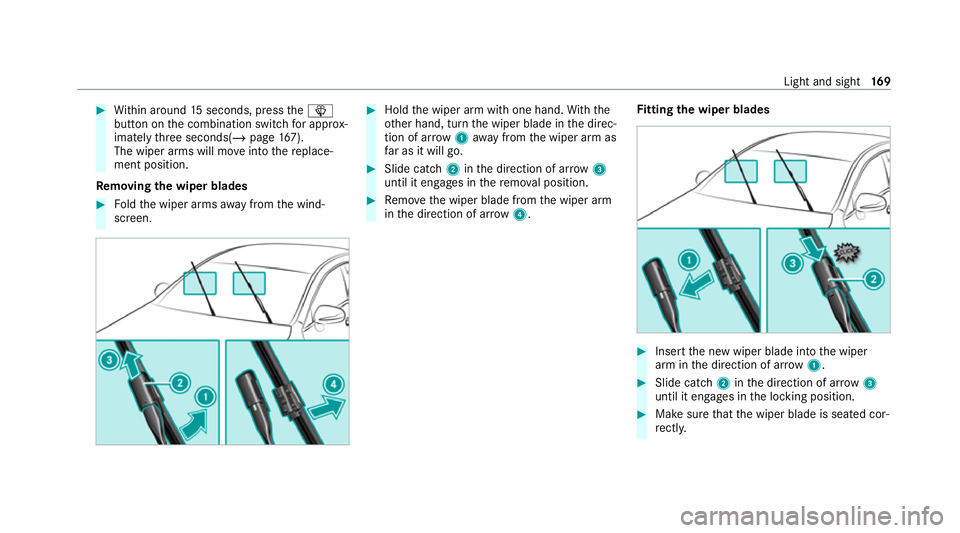
#
Within around 15seconds, press theî
button on the combination switch for appro x‐
ima tely thre e seconds(/ page167).
The wiper arms will mo veinto there place‐
ment position.
Re moving the wiper blades #
Foldthe wiper arms away from the wind‐
screen. #
Hold the wiper arm with one hand. With the
ot her hand, turn the wiper blade in the direc‐
tion of ar row1away from the wiper arm as
fa r as it will go. #
Slide catch 2inthe direction of ar row 3
until it engages in there mo val position. #
Remo vethe wiper blade from the wiper arm
in the direction of ar row4. Fi
tting the wiper blades #
Inse rtthe new wiper blade into the wiper
arm in the direction of ar row1. #
Slide catch 2inthe direction of ar row 3
until it engages in the locking position. #
Make sure that the wiper blade is seated cor‐
re ctly. Light and sight
16 9
Page 188 of 689
Driving
Note
s on Mercedes-AMG vehicles Obser
vethe no tes on thefo llowing topics in the
Supplement, as you may otherwise failto recog‐
nise dangers:
R Emotion Start
R AMG exhaust sy stem
R RACE START
R AMG RIDE CONTROL
R AMG steering-wheel buttons Switching on
the po wer supp lyor the igni‐
tion (without engine start) &
WARNING Risk of accident and inju ry
due tochildren left unat tended in the
ve hicle
If ch ildren are left unat tended in theve hicle,
th ey could:
R Open doo rs,th ereby endangering other
persons or road users.
R Get out and be stru ck byoncoming traf‐
fi c.
R Ope rate ve hicle equipment and become
trapped, forex ample.
In addition, thech ildren could also set the
ve hicle in motion, forex ample by:
R Releasing the parking brake.
R Changing the transmission position.
R Starting theve hicle. #
Never lea vechildren unat tended in the
ve hicle. #
When leaving theve hicle, alw aysta ke
th eke y with you and lock theve hicle. #
Keep theve hicle key out of reach of
ch ildren. Also obser
vethe "No tes on pets in theve hicle".
This also applies tothe Digital Vehicle Key if the
"Digital Vehicle Key" function is activated via
Mercedes me connect.
Re quirements:
R theke y is in theve hicle and has been recog‐
nised.
R or: a Digi talVe hicle Key is located in the
mar ked space (/ page187).
R Vehicles with automatic transmission: the
brake pedal is not depressed.
R Vehicles with manual transmission: the
clutch pedal is not dep ressed. Driving and parking
18 5
Page 193 of 689
#
Alw ays secure the engine against unin‐
te ntional starting before car rying out
maintenance or repair work. Re
quirements:
R park position jis selected.
R the anti- theft alarm sy stem is not activated.
R the panic alarm is not activated.
R the hazard warning light sy stem is switched
off.
R The bonn etis closed.
R the doors are closed and loc ked.
R the windo wsand sliding sun roof are closed. #
Start theve hicle using the smartphone.
Af tereve ryvehicle start, the engine runs for
te n minu tes.
Yo u can car ryout a maximum of two consecu‐
tive starting attem pts. The vehicle must be star‐
te d once with theke y before trying tostart the
ve hicle again with the smartphone. you can stop
th eve hicle again at any time. %
Further information can be found in the
smartphone app.
Securing the engine against starting before
car rying out maintenance or repair work: #
switch on the hazard warning light sy stem.
or #
unlock the doors.
or #
open a side window or the sliding sunroof. Ru
nning-in no tes Mercedes-AMG
vehicles: observeth e no tes in
th e Supplement. Otherwise, you may failto rec‐
ognise dangers.
To preser vethe engine during thefirs t1, 500 km:
R drive at varying road speeds and engine
speeds.
R drive theve hicle in drive program A
or ;.
R shift tothe next highest gear at theve ry lat‐
est when the needle reaches the last third
before there d area in there v counter. R
do not shift down a gear manually in order to
brake.
R avoidoverstra ining theve hicle, e.g. driving at
full thro ttle.
R vehicles with automatic transmission: do
not depress the accelera tor pedal be yond the
pressure point (kickdown).
R only increase the engine speed gradually and
accelera tetheve hicle tofull speed af ter
1, 500 km.
This also applies when the engine or parts of the
driv etra in ha vebeen replaced.
Please also obser vethefo llowing running-in
no tes:
R in cer tain driving and driving saf ety sy stems,
th e sensors adjust automatically while a cer‐
ta in dis tance is being driven af terth eve hicle
has been delivered or af terre pairs. Full sys‐
te m ef fectiveness is not reached until the
end of this teach-in process.
R brakepads, brake discs and tyres that are
either new or ha vebeen replaced only ach‐
ie ve optimum braking ef fect and grip af ter 19 0
Driving and pa rking
Page 194 of 689
se
veral hundred kilom etre s of driving. Com‐
pensate forth ere duced braking ef fect by
applying greaterfo rc eto the brake pedal. Note
s on driving &
WARNING Risk of accident due to
objects in the driver's foot we ll
Objects in the driver's foot we ll may impede
pedal tr avel or block a depressed pedal.
This jeopardises the operating and road
saf ety of theve hicle. #
Stow all objects in theve hicle securely
so that they cannot getinto the driver's
fo ot we ll. #
Alw aysfit th efloor mats securely and
as prescribed in order toensure that
th ere is alw ays suf ficient room forthe
pedals. #
Do not use loose floor mats and do not
place floor mats on top of one ano ther. &
WARNING Risk of accident due to
unsuitable foot we ar
Operating the pedals may be impaired by
we aring unsuitable foot we ar, e.g.:
R plat form shoes
R high-heeled shoes
R slippers #
Alw ayswe ar suitable foot we ar when
driving so that you can operate the ped‐
als safel y. &
WARNING Risk of accident when switch‐
ing off the ignition when driving
If yo u swit choff the ignition while driving,
saf ety functions are restricted or no longer
av ailable. This may af fect the po werst eering
sy stem and the brake forc e boosting, for
ex ample.
Yo u will then need touse considerably more
fo rc eto steer and brake. #
Do not switch off the ignition while driv‐
ing. &
DANG ER Risk of death caused by
ex haust gases
Combustion engines emit poisonous exhaust
ga ses such as carbon monoxide. Inhaling
th ese exhaust gases is hazardous tohealth
and leads topoisoning. #
Never lea vethe engine or, if present,
th e auxiliary heating running in an
enclosed space wi thout suf ficient venti‐
lation. &
WARNING Risk of skidding and of an
accident due toshifting down on slippery
ro ad sur faces
If yo u shift down on slippery road sur faces to
inc rease the engine braking ef fect, the drive
wheels may lose traction. #
Do not shift down on slippery road sur‐
fa ces toinc rease the engine braking
ef fect. Driving and pa
rking 191