2019 MERCEDES-BENZ GLB SUV ESP
[x] Cancel search: ESPPage 178 of 689
Overview of climate control sy
stems Note
s on climate control An interior air
filter in combination with the pre‐
fi lter in the engine compartment must alw ays be
used so that the air conditioning sy stem, pollu‐
tion le vel monitoring and the air filtration work
cor rectl y.Make sure that thefilter is ins talled
cor rectly and thefilter housing in the engine
compartment is closed cor rectly using the cap
and alw ays tightly sealed when in operation. Use
fi lters recommended and appr ovedby
Mercedes-Benz. Alw ays ha veservice workcar‐
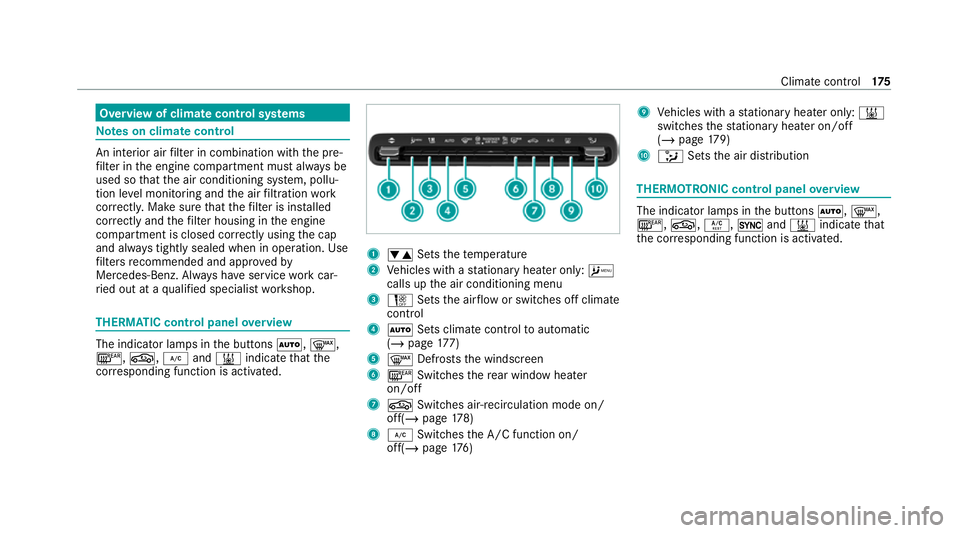
ri ed out at a qualified specialist workshop. THERMATIC control panel
overview The indicator lamps in
the buttons Ã,¬,
¤, g,¿and& indicate that the
cor responding function is activated. 1
w Setsthete mp erature
2 Vehicles with a stationary heater on ly:A
calls upthe air conditioning menu
3 H Setsthe air flow or switches off climate
control
4 Ã Sets climate control toautomatic
(/ page 177)
5 ¬ Defrosts the windscreen
6 ¤ Switches there ar wind owheater
on/off
7 g Switches air-recirculation mode on/
off(/ page178)
8 ¿ Switches the A/C function on/
off(/ page176) 9
Vehicles with a stationary heater on ly:&
swit ches thest ationary heater on/off
(/ page 179)
A _ Setsthe air distribution THERMOTRONIC control panel
overview The indicator lamps in
the buttons Ã,¬,
¤, g,Á,0and& indicate that
th e cor responding function is activated. Climate
control 175
Page 197 of 689
#
Ifth ere is damage, consult a qualified
specialist workshop immediately. When driving off-road, subs
tances su chas sand,
mud and water orwate r mixed with oil may get
into the brakes. This may lead toare duction in
braking ef fect or total brake failure as a result of
increased wear. The braking characteristics will
va ry depending on the material that has entered
th e sy stem. Clean the brakes af ter driving off-
ro ad. If youth en notice reduced braking ef fect
or hear scraping noises, ha vethe brake sy stem
ch ecked at a qualified specialist workshop.
Ad just your driving style to thech anged braking
ch aracteristics.
* NO
TEDama gecaused bydriving over
obs tacles The
vehicle can be damaged by:
R driving up on high kerbs or unpa ved
ro ads.
R quickly driving over obs tacles su chas
ke rbs, speed bumps or po tholes. R
heavy objects hitting the underbody or
ch assis components. #
Do not drive over obs tacles that could
damage theve hicle. #
Check theve hicle regular lyfor dama ge
during off-road driving. #
Adjust theve hicle speed tosuit the
ro ad sur face conditions. #
Ifth ere is damage, consult a qualified
specialist workshop immediately. +
ENVIRONMENTAL
NOTEEnvironmental
dama gedue tonon-obser vance of pro‐
hibition signs Environmental pr
otection has priority. Treat
nature with respect. #
Be sure toobser veprohibition signs. %
The vehicle is designed for easily negotiable
and medium off-road terrain. With off-road
use, make sure there is the necessary
ground clearance. Checklist before driving off-road
Check
thefo llowing points before driving off-
ro ad:
R Fuel le vel
R Vehicles with a diesel engine: AdBlue ®
le vel
R Engine oil le vel:fill engine oil up tothe maxi‐
mum le velto ensure full gradeability
(/ page 488).
R Tyre-change tool kit and spare wheel
R Tyres and wheels
Off-road driving
Re ad this section before driving your vehicle off-
ro ad. Practise bydriving over more gentle off-
ro ad terrain firs t.
R Obse rveth e no tes on the cross-country ABS
(/ page 226).
R If necessar y,select theF (/page 199)
drive program before driving off-road.
R Alw ayske ep the engine running and in gear
when driving on downhill gradients and 194
Driving and pa rking
Page 201 of 689
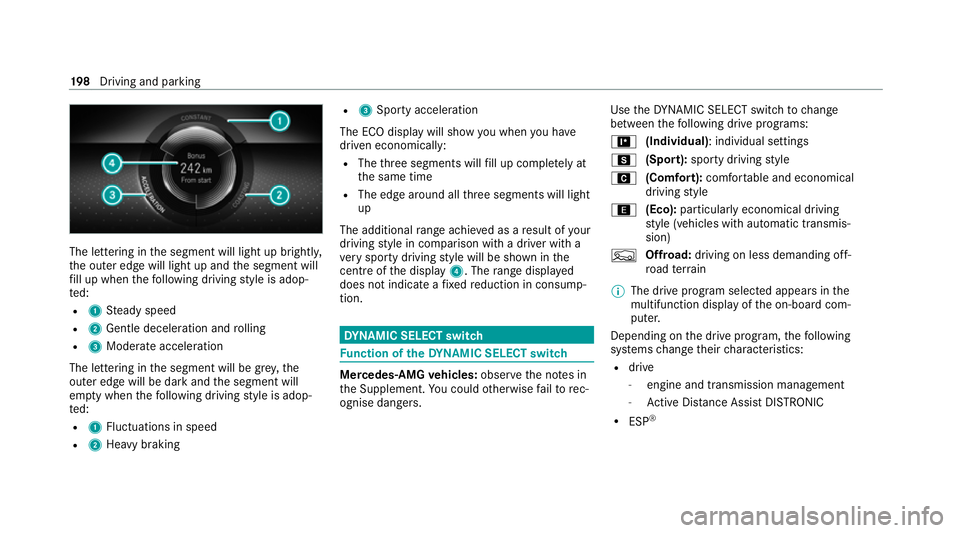
The lettering in
the segment will light up brightl y,
th e outer edge will light up and the segment will
fi ll up when thefo llowing driving style is adop‐
te d:
R 1 Steady speed
R 2 Gentle deceleration and rolling
R 3 Moderate acceleration
The lettering in the segment will be gr ey,the
outer edge will be dark and the segment will
em pty when thefo llowing driving style is adop‐
te d:
R 1 Fluctuations in speed
R 2 Heavy braking R
3 Sporty acceleration
The ECO display will show you when you ha ve
driven economically:
R The thre e segments will fill up comple tely at
th e same time
R The edge around all thre e segments will light
up
The additional range achi eved as a result of your
driving style in comparison with a driver with a
ve ry sporty driving style will be shown in the
centre of the display 4. Therange displ ayed
does not indicate a fixe dre duction in consump‐
tion. DY
NA MIC SELECT switch Fu
nction of theDY NA MIC SELECT switch Mercedes-AMG
vehicles: observeth e no tes in
th e Supplement. You could otherwise failto rec‐
ognise dangers. Use
theDY NA MIC SELECT switch tochange
between thefo llowing drive prog rams:
= (Individual): individual settings
C (Sport): sporty driving style
A (Comfort): comfortable and economical
driving style
; (Eco):particularly economical driving
st yle (vehicles with automatic transmis‐
sion)
F Offroad: driving on less demanding off-
ro ad terrain
% The drive prog ram selected appears in the
multifunction display of the on-board com‐
puter.
Depending on the drive prog ram, thefo llowing
sy stems change their characteristics:
R drive
-
engine and transmission management
- Active Dis tance Assi stDISTRONIC
R ESP ® 19 8
Driving and pa rking
Page 202 of 689
R
vehicles with adaptive damping adjust‐
ment: suspension
R electric po werst eering Note
s onthero of load display Cer
tain drive prog rams and ESP ®
settings are
unsui table for transporting a roof load.
If one of these drive programs is set or selected,
th e symbol is shown as a
warning. When
th is symbol is shown, the selected drive program
is not suitable for transporting a load on the
ro of.
The following drive prog rams are af fected:
R Sport drive program
R Individual drive program wi th the Sport
ESP ®
setting
% The symbol is also shown in thefo llowing sit‐
uations:
R Within theth emes if a cor responding
drive program is sa ved Fo
r more information on themes see
(/ page 346).
R Within there set display if the pr eviously
active drive prog ram is unsui table forthe
transpo rtof a roof load
Fo r fur ther information on there set dis‐
pla y,see (/ page 200). Selecting
the drive prog ram %
Depending on the equipment, theve hicle is
fi tted wi theither a switch or a button. #
Press DYNA MIC SELECT switch 1forw ards
or backwards.
The drive prog ram selected appears in the
multifunction displa y. Driving and pa
rking 19 9
Page 211 of 689

Problems with
the transmission Problem
Possible causes/consequences and M
MSolutions
The transmission has a faulty gear
shift. The transmission is losing oil. #
Have the transmission checked at a qualified specialist workshop immediatel y.
The acceleration characteristics are
de teriorating.
The transmission no longer shifts gear. The transmission is in emer
gency operation mode. #
Pull over and stop theve hicle, paying attention toroad and traf fic conditions. #
Switch the transmission toposition j. #
Switch off the engine. #
Wait at least ten seconds be fore re starting the engine. #
Switch the transmission toposition h. #
Have the transmission checked at a qualified specialist workshop immediatel y.Fu
nction of the 4MATIC
4MATIC ensures that all four wheels are driven
when needed. Toget her with ESP ®
and 4ETS,
4MATIC impr ovesth e traction of your vehicle
whene ver a driven wheel spins due toinsuf fi‐
cient traction. If
yo ufa ilto adapt your driving style, 4MATIC can
neither reduce therisk of an accident nor over‐
ri de the la wsof ph ysics. 4MATIC cannot take
account of road, weather and traf fic conditions.
4MATIC is only an aid. You are responsible espe‐
cially for maintaining a safe dis tance from the
ve hicle in front, forve hicle speed, for braking in
good time and forst ay ing in lane. %
In wint ryroad conditions, the maximum
ef fect of 4MATIC can be achie ved only if you
use winter tyres (M+S tyres), with sn ow
ch ains if necessar y.208
Driving and parking
Page 212 of 689
Re
fuelling Re
fuelling theve hicle &
WARNING Risk offire or explosion from
fuel
Fu els are highly flammable. #
Fire, naked flames, smoking and crea‐
tion of spar ksmust be avoided. #
Swit choff the ignition and, if available,
th est ationary heater, before and while
re fuelling theve hicle. &
WARNING Risk of inju ryfrom fuels
Fu els are poisonous and hazardous to your
health. #
Do not swallow fuel or let it come into
contact with skin, eyes or clo thing. #
Do not inhale fuel vapour. #
Keep children away from fuel. #
Keep doors and windo wsclosed du ring
th ere fuelling process. If
yo u or other people come into contact with
fuel, obser vethefo llowing: #
Immediately rinse fuel off your skin with
soap and water. #
If fuel comes into contact with your
ey es, immediately rinse them thor‐
oughly with clean water.Seek medical
attention immediately. #
Ifyo u swallow fuel, seek medical atten‐
tion immediatel y.Do not induce vomit‐
ing. #
Change immediately out of clo thing that
has come into con tact wi thfuel. &
WARNING Risk offire and explosion due
to electros tatic charge
Electros tatic charge can crea tespar ksand
th ereby ignite fuel vapours. #
Before you open the fuel filler cap or
ta ke hold of the pump nozzle, touch the
me tallic vehicle body.
This dischar ges any electros tatic charge
th at may ha vebuilt up. #
Do not get into theve hicle again during
th ere fuelling process.
Otherwise, electros tatic charge can
build up again. &
WARNING Risk offire from fuel mixture
Ve hicles with a diesel engine:
If yo u mix diesel fuel with petrol, theflash
point of the fuel mixture is lo werth an that of
pure diesel fuel.
While the engine is running, component
pa rts in theex haust sy stem may overheat
without warning. #
Neverre fuel using petrol. #
Never mix petrol with diesel fuel. Driving and parking
209
Page 222 of 689
R
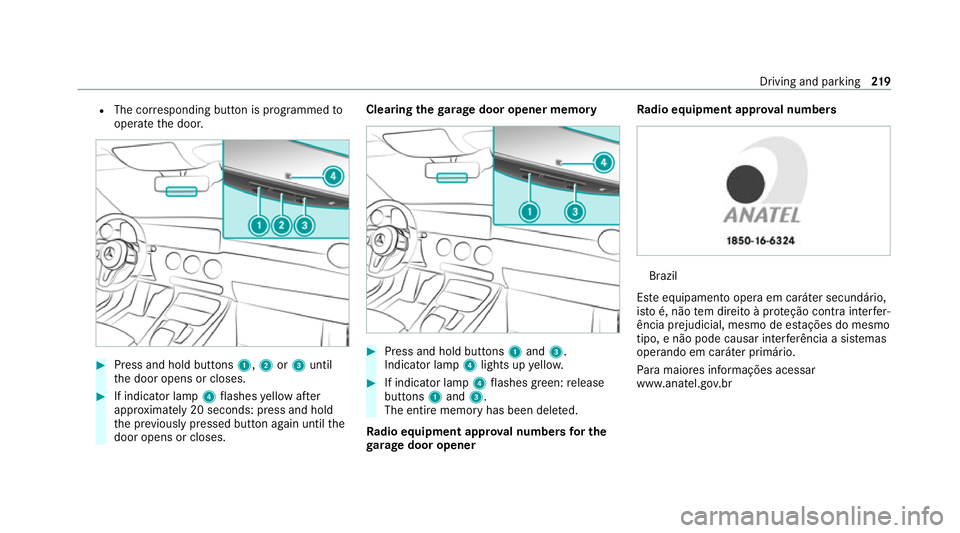
The cor responding button is programmed to
operate the door. #
Press and hold buttons 1,2or3 until
th e door opens or closes. #
If indicator lamp 4flashes yellow af ter
appr oximately 20 seconds: press and hold
th e pr eviously pressed button again until the
door opens or closes. Clearing
thega rage door opener memo ry #
Press and hold buttons 1and 3.
Indicator lamp 4lights up yello w. #
If indicator lamp 4flashes green: release
buttons 1and 3.
The entire memo ryhas been dele ted.
Ra dio equipment appr oval numbers for the
ga rage door opener Ra
dio equipment appr oval numbers Brazil
Es te equipamento opera em caráter secundário,
is to é, não tem direito à pr oteção contra inter fer‐
ência prejudicial, mesmo de es tações do mesmo
tipo, e não pode causar inter ferê ncia a si stemas
operando em caráter primário.
Pa ra maio res informações acessar
www.anatel.go v.br Driving and parking
219
Page 227 of 689
R
The electric parking brake is not applied. Note
s on parking up theve hicle If
yo u lea vetheve hicle par ked up for longer than
six weeks, it may suf fer dama gethro ugh disuse.
The 12V battery may also be impaired or dam‐
aged byheavy discharging.
% Further information can be obtained at a
qu alified specialist workshop. St
andby mode (extension of the star ter bat‐
te ry 's period out of use) St
andby mode function
% This function is not available for all models.
If standby mode is activated, ene rgy loss will be
minimised during extended pe riods of non-oper‐
ation.
St andby mode is characterised bythefo llowing:
R thest ar ter battery is preser ved.
R the maximum non-operational time appears
in the media displa y. R
the connection toonline services is inter rup‐
te d.
R theAT A (anti-theft alarm sy stem) is not avail‐
able.
R the interior pr otection and tow- aw ay protec‐
tion functions are not available.
R the function for de tecting damage on a
pa rked vehicle is not available.
If th efo llowing conditions are fulfilled, standby
mode can be activated or deactivated using the
multimedia sy stem:
R the engine is switched off.
R the ignition is switched on.
Exceeding theve hicle's displa yed non-opera‐
tional time may cause incon venience, i.e. it can‐
not be guaranteed that thest ar ter battery will
re liably start the engine.
The star ter battery must be charge dfirs t in the
fo llowing situations:
R The vehicle's non-operational time must be
ex tended. R
The Battery charge insufficient for standby
mode messa geappears in the media displa y.
% Standby mode is automatically deactivated
when the ignition is switched on.
Ac tivating/deactivating standby mode (park‐
ing up theve hicle)
Re quirements:
R The engine is switched off.
Multimedia sy stem:
4 © 5
Settings 5
Vehicle #
Switch Standby mode on or off.
When you activate the function, a prom pt
appears. #
Select Yes.
St andby mode is activated. Driving and driving saf
ety sy stems Driving sy
stems and your responsibility Yo
ur vehicle is equipped with driving sy stems
which assist you in driving, parking and manoeu‐
vring theve hicle. The driving sy stems are aids 224
Driving and parking