2019 MERCEDES-BENZ GLB SUV wheel bolts
[x] Cancel search: wheel boltsPage 500 of 689
Note
s on care of car parts &
WARNING Risk of entrapment if the
windscreen wipers are swit ched on while
th e windscreen is being cleaned
If th e windscreen wipers are set in motion
while you are cleaning the windscreen or
wiper blades, you can be trapped bythe
wiper arm. #
Alw ays switch off the windscreen wip‐
ers and the ignition before cleaning the
windscreen or wiper blades. &
WARNING Risk of bu rns from theta il‐
pipe and tailpipe trims
The exhaust tailpipe and tailpipe trims can
become very hot. If you come into contact with
these parts of theve hicle, you could
burn yourself. #
Alw ays be particular lycareful around
th eta ilpipe and theta ilpipe trims and
supervise children especially closely in
th is area. #
Allow vehicle parts tocool down before
to uching them. Obser
vethefo llowing information: Note
s on cleaning and car eA voiding vehicle damage
Wheels/rims Usewate r and acid-free wheel cleaners. R
Do not use acidic wheel cleaners toremo vebrake dust.
This could damage wheel bolts and brake components.
R Toavoid cor rosion of the brake discs and brakepads, drive
th eve hicle for a few minutes af ter cleaning before parking
it. The brake discs and brakepads warm up and dry out.
Wi ndo ws
Clean windowsinside and outside with a damp clo thand with
a cleaning agent recommended for Mercedes-Benz. Do not use dry clo
ths or abrasive or sol vent-based cleaning
agents toclean the inside of windo ws.
Wi per blades
Fold out the wiper blades and clean them using a damp clo th.D o not clean the wiper blades too of ten. Maintenance and care
497
Page 542 of 689
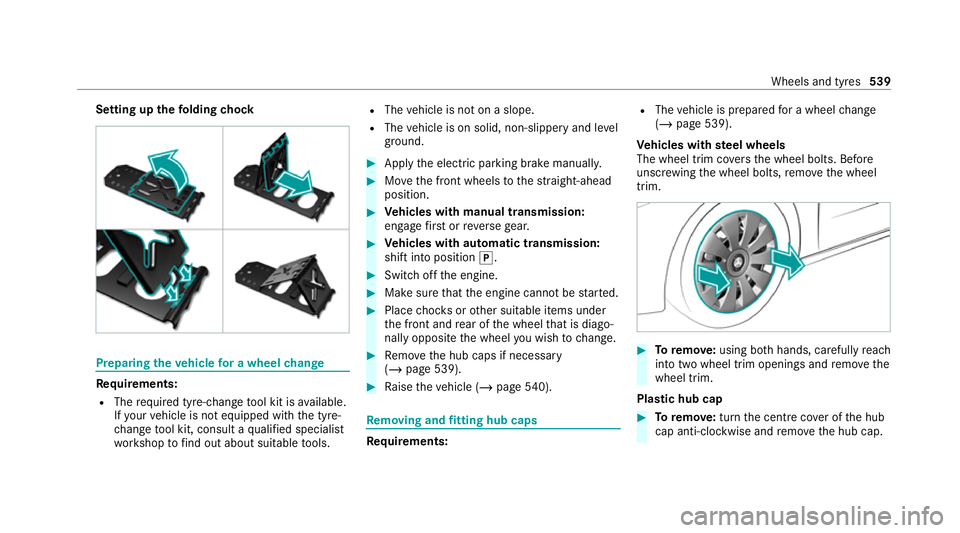
Setting up
thefo lding chock Prepa
ring theve hicle for a wheel change Re
quirements:
R The requ ired tyre-change tool kit is available.
If yo ur vehicle is not equipped with the tyre-
ch ange tool kit, consult a qualified specialist
wo rkshop tofind out about suitable tools. R
The vehicle is not on a slope.
R The vehicle is on solid, non-slippery and le vel
ground. #
Apply the electric parking brake manually. #
Movethe front wheels tothest ra ight-ahead
position. #
Vehicles with manual transmission:
engage firs t or reve rsege ar. #
Vehicles with automatic transmission:
shift into position j. #
Switch off the engine. #
Make sure that the engine cann otbe star ted. #
Place choc ks orother suitable items under
th e front and rear of the wheel that is diago‐
nally opposite the wheel you wish tochange. #
Remo vethe hub caps if necessary
(/ page 539). #
Raise theve hicle (/ page540). Re
moving and fitting hub caps Re
quirements: R
The vehicle is prepared for a wheel change
(/ page 539).
Ve hicles with steel wheels
The wheel trim co vers the wheel bolts. Before
unscr ewing the wheel bolts, remo vethe wheel
trim. #
Toremo ve:using bo thhands, carefully reach
into two wheel trim openings and remo vethe
wheel trim.
Plastic hub cap #
Toremo ve:turn the cent recover of the hub
cap anti-clockwise and remo vethe hub cap. Wheels and tyres
539
Page 543 of 689
#
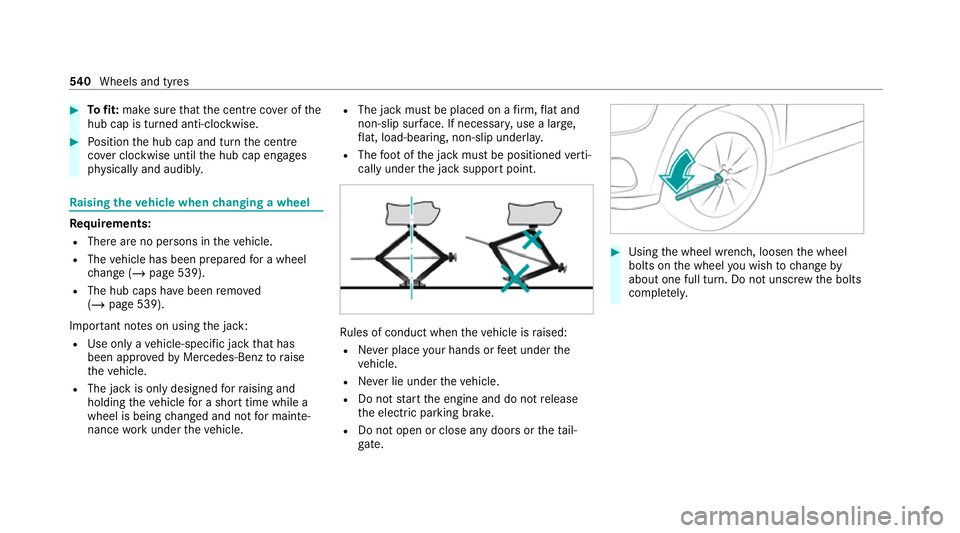
Tofit: make sure that the cent recover of the
hub cap is turned anti-clockwise. #
Position the hub cap and turn the cent re
co ver clockwise until the hub cap engages
ph ysically and audibly. Ra
ising theve hicle when changing a wheel Re
quirements:
R There are no persons in theve hicle.
R The vehicle has been prepared for a wheel
ch ange (/ page 539).
R The hub caps ha vebeen remo ved
( / page 539).
Impor tant no tes on using the jack:
R Use only a vehicle-specific jack that has
been appr oved byMercedes-Benz toraise
th eve hicle.
R The jack is only designed forra ising and
holding theve hicle for a short time while a
wheel is being changed and not for mainte‐
nance workunder theve hicle. R
The jack must be placed on a firm ,fl at and
non-slip sur face. If necessar y,use a lar ge,
fl at, load-bearing, non-slip unde rlay.
R The foot ofthe jack must be positioned verti‐
cally under the jack support point. Ru
les of conduct when theve hicle is raised:
R Never place your hands or feet under the
ve hicle.
R Never lie under theve hicle.
R Do not start the engine and do not release
th e electric parking brake.
R Do not open or close any doors or theta il‐
gate. #
Using the wheel wrench, loosen the wheel
bolts on the wheel you wish tochange by
about one full turn. Do not unscr ewthe bolts
comple tely. 540
Wheels and tyres
Page 545 of 689
Re
moving a wheel Re
quirements:
R The vehicle is raised (/ page540).
When changing a wheel, avoid applying any force
to the brake discs, since this could impair the
le ve l of com fort when braking.
* NO
TEDama getothre ading from dirt on
wheel bolts #
Do not place wheel bolts in sand or on
a dirty sur face. #
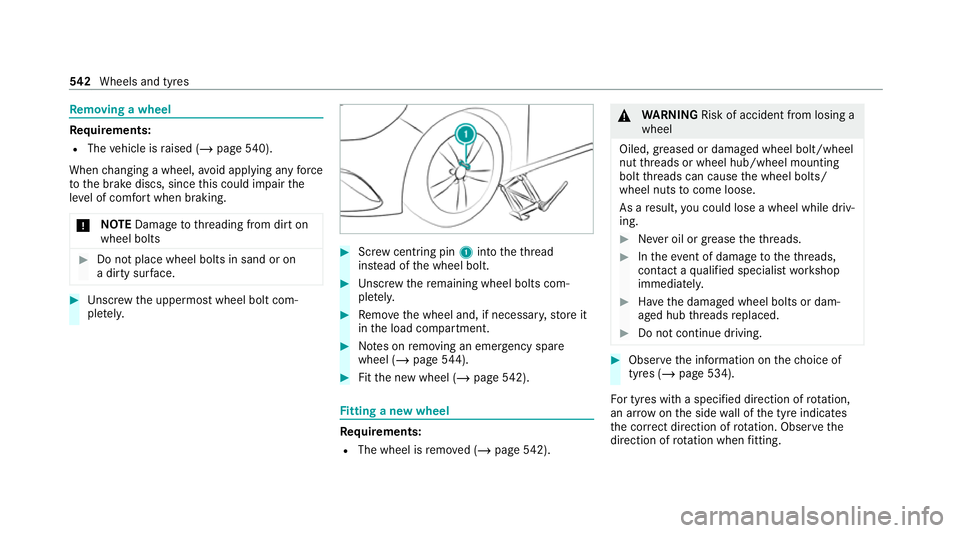
Unscr ew the uppermost wheel bolt com‐
ple tely. #
Screw centring pin 1into theth re ad
ins tead of the wheel bolt. #
Unscr ew there maining wheel bolts com‐
ple tely. #
Remo vethe wheel and, if necessar y,store it
in the load compartment. #
Notes on removing an emer gency spa re
wheel (/ page544). #
Fitth e new wheel (/ page542). Fi
tting a new wheel Re
quirements:
R The wheel is remo ved (/ page542). &
WARNING Risk of accident from losing a
wheel
Oiled, greased or damaged wheel bolt/wheel
nut thre ads or wheel hub/wheel mounting
bolt thre ads can cause the wheel bolts/
wheel nuts tocome loose.
As a result, you could lose a wheel while driv‐
ing. #
Never oil or grease theth re ads. #
Intheeve nt of dama getotheth re ads,
con tact a qualified specialist workshop
immediatel y. #
Have the damaged wheel bolts or dam‐
aged hub thre ads replaced. #
Do not continue driving. #
Obser vethe information on thech oice of
tyres (/ page 534).
Fo r tyres with a specified direction of rotation,
an ar row on the side wall of the tyre indicates
th e cor rect di rection of rotation. Obse rvethe
direction of rotation when fitting. 542
Wheels and tyres
Page 546 of 689
#
Slide the wheel tobe mounted onto the cen‐
tring pin and push it on. #
Notes on fitting an eme rgency spare wheel
(/ page 544). &
WARNING Risk of inju ryfrom tightening
wheel bolts and nuts
If yo u tighten the wheel bolts or wheel nuts
when theve hicle is raised, the jack could tip. #
Only tighten wheel bolts or wheel nuts
when theve hicle is on the ground. #
Be sure toobser vethe instructions and
saf ety no tes on "Changing a wheel"
(/ page 534). #
For saf etyre asons, on lyuse wheel bolts
which ha vebeen appr ovedby Mercedes-
Benz and forth e wheel in question. #
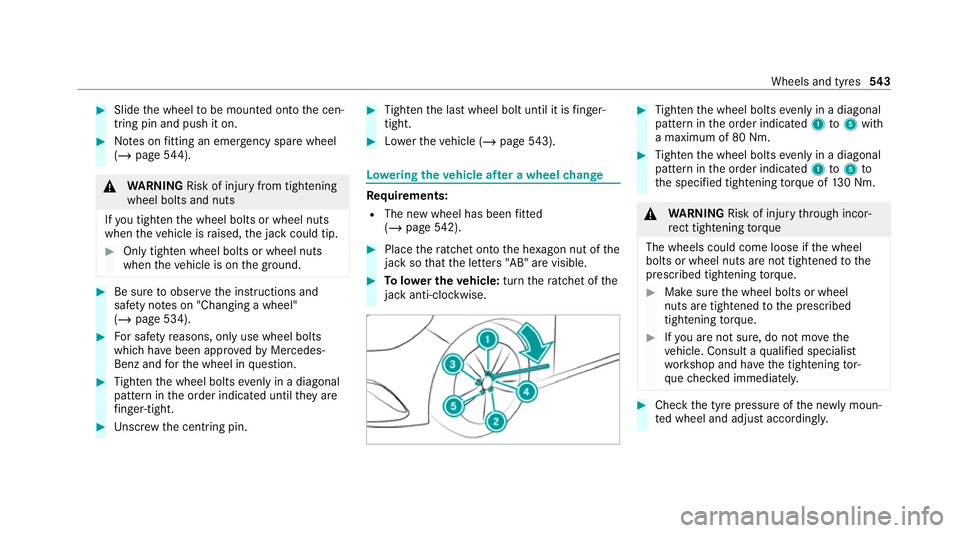
Tighten the wheel bolts evenly in a diagonal
pattern in the order indicated until they are
fi nger-tight. #
Unscr ew the cent ring pin. #
Tighten the last wheel bolt until it is finger-
tight. #
Lowe rth eve hicle (/ page543). Lo
weri ngtheve hicle af ter a wheel change Re
quirements:
R The new wheel has been fitted
(/ page 542). #
Place thera tchet onto the he xagon nut of the
jack so that the letters "AB" are visible. #
Tolowe r the vehicle: turnthera tchet of the
jack anti-clo ckwise. #
Tighten the wheel bolts evenly in a diagonal
pattern in the order indicated 1to5 with
a maximum of 80 Nm. #
Tighten the wheel bolts evenly in a diagonal
pattern in the order indicated 1to5 to
th e specified tightening torque of 130 Nm. &
WARNING Risk of inju rythro ugh incor‐
re ct tigh tening torque
The wheels could come loose if the wheel
bolts or wheel nuts are not tightened tothe
prescribed tightening torque. #
Makesure the wheel bolts or wheel
nuts are tightened tothe prescribed
tightening torque. #
Ifyo u are not sure, do not mo vethe
ve hicle. Consult a qualified specialist
wo rkshop and ha vethe tightening tor‐
qu ech ecked immediately. #
Check the tyre pressure of the newly moun‐
te d wheel and adjust according ly. Wheels and tyres
543