2019 MERCEDES-BENZ GLA transmission
[x] Cancel search: transmissionPage 22 of 346
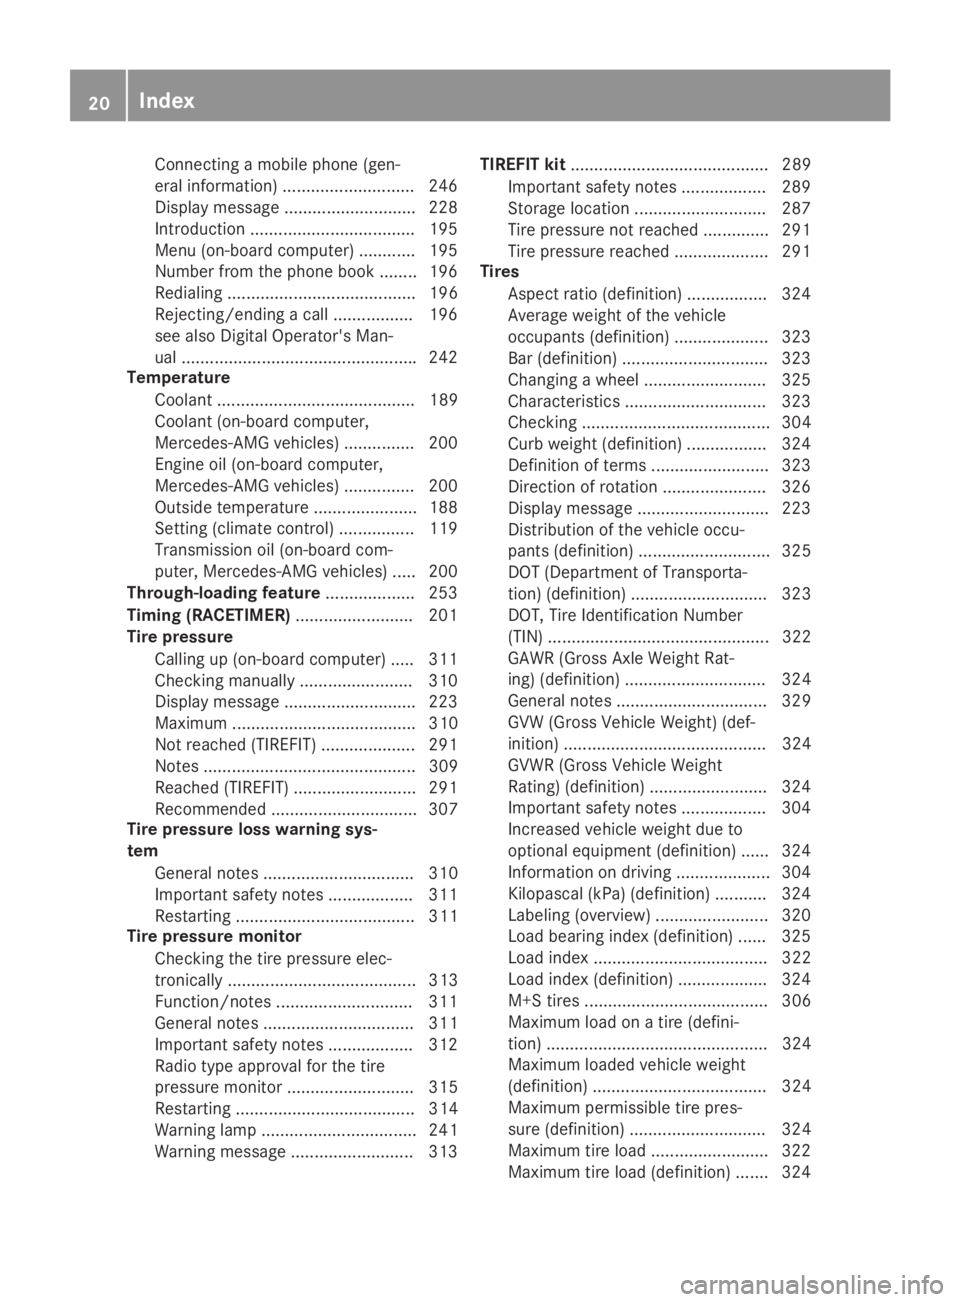
Connecting a mobile phone (gen-
eral information) ............................ 246
Display message ............................ 228
Introduction ...................................195
Menu (on-board computer) ............ 195
Number from the phone book ........196
Redialing ........................................ 196
Rejecting/ending a call ................. 196
see also Digital Operator's Man-
ual ..................................................242
Temperature
Coolant .......................................... 189
Coolant (on-board computer,
Mercedes-AMG vehicles) ...............200
Engine oil (on-board computer,
Mercedes-AMG vehicles) ...............200
Outside temperature ......................188
Setting (climate control) ................ 119
Transmission oil (on-board com-
puter, Mercedes-AMG vehicles) ..... 200
Through-loading feature................... 253
Timing (RACETIMER)......................... 201
Tire pressure
Calling up (on-board computer) ..... 311
Checking manually ........................ 310
Display message ............................ 223
Maximum ....................................... 310
Not reached (TIREFIT) .................... 291
Notes ............................................. 309
Reached (TIREFIT) .......................... 291
Recommended ............................... 307
Tire pressure loss warning sys-
tem
General notes ................................ 310
Important safety notes .................. 311
Restarting ...................................... 311
Tire pressure monitor
Checking the tire pressure elec-
tronically ........................................ 313
Function/notes .............................311
General notes ................................ 311
Important safety notes .................. 312
Radio type approval for the tire
pressure monitor ........................... 315
Restarting ...................................... 314
Warning lamp ................................. 241
Warning message .......................... 313
TIREFIT kit.......................................... 289
Important safety notes .................. 289
Storage location ............................ 287
Tire pressure not reached .............. 291
Tire pressure reached .................... 291
Tires
Aspect ratio (definition) ................. 324
Average weight of the vehicle
occupants (definition) .................... 323
Bar (definition) ............................... 323
Changing a wheel .......................... 325
Characteristics .............................. 323
Checking ........................................ 304
Curb weight (definition) ................. 324
Definition of terms ......................... 323
Direction of rotation...................... 326
Display message ............................ 223
Distribution of the vehicle occu-
pants (definition) ............................ 325
DOT (Department of Transporta-
tion) (definition) ............................. 323
DOT, Tire Identification Number
(TIN) ............................................... 322
GAWR (Gross Axle Weight Rat-
ing) (definition) .............................. 324
General notes ................................ 329
GVW (Gross Vehicle Weight) (def-
inition) ........................................... 324
GVWR (Gross Vehicle Weight
Rating) (definition) ......................... 324
Important safety notes .................. 304
Increased vehicle weight due to
optional equipment (definition) ...... 324
Information on driving .................... 304
Kilopascal (kPa) (definition) ........... 324
Labeling (overview) ........................ 320
Load bearing index (definition) ...... 325
Load index ..................................... 322
Load index (definition) ................... 324
M+S tires....................................... 306
Maximum load on a tire (defini-
tion) ............................................... 324
Maximum loaded vehicle weight
(definition) ..................................... 324
Maximum permissible tire pres-
sure (definition) ............................. 324
Maximum tire load ......................... 322
Maximum tire load (definition) ....... 324
20Index
Page 23 of 346
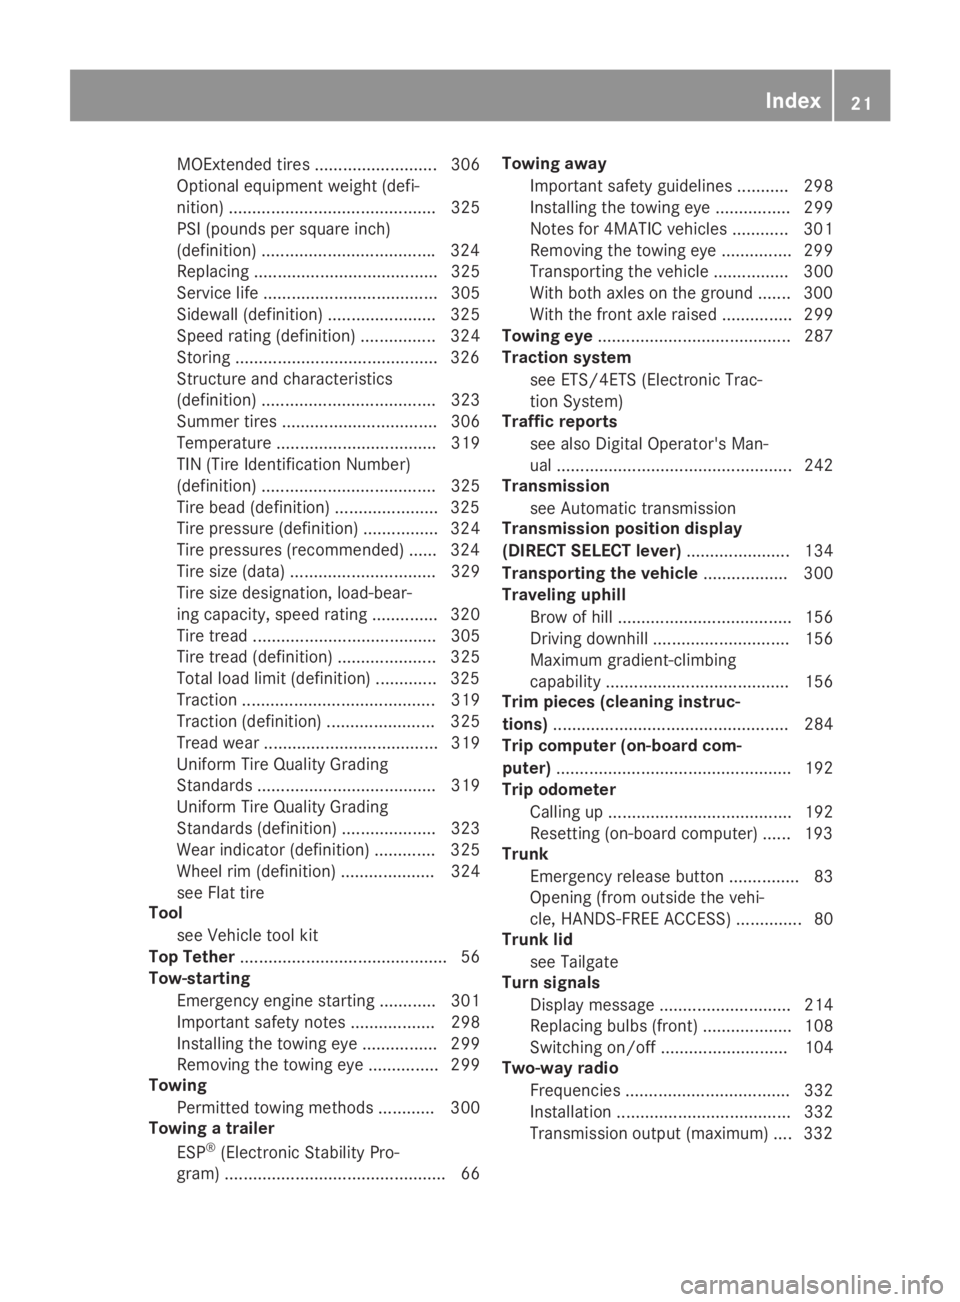
MOExtended tires .......................... 306
Optional equipment weight (defi-
nition) ............................................ 325
PSI (pounds per square inch)
(definition) .....................................324
Replacing ....................................... 325
Service life ..................................... 305
Sidewall (definition) ....................... 325
Speed rating (definition) ................ 324
Storing ...........................................326
Structure and characteristics
(definition) ..................................... 323
Summer tires ................................. 306
Temperature .................................. 319
TIN (Tire Identification Number)
(definition) ..................................... 325
Tire bead (definition) ......................325
Tire pressure (definition) ................ 324
Tire pressures (recommended) ...... 324
Tire size (data) ............................... 329
Tire size designation, load-bear-
ing capacity, speed rating .............. 320
Tire tread ....................................... 305
Tire tread (definition) ..................... 325
Total load limit (definition) ............. 325
Traction ......................................... 319
Traction (definition) ....................... 325
Tread wear..................................... 319
Uniform Tire Quality Grading
Standards ...................................... 319
Uniform Tire Quality Grading
Standards (definition) .................... 323
Wear indicator (definition) ............. 325
Wheel rim (definition) .................... 324
see Flat tire
Tool
see Vehicle tool kit
Top Tether............................................ 56
Tow-starting
Emergency engine starting ............ 301
Important safety notes .................. 298
Installing the towing eye ................ 299
Removing the towing eye ............... 299
Towing
Permitted towing methods ............ 300
Towing a trailer
ESP®(Electronic Stability Pro-
gram) ............................................... 66
Towing away
Important safety guidelines ........... 298
Installing the towing eye ................ 299
Notes for 4MATIC vehicles ............ 301
Removing the towing eye ............... 299
Transporting the vehicle ................ 300
With both axles on the ground ....... 300
With the front axle raised ............... 299
Towing eye......................................... 287
Traction system
see ETS/4ETS (Electronic Trac-
tion System)
Traffic reports
see also Digital Operator's Man-
ual .................................................. 242
Transmission
see Automatic transmission
Transmission position display
(DIRECT SELECT lever)...................... 134
Transporting the vehicle.................. 300
Traveling uphill
Brow of hill ..................................... 156
Driving downhill ............................. 156
Maximum gradient-climbing
capability ....................................... 156
Trim pieces (cleaning instruc-
tions).................................................. 284
Trip computer (on-board com-
puter).................................................. 192
Trip odometer
Calling up ....................................... 192
Resetting (on-board computer) ...... 193
Trunk
Emergency release button ............... 83
Opening (from outside the vehi-
cle, HANDS-FREE ACCESS) .............. 80
Trunk lid
see Tailgate
Turn signals
Display message ............................ 214
Replacing bulbs (front) ................... 108
Switching on/off........................... 104
Two-way radio
Frequencies ................................... 332
Installation ..................................... 332
Transmission output (maximum) .... 332
Index21
Page 27 of 346
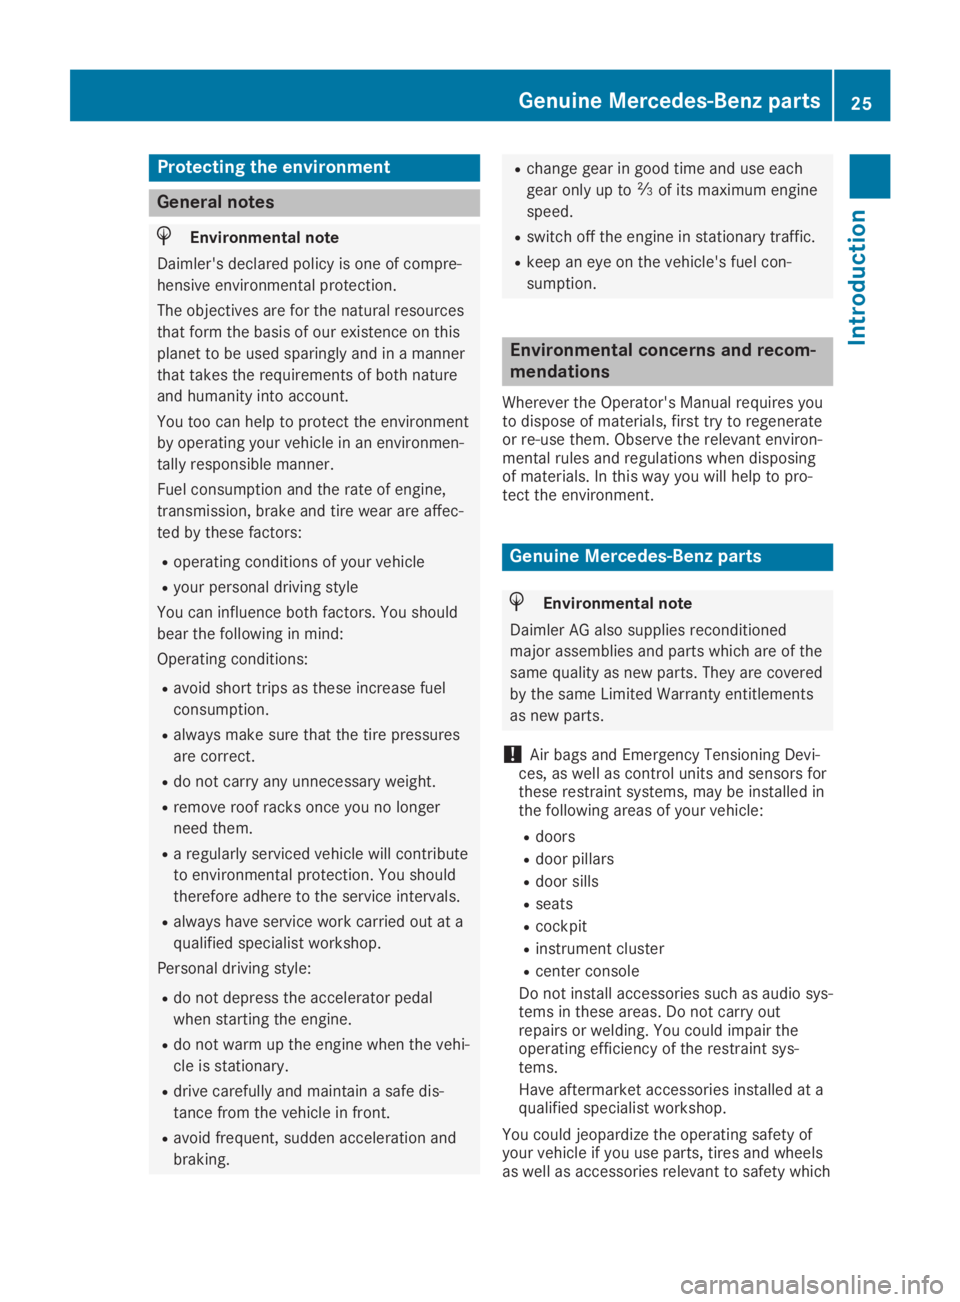
Protecting the environment
General notes
HEnvironmental note
Daimler's declared policy is one of compre-
hensive environmental protection.
The objectives are for the natural resources
that form the basis of our existence on this
planet to be used sparingly and in a manner
that takes the requirements of both nature
and humanity into account.
You too can help to protect the environment
by operating your vehicle in an environmen-
tally responsible manner.
Fuel consumption and the rate of engine,
transmission, brake and tire wear are affec-
ted by these factors:
Roperating conditions of your vehicle
Ryour personal driving style
You can influence both factors. You should
bear the following in mind:
Operating conditions:
Ravoid short trips as these increase fuel
consumption.
Ralways make sure that the tire pressures
are correct.
Rdo not carry any unnecessary weight.
Rremove roof racks once you no longer
need them.
Ra regularly serviced vehicle will contribute
to environmental protection. You should
therefore adhere to the service intervals.
Ralways have service work carried out at a
qualified specialist workshop.
Personal driving style:
Rdo not depress the accelerator pedal
when starting the engine.
Rdo not warm up the engine when the vehi-
cle is stationary.
Rdrive carefully and maintain a safe dis-
tance from the vehicle in front.
Ravoid frequent, sudden acceleration and
braking.
Rchange gear in good time and use each
gear only up to�
Page 56 of 346
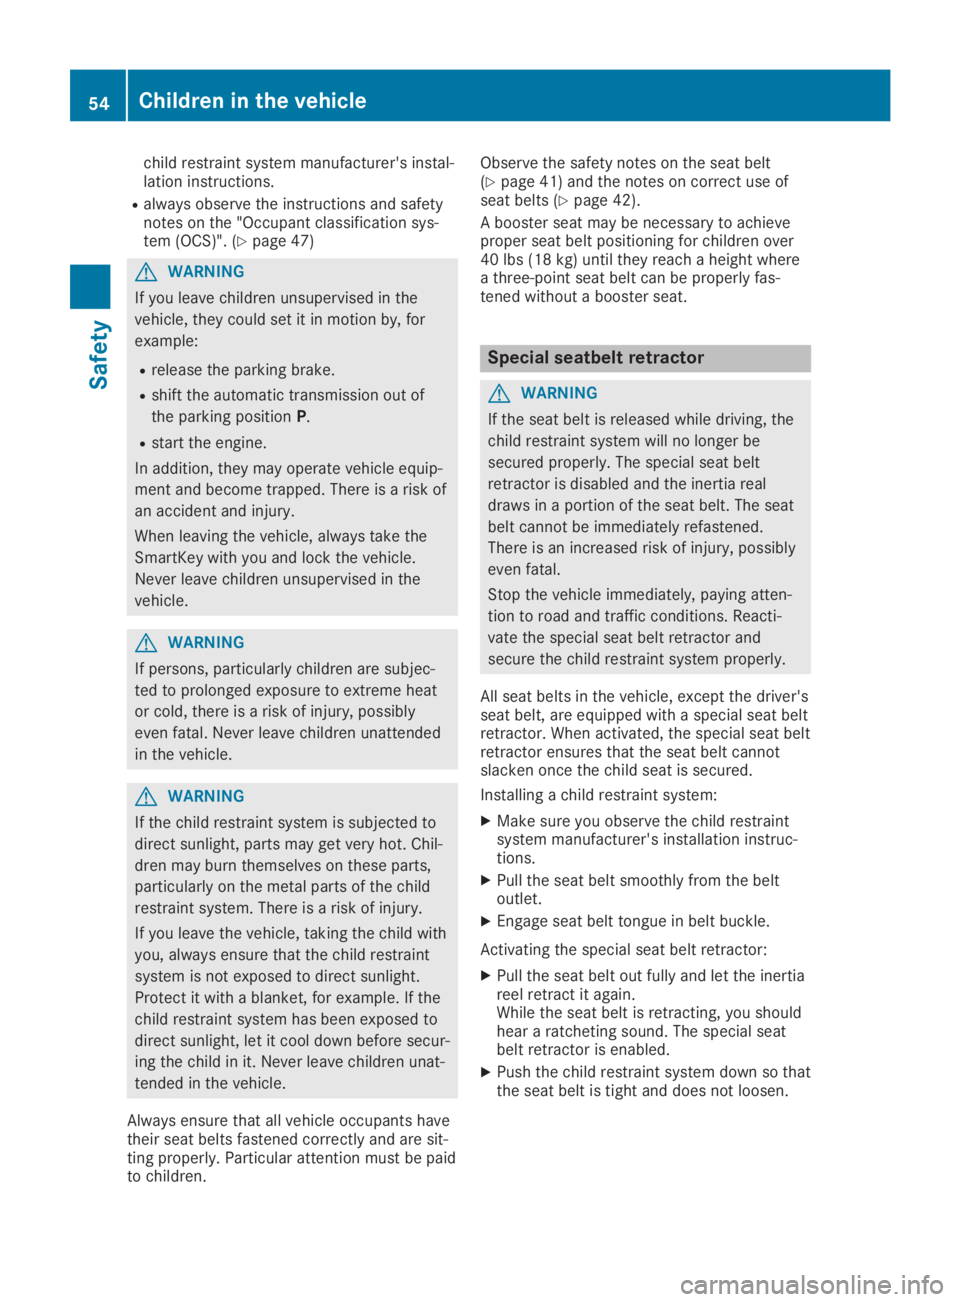
child restraint system manufacturer's instal-lation instructions.
Ralways observe the instructions and safetynotes on the "Occupant classification sys-tem (OCS)". (Ypage 47)
GWARNING
If you leave children unsupervised in the
vehicle, they could set it in motion by, for
example:
Rrelease the parking brake.
Rshift the automatic transmission out of
the parking positionP.
Rstart the engine.
In addition, they may operate vehicle equip-
ment and become trapped. There is a risk of
an accident and injury.
When leaving the vehicle, always take the
SmartKey with you and lock the vehicle.
Never leave children unsupervised in the
vehicle.
GWARNING
If persons, particularly children are subjec-
ted to prolonged exposure to extreme heat
or cold, there is a risk of injury, possibly
even fatal. Never leave children unattended
in the vehicle.
GWARNING
If the child restraint system is subjected to
direct sunlight, parts may get very hot. Chil-
dren may burn themselves on these parts,
particularly on the metal parts of the child
restraint system. There is a risk of injury.
If you leave the vehicle, taking the child with
you, always ensure that the child restraint
system is not exposed to direct sunlight.
Protect it with a blanket, for example. If the
child restraint system has been exposed to
direct sunlight, let it cool down before secur-
ing the child in it. Never leave children unat-
tended in the vehicle.
Always ensure that all vehicle occupants havetheir seat belts fastened correctly and are sit-ting properly. Particular attention must be paidto children.
Observe the safety notes on the seat belt(Ypage 41) and the notes on correct use ofseat belts (Ypage 42).
A booster seat may be necessary to achieveproper seat belt positioning for children over40 lbs (18 kg) until they reach a height wherea three-point seat belt can be properly fas-tened without a booster seat.
Special seatbelt retractor
GWARNING
If the seat belt is released while driving, the
child restraint system will no longer be
secured properly. The special seat belt
retractor is disabled and the inertia real
draws in a portion of the seat belt. The seat
belt cannot be immediately refastened.
There is an increased risk of injury, possibly
even fatal.
Stop the vehicle immediately, paying atten-
tion to road and traffic conditions. Reacti-
vate the special seat belt retractor and
secure the child restraint system properly.
All seat belts in the vehicle, except the driver'sseat belt, are equipped with a special seat beltretractor. When activated, the special seat beltretractor ensures that the seat belt cannotslacken once the child seat is secured.
Installing a child restraint system:
XMake sure you observe the child restraintsystem manufacturer's installation instruc-tions.
XPull the seat belt smoothly from the beltoutlet.
XEngage seat belt tongue in belt buckle.
Activating the special seat belt retractor:
XPull the seat belt out fully and let the inertiareel retract it again.While the seat belt is retracting, you shouldhear a ratcheting sound. The special seatbelt retractor is enabled.
XPush the child restraint system down so thatthe seat belt is tight and does not loosen.
54Children in the vehicle
Safety
Page 60 of 346
you install the child restraint system on a rearseat.
If it is absolutely necessary to install a childrestraint system on the front-passenger seat,always observe the instructions and safetynotes on the "Occupant Classification System(OCS)" (Ypage 47).
You can thus avoid the risks that could ariseas a result of:
Ran incorrectly categorized person in thefront-passenger seat
Rdeactivating the front passenger front airbag unintentionally
Rthe unsuitable positioning of the childrestraint system, e.g. too close to the dash-board
Rearward-facing child restraint system
If circumstances require you to secure a childin a rearward-facing child restraint system onthe front-passenger seat, always make surethat the front passenger front air bag is deacti-vated. Only if the PASSENGER AIR BAG OFFindicator lamp is lit continuously (Ypage 40),is the front passenger front air bag deactiva-ted.
Always observe the child restraint systemmanufacturer's installation and operatinginstructions.
Forward-facing child restraint system
If it is absolutely necessary to install aforward-facing child restraint system on thefront-passenger seat, always move the front-passenger seat as far back as possible. Fullyretract the seat cushion length. The entirebase of the child restraint system must alwaysrest on the seat cushion of the front-passenger seat. The backrest of the childrestraint system must lie as flat as possibleagainst the backrest of the front-passengerseat. The child restraint system must nottouch the roof or be subjected to a load by thehead restraint. Adjust the angle of the seatbackrest and the head restraint positionaccordingly. Always make sure that the shoul-der belt strap is correctly routed from the vehi-cle belt outlet to the shoulder belt guide onthe child restraint system. The shoulder beltstrap must be routed forward and down fromthe vehicle belt outlet. If necessary, adjust the
vehicle belt outlet and the front-passengerseat accordingly.
Always observe the child restraint systemmanufacturer's installation and operatinginstructions.
Child-proof locks
Important safety notes
GWARNING
If children are traveling in the vehicle, they
could:
Ropen doors, thus endangering other peo-
ple or road users
Rexit the vehicle and be caught by oncom-
ing traffic
Roperate vehicle equipment and become
trapped
There is a risk of an accident and injury.
Always activate the child-proof locks and
override feature if children are traveling in
the vehicle. When leaving the vehicle,
always take the key with you and lock the
vehicle. Never leave children unattended in
the vehicle.
Override feature for:
Rthe rear doors (Ypage 59)
Rthe rear side windows (Ypage 59)
GWARNING
If you leave children unsupervised in the
vehicle, they could set it in motion by, for
example:
Rrelease the parking brake.
Rshift the automatic transmission out of
the parking positionP.
Rstart the engine.
In addition, they may operate vehicle equip-
ment and become trapped. There is a risk of
an accident and injury.
When leaving the vehicle, always take the
SmartKey with you and lock the vehicle.
Never leave children unsupervised in the
vehicle.
58Children in the vehicle
Safety
Page 65 of 346
Situation-dependent braking assis-
tance
General information
iObserve the "Important safety notes" sec-tion (Ypage 60).
With the help of the radar sensor system,Active Brake Assist can detect obstacles thatare in the path of your vehicle for an extendedperiod of time.
If Active Brake Assist detects a risk of collisionwith the vehicle in front, it calculates the brakepressure necessary to avoid a collision. If youapply the brakes forcefully, situation-depend-ent braking assistance adapts to the situationand automatically increases the brake pres-sure to a degree appropriate to the traffic sit-uation.
Situation-dependent braking assistance pro-vides braking assistance in hazardous situa-tions at speeds above 4 mph (7 km/h). It usesradar sensor technology to assess the trafficsituation.
Situation-dependent braking assistance iscapable of reacting to moving objects thathave already been detected as such at leastonce over the period of observation, up tovehicle speeds of around 155 mph(250 km/h).
Situation-dependent braking assistance canalso detect stationary objects, up to vehiclespeeds of around 44 mph (70 km/h).
XKeep the brake pedal depressed until theemergency braking situation is over.ABS prevents the wheels from locking.
The brakes will work normally again if:
Ryou release the brake pedal
Rthere is no longer any danger of a collision
Rno obstacle is detected in front of your vehi-cle
Situation-dependent braking assistance is thendeactivated.
Important safety notes
iObserve the "Important safety notes" sec-tion for driving safety systems (Ypage 60).
GWARNING
Active Brake Assist does not react:
Rto persons, bicycles, motorcycles or ani-
mals
Rto approaching vehicles
Rto cross traffic
Ron bends
As a result, Active Brake Assist cannot inter-
vene in all critical situations. There is a risk
of an accident.
Always pay careful attention to the traffic
situation and be prepared to brake.
GWARNING
Adaptive Brake Assist cannot always clearly
identify objects and complex traffic situa-
tions.
In such cases, Adaptive Brake Assist might:
Rintervene unnecessarily
Rnot intervene
There is a risk of an accident.
Always pay careful attention to the traffic
situation and be ready to brake. Terminate
the intervention in a non-critical driving sit-
uation.
Due to the nature of the system, complex butnon-critical driving conditions may also causeActive Brake Assist to intervene.
Even if Active Brake Assist is not available dueto a malfunction in the radar sensor system,the brake system is still available with fullbrake boosting effect and BAS.
ESP®(Electronic Stability Program)
General notes
iObserve the "Important safety notes" sec-tion (Ypage 60).
ESP®monitors driving stability and traction,i.e. power transmission between the tires andthe road surface.
If ESP®detects that the vehicle is deviatingfrom the direction desired by the driver, one ormore wheels are braked to stabilize the vehi-
Driving safety systems63
Safety
Z
Page 71 of 346
SmartKey
Important safety notes
GWARNING
If children are left unsupervised in the vehi-
cle, they could:
Roperate the vehicle's equipment
Additionally, children could set the vehicle in
motion if, for example, they:
Rrelease the parking brake
Rshift the automatic transmission out of
park position�]
Rstart the engine
There is a risk of an accident and injury.
Never leave children or animals unattended
in the vehicle.
When leaving the vehicle, always take the
SmartKey with you and lock the vehicle. This
also applies for the Digital Vehicle Key if the
"Digital Vehicle Key" function is activated via
Mercedes me connect.
GWARNING
If you attach heavy or large objects to the
SmartKey, the SmartKey could be uninten-
tionally turned in the ignition lock. This
could cause the engine to be switched off.
There is a risk of an accident.
Do not attach any heavy or large objects to
the SmartKey. Remove any bulky key rings
before inserting the SmartKey into the igni-
tion lock.
!Keep the SmartKey away from strong mag-netic fields. Otherwise, the remote controlfunction could be affected.
Strong magnetic fields can occur in thevicinity of powerful electrical installations.
Do not keep the SmartKey:
Rwith electronic devices, e.g. a mobile phoneor another SmartKey
Rwith metallic objects, e.g. coins or metal foil
Rinside metallic objects, e.g. a metal case
Vehicles with KEYLESS-GO start function:do not keep the SmartKey in the cargo com-
partment. Otherwise, the SmartKey may notbe detected, e.g. when starting the engineusing the Start/Stop button.
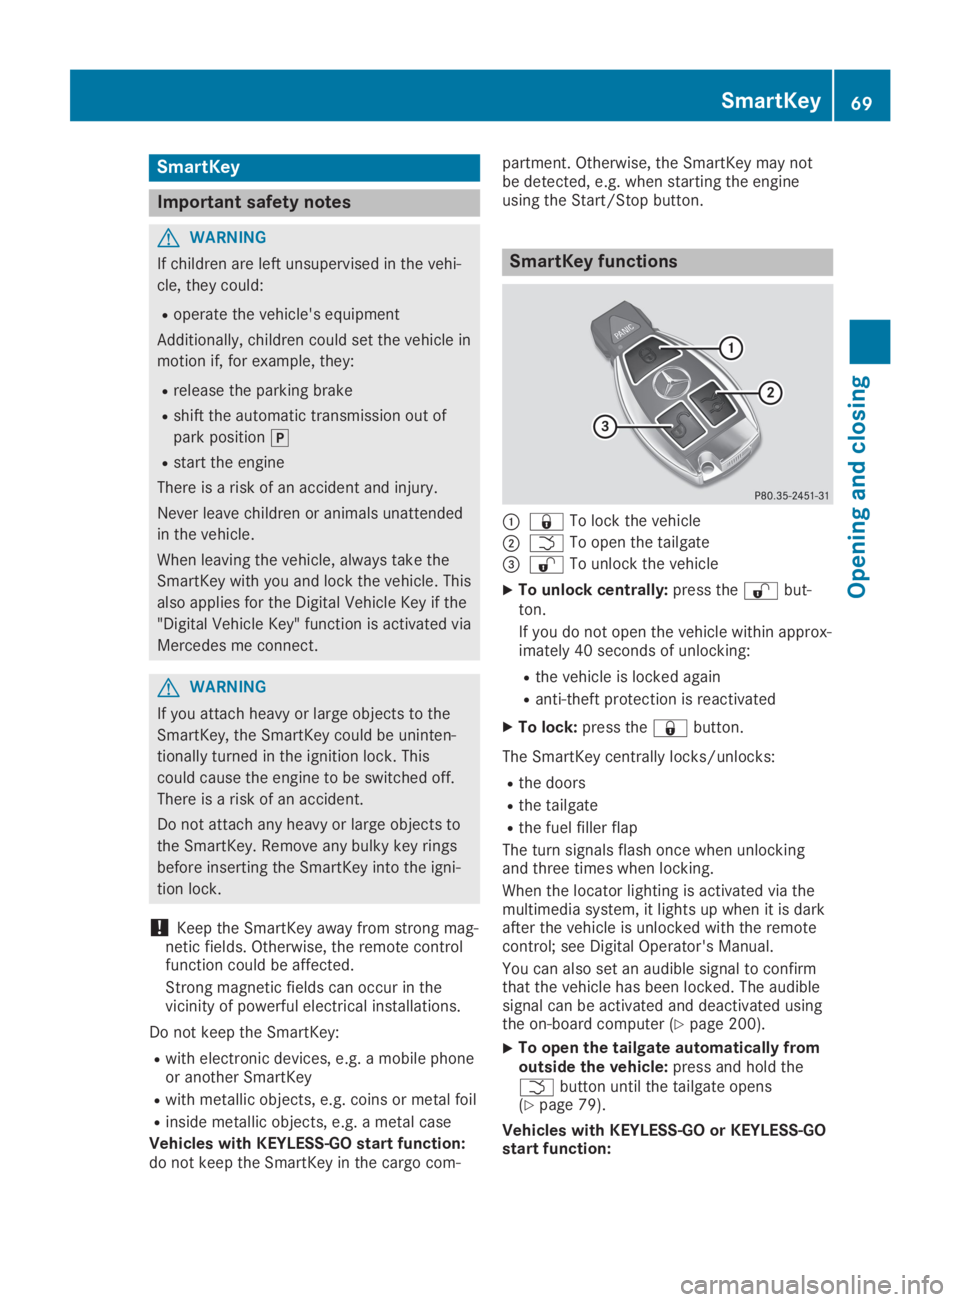
SmartKey functions
�C�7To lock the vehicle
�D�TTo open the tailgate
�
Page 77 of 346
ProblemPossible causes/consequences and�P�PSolutions
You have lost a Smart-Key.XHave the SmartKey deactivated at a qualified specialist work-shop.
XReport the loss immediately to the vehicle insurers.
XIf necessary, have the locks changed as well.
You have lost themechanical key.XReport the loss immediately to the vehicle insurers.
XIf necessary, have the locks changed as well.
Doors
Important safety notes
GWARNING
If children are left unsupervised in the vehi-
cle, they could:
Roperate the vehicle's equipment
Additionally, children could set the vehicle in
motion if, for example, they:
Rrelease the parking brake
Rshift the automatic transmission out of
park position�]
Rstart the engine
There is a risk of an accident and injury.
Never leave children or animals unattended
in the vehicle.
When leaving the vehicle, always take the
SmartKey with you and lock the vehicle. This
also applies for the Digital Vehicle Key if the
"Digital Vehicle Key" function is activated via
Mercedes me connect.
You should preferably place luggage or loadsin the cargo compartment. Observe the load-ing guidelines (Ypage 250).
Unlocking and opening doors from
the inside
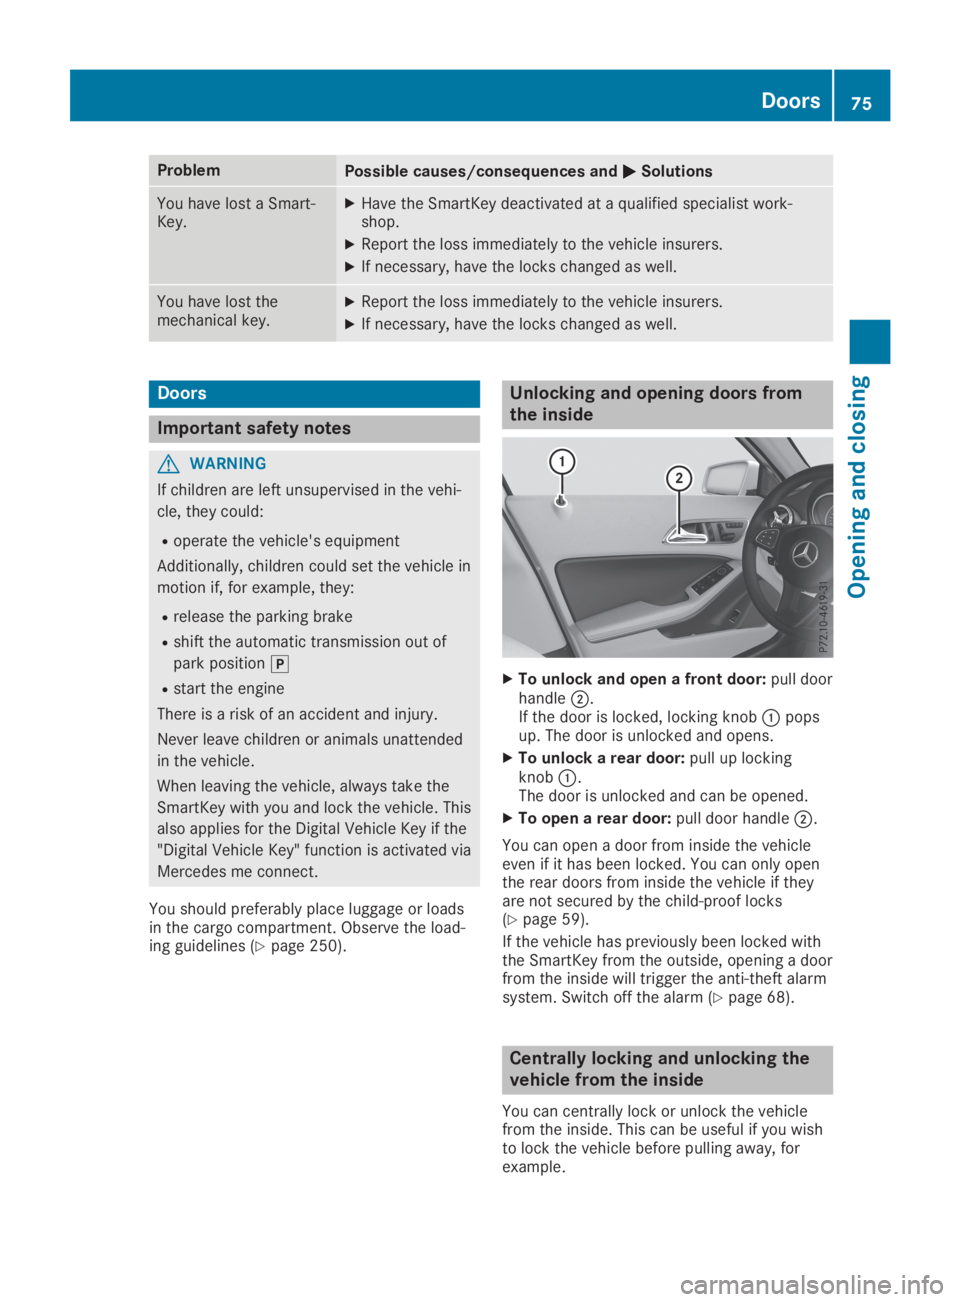
XTo unlock and open a front door:pull doorhandle�D.If the door is locked, locking knob�Cpopsup. The door is unlocked and opens.
XTo unlock a rear door:pull up lockingknob�C.The door is unlocked and can be opened.
XTo open a rear door:pull door handle�D.
You can open a door from inside the vehicleeven if it has been locked. You can only openthe rear doors from inside the vehicle if theyare not secured by the child-proof locks(Ypage 59).
If the vehicle has previously been locked withthe SmartKey from the outside, opening a doorfrom the inside will trigger the anti-theft alarmsystem. Switch off the alarm (Ypage 68).
Centrally locking and unlocking the
vehicle from the inside
You can centrally lock or unlock the vehiclefrom the inside. This can be useful if you wishto lock the vehicle before pulling away, forexample.
Doors75
Opening and closing
Z