2019 MERCEDES-BENZ EQC SUV steering
[x] Cancel search: steeringPage 106 of 629
Ad
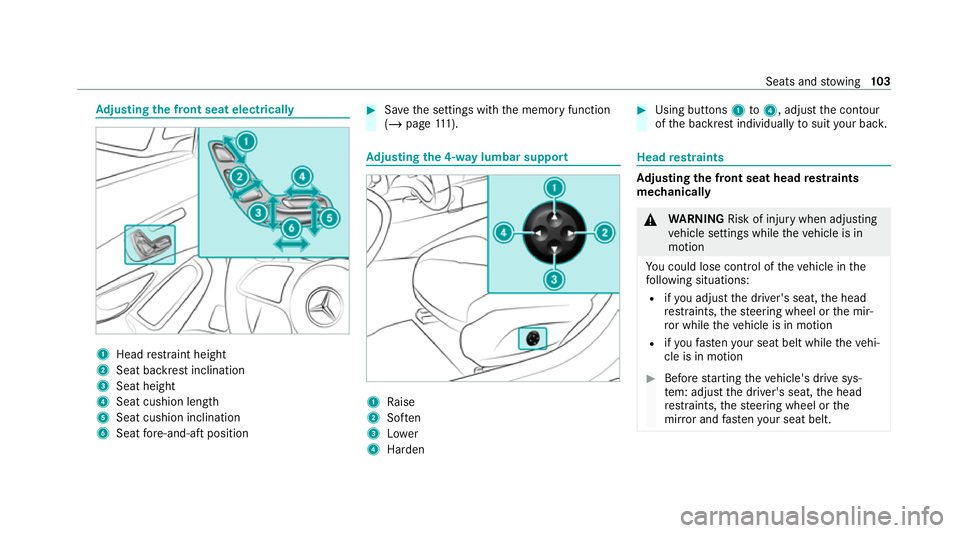
justing the front seat electrically 1
Head restra int height
2 Seat backrest inclination
3 Seat height
4 Seat cushion length
5 Seat cushion inclination
6 Seat fore -and-aft position #
Save the settings with the memory function
(/ page 111). Ad
justing the 4-w aylumbar support 1
Raise
2 Soften
3 Lower
4 Harden #
Using buttons 1to4 , adjust the conto ur
of the backrest individually tosuit your bac k. Head
restra ints Ad
justing the front seat head restra ints
mechanically &
WARNING Risk of inju rywhen adjusting
ve hicle settings while theve hicle is in
motion
Yo u could lose cont rol of theve hicle in the
fo llowing situations:
R ifyo u adjust the driver's seat, the head
re stra ints, thesteering wheel or the mir‐
ro r while theve hicle is in motion
R ifyo ufast enyour seat belt while theve hi‐
cle is in motion #
Before starting theve hicle's drive sys‐
te m: adju stthe driver's seat, the head
re stra ints, thesteering wheel or the
mir ror and fastenyour seat belt. Seats and
stowing 103
Page 111 of 629
#
Toswitch off / reduce the le vel:press but‐
to n1 repeatedly until the desired heating
le ve l is set.
If all indicator lamps are off, the seat heating
is switched off.
% The seat heating will automatically switch
down from theth re e heating le vels af ter 8,
10 and 20 minutes until the seat heating is
switched off. Setting
the panel heating Multimedia sy
stem:
4 © 5
Settings 5
Vehicle
5 Panel heating
When the seat heater is switched on, the armr‐
ests, the cent repanels of the doors and the
centre console can be hea ted. #
Switch the function forth e desired seats on
or off. Switching
the seat ventilation on/off Re
quirements: R
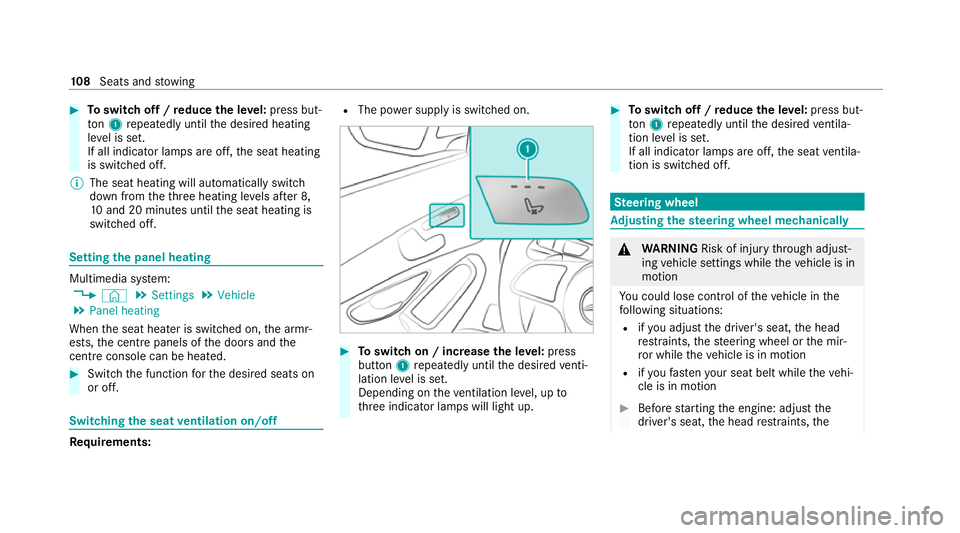
The po wer supply is switched on. #
Toswitch on / increase the le vel:press
button 1repeatedly until the desired venti‐
lation le vel is set.
Depending on theve ntilation le vel, up to
th re e indicator lamps will light up. #
Toswitch off / reduce the le vel:press but‐
to n1 repeatedly until the desired ventila‐
tion le vel is set.
If all indicator lamps are off, the seat ventila‐
tion is switched off. Ste
ering wheel Ad
justing the steering wheel mechanically &
WARNING Risk of inju rythro ugh adjust‐
ing vehicle settings while theve hicle is in
motion
Yo u could lose cont rol of theve hicle in the
fo llowing situations:
R ifyo u adjust the driver's seat, the head
re stra ints, thesteering wheel or the mir‐
ro r while theve hicle is in motion
R ifyo ufast enyour seat belt while theve hi‐
cle is in motion #
Before starting the engine: adjust the
driver's seat, the head restra ints, the 108
Seats and stowing
Page 112 of 629
st
eering wheel or the mir ror and fasten
yo ur seat belt. &
WARNING Risk of entrapment forch il‐
dren when adjusting thesteering wheel
Children could injure themselves if they
adjust thesteering wheel. #
Never lea vechildren unat tended in the
ve hicle. #
When leaving theve hicle, alw aysta ke
th eke y with you and lock theve hicle.
This also applies tothe digital vehicle
ke y if the "Digital Vehicle Key" function
is activated via Mercedes me connect. #
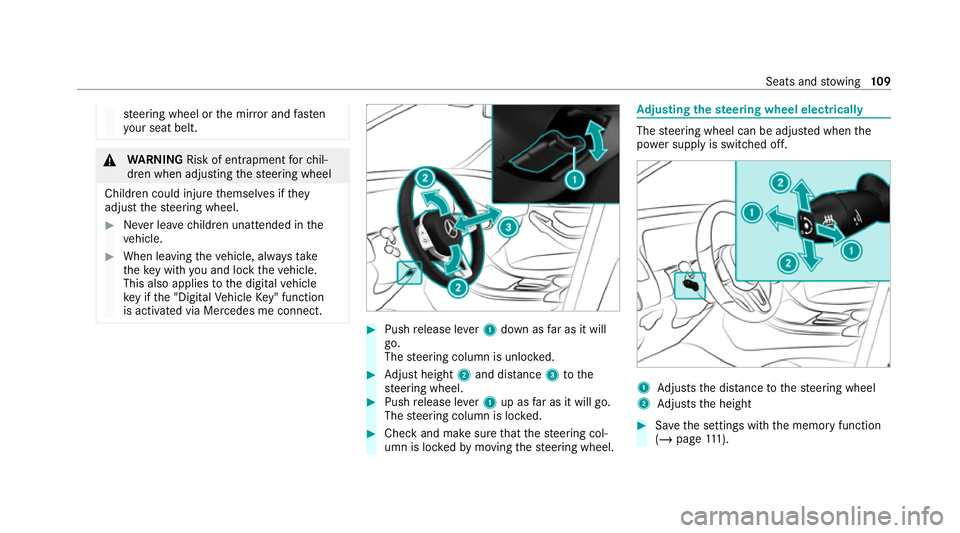
Push release le ver1 down as far as it will
go.
The steering column is unloc ked. #
Adjust height 2and di stance 3tothe
st eering wheel. #
Push release le ver1 up as far as it will go.
The steering column is loc ked. #
Check and make sure that thesteering col‐
umn is loc kedby moving thesteering wheel. Ad
justing the steering wheel electrically The
steering wheel can be adjus ted when the
po we r supp lyis switched off. 1
Adjusts the dis tance tothesteering wheel
2 Adjusts the height #
Save the settings with the memory function
(/ page 111). Se
ats and stowing 109
Page 113 of 629

Switching
thest eering wheel heater on/off Re
quirements:
R The ignition is switched on. #
Turn the le ver in the direction of ar row1or
2.
If th e indicator lamp 3lights up, thesteer‐
ing wheel heater is switched on. When
you swit ch the ignition off, thesteering
wheel heater will switch off. Easy entry and
exitfeature Using
the easy entry and exitfeature &
WARNING Risk of accident when pulling
aw ay during the adjustment process of
th e easy exitfeature
‑ If you pull away while the easy entry and
ex itfeature is making adjustments, you could
lose cont rol of theve hicle. #
Alw ayswa it until the adjustment proc‐
ess is comple tebefore pulling away. &
WARNING Risk of becoming trapped
while adjusting the easy entry andexit
fe ature
When the easy entry andexitfeature adjusts
th esteering wheel and the driver's seat, you
and other vehicle occupants – particular ly
ch ildren – could become trapped. #
During the adjustment process forthe
easy entry andexitfeature, make sure
th at no one has any body parts in the
sweep of thesteering wheel or the driv‐
er's seat.
If th ere is a risk of becoming trapped bythe
st eering wheel: #
Movethe adjustment le ver of thesteer‐
ing wheel.
The adjustment process is stopped.
If th ere is a risk of becoming trapped bythe
driver's seat: #
Press the seat adjustment switch.
The adjustment process is stopped. #
Never lea vechildren unat tended in the
ve hicle. #
When leaving theve hicle, alw aysta ke
th eke y with you and lock theve hicle.
This also applies tothe digital vehicle
ke y if the "Digital Vehicle Key" function
is activated via Mercedes me connect. 11 0
Seats and stowing
Page 114 of 629
Ve
hicles with memory function: you can stop
th e adjustment process bypressing one of the
memory function position switches. &
WARNING Risk of becoming trapped
du ring acti vation of the easy entry and
ex itfeature bychildren
If ch ildren activate the easy entry andexit
fe ature, they can become trapped, pa rticu‐
lar lywhen unat tended. #
Never lea vechildren unat tended in the
ve hicle. #
When leaving theve hicle, alw aysta ke
th eke y with you and lock theve hicle. This also applies
tothe Digital Vehicle Key if the
"Digital Vehicle Key" function is activated via
Mercedes me connect.
If th e easy entry andexitfeature is active, the
st eering wheel will mo veupwards and the driv‐
er's seat will mo veback in thefo llowing situa‐
tions:
R you swit chthe ignition off with the driver's
door open R
you open the driver's door with the ignition
switched off
% The steering wheel will mo veupwards on lyif
it is not already as high as it will go. The driv‐
er's seat will mo vebackwards only if it is not
already in there armost position.
The steering wheel and the driver's seat will
mo veback tothe last drive position in thefo l‐
lowing cases:
R you swit chthe po wer supp lyor the ignition
on when the driver's door is closed
R you close the driver's door with the ignition
switched on
The last drive position will be stored when:
R you swit chthe ignition off
R vehicles with memory function: you call
up the seat settings via the memory function.
R vehicles with memory function: you sa ve
th e seat settings via the memory function.
Ve hicles with memory function: press one of
th e memory function sa ved position buttons to
st op the adjustment process. Operating
the memory function &
WARNING Risk of an accident if the
memory function is used while driving
If yo u use the memory function on the driv‐
er's side while driving, you could lose cont rol
of theve hicle as a result of the adjustments
being made. #
Only use the memory function on the
driver's side when theve hicle is station‐
ar y. &
WARNING Risk of entrapment when set‐
ting the seat with the memory function
When the memory function adjusts the seat
or steering wheel, you and other vehicle
occupants – particularly children – could
become trapped. #
During the setting procedure of the
memory function, ensure that no body
parts are in the sweep of the seat or
th esteering wheel. Seats and
stowing 111
Page 115 of 629
#
If somebody becomes trapped, immedi‐
ately release the memory function posi‐
tion button.
The adjustment process is stopped. &
WARNING Risk of entrapment if the
memory function is activated bychildren
Children could become trapped if they acti‐
va te the memory function, particularly when
unattended. #
Never lea vechildren unat tended in the
ve hicle. #
When leaving theve hicle, alw aysta ke
th eke y with you and lock theve hicle. This also applies
tothe Digital Vehicle Key if the
"Digital Vehicle Key" function is activated via
Mercedes me connect.
The memory function can be used when the igni‐
tion is switched off.
St oring
Seat adjustments for up tothre e people can be
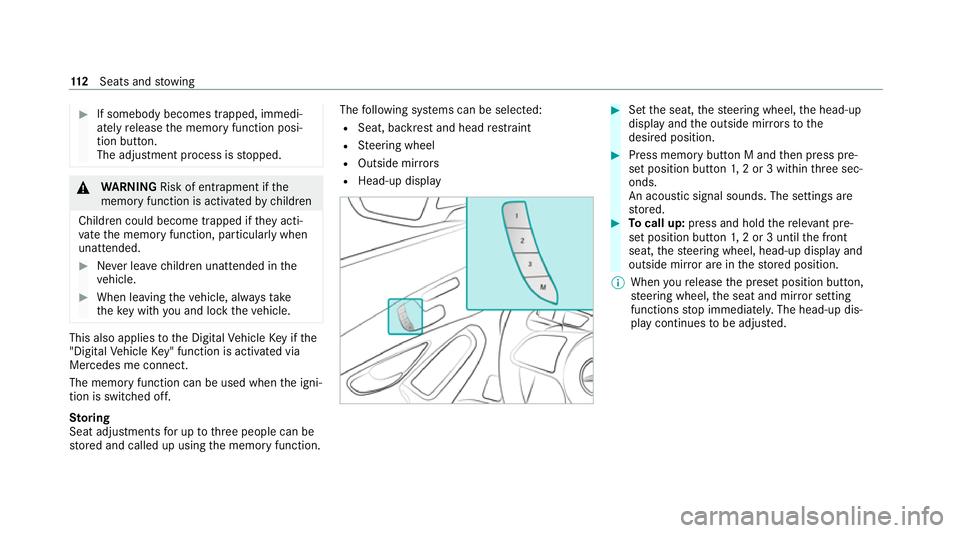
st ored and called up using the memory function. The
following sy stems can be selected:
R Seat, backrest and head restra int
R Steering wheel
R Outside mir rors
R Head-up display #
Set the seat, thesteering wheel, the head-up
display and the outside mir rors to the
desired position. #
Press memory button M and then press pre‐
set position button 1,2 or 3 within thre e sec‐
onds.
An acoustic signal sounds. The settings are
st ored. #
Tocall up: press and hold there leva nt pre‐
set position button 1,2 or 3 until the front
seat, thesteering wheel, head-up display and
outside mir ror are in thestored position.
% When youre lease the preset position button,
st eering wheel, the seat and mir ror setting
functions stop immediatel y.The head-up dis‐
play continues tobe adjus ted. 11 2
Seats and stowing
Page 128 of 629
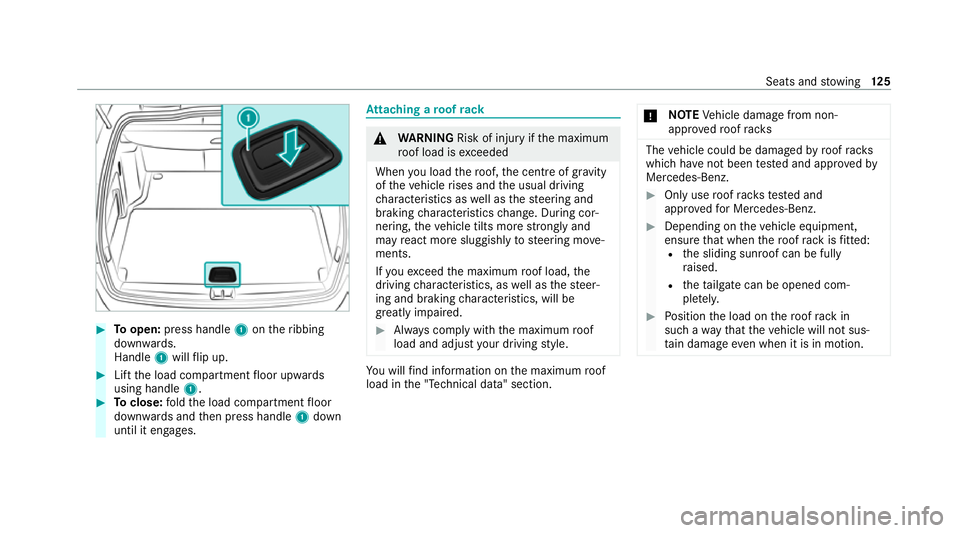
#
Toopen: press handle 1ontheribbing
down wards.
Handle 1will flip up. #
Lift the load compartment floor upwards
using handle 1. #
Toclose: fold the load compartment floor
down wards and then press handle 1down
until it engages. At
taching a roof rack &
WARNING Risk of inju ryifth e maximum
ro of load is exceeded
When you load thero of, the cent reof gr avity
of theve hicle rises and the usual driving
ch aracteristics as well as thesteering and
braking characteristics change. During cor‐
nering, theve hicle tilts more strongly and
may react more sluggishly tosteering mo ve‐
ments.
If yo uexc eed the maximum roof load, the
driving characteristics, as well as thesteer‐
ing and braking characteristics, will be
great lyimpaired. #
Alw ays comply with the maximum roof
load and adjust your driving style. Yo
u will find information on the maximum roof
load in the "Technical data" section. *
NO
TEVehicle damage from non-
appr ovedro of racks The
vehicle could be damaged byroof racks
which ha venot been tested and appr ovedby
Mercedes-Benz. #
Only use roof rack ste sted and
appr ovedfo r Mercedes-Benz. #
Depending on theve hicle equipment,
ensure that when thero of rack isfitted:
R the sliding sunroof can be fully
ra ised.
R theta ilgate can be opened com‐
ple tely. #
Position the load on thero of rack in
such a wayth at theve hicle will not sus‐
ta in damage even when it is in motion. Seats and
stowing 12 5
Page 140 of 629
When
you pull away again, the hazard warning
lamps will switch off automatically at appr ox‐
imately 10km/h. You can also swit choff the
hazard warning lamps using button 1.Ad
aptive functions, MULTIBEAM LED Fu
nctions of the Intelligent Light Sy stem
The MULTIBEAM LED headlamps adapt tothe
driving and weather situation and pr ovide exten‐
ded functions for impr oved illumination of the
ro ad.
The sy stem comprises thefo llowing functions:
R Active headla mps (/ page137)
R Cor nering light (/ page 137)
R Motorw ay mode (/ page138)
R City lighting (/ page138)
Sy stem limits
R The sy stem is active only when it is dar k.Ac
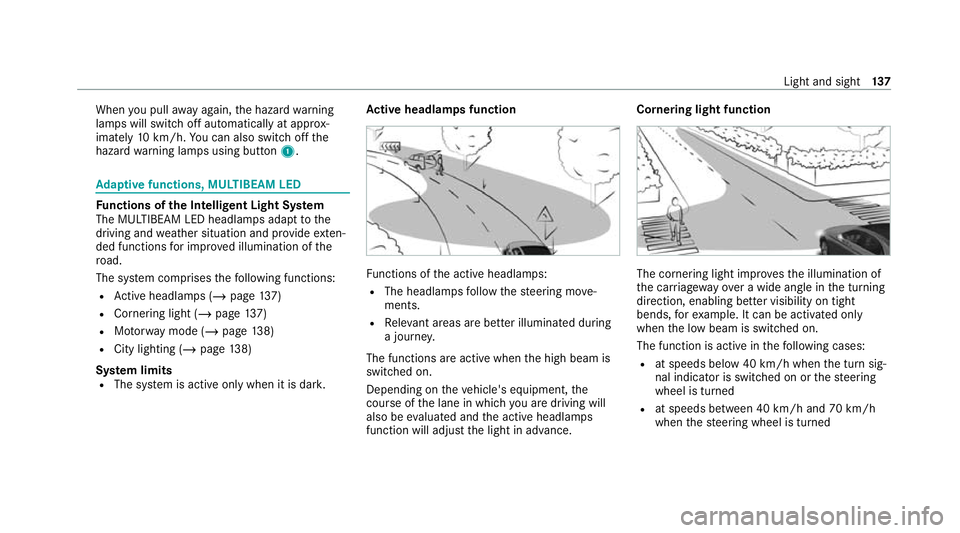
tive headlamps function Fu
nctions of the active headlamps:
R The headlamps follow thesteering mo ve‐
ments.
R Releva nt areas are better illumina ted during
a journe y.
The functions are active when the high beam is
switched on.
Depending on theve hicle's equipment, the
cou rse of the lane in which you are driving will
also be evaluated and the active headlamps
function will adjust the light in advance. Cornering light function
The cornering light impr
ovesth e illumination of
th e car riag ewa yove r a wide angle in the turning
direction, enabling better visibility on tight
bends, forex ample. It can be activated on ly
when the low beam is switched on.
The function is active in thefo llowing cases:
R at speeds below 40 km/h when the turn sig‐
nal indicator is switched on or thesteering
wheel is turned
R at speeds between 40 km/h and 70 km/h
when thesteering wheel is turned Light and sight
137