2019 MERCEDES-BENZ CLA COUPE dimensions
[x] Cancel search: dimensionsPage 235 of 645
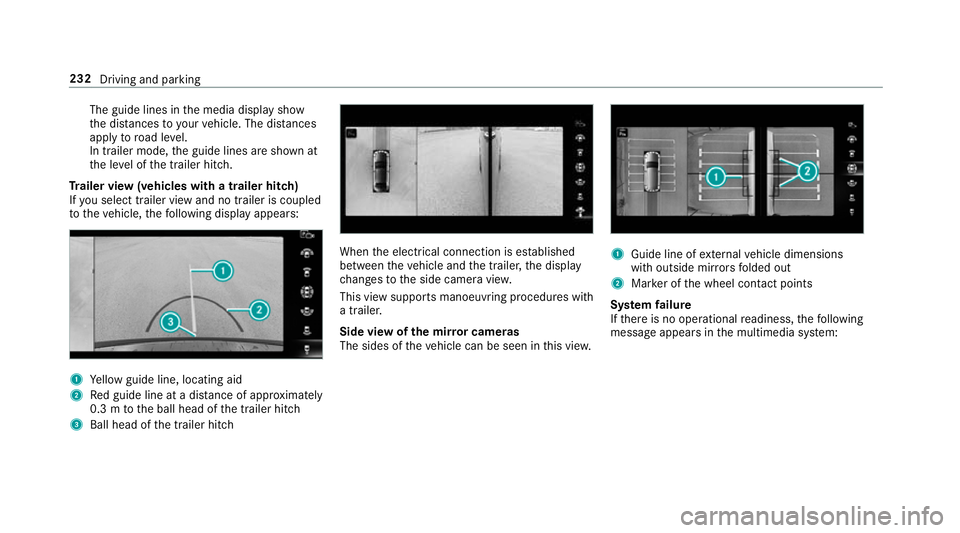
The guide lines in
the media display show
th e dis tances to yourvehicle. The dis tances
apply toroad le vel.
In trailer mode, the guide lines are shown at
th e le vel of the trailer hitch.
Tr ailer view (vehicles with a trailer hitch)
If yo u select trailer view and no trailer is coupled
to theve hicle, thefo llowing display appears: 1
Yellow guide line, locating aid
2 Red guide line at a dis tance of appr oximately
0.3 m tothe ball head of the trailer hitch
3 Ball head of the trailer hitch When
the electrical connection is es tablished
between theve hicle and the trailer, the display
ch anges tothe side camera vie w.
This view supports manoeuvring procedures with
a trailer.
Side view of the mir ror cameras
The sides of theve hicle can be seen in this vie w. 1
Guide line of extern al vehicle dimensions
with outside mir rors folded out
2 Marker of the wheel conta ct points
Sy stem failure
If th ere is no operational readiness, thefo llowing
message appears in the multimedia sy stem: 232
Driving and parking
Page 456 of 645
*
NO
TEDama gedue tounsuitable car
wa sh #
Before driving into a car wash make
sure that the car wash is suitable for
th eve hicle dimensions. #
Ensure there is suf ficient ground clear‐
ance between the underbody and the
guide rails of the car wash. #
Ensure that the clearance width of the
car wash, in particular the width of the
guide rails, is suf ficient. To
avo id damage to yourvehicle when using a
car wash, ensure thefo llowing beforehand:
R Active Dis tance Assi stDISTRONIC and the
HOLD function are deactivated.
R the 360° Camera or there ve rsing camera is
switched off.
R the side windo wsand sliding sun roof are
comple tely closed.
R the blo werfo rth eve ntilation/heating is
switched off. R
the windscreen wiper switch is in position
g.
R in car washes with a con veyo r sy stem: neu‐
tral iis engaged.
R theke y is at a minimum dis tance of 3 m
aw ay from theve hicle, otherwise the boot lid
could open unintentionally.
% Ifyo uwo uld like tolea vetheve hicle while it
is being washed, make sure theke y is loca‐
te d in theve hicle. The jgear is otherwise
automatically engaged.
% If, af terth e car wash, youre mo vethewax
from the windscreen and wiper rubbers, this
will pr event smearing and reduce wiper
noise. Ac
tivating/deactivating automatic car wash
mode Re
quirements:
R theve hicle is stationary
R the engine is running. Multimedia sy
stem:
4 © 5
Settings
5 Schnellzugriff (Quick access)
Ac tivating automatic car wash mode #
Select Automatic car wash mode. #
Select Start.
If one of the settings cann otbe selected, this is
displa yedby a% behind there spective set‐
ting.
% For an overview of the settings made when
activating automatic car wash mode
(/ page 452).
Deactivating automatic car wash mode #
Select Stop.
The automatic car wash settings are reset.
% The automatic car wash mode is automati‐
cally deactivated as soon as a speed of
10 km/h is exceeded. Maintenance and care
453
Page 498 of 645
On-board computer:
4 Service 5
Tyres #
Swipe down wards on Touch Control on the
left-hand side of thesteering wheel.
The Run Flat Indicator activeRestart message
is shown in the multifunction displa y.
Re start the tyre pressure loss warning sy stem in
th efo llowing situations:
R The tyre pressure has changed.
R The wheels or tyres ha vebeen changed or
newly fitted. #
Tobegin restart, press Touch Control on the
left-hand side of thesteering wheel.
The Tyre pressure now OK? message is
shown in the multifunction displa y.#
Select Yes. #
Toconfirm restart, press Touch Control on
th e left-hand side of thesteering wheel.
The Run Flat Indicator restarted message is
shown in the multifunction displa y. Af
teryo u ha vedriven for a few minutes, the
tyre pressu reloss warning sy stem monitors
th e set tyre pressures of all the tyres.
Be sure toalso obse rveth efo llowing fur ther
re lated subjects:
R Notes on tyre pressure (/ page 486) Wheel
change Note
s on selecting, fitting and replacing
tyres Mercedes
-AMG vehicles: observeth e no tes in
th e Supplement. Otherwise, you may failto rec‐
ognise dangers.
Yo u can ask for information rega rding permit ted
wheel/tyre combinations at a Mercedes-Benz
Service Cent re. &
WARNING Risk of accident due toincor‐
re ct dimensions of wheels and tyres
If wheels and tyres of the wrong size are
used, the wheel brakes or wheel suspension
components may become damaged. #
Alw aysre place wheels and tyres with
th ose that fulfil the specifications of the
original part.
When replacing wheels, make sure tofit the
cor rect:
R Designation
R Type
When replacing tyres, make sure tofit the
cor rect:
R Designation
R Manufactu rer
R Type &
WARNING Risk of inju rythro ugh exceed‐
ing the specified tyre load-bearing capa‐
city or the permissible speed rating
Exceeding the specified tyre load-bearing
capacity or the permissible speed rating may
lead totyre dama geand tothe tyres bur st‐
ing. Wheels and tyres
495
Page 501 of 645
R
Obser vethe maximum permissible speed for
th e M+S tyres fitted.
If th is is below theve hicle's maximum speed,
th is must be indicated byan appropriate
label in the driver's field of vision.
R Run in new tyres at moderate speeds forthe
fi rs t10 0 km.
R Replace the tyres af ter six years at the latest,
re ga rdless of wear.
R When replacing with tyres that do not
fe ature run-flat characteristics: vehicles
with MOExtended tyres are not equipped
with a TIREFIT kit at thefa ctor y.Equip the
ve hicle with a TIREFIT kit af terre placing with
tyres that do not feature run-flat characteris‐
tics, e.g. winter tyres.
% You can permanently limit the maximum
ve hicle speed for driving with winter tyres
(/ page 207).
Fo r more information on wheels and tyres, con‐
ta ct a qualified specialist workshop. Be sure
toalso obse rveth efo llowing fur ther
re lated subjects:
R Notes on tyre pressure (/ page 486)
R Tyre pressure table (/ page 487)
R Notes on the emer gency spa rewheel
(/ page 504) Note
s on inter changing wheels &
WARNING Risk of inju rythro ugh dif fer‐
ent wheel sizes
Inter changing the front and rear wheels if the
wheels or tyres ha vediffere nt dimensions
may se verely impair the driving characteris‐
tics.
The disk brakes or wheel suspension compo‐
nents may also be damaged. #
Rotate front and rear wheels on lyifthe
wheels and tyres are of the same
dimensions. Inter
changing the front and rear wheels if the
wheels or tyres ha vediffere nt dimensions can
re nder thege neral operating pe rmit in valid.
The wear pat tern s on the front and rear wheels
dif fer:
R Front wheels wear more on the shoulder of
th e tyre
R Rear wheels wear more in the cent reofthe
tyre
On vehicles with the same front and rear wheel
size, you can inter change the wheels every
5,000 to10,000 km, depending on thewe ar.
Ensure the direction of rotation is maintained for
th e wheels.
It is imperative toobser vethe instructions and
saf ety no tes on "Changing a wheel" when doing
so Preparing theve hicle for a wheel
ch ange( /page 500). 498
Wheels and tyres
Page 507 of 645
#
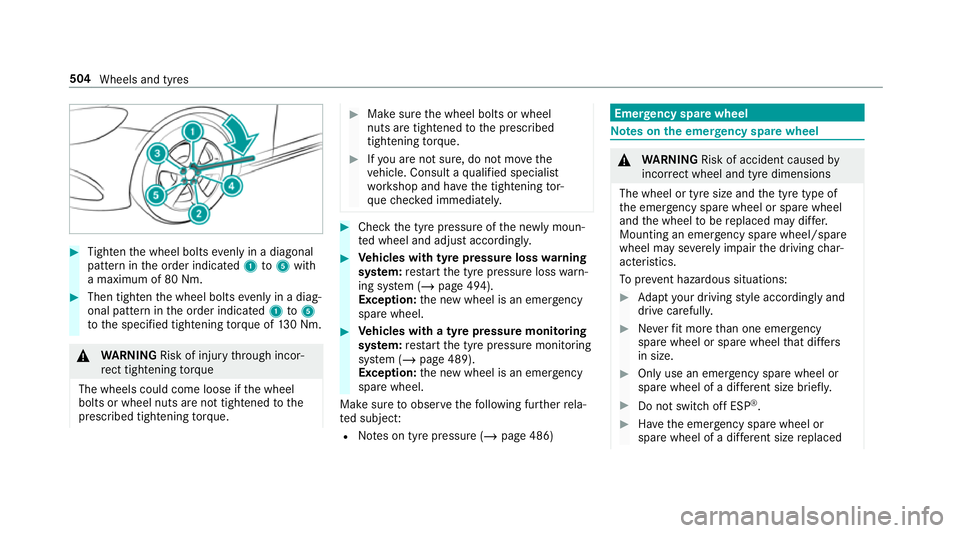
Tighten the wheel bolts evenly in a diagonal
pattern in the order indicated 1to5 with
a maximum of 80 Nm. #
Then tighten the wheel bolts evenly in a diag‐
onal pattern in the order indicated 1to5
to the specified tightening torque of 130 Nm. &
WARNING Risk of inju rythro ugh incor‐
re ct tigh tening torque
The wheels could come loose if the wheel
bolts or wheel nuts are not tightened tothe
prescribed tightening torque. #
Makesure the wheel bolts or wheel
nuts are tightened tothe prescribed
tightening torque. #
Ifyo u are not sure, do not mo vethe
ve hicle. Consult a qualified specialist
wo rkshop and ha vethe tightening tor‐
qu ech ecked immediately. #
Check the tyre pressure of the newly moun‐
te d wheel and adjust according ly. #
Vehicles with tyre pressure loss warning
sy stem: restart the tyre pressure loss warn‐
ing sy stem (/ page 494).
Exception: the new wheel is an emer gency
spa rewheel. #
Vehicles with a tyre pressure monitoring
sy stem: restart the tyre pressure monitoring
sy stem (/ page 489).
Exception: the new wheel is an emer gency
spa rewheel.
Make sure toobser vethefo llowing fur ther rela‐
te d subjec t:
R Notes on tyre pressure (/ page 486) Emer
gency spare wheel Note
s onthe emer gency spare wheel &
WARNING Risk of accident caused by
incor rect wheel and tyre dimensions
The wheel or tyre size and the tyre type of
th e emer gency spa rewheel or spare wheel
and the wheel tobe replaced may dif fer.
Mounting an emer gency spa rewheel/spare
wheel may se verely impair the driving char‐
acteristics.
To preve nt hazardous situations: #
Adapt your driving style according lyand
drive carefull y. #
Neverfit more than one emer gency
spa rewheel or spare wheel that dif fers
in size. #
Only use an emer gency spa rewheel or
spare wheel of a dif fere nt size brie fly. #
Do not switch off ESP ®
. #
Have the emer gency spa rewheel or
spare wheel of a dif fere nt size replaced 504
Wheels and tyres
Page 508 of 645
at
the nearest qualified specialist work‐
shop. The new wheel must ha vethe
cor rect dimensions. Check
the tyre pressure of the emer gency spa re
wheel fitted. Co rrect the pressure as necessar y.
The maximum permissible speed with an emer‐
ge ncy spa rewheel fitted is 80 km/h.
Do not fit th e emer gency spa rewheel with sn ow
ch ains.
Re place the emer gency spa rewheel af ter six
ye ars at the latest, rega rdless of wear.
% Ve
hicles with a tyre pressure loss warn‐
ing sy stem: if an emer gency spa rewheel is
fi tted the tyre pressure loss warning sy stem
cann otfunction reliabl y.Only restart the sys‐
te m again when the emer gency spa rewheel
has been replaced with a new wheel.
Ve hicles with a tyre pressure monitoring
sy stem: if an emer gency spa rewheel is fit‐
te dth e tyre pressure monitoring sy stem can‐
not function reliabl y.Fo r a few minutes af ter
an emer gency spa rewheel is fitted, the sys‐
te m may still display the tyre pressure of there
mo ved wheel. Only restart the sy stem
again when the emer gency spa rewheel has
been replaced with a new wheel.
Be sure toalso obse rveth efo llowing fur ther
re lated subjects:
R Notes on tyre pressure (/ page 486)
R Tyre pressure table (/ page 487) Re
moving the eme rgency spa rewheel The deflated eme
rgency spare wheel is secured
in the emer gency spa rewheel bag in the boot. #
Obser vethe information on mounting tyres
(/ page 495). #
Open the boot. #
Detach thefast ening stra ps. #
Unhook there taining spring hooks of thefa s‐
te ning stra ps from the brac kets. #
Remo vethe emer gency spa rewheel bag with
th e emer gency spa rewheel. #
Open the emer gency spa rewheel bag and
re mo vethe emer gency spa rewheel. Inflating
the emer gency spare wheel *
NO
TEOverheating due tothe tyre infla‐
tion compressor running too long #
Do not runth e tyre inflation compres‐
sor for longer than ten minu tes without
inter ruption. Re
quirements:
R Comply with the manufacturer's saf ety no tes
on thest icke r of the emer gency spa rewheel
and on the tyre inflation compressor.
R Remo vethe tyre inflation compressor from
th estow age space under the boot floor
(/ page 466). Wheels and tyres
505
Page 510 of 645
#
Stow filling hose 2and plug 4inthe lo wer
section of the compressor housing. #
Stow th e tyre inflation compressor in the
ve hicle. Collapsible spare wheel
Note
s onthe collapsible spa rewheel &
WARNING Risk of accident caused by
incor rect wheel and tyre dimensions
The wheel or tyre size and the tyre type of
th e emer gency spa rewheel or spare wheel
and the wheel tobe replaced may dif fer.
Mounting an emer gency spa rewheel/spare
wheel may se verely impair the driving char‐
acteristics.
To preve nt hazardous situations: #
Adapt your driving style according lyand
drive carefull y. #
Neverfit more than one emer gency
spa rewheel or spare wheel that dif fers
in size. #
Only use an emer gency spa rewheel or
spare wheel of a dif fere nt size brie fly. #
Do not switch off ESP ®
. #
Have the emer gency spa rewheel or
spare wheel of a dif fere nt size replaced
at the nearest qualified specialist work‐
shop. The new wheel must ha vethe
cor rect dimensions. The collapsible spa
rewheel is an emer gency
wheel which is only suitable for use for a limi ted
period of time and in a restricted manner in the
eve nt of a flat tyre (e.g. until the nearest work‐
shop).
The tyre side walls are folded when in transpo rt
mode. Before use, the collapsible spare wheel
has tobe inflated with the accompanying com‐
pressor.
Check the tyre pressure of the collapsible spare
wheel once fitted. Co rrect the pressure as nec‐
essar y.
The maximum permissible speed with a collapsi‐
ble spare wheel fitted is 80 km/h. Do not
fit snow chains with the collapsible spare
wheel.
Re place the collapsible spare wheel af ter six
ye ars at the latest, rega rdless of wear.
% Ve
hicles with a tyre pressure loss warn‐
ing sy stem: if a collapsible spare wheel is
fi tted, the tyre pressure loss warning sy stem
cann otfunction reliabl y.Only restart the sys‐
te m again when the collapsible spare wheel
has been replaced with a new wheel.
Ve hicles with a tyre pressure monitoring
sy stem: if a collapsible spare wheel is fitted
th e tyre pressure monitoring sy stem cann ot
function reliably. For a few minutes af ter an
emergency spare wheel is fitted, the sy stem
may still display the tyre pressure of the
re mo ved wheel. Only restart the sy stem
again when the collapsible spare wheel has
been replaced with a new wheel.
Be sure toalso obse rveth efo llowing fur ther
re lated subjects:
R Notes on tyre pressure (/ page 486)
R Tyre pressure table (/ page 487) Wheels and tyres
507
Page 526 of 645
Fo
rth e cor rect mixing ratio, referto the informa‐
tion on the antif reeze conta iner.
Mix thewa sher fluid with the windscreen washer
fl uid all year round. Ve
hicle data Ve
hicle dimensions The heights speci
fied may vary as a result of the
fo llowing factors:
R tyres
R load
R condition of the suspension
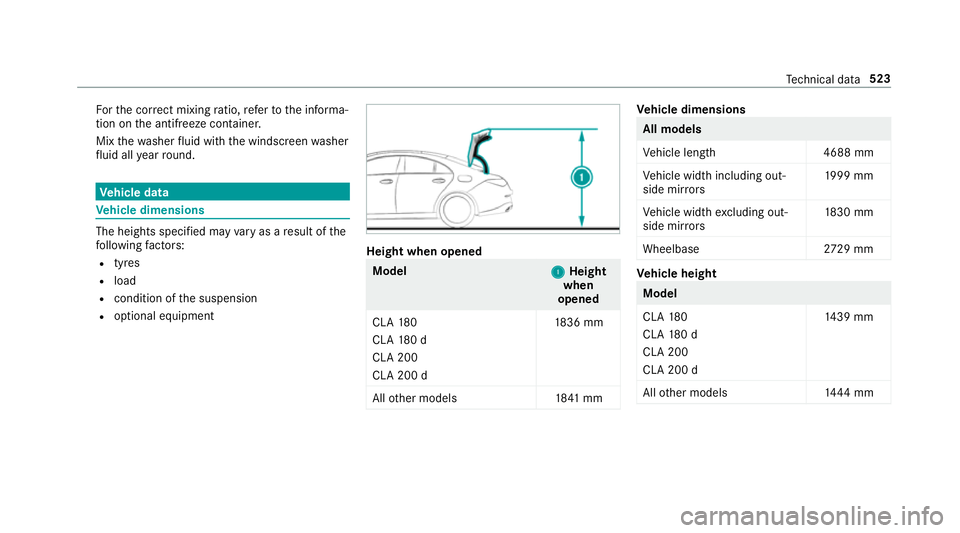
R optional equipment Height when opened
Model
1
1Height
when
opened
CLA 180
CLA 180 d
CLA 200
CLA 200 d 18
36 mm
All other models 1841 mm Ve
hicle dimensions All models
Ve
hicle lengt h4 688 mm
Ve hicle width including out‐
side mir rors 19
99 mm
Ve hicle width excluding out‐
side mir rors 18
30 mm
Wheelbase 2729 mm Ve
hicle height Model
CLA
180
CLA 180 d
CLA 200
CLA 200 d 14
39 mm
All other models 1444 mm Te
ch nical da ta523