2019 MERCEDES-BENZ CLA COUPE lock
[x] Cancel search: lockPage 276 of 330
Vehi
cle too lkit
Gen eral notes Veh
icles with aTIR EFIT kit:the TIREFIT kitis
lo cate din the stow agewe llund erthe trunk
flo or.
Veh icles with atire -cha nge tool kit:the tire-
cha nge tool kitisin the stow agewe llund erthe
trunk floor.
Apa rtfrom certaincou ntry -spe cificvar iatio ns,
the vehicles are not equipp ed with atire -cha nge
tool kit.Some toolsfor cha nging awh eelare
spe cificto the vehicle. For more informa tionon
wh ich tire changing tool sare required and
ap pro ved toperfor mawh eelcha nge onyour
veh icle, consu ltaqu alifi ed spe cialist wo rksh op.
Too lsreq uired forcha nging awh eelmay
incl ude,for exa mpl e:
R Jack
R Whe elchoc k
R Lu gwre nch
R Ali gnme ntbolt
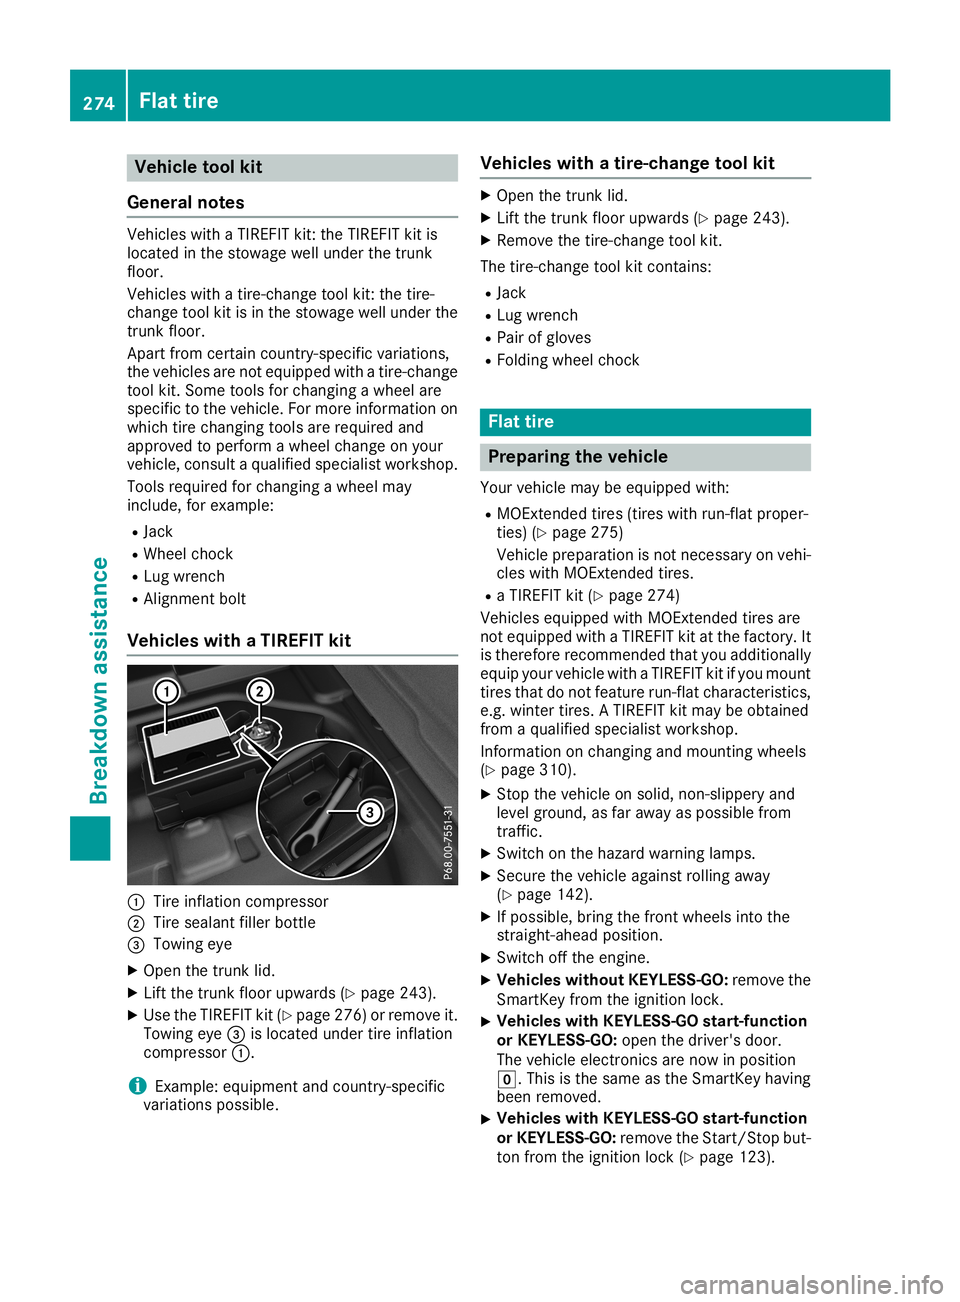
Vehi cles with aTIRE FITkit 0043
Tire infl ation comp ressor
0044 Tire sea lant fillerbo ttle
0087 Tow ingeye
X Ope nthe trunk lid.
X Lif tthe trunk floor upwa rds (Ypage 243) .
X Use theTIREFIT kit(Ypage 276 )orremove it.
Towi ngeye 0087islocated undertireinfla tion
compresso r0043.
i Example:
equipment andcountry-spe cific
varia tions possible. Vehic
leswith atire-chang etool kit X
Open thetrunk lid.
X Lift the trunk floorupwards (Ypag e243).
X Remo vethe tire-change toolkit.
The tire-change toolkitcontains:
R Jack
R Lug wrench
R Pai rof glove s
R Foldi ngwhee lchock Flat
tire Preparing
thevehic le
You rvehicl emay beequ ipped with:
R MOExtended tires(tires withrun-flat proper-
ties) (Ypag e275)
Vehicl eprepa ration isnot necessary onvehi-
cles with MOExtended tires.
R aTIREFIT kit(Ypag e274)
Vehicl esequ ipped with MOExtended tiresare
not equippedwith aTIREFIT kitatthe factory. It
is therefore recommended thatyouadditional ly
equ ipyou rvehicl ewith aTIREFIT kitifyou mount
tires thatdonot feature run-flat characteristics,
e.g. winter tires.ATIREFIT kitmay beobtai ned
from aqua lified specia listworkshop .
Information onchanging andmounting wheels
(Y pag e310).
X Stop thevehicl eon soli d,non-slipp eryand
level ground ,as far awa yas possi blefrom
traffic.
X Switch onthe hazard warninglamp s.
X Secure thevehicl eaga inst rolling awa y
(Y pag e142) .
X Ifpossi ble,bring thefront wheelsinto the
straigh t-ahead position.
X Switch offthe engine.
X Vehic leswitho utKE YLESS-GO :remove the
SmartKey fromtheignitio nlock.
X Vehic
leswith KEYLESS-GO start-function
or KEYLESS-GO :open thedriver' sdoor.
The vehicl eelectronics arenow inposi tion
005A. This isthe same asthe SmartKey having
been removed .
X Vehic
leswith KEYLESS-GO start-function
or KE YLESS-GO :remove theStart/Stop but-
ton from theignitio nlock (Ypag e123). 274
Fl
at tireBreakdown assistance
Page 279 of 330
X
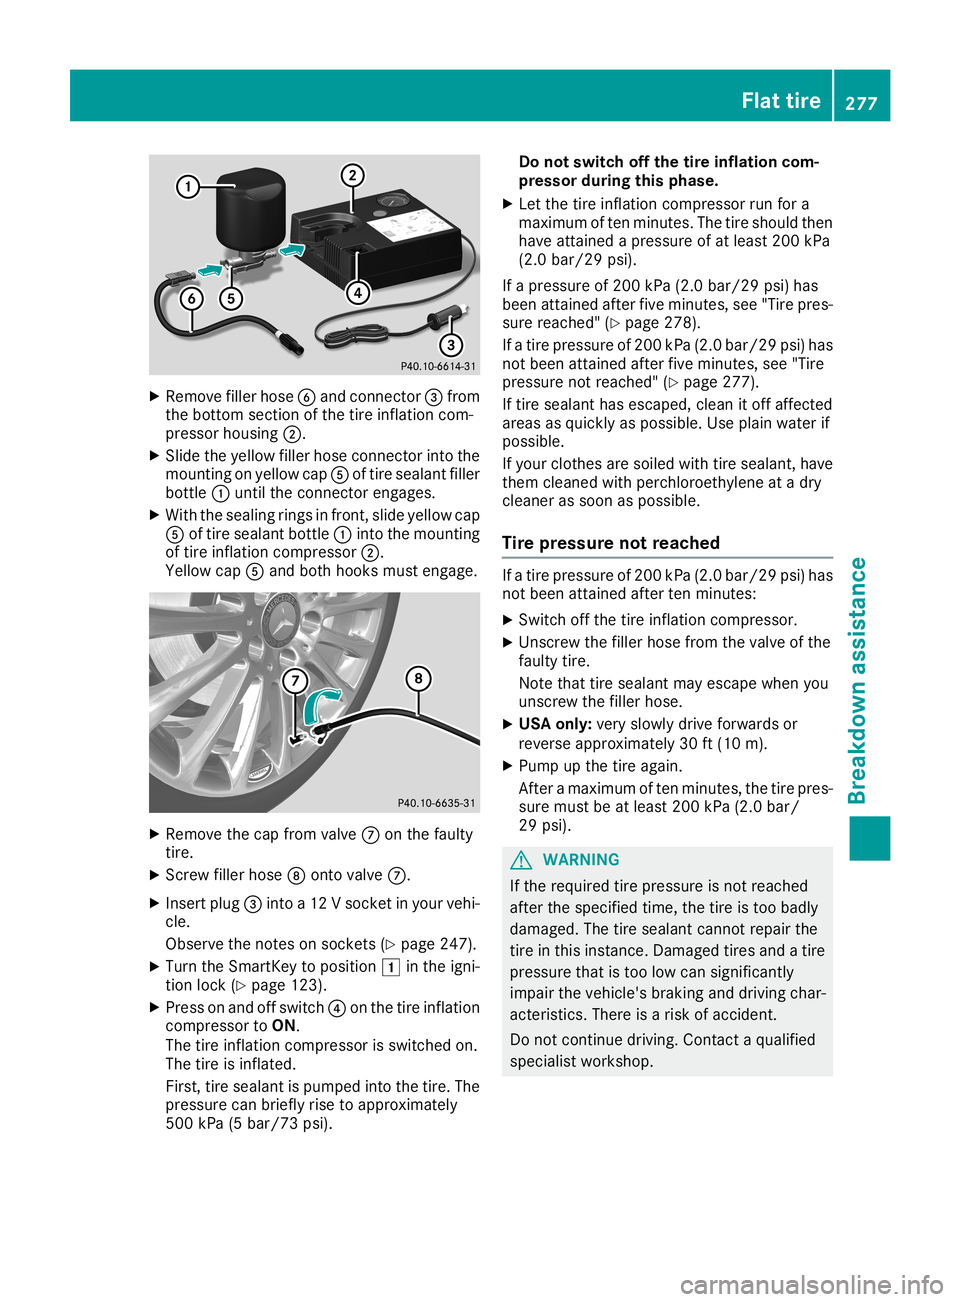
Remo vefiller hos e0084 and conn ector0087 from
th ebot tom sec tion ofthetire inflat ion com-
pre sso rhous ing0044.
X Sli de theyellow filler hos eco nn ectorint oth e
moun ting on yellow cap0083oftire sealan tfill er
bot tle 0043 untilth eco nn ectoren gage s.
X Wit hth eseali ngrings infron t,slid eyellow cap
0083 oftire sealan tbot tle 0043 intoth emoun ting
of tire inflat ion compr essor0044.
Yello wcap 0083and bothhoo ksmus ten gage . X
Remo vethecap from valv e006B onthefault y
ti re.
X Sc rew filler hos e006C onto valv e006B.
X Inser tplug 0087intoa12 Vsoc ketin your vehi-
cle .
Obs erveth eno teson soc kets (Y page 247).
X Turn theSm artKey topos ition 0047intheign i-
ti on lock(Y page 123).
X Pre sson and offswit ch0085 onthetire inf lat ion
co mpr essortoON .
The tire inflat ion compr essorisswit ched on.
The tire isinf lat ed.
Fir st,ti re sealan tis pump edintoth etire. The
pre ssur ecan brieflyriseto appr oximat ely
50 0kP a(5 bar/ 73psi) . Do
not swit choff thetire inflation com -
pr essor during this ph ase .
X Let thetire inflat ion compr essorrun fora
max imum oftenmin utes.The tire sho uldthen
hav eatt ain ed apre ssur eof at least 200kP a
(2.0 bar/29 psi).
If apr es su re of20 0kPa (2.0 bar/29 psi)ha s
be en attai ned after fivemi nute s,se e"T ire pre s-
su re rea che d"(Y page 278 ).
If atire pressu reof200 kPa(2.0 bar/29 psi)ha s
not been atta inedaf ter fivemi nute s,see"T ire
pre ssu renot reache d"(Y page 277 ).
If tire sealant hases cap ed,cle an itoff affecte d
ar ea sas quickl yas possi ble. Use plain wa ter if
po ssi ble.
If yo ur clo the sar esoi led wi th tire sealant, have
the mcle ane dwi th perchl oroethylene atadry
cle ane ras soo nas possi ble.
Tire pres sure notreac hed If
atire pressu reof200 kPa(2.0 bar/29 psi)ha s
not been atta inedaf ter ten minute s:
X Swi tch offthe tire inflatio ncomp ressor .
X Unsc rewthefillerhos efro mthe valve ofthe
fa ulty tire .
Note thattire sealant mayes cap ewh en you
uns crewthe fillerhos e.
X US Aon ly:ver yslow lydri ve forwa rds or
rev ers eap pro xim ately30 ft(10 m).
X Pu mp upthe tire again.
After ama xim um often minute s,the tire pres-
su re mu stbe atleas t200 kPa(2.0 bar/
29 psi). G
WA
RNING
If the required tire pressu reisnot reache d
af ter the speci fiedtim e,the tire istoo badly
da ma ged. Thetire sealant cann otrep airthe
tire inthi sins tance .Dam aged tire sand atire
pre ssu retha tis too low can signi ficantl y
im pairthe vehicle'sbra king anddrivin gcha r-
acte ristics .Th ere isaris kof acc ident.
Do not conti nuedrivin g.Co ntact aqu alifi ed
sp eci alistwo rksh op. Fl
at tire
277Break downass istanc e Z
Page 280 of 330
Tire
pres sure reached G
WA
RNING
A tire temp orarilysea led wi th tire sealant
imp airs the drivin gcha racteri stics and isnot
su ita ble for highe rsp ee ds.The reisaris kof
acc ident.
Yo usho uld the refore adaptyo ur drivin gsty le
acc ordinglyand drive car efully. Do not exce ed
the speci fiedma xim um spee dwi th atire that
ha sbe en rep aired using tire sealant.
US Aon ly:The maxim um permi ssiblesp ee dfor
a tire sealed wi th tire sealant is50 mph
(80 km/h ).The upperpa rtof the TIREFIT sticker
mu stbe affixe dto the instrument cluster inthe
dri ver 'sfie ldof vis ion.
If atire pressu reof200 kPa(2.0 bar/2 9ps i)ha s
be en atta inedaf ter ten minutes:
X Swi tch offthe tire inflation comp ressor .
X Unsc rewthefillerhos efro mthe valve ofthe
fa ulty tire .
Note thattire sealant ma yesc apewh en you
uns crew thefillerhos e.
X US Aon ly:Stow thetire sealant bo ttle and the
tire inflation comp ressor .
X Pul law ayimme diately.
X Stop after drivin gfor appro xim atelyten
min utesand checkthe tire pressu rewith the
tire inflation comp ressor .
The tirepressu remu stnow beatleas t
130 kPa(1.3 bar/19 psi). G
WA
RNING
If the required tire pressu reisnot reached
afte rdri ving forasho rtper iod,the tire istoo
ba dlyda mag ed.The tiresealant cannot repair
the tire inthis insta nce. Dama gedtiresand a
tire pressu rethat istoo low can signifi cantl y
imp airthe vehi cle'sbra king anddriving char-
acter istics. The reisaris kof acci dent.
Do not continu edri ving .Co ntact aqu alifi ed
spe cialist wo rksho p.
i USA
only: Incase ssu ch asthe one men-
tione dab ove, contact anauthori zed
Merce des-Benz Center. Orcall
1-800-FOR -MERCedes(in the USA) or
1-800-38 7-0100(in Ca nad a). X
USA only: Corre ctthe tire pressu reifit is stil l
at leas t130 kPa(1.3 bar/19 psi) .See theTire
and Load ingInformati onplacard onthe driv-
er's side B-pill aror the tire press uretablein
the fuel filler flapfor values .
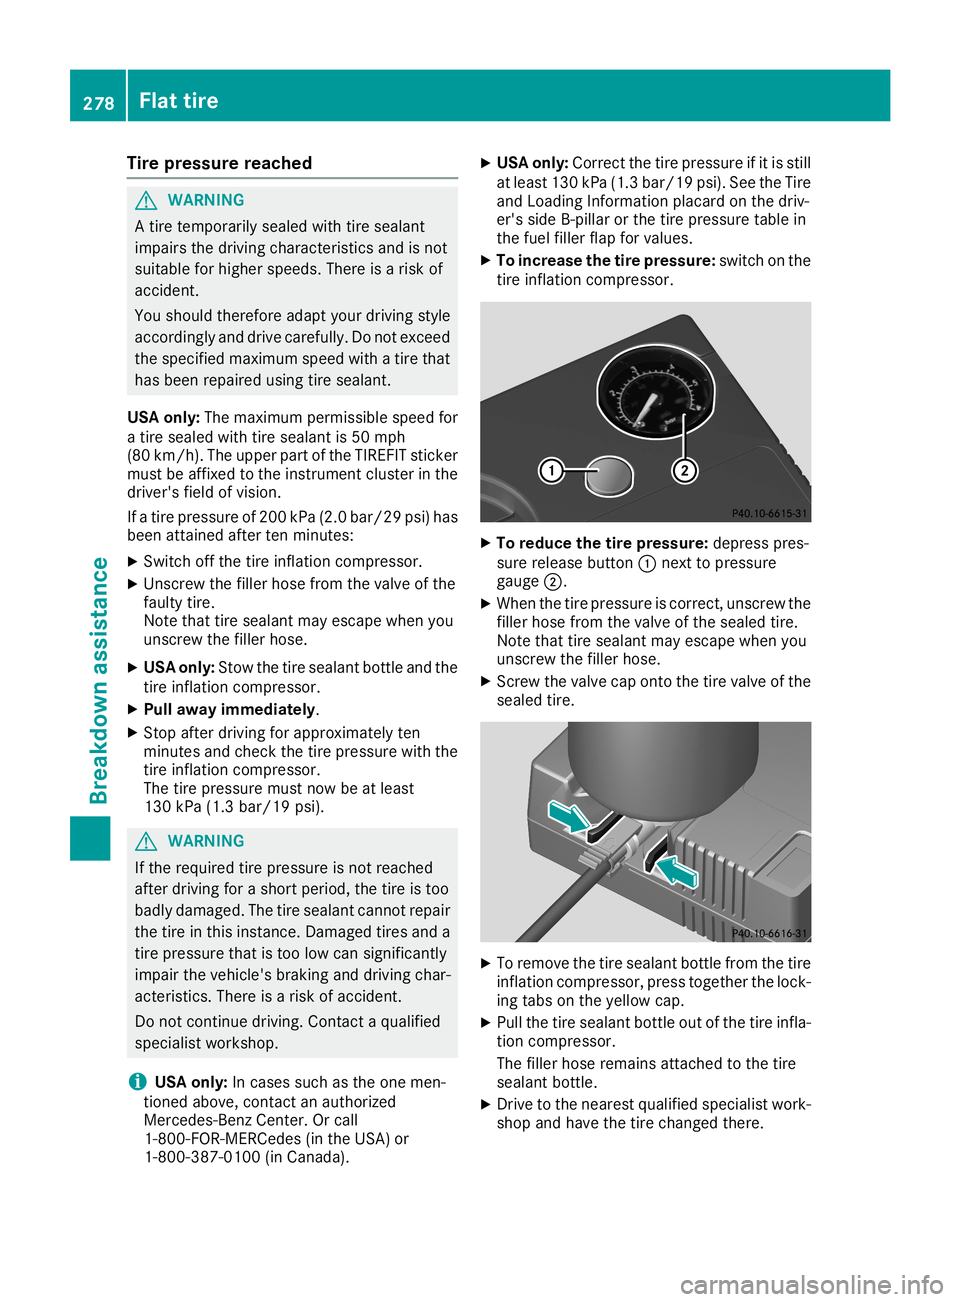
X To inc rease thetire pressure :swi tch onthe
tire infla tion compres sor. X
To reduce thetire pressure :dep ress pres-
sure release button 0043next topress ure
gau ge0044.
X When thetire press ureiscorrect, unscrew the
fill er hose fromthevalve ofthe sealed tire.
Note thattiresealant may escap ewhe nyou
unscrew thefiller hose .
X Screw thevalve cap onto thetire valve ofthe
sea led tire. X
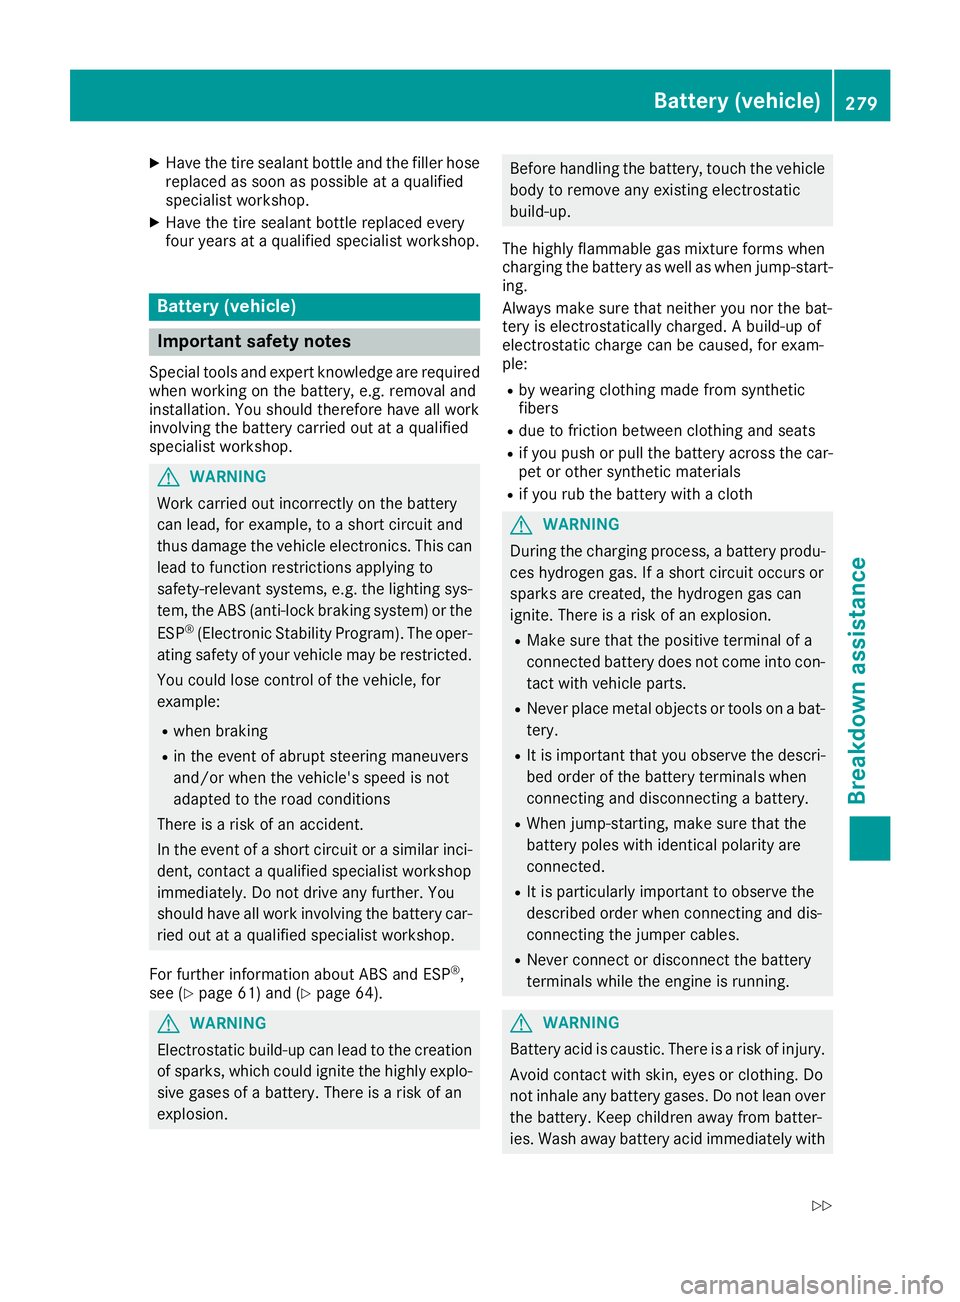
To remove thetire sealant bottle fromthetire
infla tion compres sor,press together thelock-
ing tabs onthe yellow cap.
X Pul lthe tire sealant bottle outofthe tire infla -
tion compres sor.
The filler hose remai nsattache dto the tire
sea lant bottle.
X Drive tothe neare stqua lified speci alist work-
shop andhave thetire change dthere. 278
Fl
at tireBreakdow nassi stanc e
Page 281 of 330
X
Have thetire sealant bottle andthefiller hose
repl aced assoon aspos sibleat aqu alifi ed
spe cialist wor kshop .
X Have thetire sealant bottle replaced every
fou rye ars ataqu alifi ed spe cialist wor kshop . Battery
(vehicle) Importan
tsafe tynotes
Speci altool sand expe rtknowl edgeare requ ired
whe nwor king onthe battery, e.g.remov aland
insta llatio n.You shou ldthere forehaveallwor k
invol ving thebattery carriedout ataqu alifi ed
spe cialist wor kshop . G
WARNI
NG
Work carriedout incorre ctlyonthe battery
can lead,for exam ple,to ashor tcircu itand
thus damag ethe vehi cleelectronics. Thiscan
lea dto functio nrestri ctions apply ing to
safe ty-rel evantsys tems, e.g.thelighting sys-
tem, theABS (anti-lock braking system) orthe
ESP ®
(Ele ctronic Stability Prog ram) .The oper-
ating safetyof your vehi clemay berestri cted.
You couldlos econtrol ofthe vehi cle, for
exam ple:
R whe nbra king
R in the event ofabrup tsteeri ngmane uvers
and/o rwhe nthe vehi cle'sspe edisnot
ad apted tothe roadcondi tions
The reisarisk ofan acci dent.
In the event ofashor tcircu itor asimi larinci-
dent, contact aqu alifi ed spe cialist wor kshop
imme diately .Do not drive any furthe r.You
shou ldhav eal lwor kinvol vingthebattery car-
rie dout ataqu alifi ed spe cialist wor kshop .
For furthe rinform ationab out ABS andESP®
,
see (Ypage 61)and (Ypage 64). G
WARNI
NG
Electros taticbuild-up canleadto the crea tion
of spa rks, whichcoul digni tethe highly expl o-
sive gasesofaba ttery. Thereisarisk ofan
expl osion. Before
handling the battery, touch thevehi cle
bod yto remov eany existing electrostati c
bu ild-up .
The highly flammab legas mixtu reforms when
charg ingthe battery aswel las whe njump -start-
ing.
Alwa ysmake surethat neithe ryo unor thebat-
tery isele ctrostati callycharg ed.Abu ild-up of
ele ctrostati ccharg ecan becau sed,for exam -
ple :
R by wea ring clothi ngmad efrom synthe tic
fib ers
R du eto fricti onbetw eenclothi ngand seats
R ifyo upu sh orpullthe battery acrossthe car-
pet orother synthe ticmater ials
R ifyo urub thebattery with acloth G
WARNI
NG
Duri ngthe charg ingproce ss,aba ttery produ-
ces hydroge ngas .If ashor tcircu itoccur sor
spa rks are crea ted, thehydroge ngas can
igni te.The reisarisk ofan expl osion.
R Make surethat thepositive termina lof a
connected battery doesnot come intocon-
tact with vehi cleparts.
R Neve rpla cemetal objects ortool son aba t-
tery .
R Itis imp ortant thatyouobs erve thedescri-
bed orde rof the battery termina lswhe n
connecting anddisconnecting aba ttery.
R Whe njump -starti ng,make surethat the
ba ttery poleswith ide ntical polarityare
connected .
R Itis pa rticu larly imp ortant toobs erve the
des crib edorde rwhe nconnecting anddis-
connecting thejump ercabl es.
R Neve rconnect ordis connect thebattery
termina lswhi lethe engi neisrunni ng. G
WARNI
NG
Battery acidis cau stic. Thereisarisk ofinjury .
Avoid contact with skin, eyes orclothi ng.Do
not inha leany battery gases.Donot leanover
the battery. Keepchildren away from batter-
ies .Wa shawaybattery acidimme diately with Battery
(vehicle)
279Breakdow nassi stanc e
Z
Page 282 of 330
plent
yof clean water andseek medical atten-
tion . H
Environm
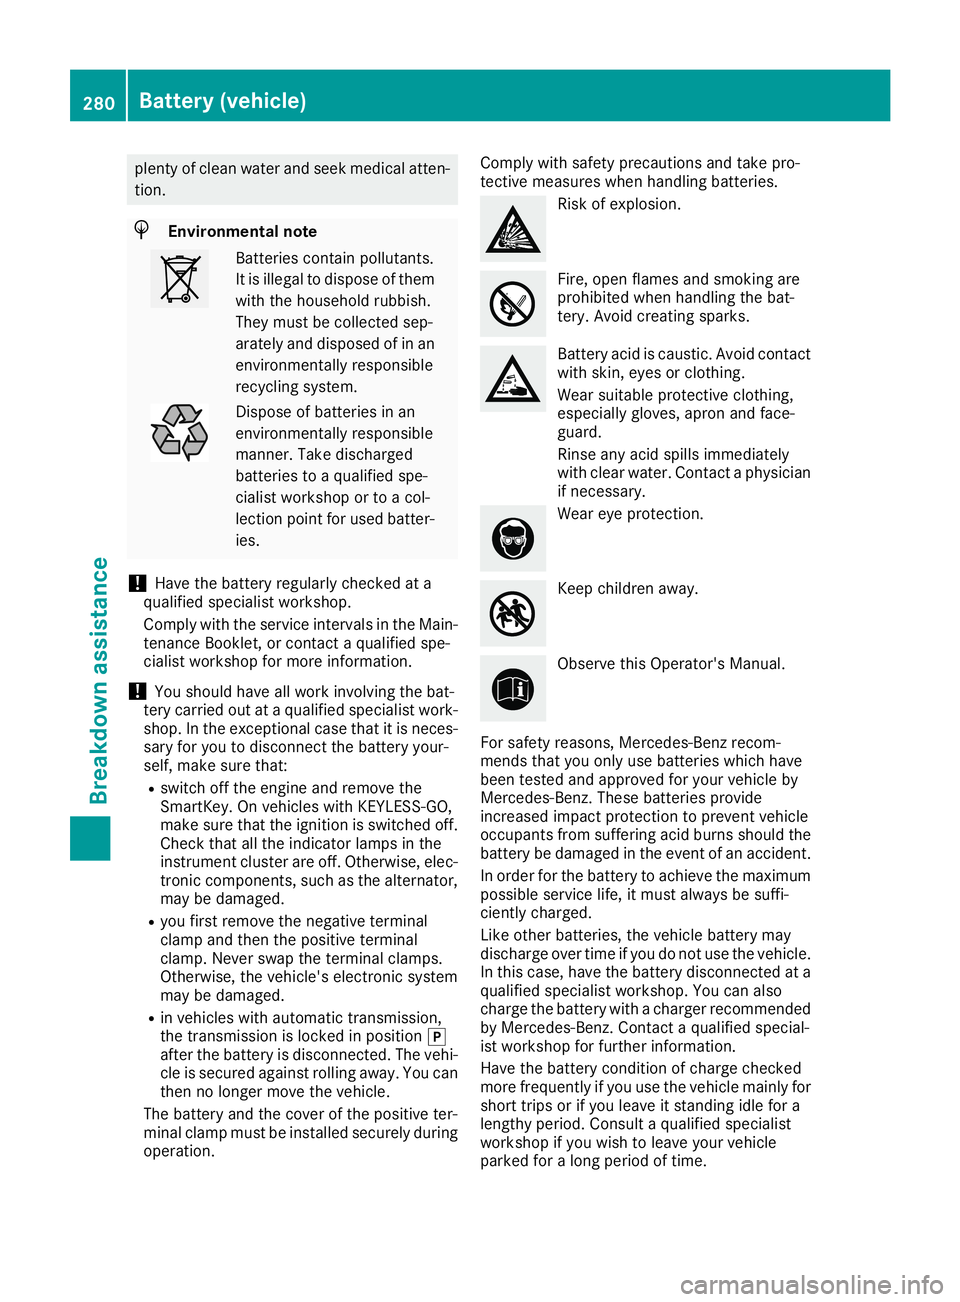
entalnote Batt
eries contain pollutant s.
It is illegal todispose ofthem
with thehousehold rubbish.
They must becollect edsep-
arately anddisposed ofinan
envir onmen tallyrespon sible
recyclin gsystem. Dispose
ofbatte riesinan
envir onmen tallyrespon sible
mann er.Take discharged
batte riestoaqualified spe-
cialist worksh oportoacol-
lection pointforused batter-
ies.
! Have
thebatte ryregularly checkedata
qualified specialist workshop.
Comply withtheservic eint ervals inthe Main-
ten ance Booklet,orcon tact aqualified spe-
cialist worksh opfor more information .
! You
should haveallwork involv ingthe bat-
tery carried outataqualified specialist work-
shop. Inthe exception alcase thatitis nec es-
sary foryou todiscon nectthe batte ryyour-
self, make surethat:
R switch offthe engin eand remov ethe
Smart Key.Onvehicles withKEYL ESS-GO,
make surethattheignit ionisswitch edoff.
Check thatallthe indicat orlamps inthe
inst rument clusterareoff. Other wise,elec-
tron iccompon ents,such asthe altern ator,
may bedamaged.
R you first remov ethe negat iveterm inal
clamp andthen thepositive terminal
clamp. Neverswaptheterm inalclamps.
Other wise, thevehicle's electronic system
may bedamaged.
R in vehicles withautomatic transmission ,
the tran smission islock edinposition 005D
after thebatte ryisdiscon nected. Thevehi-
cle issecured againstrollingaway.Youcan
then nolonger movethevehicle.
The batte ryand thecover ofthe positive ter-
minal clamp mustbeinst alled securely during
operation . Comply
withsafety precaution sand take pro-
tec tive measures whenhandling batteries. Risk
ofexplosion . Fire,
open flames andsmok ingare
prohibited whenhandling thebat-
tery. Avoid creatingsparks. Batt
eryacid iscaustic .Avoid contact
with skin,eyes orclot hing.
Wear suitable protective clot hing,
especially gloves,apronandface-
guard.
Rinse anyacid spills immediately
with clear water. Contac ta physician
if nec essary. Wear
eyeprote ction. Keep
children away. Observe
thisOperator 'sManual.
For safety reasons ,Mercedes -Benzrecom -
mends thatyouonly usebatte rieswhich have
been testedand approved foryour vehicle by
Mercedes -Benz.These batteriesprovide
incr eased impact protection topreven tvehicle
occ upants fromsufferin gacid burns should the
batte rybe damaged inthe event ofan acciden t.
In order forthe batte ryto achieve themaximum
possible servicelife, itmust always besuffi-
cient lycharged.
Like other batteries,thevehicle batterymay
discharge overtime ifyou donot use thevehicle.
In this case, havethebatte rydiscon nected ata
qualified specialist workshop.You canalso
charge thebatte rywith acharger recommended
by Mercedes -Benz.Contac ta qualified special-
ist worksh opfor furth erinfor mation .
Have thebatte rycon dition ofcharge checked
more frequent lyifyou usethevehicle mainlyfor
short tripsorifyou leave itstan ding idlefora
lengt hyperiod. Consult aqualified specialist
worksh opifyou wish toleave yourvehicle
parked foralong period oftime. 280
Ba
ttery (vehicle)Breakd ownassista nce
Page 283 of 330
Only
replace abattery withabattery thathas
been recommended byMercedes-Benz .
Remove theSmartKey ifyou park thevehicle
and donot require anyelectrical consumers.
The vehicle willthen usevery little energy, thus
conserving batterypower.
If the power supply hasbeen interrupted, e.g.if
you reconnec tthe battery, youwillhave to:
R set the clock using themultimedia system
(see theDigital Operator's Manual)
R reset thefunction forfolding theexterior mir-
rors in/out automaticall y,by folding themir-
rors outonce (Ypage 98) Charging
thebatter y G
WARNING
During charging andjump-startin g,explosive
gases canescape fromthebattery. Thereisa
risk ofan explosion.
Particularl yavoid fire,open flames, creating
sparks andsmoking. Ensurethereissufficient
ventilation whilecharging andjump-startin g.
Do not lean over abattery. G
WARNING
Battery acidiscaustic. Thereisarisk ofinjury.
Avoid contactwith skin, eyesorclothing. Do
not inhale anybattery gases.Donot lean over
the battery. Keepchildren awayfrom batter-
ies. Wash awaybattery acidimmediately with
plenty ofclean water andseek medical atten-
tion. G
WARNING
A discharged batterycanfreeze attempera-
tures below freezing point.Whenjump-start-
ing the vehicle orcharging thebattery, gases
can escape fromthebattery. Thereisarisk of
an explosion.
Allow thefrozen battery tothaw outbefore
charging itor jump-startin g.
! Only
usebattery chargers withamaximum
charging voltageof14.8 V.
! Only
charge thebattery usingthejump-
starting connectionpoint. The
jump-startin gconnec tionpoint isin the
engine compartment (Ypage 282).
X Open thehood.
X Connect thebattery charger tothe positive
terminal andground pointinthe same order
as when connec tingthedonor battery inthe
jump-startin gprocedure (Ypage 282).
If the <004C00510047004C004600440057005200550012005A004400550051004C0051
004A[ lampsdonot light upin
the instrument clusteratlow temperatures, itis
very likely thatthedischarged batteryhasfro-
zen. Inthis case youmay neither jump-start the
vehicle norcharge thebattery. Theservice lifeof
a thawed-out batterymaybeshorter. Thestart-
ing characteristics canbeimpaired ,particularl y
at low temperatures. Havethethawed-out bat-
tery checked ataqual ified speciali stworkshop.
Only charge theinstalled batterywithabattery
charger whichhasbeen tested andapproved by
Mercedes-Benz .A battery charger unitspeciall y
adap tedforMercedes-Benz vehiclesandtested
and approved byMercedes-Benz isavail able as
an accessory. Itpermits thecharging ofthe bat-
tery inits installed position. Contactanauthor-
ized Mercedes-Benz Centerforfurther informa-
tion andavail ability. Read thebattery charger's
operating instructionsbefore charging thebat-
tery. Replacing
the12Vbatter y
Observe thenotes onthe 12Vbattery
(Y page 279).
Mercedes-Benz recommendsthatyouhave the
12 Vbattery replaced ataqual ified speciali st
workshop, e.g.atan authorized Mercedes-Benz
Center.
If you want toreplace thebattery yourself,
observe thefollowi ngnotes:
R Alway sreplace adefective batterywithabat-
tery which meets thespecific requirements of
the vehicle.
The vehicle isequip pedwith abattery using
AGM (absorbe ntglass mat)technology ora
battery usingEFB(enhanced floodedbattery)
technology. Fullvehicle functionality isguar-
anteed onlywith anAGM orEFB battery. If
replacement isnecessary, alwaysuse thebat-
tery technology originallyinstalled. Switching
between thebattery technologies isnot per-
mitted. Forsafety reasons, Mercedes-Benz
recommends thatyouonly usebatteries Bat
tery (vehic le)
281Breakdown assistance Z
Page 285 of 330
If
the indicator/wa rninglampsdo not light upinthe instrument clusteratlow temperature s,itis very
likely thatthedischa rgedbattery hasfrozen. Inthis case youmay neither jump-start thevehicle nor
charge thebattery. Letthe battery thawfirst.Theservice lifeofathawed -outbattery maybeshorter.
The starting characteristics canbeimpa ired,particul arlyatlow temperature s.Have thethawed -out
battery checked ataqua lifiedspecia listworkshop.
Do not start thevehicle usingarapi dcharging device.Ifyou rvehicle 'sbattery isdischa rged,the
engine canbejump-started fromanother vehicleorfrom asecond batteryusingjumper cables.
Observe thefollow ingpoints:
R The battery isnot accessib lein all vehicle s.Ifthe other vehicle 'sbattery isnot accessib le,jump-
start thevehicle usingasecond batteryorajump-starting device.
R You may onlyjump-start thevehicle whentheengine andexhau stsystem arecold.
R Do not start theengine ifthe battery isfrozen. Letthe battery thawfirst.
R Only jump-start frombatteries witha12 Vvoltage rating.
R Only usejumper cablesthat arenot dama gedand have asufficie ntcross-section andinsula ted
terminal clamps.
R Make surethatthetwo vehicle sdo not touch.
Make surethat:
R The jumper cablesare not dama ged.
R Non-insula tedparts ofthe terminal clampsdonot come intocontact withother metal partswhile
the jumper cablesare connected tothe battery.
R The jumper cablescannot comeintocontact withparts thatcanmove whentheengine isrunning,
such asthe V-belt pulley orthe fan.
X Secure thevehicle byappl ying theelectric parking brake.
X Shift thetransmission topositio n005D.
X Turn theSmartKey topositio n005A inthe ignition lockandremove it.
X Switch offallelectrical consumers, e.g.rear window defroster, lighting,etc.
X Open thehood. Jump-st
arting
283Breakd ownassis tance Z
Page 286 of 330
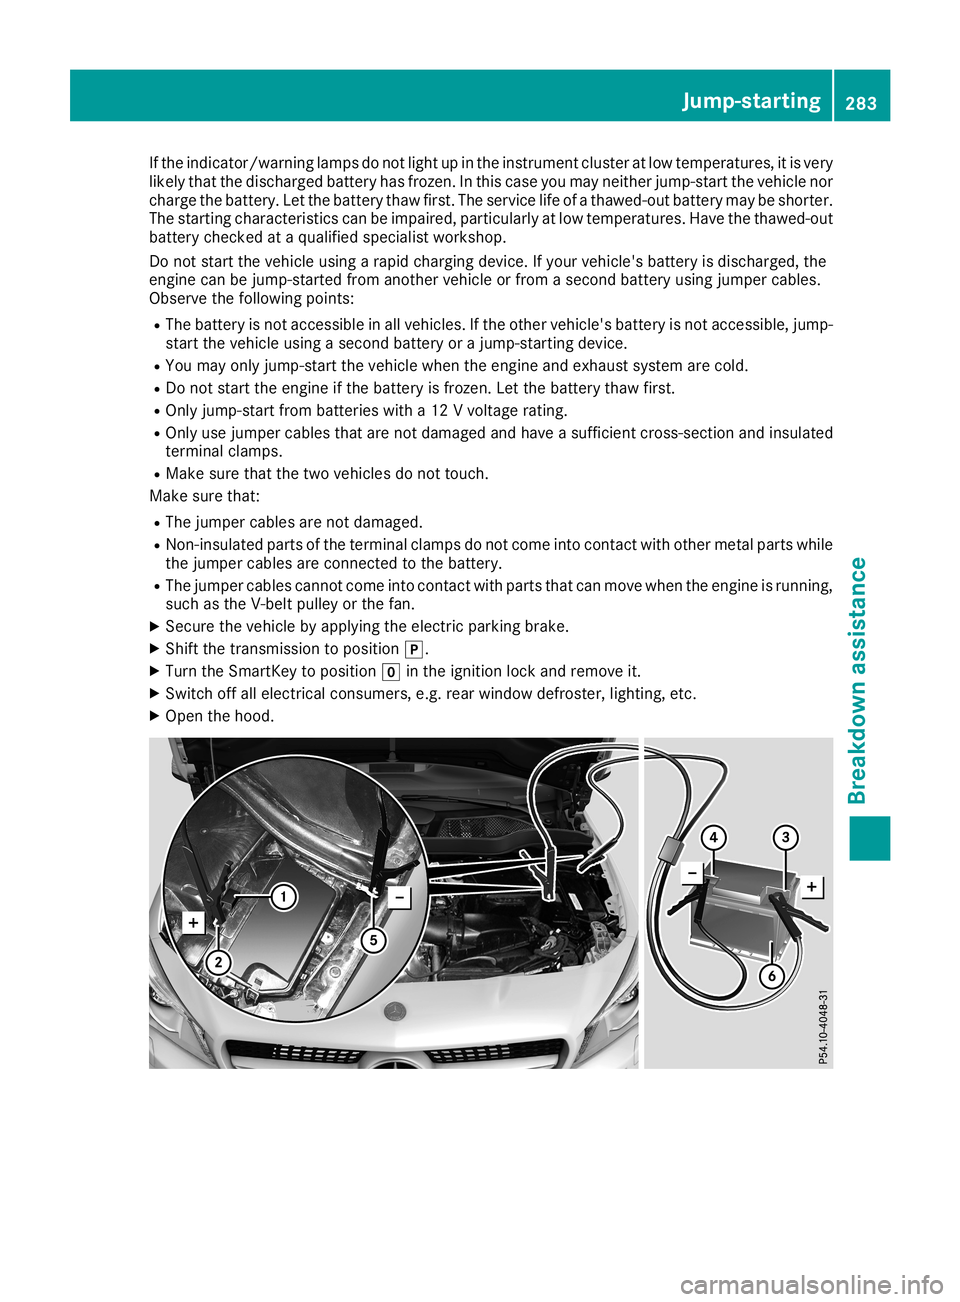
Position
number0084identifies thecharged batteryofthe other vehicle oran equivalent jump-starting
device.
X Press togethercover 0043ofpositive clamp0044and slide itback.
X Connec tpositive terminal0044 onyour vehicle topositive terminal0087 ofdonor battery 0084using the
jumper cable,beginnin gwith your ownbattery.
X Start theengine ofthe donor vehicle andrunitat idling speed.
X Connec tnegative terminal0085 ofdonor battery 0084toground point0083ofyour vehicle usingthe
jumper cable,connectin gthe jumper cabletobattery ofother vehicle 0084first.
X Ifthe battery isfully discharged, leavethebattery thatisbeing usedtojump-st artconn ected for
a few minutes beforeattemptingtostart .This charges thebattery slightly.
X Start theengine.
X Before disconn ectingthe jumper cables,letthe engine runforseveral minutes.
X First ,remove thejumper cablesfromground point0083and negative terminal0085, then from pos-
itive termin al0044 and positive terminal0087. Begin eachtimeatthe cont acts onyour ownvehicle
first.
X Close cover0043ofpositive terminal0044 after removin gthe jumper cables.
X Close thehood.
X Have thebattery checkedataqualified specialist workshop.
i Jump-start
ingisnot cons idered tobe anormal operating condition.
i Jumper
cablesandfurther informationregarding jump-startingcanbeobtained atany qualified
specialist workshop. Towing
andtow-sta rting Impor
tantsafety notes G
WARNIN
G
Funct ionsrelevant tosafety arerestr icted or
no longer availabl eif:
R the engine isnot runnin g
R the brake system orthe power steerin gis
malfunct ioning
R there isamalfunct ioninthe power supply
or the vehicle's electricalsystem
When yourvehicle istowed awayortowed
start ed,you may require considerably more
effort tosteer andbrake. Thereisarisk ofan
accident .
In such cases, useatow bar. Before being
towed awayortow start ed,make surethe
steerin gmoves freely. G
WARNIN
G
You cannolonger steerthevehicle ifthe
steerin gwheel lockhasbeen engaged. There
is arisk ofan accident .
Always switchoffthe ignition whentowing the
vehicle withatow cable oratow bar. G
WARNIN
G
When towing ortow-st arting another vehicle
and itsweight isgreater thanthepermissible
gross weight ofyour vehicle, the:
R the towing eyecould detach itself
R the vehicle/t railercombinat ioncould roll-
over.
There isarisk ofan accident .
When towing ortow-st arting another vehicle,
its weight should notbegreater thantheper-
missible grossweight ofyour vehicle.
Det ails onthe permissible grossvehicle weight
of your vehicle canbefound onthe vehicle iden-
tificat ionplate (Ypage 318). 284
Towing
andtow-sta rtingBr eakdown assistance