2019 MERCEDES-BENZ CLA COUPE warning
[x] Cancel search: warningPage 244 of 330
Observe
theloadi ngguide lines(Ypage 239). Cargo
compart mentenlargement
Importa ntsafety notes G
WARNING
If the rear bench seat/rear seatandseat
backrest arenot engaged theycould foldfor-
wards, e.g.when braking suddenly orinthe
event ofan accident.
R The vehicle occupant wouldthereby be
pushed intotheseat beltbythe rear bench
seat/rear seatorby the seat backrest. The
seat beltcannolonger offertheintended
level ofprotection andcould evencause
injuries.
R Objects orloads inthe trunk cannot be
restrained bythe seat backrest.
There isan increased riskofinjury.
Before everytrip,make surethattheseat
backrests andtherear bench seat/rear seat
are engaged.
! Before
folding thebackrest inthe rear com-
partment forwards, makesurethattherear
compartment armrestandthecup holder are
folded in.They mayotherwise bedamaged .
Observe theloadi ngguide lines(Ypage 239).
The left-hand andright-hand rearseat backrests
can befolded forwards separately toincrease
the trunk capacity. Fol
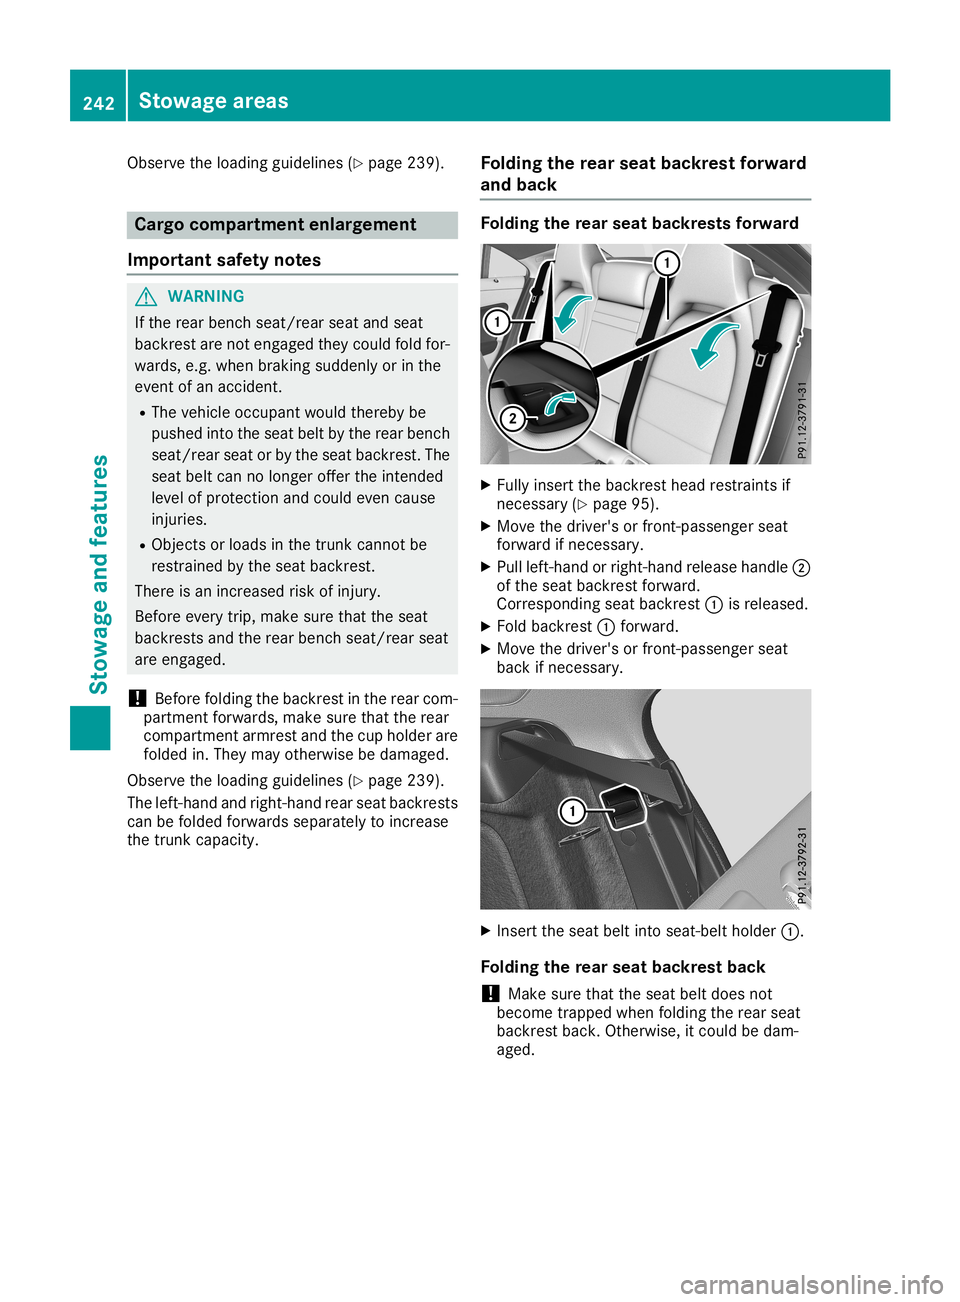
ding therear seat backrest forward
and back Foldin
gthe rear seat backrests forward X
Fully insert thebackrest headrestraints if
necessary (Ypage 95).
X Move thedriver's orfront -passenger seat
forward ifnecessary.
X Pull left-hand orright-hand releasehandle0044
of the seat backrest forward.
Corresponding seatbackrest 0043isreleased .
X Fold backrest 0043forward.
X Move thedriver's orfront -passenger seat
back ifnecessary. X
Insert theseat beltinto seat-belt holder0043.
Foldin gthe rear seat backrest back
! Make
surethattheseat beltdoes not
become trappedwhenfolding therear seat
backrest back.Otherwise, itcould bedam-
aged. 242
Stowage
areasStowage andfeatur es
Page 248 of 330
of
the upper section ofcup holder 0043faces
forwards.
X Press thecup holder downwards untilit
engages onthe right andleft-h andsides.
Cup holder inthe rear seat armrest !
Do
not siton orsupport yourbody weight on
the rear seat armrest whenitis folded down,
as you could otherwise damageit.
! Close
thecup holder before folding therear
seat armrest up.Otherwise, thecup holder
could bedamaged. X
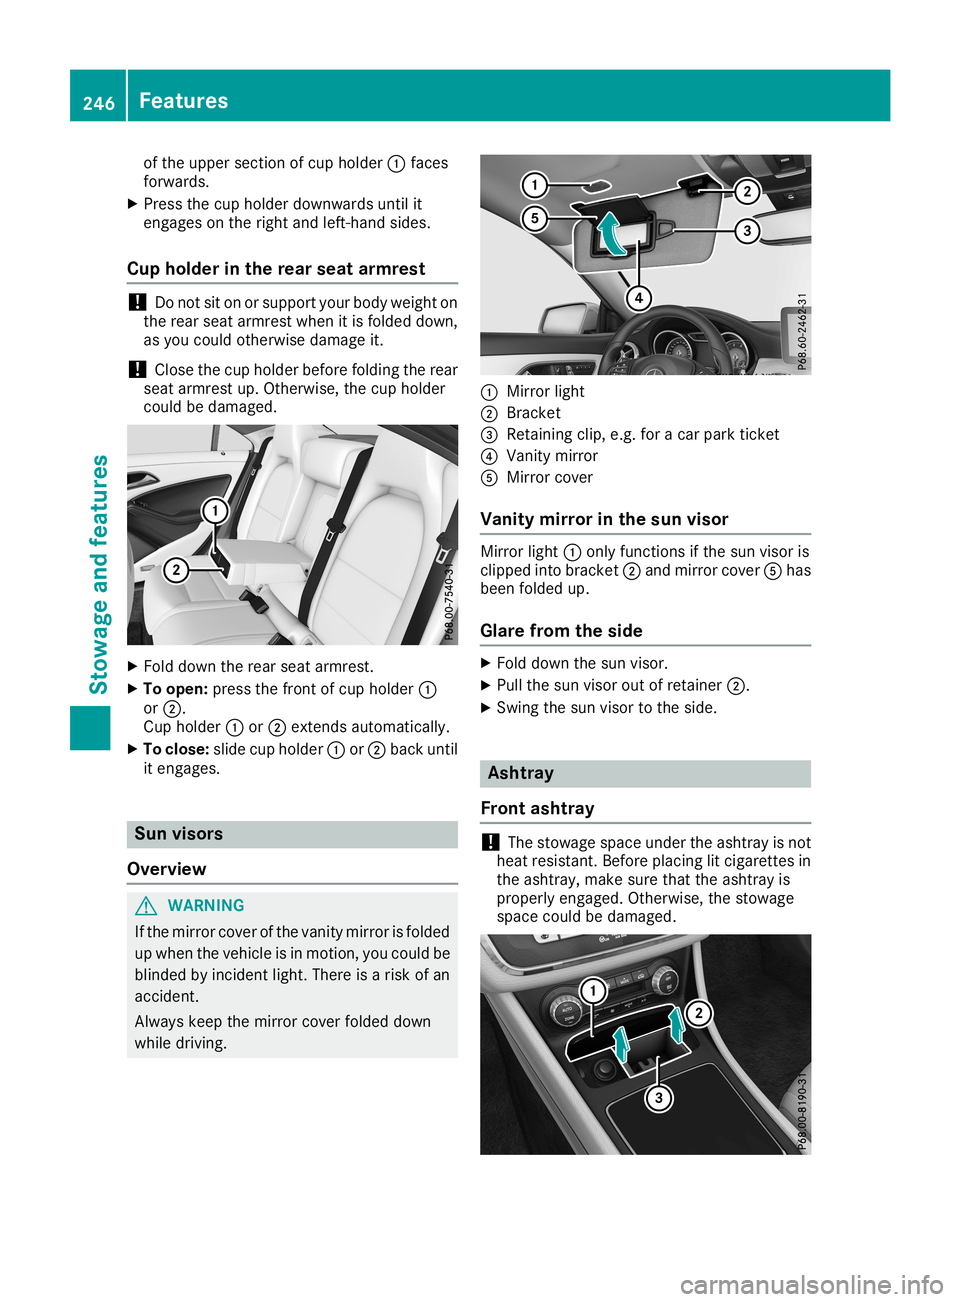
Fold down therear seat armrest.
X To open: pressthefront ofcup holder 0043
or 0044.
Cup holder 0043or0044 exten dsautomatically.
X To close: slidecupholder 0043or0044 back until
it engages. Sun
visors
Overview G
WARNING
If the mirror coverofthe vanity mirror isfolded
up when thevehicle isin motion, youcould be
blinded byincident light.There isarisk ofan
accident .
Always keepthemirror coverfolded down
while driving. 0043
Mirror light
0044 Brack et
0087 Retaining clip,e.g.foracar park ticket
0085 Vanity mirror
0083 Mirror cover
Vanit ymirr orinthe sun visor Mirror
light0043only funct ionsifthe sun visor is
clipped intobracket 0044and mirror cover0083has
been folded up.
Glare fromtheside X
Fold down thesun visor.
X Pull thesun visor outofretainer 0044.
X Swing thesun visor tothe side. Ashtra
y
Front ashtray !
The
stowage spaceundertheashtray isnot
heat resistant .Before placing litcigarett esin
the ashtray, makesurethattheashtray is
properly engaged. Otherwise, thestowage
space couldbedamaged. 246
Featur
esStowage andfeatu res
Page 257 of 330
Curr
ently inac tiveareas canbeact ivat edbytext
mes sage.
Tr igger ingthevehi clealarm Wit
hth is fun ction ,you can trigge rth eveh icle's
pan icalarm viatext mes sage. Analarm sounds
and theex terior light ingflashes. Depen dingon
th eset ting,thepan icalarm lastsfiv eor tensec -
on ds. Afterwar ds,thealarm switches off. Ga
rage door opener
Gener alnot es The
Hom eLink®
garag edoor openerintegr ated
in therear -view mirror allows youtooper ateup
to three differe ntdoor andgatesyst ems .
Use theint egr atedgarag edoor openeronlyon
garag edoor sth at:
R have safetystop and revers efeat ures and
R mee tcur ren tU. S. fed eral safetystand ards
On ce pro gram ed,theint egr atedgarag edoor
open erintherear -view mirror will assum eth e
fun ction ofthegarag edoor system'srem ote
co ntrol. Pleas ealso read theoper atingins truc-
tio ns for thegarag edoor system.
When program mingagarag edoor opener,park
th eveh icle outside thegarag e.Do notleave the
en gin erun ningwhile program ming.
Cert aingarag edoor drivesare incomp atible
wit hth eint egr atedgarag edoor opener.Ifyou
have difficult ypro gram ingtheint egr atedgarag e
door opener,contact aMer cedes-Ben zSer vice
Cen ter.
Alt ern ativ ely, you can callthefoll owin gte le-
phon eassis tanceser vices:
R USA: Mercedes-Ben zCust omerAs sist anc e
Cen terat 1-80 0-FO R-M ERCe des
R Cana da:Cust omerSer viceat
1- 80 0-38 7-01 00
R Hom eLink®
hot line1- 80 0-35 5-35 15 (free of
ch arge )
Mor einf orm ationon Hom eLink®
and /or com-
pat ible product sis also availab leon lineat
ht tp :/ /www. homelink.co m.
Notes onthe declara tionofconformity
(Y page 27).
USA: FCCID:CB2HMIHL4
Cana da:IC:279B-H MIHL4 Important
safetynotes G
WARNING
When youoperate orprogram thedoor with
the integrated garagedoor opener, persons in
the range ofmovement ofthe door may
become trappedorbe struck bythe door.
There isarisk ofinjury.
When usingtheintegrated garagedoor
opener, always make surethatnobody is
within therange ofmovement ofthe door. G
DANGER
Combu stionengines emitpoisonou sexhaust
gases suchascarbon monoxide. Inhaling
these exhaust gasesishazardou sto heal th
and canresult inpoisoning. Thereisarisk of
fatal injury. Therefore, neverleavetheengine
running inan enclosed spacewithou tade-
qua teventilation.
Programming Programming
thebuttons
Pay attention tothe "Important safetynotes"
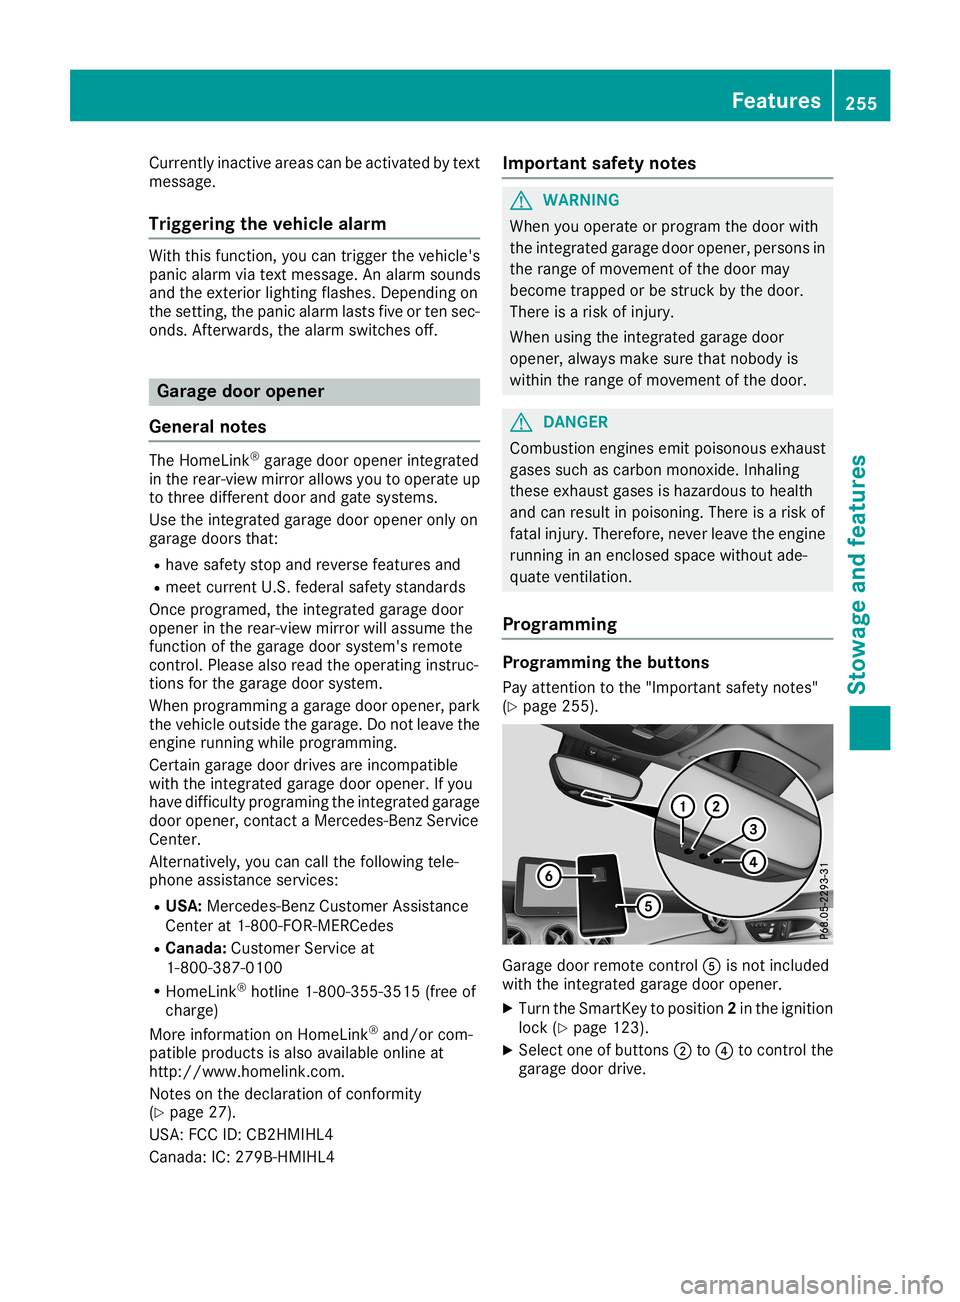
(Y page 255). Gara
gedoor remote control0083isnot included
with theintegrated garagedoor opener.
X Turn theSmartKey toposition 2in the ignition
lock (Ypage 123).
X Select oneofbuttons 0044to0085 tocontrol the
garag edoor drive. Fe
atur es
255Stowage andfeatures Z
Page 261 of 330
South
America Floo
rmats G
WARNING
Object sin the driver's footwell canrestrict the
pedal travel orobstruct adepressed pedal.
The operating androad safety ofthe vehicle is
jeopardized. Thereisarisk ofan accident.
Make surethatallobject sin the vehicle are
stowed correctly,and that they cannot enter
the driver's footwell. Installthe floormats
securely andasspecified inorder toensure
sufficient clearance forthe pedals. Donot use
loose floormats anddonot place floormats on
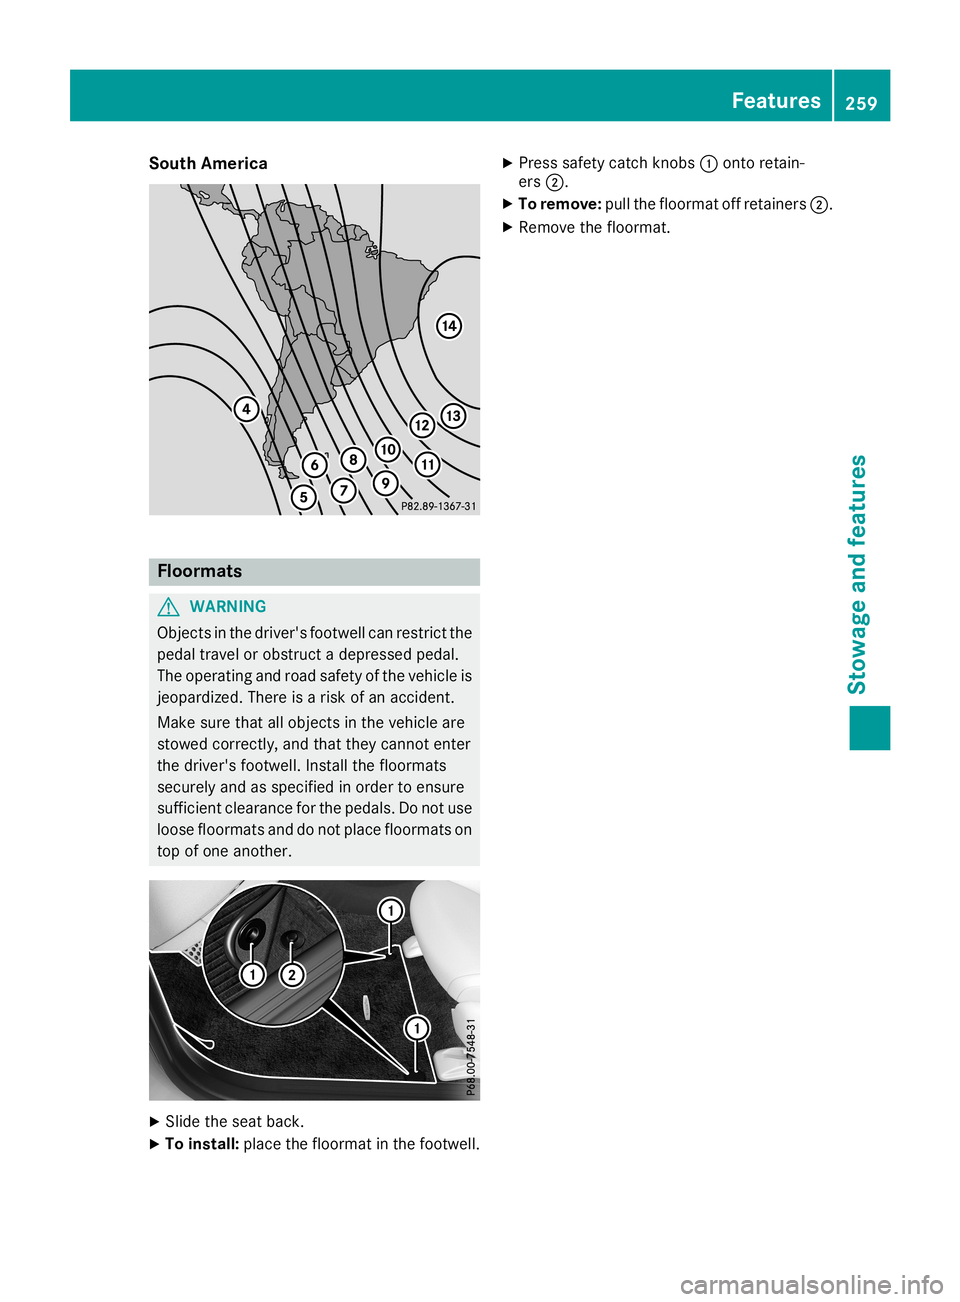
top ofone another. X
Slide theseat back.
X To install: placethefloormat inthe footwell. X
Press safety catchknobs 0043onto retain-
ers 0044.
X To remove: pullthefloormat offretainers 0044.
X Remove thefloormat. Features
259Stowageandfeatu res Z
Page 263 of 330
X
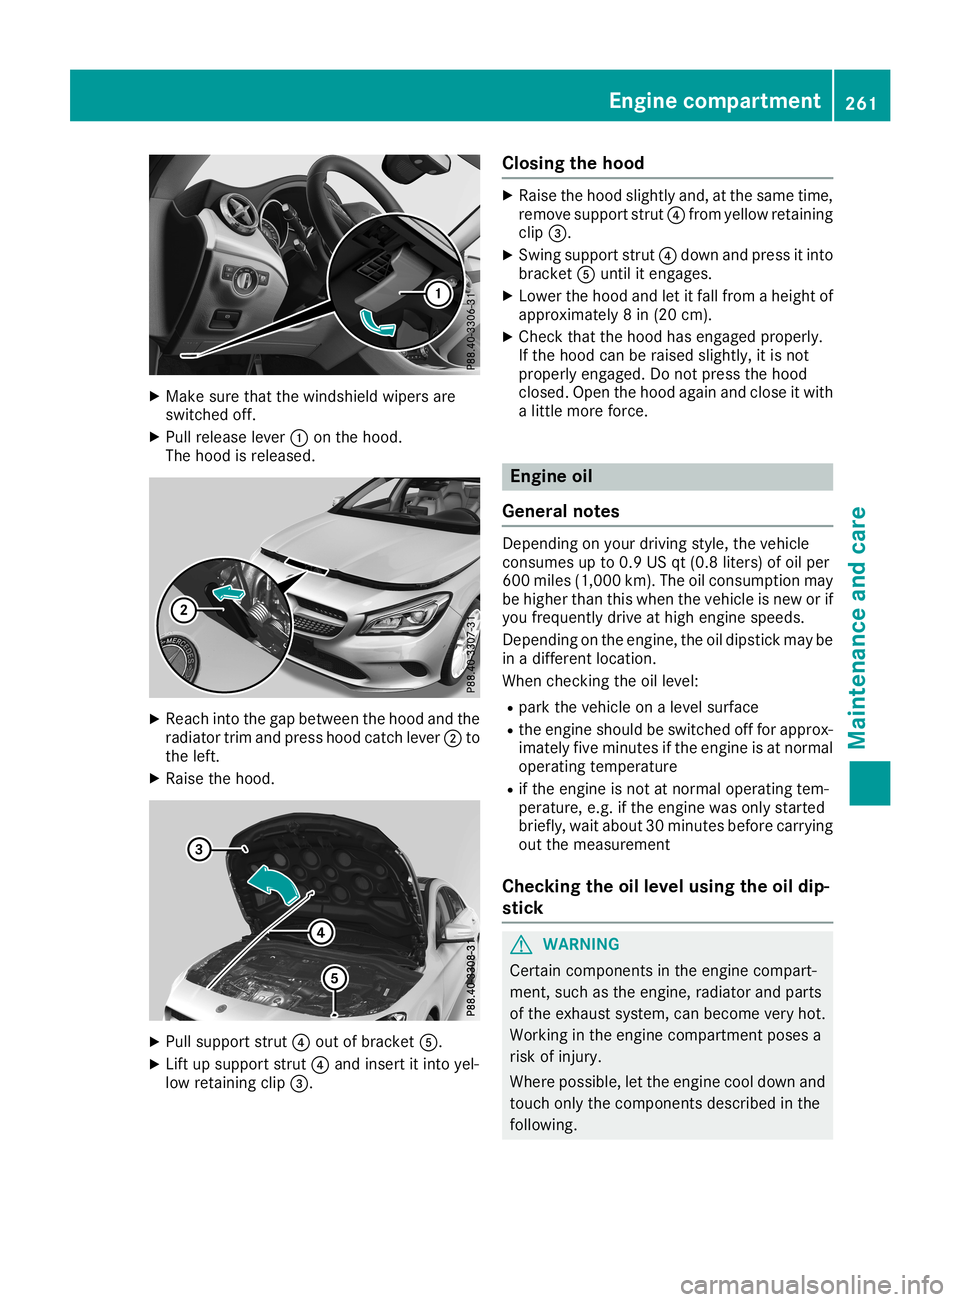
Make surethatthewindshield wipersare
switched off.
X Pull release lever0043onthe hood.
The hood isreleased. X
Reach intothegap between thehood andthe
radiator trimandpress hoodcatch lever0044to
the left.
X Raise thehood. X
Pull support strut0085out ofbracket 0083.
X Lift upsupport strut0085and insert itinto yel-
low retaining clip0087. Closi
ngthe hood X
Raise thehood slightly and,atthe same time,
remove support strut0085from yellow retaining
clip 0087.
X Swing support strut0085down andpress itinto
bracket 0083until itengages.
X Lower thehood andletitfall from aheight of
approximately 8in (20 cm).
X Check thatthehood hasengaged properly.
If the hood canberaised slightly, itis not
properly engaged. Donot press thehood
closed. Openthehood again andclose itwith
a little more force. Engine
oil
General notes Depending
onyour driving style,thevehicle
consumes upto0.9 USqt(0.8 liters) ofoil per
600 miles (1,000 km).Theoilconsumption may
be higher thanthiswhen thevehicle isnew orif
you frequently driveathigh engine speeds.
Depending onthe engine, theoildipstick maybe
in adifferent location.
When checkingthe oillevel:
R park thevehicle onalevel surface
R the engine shouldbeswitched offfor approx-
imately fiveminutes ifthe engine isat normal
operating temperature
R ifthe engine isnot atnormal operating tem-
perature, e.g.ifthe engine wasonly started
briefly, waitabout 30minutes beforecarrying
out themeasurement
Checking theoillevel using theoildip-
stick G
WARNING
Certain componen tsinthe engine compart-
ment, suchasthe engine, radiator andparts
of the exhaust system,canbecome veryhot.
Working inthe engine compartmen tposes a
risk ofinjury.
Where possible, letthe engine cooldown and
touch onlythecomponen tsdescribed inthe
following. Engi
necompar tment
261Maintenance andcare Z
Page 264 of 330
G
WARNING
Functions relevant tosafety arerestricted or
no longer available if:
R the engine isnot running
R the brake system orthe pow ersteering is
malfu nctioning
R there isamalfu nction inthe pow ersup ply
or the vehicl e'selectrica lsystem
When yourvehicl eis towed awayor towed
started, youmay requireconside rablymore
effort tosteer andbrake. Thereisarisk ofan
accide nt.
In such cases, useatow bar. Before being
towed awayor tow started, makesurethe
steering movesfreely. X
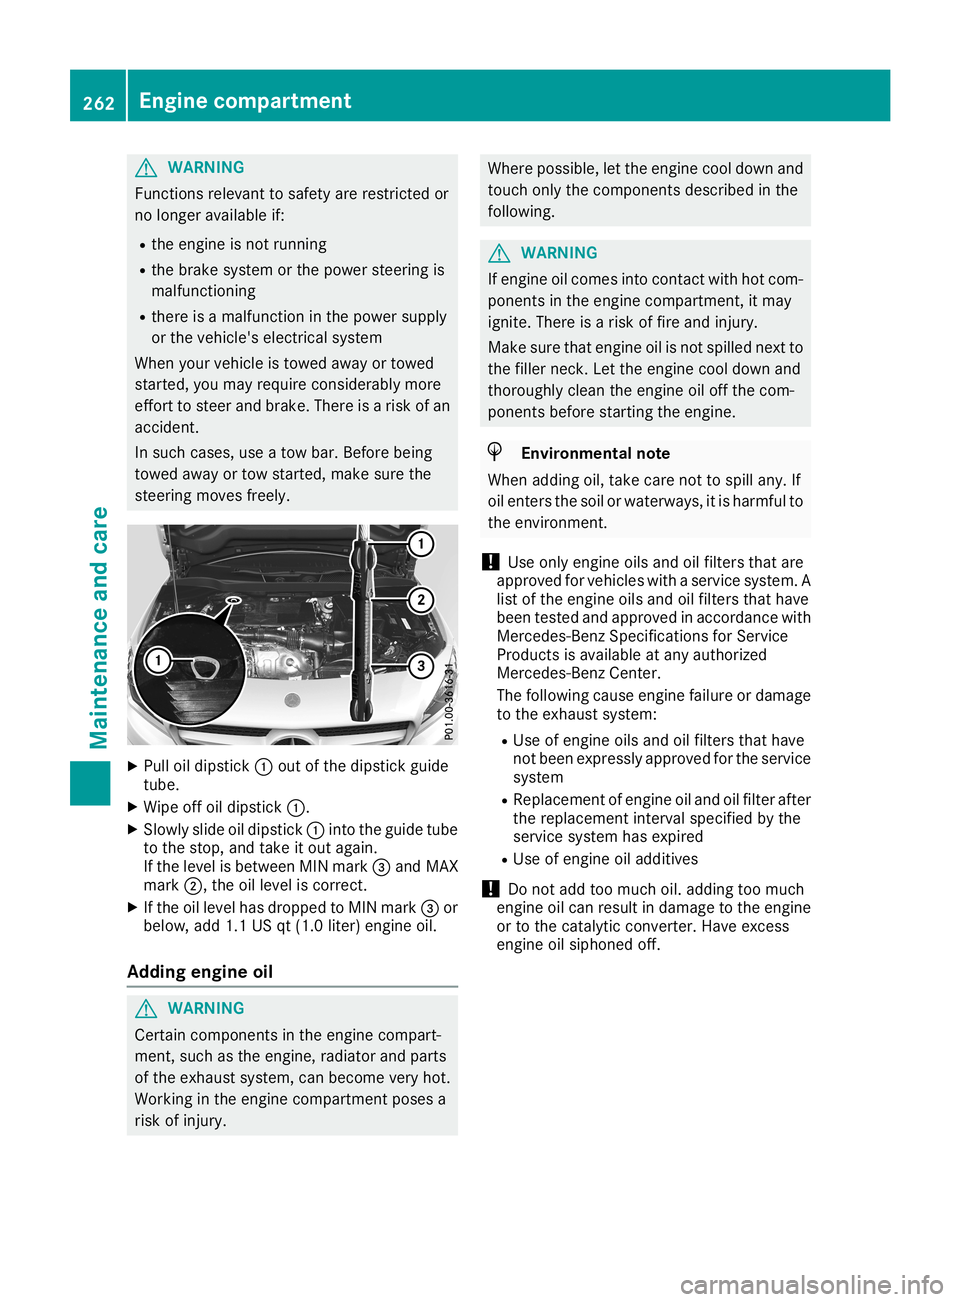
Pul loil dip stick 0043out ofthe dipstick guide
tube.
X Wip eoff oildip stick 0043.
X Slowl yslid eoil dip stick 0043into theguidetube
to the stop, andtake itout again.
If the leve lis betwe enMIN mark 0087and MAX
mark 0044,theoilleve lis correct.
X Ifthe oilleve lhas dropp edtoMIN mark 0087or
bel ow, add 1.1USqt(1.0 liter)engine oil.
Adding engineoil G
WARNING
Certa incomponents inthe engine compart-
ment, suchasthe engine, radiator andparts
of the exhau stsystem, canbecome veryhot.
Working inthe engine compartment posesa
risk ofinjury . Where
possible,let the engine cooldownand
touch onlythecomponents describedinthe
foll owi ng. G
WARNING
If engine oilcomes intocontact withhotcom-
ponents inthe engine compartment, itmay
ignite. Thereisarisk offire and injury .
Make surethatengine oilisnot spilled next to
the filler neck. Letthe engine cooldownand
thoroug hlyclea nthe engine oiloff the com-
ponents beforestarting theengine. H
Envi
ronmental note
When addingoil,take carenottospil lany. If
oil enters thesoil orwater ways,itis harmfu lto
the environment.
! Use
only engine oilsand oilfilters thatare
app roved forvehicl eswith aservice system. A
list ofthe engine oilsand oilfilters thathave
been tested andapproved inaccorda ncewith
Mercede s-BenzSpecifications forService
Produ ctsisava ilable atany authorized
Mercede s-BenzCenter.
The followi ngcaus eengine failure ordama ge
to the exhau stsystem:
R Use ofengine oilsand oilfilters thathave
not been express lyapp roved forthe service
system
R Rep lace ment ofengine oiland oilfilter after
the replacement intervalspecifiedbythe
service system hasexpire d
R Use ofengine oiladd itives
! Do
not add toomuch oil.add ingtoo much
engine oilcan resu ltin dama getothe engine
or tothe catal yticconverter. Haveexcess
engine oilsiph oned off. 262
Eng
inecompar tmentMainten anceandcare
Page 265 of 330
Exam
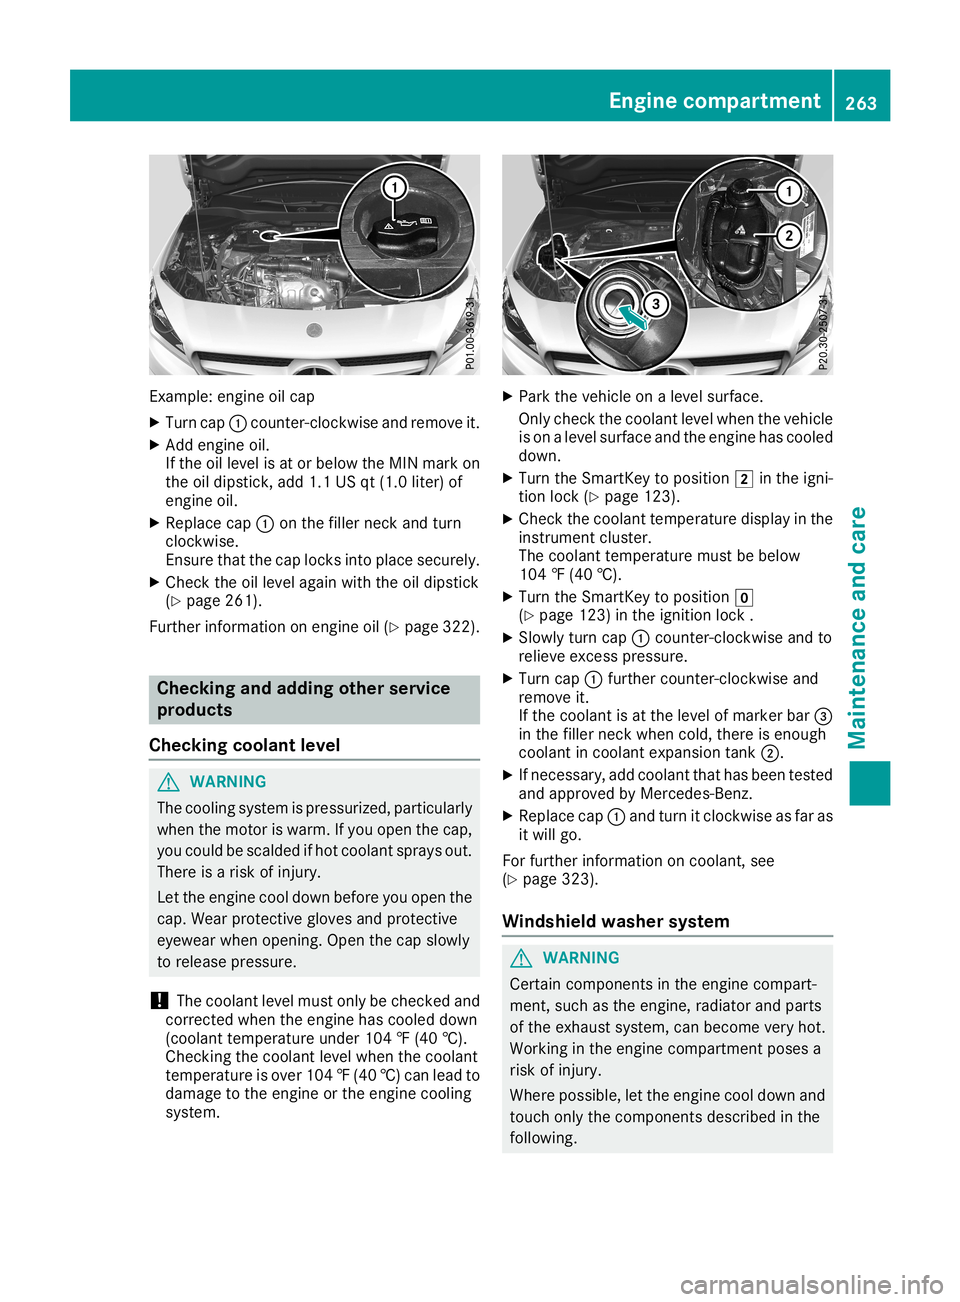
ple: eng ineoilcap
X Tu rn cap 0043cou nter-c lockwi seand remove it.
X Add engineoil.
If the oille vel isat or below the MIN markon
the oildi ps tick, add1.1 USqt(1.0 liter) of
eng ineoil.
X Re place cap 0043onthe fillerneck andturn
clo ckwi se.
Ensu retha tthe cap locks into place securely.
X Ch eck theoille vel again wi th the oildi ps tick
(Y page 261 ).
Fur therinfo rma tionon eng ineoil(Y page 322 ). Ch
eckin gand addi ngoth erservi ce
produ cts
Ch eckin gco olant leve l G
WA
RNING
The cooling system ispre ssu rize d,pa rtic ular ly
wh en the moto ris wa rm. Ifyo uop en the cap,
yo ucou ldbe sca lded ifhot coolant sprays out.
The reisaris kof inju ry.
Let the enginecoo ldo wn befor eyo uop en the
cap .We arpro tecti veglove sand protecti ve
ey ew earwh en openi ng. Open the cap slow ly
to release pre ssu re.
! The
coolant level mustonl ybe che cked and
corr ecte dwh en the enginehascoo led do wn
(co olant temp eratureund er104 ‡(40 †).
Ch ecki ngthe coolant level when the coolant
temp eratureis ove r104 ‡(40 †) can leadto
dama getothe engine orthe engine cooling
sys tem. X
Park thevehi cleonaleve lsurfa ce.
Only check thecoola ntleve lwhe nthe vehi cle
is on aleve lsurfa ceand theengine hascoole d
dow n.
X Turn theSmartKey toposi tion 0048inthe igni-
tion lock (Ypag e123).
X Che ckthe coola nttempera turedisplayin the
instrume ntclus ter.
The coola nttempera turemust bebelow
104 ‡(40 †).
X Turn theSmartKey toposi tion 005A
(Y pag e123) inthe igniti onlock .
X Slow lyturn cap0043counter-clo ckwiseandto
reli eve excess pressure.
X Turn cap0043further counter-clo ckwiseand
remove it.
If the coola ntisat the leve lof marker bar0087
in the filler neck whencold, there isenoug h
coola ntincoola ntexpa nsion tank0044.
X Ifnecessa ry,add coola ntthat hasbeentested
and approved byMerced es-Benz.
X Rep lace cap 0043and turn itclockwi seasfar as
it wil lgo.
For further informa tiononcoola nt,see
(Y pag e323) .
Windshi eldwashe rsyste m G
WARNING
Certa incomponents inthe engine compart-
ment, suchasthe engine, radiator andparts
of the exhau stsys tem, canbecome veryhot.
Working inthe engine compartment posesa
risk ofinjury .
Where possible,let the engine cooldownand
touch onlythecomponents describedinthe
foll owi ng. Eng
inecompar tment
263Maintenanceand care Z
Page 266 of 330
G
WARNING
Windsh ieldwas herconcentrate couldignite if
it comes intocontact withhotengine compo-
nents orthe exhau stsystem. Thereisarisk of
fire and injury .
Make surethatnowinds hieldwas hercon-
centrate isspil led next tothe filler neck. X
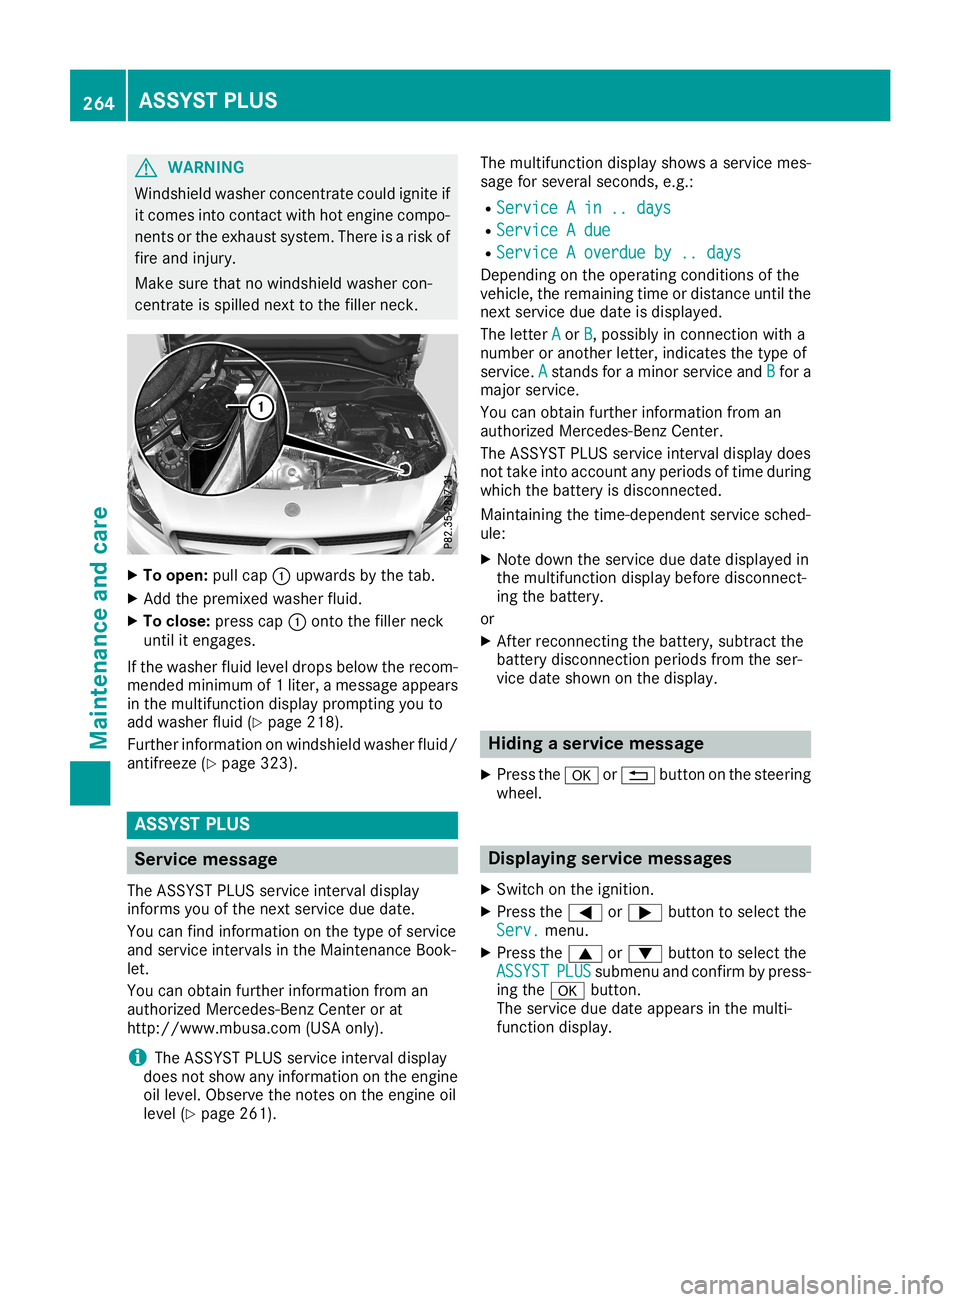
To open :pul lcap 0043upw ards bythe tab.
X Add thepremi xedwasherfluid.
X To clo se: press cap0043onto thefiller neck
until itengag es.
If the was herfluidleve ldrops below the recom-
mended minimumof 1liter, amessa geapp ears
in the multi function displayprompti ngyou to
add washerfluid(Y pag e218) .
Further informati ononwinds hieldwas herfluid/
antifree ze(Y pag e323) . ASSY
STPLU S Servic
emessag e
The ASSYST PLUSservice interval display
informs youofthe next service duedate.
You canfind informati onon the type ofservice
and service intervalsin the Maintenance Book-
let.
You canobtai nfurther informati onfrom an
au thorized Mercede s-BenzCenter orat
http://www.mb usa.com (USA only).
i The
ASSYST PLUSservice interval display
does notshow anyinformati ononthe engine
oil leve l.Observe thenotes onthe engine oil
leve l(Y pag e261) . The
multi function displayshow sa service mes-
sage forsevera lseconds, e.g.:
R Service Ain ..days Service
Ain ..days
R Service Adue Service
Adue
R Service Aoverdue by..days Service
Aoverdue by..days
Dependi ngon the opera tingconditions ofthe
vehicl e,the remai ningtime ordista nceuntil the
next service duedate isdisp layed.
The letter A A
or B B,
possi blyinconnection witha
number oranother letter,indicatesthe type of
service .A A
stands foraminor service andB B
for a
major service .
You canobtai nfurther informati onfrom an
au thorized Mercede s-BenzCenter.
The ASSYST PLUSservice interval displaydoes
not take intoaccount anyperiods oftime during
whi chthe battery isdisconnected.
Mai ntaining thetime-dep endentservice sched-
ule :
X Note downthe service duedate displayed in
the multi function displaybefore disconnect-
ing the battery .
or X After reconnecting thebattery ,sub tract the
battery disconnectio nperi ods from theser-
vice date show non the disp lay. Hiding
aservi cemessag e
X Press the0076 or0038 button onthe steering
whee l. Di
splayin gservi cemessag es
X Switch onthe ignitio n.
X Press the0059 or0065 button tosele ctthe
Serv. Serv.
menu.
X Press the0063 or0064 button tosele ctthe
ASSYST ASSYST
PLUS PLUS
submenu andconfirm bypress-
ing the 0076 button.
The service duedate appears inthe multi -
function display. 264
ASS
YST PLUSMainten anceandcare