2019 MERCEDES-BENZ CLA COUPE check oil
[x] Cancel search: check oilPage 125 of 330
!
Do
not warm upthe engine whilestationary.
Pull awayimmediately .Avoid highengine
speeds andfullthrott leuntil theengine has
reached itsoperating temperature.
In vehicles withautomatic transmission,
engage positions Pand Ronly when thevehi-
cle isstationary.
Where possible ,avoid spinning thedrive
wheels whenpulling awa yon slippe ryroads.
You could otherwise damagethedrive train.
! Mercedes-AMG
vehicles:avoid full-loa d
operation andengine speeds greater than
5000 rpmwhen theengine iscold. Thishelps
to protect theengine andavoids uncomfort-
able driving. Key
positions
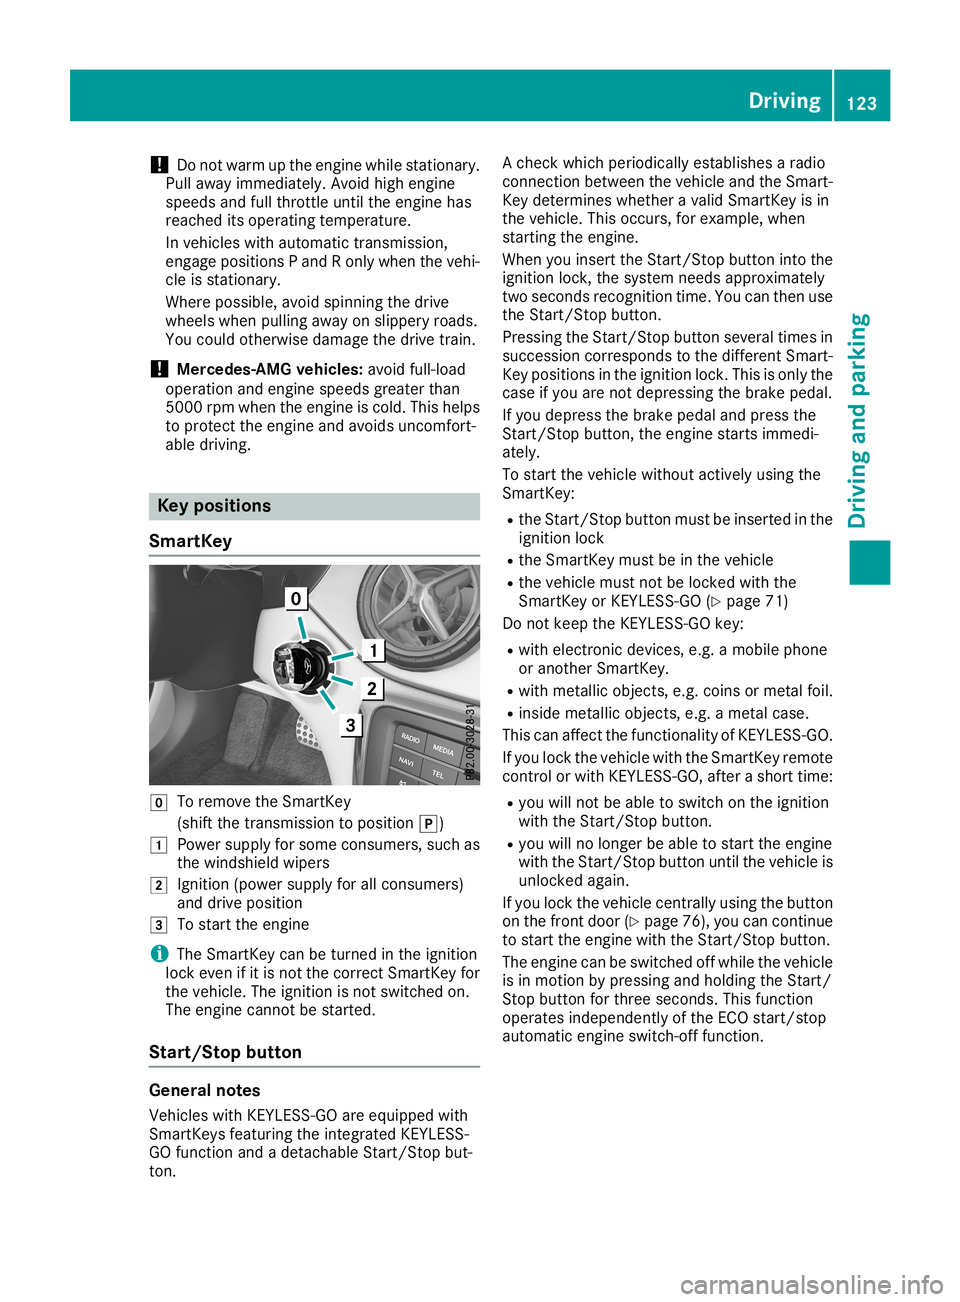
Smar tKey 005A
Toremove theSmartKey
(shift thetransmission toposition 005D)
0047 Power supplyfor some consumers, suchas
the windshiel dwipers
0048 Ignition (powersupplyfor allconsumers)
and drive position
0049 Tostart theengine
i The
SmartKey canbeturned inthe ignition
lock even ifit is not thecorrect SmartKey for
the vehicle. Theignition isnot switched on.
The engine cannot bestarted.
Star t/Stop button General
notes
Vehicles withKEYLES S-GOareequip pedwith
SmartKeys featuringtheintegrated KEYLESS-
GO function andadetachable Start/Stopbut-
ton. A
check whichperiodica llyestablishes aradio
connec tionbetween thevehicle andtheSmart-
Key determines whetheravalid SmartKey isin
the vehicle. Thisoccurs, forexample, when
starting theengine.
When youinsert theStart/ Stopbutton intothe
ignition lock,thesystem needsapproximately
two seconds recognition time.Youcanthen use
the Start/ Stopbutton.
Pressing theStart/ Stopbutton several timesin
succession corresponds tothe different Smart-
Key positions inthe ignition lock.Thisisonly the
case ifyou arenot depressing thebrake pedal.
If you depress thebrake pedalandpress the
Start/ Stopbutton, theengine startsimmedi-
ately.
To start thevehicle without actively usingthe
SmartKey:
R the Start/ Stopbutton mustbeinserted inthe
ignition lock
R the SmartKey mustbeinthe vehicle
R the vehicle mustnotbelocked withthe
SmartKey orKEYLES S-GO(Ypage 71)
Do not keep theKEYLES S-GOkey:
R with electronic devices,e.g.amobile phone
or another SmartKey.
R with metallic objects, e.g.coins ormetal foil.
R inside metallic objects, e.g.ametal case.
This canaffect thefunctionality ofKEYLES S-GO.
If you lock thevehicle withtheSmartKey remote
cont rolorwith KEYLES S-GO,afterashort time:
R you willnotbeable toswitch onthe ignition
with theStart/ Stopbutton.
R you willnolonger beable tostart theengine
with theStart/ Stopbutton untilthevehicle is
unlocked again.
If you lock thevehicle centrallyusing thebutton
on the front door(Ypage 76),youcan cont inue
to start theengine withtheStart/ Stopbutton.
The engine canbeswitched offwhile thevehicle
is in motion bypressing andholding theStart/
Stop button forthree seconds. Thisfunction
operates independently ofthe ECO start/st op
automatic engineswitch-off function. Driving
123Drivingandparking Z
Page 141 of 330
Befor
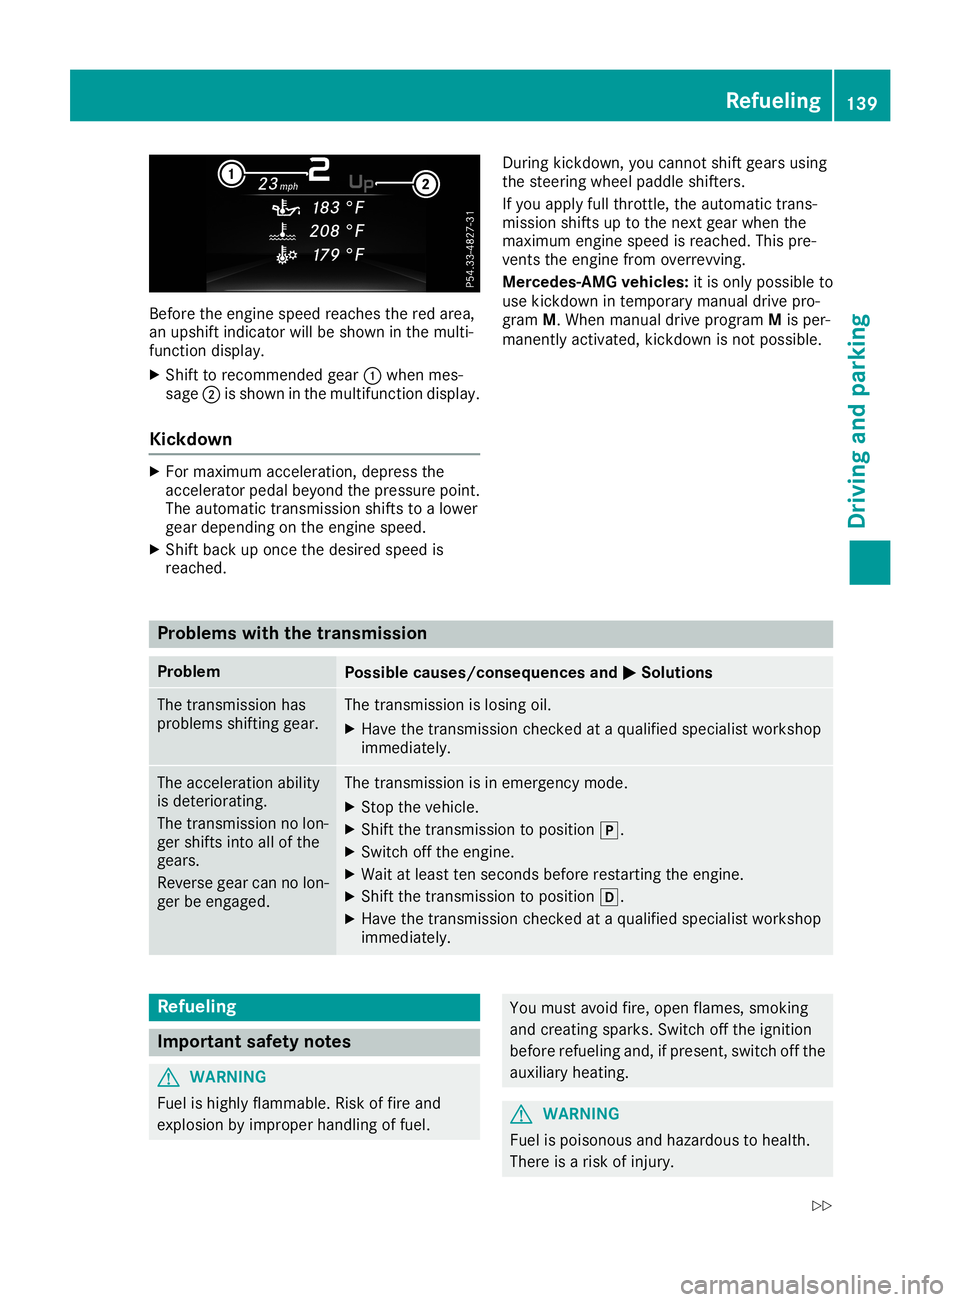
ethe engi nespe edrea ches thered area,
an upshi ftindi cator willbe show nin the multi-
functi ondispl ay.
X Shift torecom mende dgea r0043 whe nmes-
sag e0044 isshow nin the multifunction displ ay.
Ki ckdo wn X
For maxi mum acceleration, dep ress the
acce lerator pedalbey ond thepressu repoi nt.
The automa tictransm ission shifts toalow er
gea rdep endi ngon the engi nespe ed.
X Shift back up once thedesiredspe edis
rea ched . Duri
ngkickdo wn,youcannot shiftgea rsusi ng
the stee ring wheelpa ddl eshi fters.
If yo uap plyful lthrottle ,the automa tictrans-
mis sionshi fts uptothe next gearwhe nthe
maxi mum enginespe edisrea ched .Thi spre -
vents theengi nefrom overrevvi ng.
Merc edes-AMG vehicle s: itis only possibleto
use kickdo wnintempo rarymanu aldri ve pro-
gra mM. Whe nmanu aldri ve prog ramMisper -
mane ntlyactivate d,kickdo wnisnot possible. Prob
lems with the transmis sion Prob
lem Pos
siblecaus es/c on sequen cesand 0050 0050
Sol utio ns The
transm ission has
prob lemsshi fting gear. The
transm ission islos ing oil.
X Have thetransm ission checke dat aqu alifi ed spe cialist wor kshop
imme diatel y. The
acce leration ability
is dete riorati ng.
The transm ission nolon-
ger shifts into allof the
gea rs.
Re vers egea rcan nolon-
ger beenga ged. The
transm ission isin eme rgency mode.
X Stop thevehi cle.
X Shift thetransm ission topos ition005D.
X Swi tch offthe engi ne.
X Wa itat lea stten seco ndsbefore resta rting theengi ne.
X Shift thetransm ission topos ition005B.
X Have thetransm ission checke dat aqu alifi ed spe cialist wor kshop
imme diatel y. Refue
ling Impo
rtant safetynotes G
WARNI
NG
Fue lis hig hly flammab le.Risk offire and
expl osion byimp rope rhand ling offue l. You
mustavo idfire ,ope nfla mes, smoki ng
and crea ting sparks. Switch offthe ignition
bef ore refu eling and ,if pre sent, switch offthe
au xiliary hea ting. G
WARNI
NG
Fue lis poi sonou sand haza rdousto hea lth.
The reisarisk ofinju ry. Refue
ling
139Drivin gand parking
Z
Page 263 of 330
X
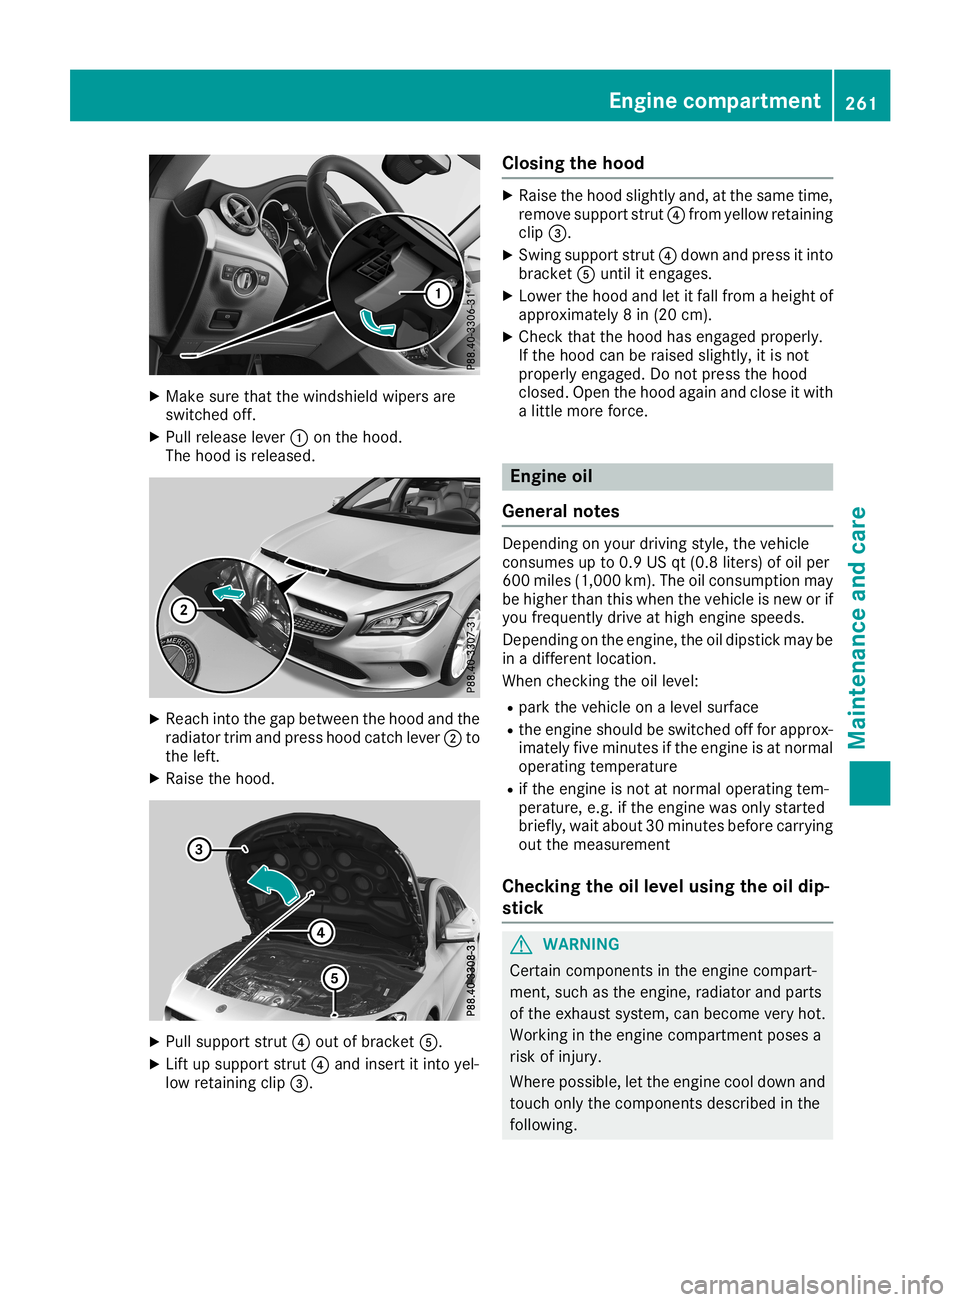
Make surethatthewindshield wipersare
switched off.
X Pull release lever0043onthe hood.
The hood isreleased. X
Reach intothegap between thehood andthe
radiator trimandpress hoodcatch lever0044to
the left.
X Raise thehood. X
Pull support strut0085out ofbracket 0083.
X Lift upsupport strut0085and insert itinto yel-
low retaining clip0087. Closi
ngthe hood X
Raise thehood slightly and,atthe same time,
remove support strut0085from yellow retaining
clip 0087.
X Swing support strut0085down andpress itinto
bracket 0083until itengages.
X Lower thehood andletitfall from aheight of
approximately 8in (20 cm).
X Check thatthehood hasengaged properly.
If the hood canberaised slightly, itis not
properly engaged. Donot press thehood
closed. Openthehood again andclose itwith
a little more force. Engine
oil
General notes Depending
onyour driving style,thevehicle
consumes upto0.9 USqt(0.8 liters) ofoil per
600 miles (1,000 km).Theoilconsumption may
be higher thanthiswhen thevehicle isnew orif
you frequently driveathigh engine speeds.
Depending onthe engine, theoildipstick maybe
in adifferent location.
When checkingthe oillevel:
R park thevehicle onalevel surface
R the engine shouldbeswitched offfor approx-
imately fiveminutes ifthe engine isat normal
operating temperature
R ifthe engine isnot atnormal operating tem-
perature, e.g.ifthe engine wasonly started
briefly, waitabout 30minutes beforecarrying
out themeasurement
Checking theoillevel using theoildip-
stick G
WARNING
Certain componen tsinthe engine compart-
ment, suchasthe engine, radiator andparts
of the exhaust system,canbecome veryhot.
Working inthe engine compartmen tposes a
risk ofinjury.
Where possible, letthe engine cooldown and
touch onlythecomponen tsdescribed inthe
following. Engi
necompar tment
261Maintenance andcare Z
Page 265 of 330
Exam
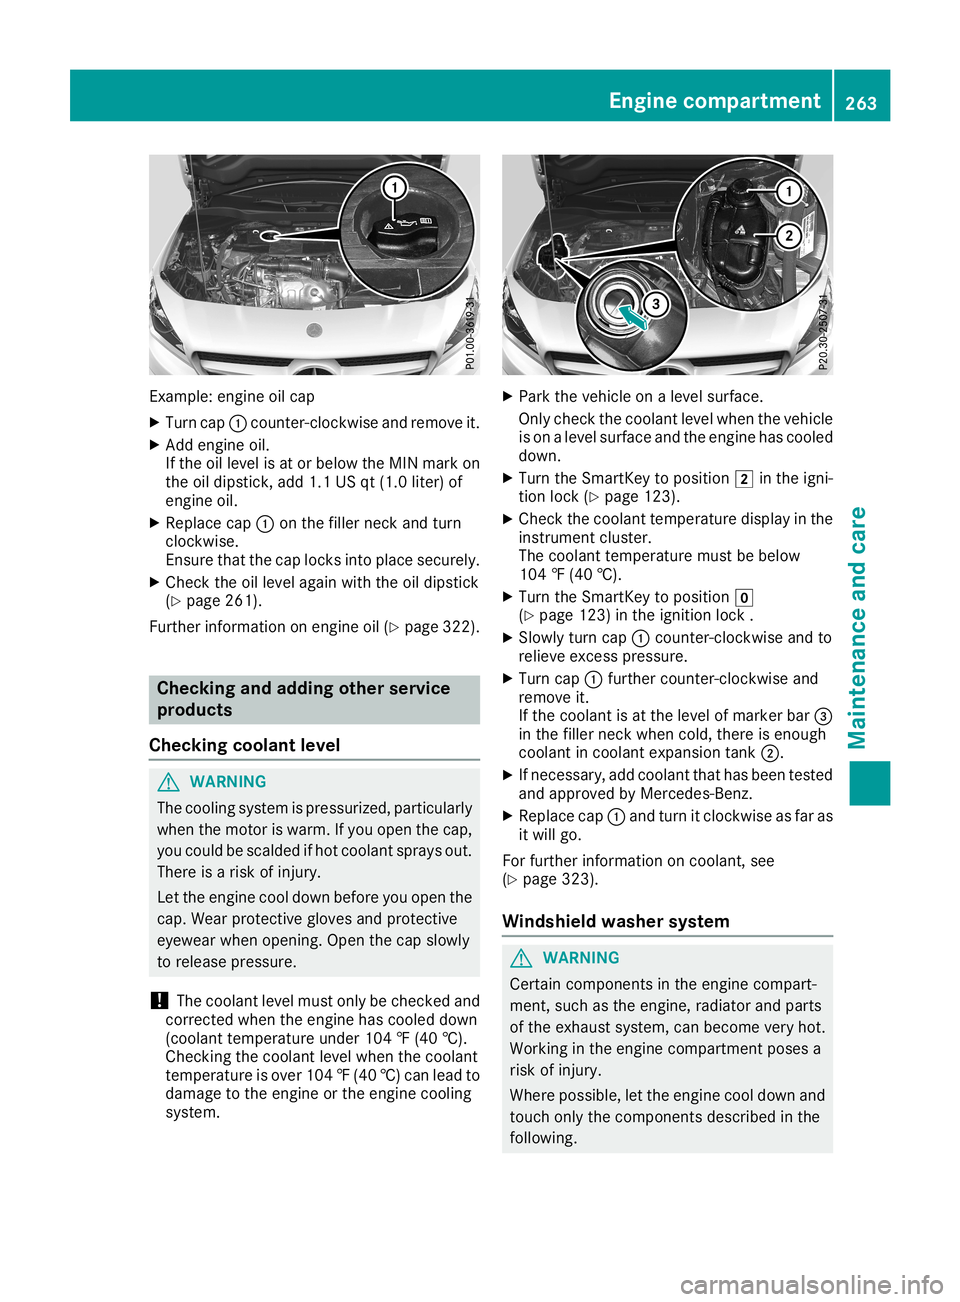
ple: eng ineoilcap
X Tu rn cap 0043cou nter-c lockwi seand remove it.
X Add engineoil.
If the oille vel isat or below the MIN markon
the oildi ps tick, add1.1 USqt(1.0 liter) of
eng ineoil.
X Re place cap 0043onthe fillerneck andturn
clo ckwi se.
Ensu retha tthe cap locks into place securely.
X Ch eck theoille vel again wi th the oildi ps tick
(Y page 261 ).
Fur therinfo rma tionon eng ineoil(Y page 322 ). Ch
eckin gand addi ngoth erservi ce
produ cts
Ch eckin gco olant leve l G
WA
RNING
The cooling system ispre ssu rize d,pa rtic ular ly
wh en the moto ris wa rm. Ifyo uop en the cap,
yo ucou ldbe sca lded ifhot coolant sprays out.
The reisaris kof inju ry.
Let the enginecoo ldo wn befor eyo uop en the
cap .We arpro tecti veglove sand protecti ve
ey ew earwh en openi ng. Open the cap slow ly
to release pre ssu re.
! The
coolant level mustonl ybe che cked and
corr ecte dwh en the enginehascoo led do wn
(co olant temp eratureund er104 ‡(40 †).
Ch ecki ngthe coolant level when the coolant
temp eratureis ove r104 ‡(40 †) can leadto
dama getothe engine orthe engine cooling
sys tem. X
Park thevehi cleonaleve lsurfa ce.
Only check thecoola ntleve lwhe nthe vehi cle
is on aleve lsurfa ceand theengine hascoole d
dow n.
X Turn theSmartKey toposi tion 0048inthe igni-
tion lock (Ypag e123).
X Che ckthe coola nttempera turedisplayin the
instrume ntclus ter.
The coola nttempera turemust bebelow
104 ‡(40 †).
X Turn theSmartKey toposi tion 005A
(Y pag e123) inthe igniti onlock .
X Slow lyturn cap0043counter-clo ckwiseandto
reli eve excess pressure.
X Turn cap0043further counter-clo ckwiseand
remove it.
If the coola ntisat the leve lof marker bar0087
in the filler neck whencold, there isenoug h
coola ntincoola ntexpa nsion tank0044.
X Ifnecessa ry,add coola ntthat hasbeentested
and approved byMerced es-Benz.
X Rep lace cap 0043and turn itclockwi seasfar as
it wil lgo.
For further informa tiononcoola nt,see
(Y pag e323) .
Windshi eldwashe rsyste m G
WARNING
Certa incomponents inthe engine compart-
ment, suchasthe engine, radiator andparts
of the exhau stsys tem, canbecome veryhot.
Working inthe engine compartment posesa
risk ofinjury .
Where possible,let the engine cooldownand
touch onlythecomponents describedinthe
foll owi ng. Eng
inecompar tment
263Maintenanceand care Z
Page 267 of 330
Infor
mation abou tSer vice
Res etting theASSYS TPLUS service
int erv aldis pla y !
If
th eAS SYS TPLU Sser viceint erv aldisp lay
has been inadve rten tly res et,th is set ting can
be correc tedat aqualif iedspec ialist work-
sho p.
Hav eser vicewor kcar ried outasdesc ribedin
th eMain tenan ceBooklet .This may other wise
lead toinc reas edwear anddamag eto the
maj orasse mbliesortheveh icle.
A qualif iedspec ialist workshop, e.g. an auth or-
ize dMer cedes- BenzCen ter, will resetthe
AS SYS TPLU Sser viceint erv aldisp layafterthe
ser vicewor khas been carried out.You canalso
obt ain further inform ation onmain tenan ce
wor k,for exampl e.
Sp ecial service requireme nts The
spec ifiedmain tenan ceinterv altak esonly
th eno rm aloper ation oftheveh icleint o
acc oun t.Un der arduo usoper ating cond ition sor
inc reas edload ontheveh icle, main tenan ce
wor kmust becar ried outmor efrequen tly, for
ex ampl e:
R reg ular citydriv ingwithfrequen tint erm ediat e
st ops
R ifth eveh icleis prim arily used totravel short
dist ances
R use inmoun tainous terrain oron poor road
sur faces
R ifth een gin eis oft en leftidlin gfor longper iods
R in part icularly dust yco nd ition s,or ifair- recir-
culat ionmod eis frequen tly used
In these orsim ilar oper ating cond ition s,have
th eint erio rfilt er, engin eair cleane r,en gin eoil
and oilfilter, for exampl e,chang edmor efre-
quen tly. Un der arduo usoper ating cond ition s,
th etires must bechecke dmor eoft en.Fur ther
inf orm ation can beobt ained ataqualif iedspe-
cial istwor kshop, e.g. an auth orizedMer cedes-
Ben zCen ter.
Driv ingabroad An
extens ive Mer cedes- BenzSe rvice netwo rkis
also availa bleinother count ries .You canobtain
fur ther inform ation from any auth orized
Mer cedes- BenzCen ter. Car
e Gener
alnot es H
Envir
onmentalnot e
Di spo seofemp typac kaging and cleani ng
clo thsin an environ men tallyres pon sible man-
ne r.
! When
cleani ng your car,do notuse:
R dry, coars eor har dclo ths
R abras ivecleani ng agen ts
R solv ents
R cle ani ng agen tscontain ing solv ents
Do notsc rub.
Do notto uch thesur facesand filmswit hhar d
obj ects,e. g. rin gs orice scrape rs.Other wise,
you may scrat ch ordamag eth esur facesand
film s.
! Do
notpark yourvehiclefor alon gper iod of
ti me dire ctly aft ercle ani ng,part icularly after
cle ani ng thewhee lrim withwhee lcle ane r.
Whee lcle ane rcan lead totheinc reas edcor-
ros ion ofthebrak edisc sand pads. Therefore,
driv efor afew minutesaft ercle ani ng.By
heat ingupthebrak es,thebrak edisc sand
pads dry.Thevehiclecan then be park edfor a
lon gper iod oftime.
Regular careof your vehicleis aco nd ition for
ret ain ing thequalit yin thelon gte rm .
Use carepro duc tsand cleani ng agen tsrec om-
men dedandappr ovedby Mer cedes- Benz. Wa
shing theveh icle and clean ingthe
pa int work
Aut oma tic car wash G
WAR
NING
Br aki ng efficien cy isred uce daft erwashi ng
th eveh icle. Ther eis aris kof an acc iden t.
Af terth eveh iclehas been washe d,brak e
car eful lywhile payingatt ention tothetraff ic
co nd ition sunt ilfull brak ingpower isres tored .
! When
Active Distanc eAs sist DIST RONI Cor
th eHO LD function isact ivat ed, theveh icle
brak esauto maticallyin certain situati ons. Car
e
265Maintenan ceand care Z
Page 313 of 330

Tire-mount
ingtools should notbeused near
the valve. Thiscould damage theelectron ic
compon ents.
Only have tireschanged ataqualified spe-
cialist workshop.
Observe theinstr uctions andsafety notesinthe
"Changing awheel" section (Ypage 310).
The wear pattern son the front andrear tires
differ, depending onthe operating conditions.
Rotate thewheels beforeaclear wearpattern
has formed onthe tires. Fronttires typically
wear more onthe shoulders andtherear tires in
the cent er.
On vehicles thathave thesame sizefront and
rear wheels, youcan rotat ethe wheels accord-
ing tothe inter valsinthe tire manufact urer's
warranty bookinyour vehicle document s.Ifno
warranty bookisavailabl e,the tires should be
rotat edevery 3,000 to6,000 miles(5,000 to
10,00 0km ).Dependin gon tire wear, thismay
be required earlier.Donot change thedirection
of wheel rotation.
Clean thecont actsurfaces ofthe wheel andthe
brake discthoroughly everytimeawheel isrota-
ted. Check thetire pressure and,ifnecessary,
restart thetire pressure losswarning system
(Canada only)orthe tire pressure monitor(USA
only). Direction
ofrota tion
Tires withaspecified directionofrotat ionhave
additional benefits,e.g. ifthere isarisk ofhydro-
planing. Theseadvantages canonly begained if
the tires areinstalled correspon dingtothe
direction ofrotat ion.
An arrow onthe sidewall ofthe tire indicates its
correc tdirection ofrotat ion. Storing
wheels
Stor ewheels thatarenot being usedinacool,
dry and preferably darkplace. Protectthe tires
from oil,grease, gasoline anddiesel. Mounting
awheel
Prepa ringthevehicle X
Stop thevehicle onsolid, non-slippery and
level ground.
X Apply theelectric parking brakemanually.
X Bring thefront wheels intothestraight- ahead
position.
X Shift thetrans mission toposition 005D.
X Switch offthe engine.
X Vehicles withoutKEYLESS-GO: removethe
Smart Keyfrom theignition lock.
X Vehicles
withKEYL ESS-GO start-function
or KEYL ESS-GO: openthedriver's door.
The vehicle electron icsare now inposition
0092. This isthe same as“key removed”.
X Vehicles
withKEYL ESS-GO start-function
or KEYL ESS-GO: removetheStart /Stopbut-
ton from theignition lock(Ypage 123).
X Make surethattheengine cannotbe start ed
via your smartphon e(Y page 83).
X Ifincluded inthe vehicle equipment, remove
the tire- change toolkitfrom thevehicle.
X Safeguard thevehicle against rollingaway
(Y page 142).
i Apart
fromcertaincount ry-specific varia-
tions, thevehicles arenot equipped witha
tire- change toolkit.Some toolsforchanging a
wheel arespecific tothe vehicle. Formore
inform ationonwhich toolsarerequired to
perform awheel change onyour vehicle, con-
sult aqualified specialist workshop.
Necessary tire-changing toolscaninclude, for
example:
R Jack
R Wheel chock
R Lug wrench Changing
awheel
311Wheels andtires Z
Page 316 of 330

bolts
tocome loose. Asaresult, youcould
lose awheel whiledriving .There isarisk of
acciden t.
Never oilorgrease wheelbolts.Inthe event of
damage tothe threads, contact aqualified
specialist workshopimmediately. Havethe
damaged wheelboltsorhub threads
replaced/r enewed.Donot continue driving . G
WARN
ING
If you tight enthe wheel boltsorwheel nuts
when thevehicle israised, thejack could tip
over. There isarisk ofinjury.
Only tightenthe wheel boltsorwheel nuts
when thevehicle ison the ground.
Always payattention tothe instruct ions and
safety notesinthe "Changing awheel" section
(Y page 310).
Only usewheel boltsthathave been designed
for the wheel andthevehicle. Forsafety rea-
sons, Mercedes -Benzrecom mends thatyou
only usewheel boltswhich havebeen approved
for Mercedes -Benzvehicles andtherespect ive
wheel.
! To
preven tdamage tothe paintwor k,hold
the wheel securely againstthewheel hub
while screwin gin the first wheel bolt. X
Clean thewheel andwheel hubcontact sur-
faces.
X Place thenew wheel onthe wheel huband
push iton.
X Tighten thewheel boltsuntiltheyarefinger -
tight . Lowering
thevehicle G
WARN
ING
The wheels couldworkloose ifthe wheel nuts
and bolts arenot tight ened tothe specified
tight eningtorque. Thereisarisk ofacciden t.
Have thetight eningtorque immediately
chec kedataqualified specialist workshop
after awheel ischang ed.
X Place theratc hetwrenc hont othe hexagon
nut ofthe jack sothat theletters ABare visi-
ble.
X Turn theratc hetwrenc huntil thevehicle is
onc eagain standing firmly onthe ground.
X Place thejack toone side. X
Tighten thewheel boltsevenly inacros swise
patte rninthe sequence indicated(0043 to0083).
The specified tighteningtorque is96 lb-ft
(130 Nm).
X Turn thejack back toits initial position .
X Stow the jack andtherest ofthe vehicle tools
in the vehicle again.
X Mercedes-
AMGvehicles andvehicles
with AMG Line: usethecover ofthe outer sill.
X Check thetire pressure ofthe newly mount ed
wheel andadjust itifnec essary.
Observe therecom mended tirepressure
(Y page 293).
Canad aonly: aslong asyou aredriving withthe
emergen cyspare wheel mounted,the tire pres-
sure losswarning systemcannotfunc tion relia-
bly. Only restartthe tire pressure losswarning
system whenthedefect ivewheel hasbeen
replaced withanew wheel.
Vehicles withtirepr essure monitor (USA
only): allmount edwheels mustbeequipped
with functioningsensor s. 314
Changing
awheelWheels andtires