2019 MERCEDES-BENZ CLA COUPE warning
[x] Cancel search: warningPage 272 of 330
X
Make surethatthevehicle isat astandstill
and theSmartK eyisin position 0048inthe igni-
tion lock.
X Open thecamera coverforcleaning viathe
multimedia system(seeDigital Operator's
Manual).
X To clean therear view camera: useclear
water andasoft cloth toclean camera
lens 0043.
Cleanin gthe exhaust pipes G
WARNING
The exhaust tailpipe andtailpipe trimcan
become veryhot.Ifyou come intocontact
with these partsofthe vehicle, youcould burn
yourself. Thereisarisk ofinjury.
Always beparticularly carefularound the
exhaust tailpipe andthetailpipe trim. Allow
these componen tsto cool down before touch-
ing them.
! Do
not clean theexhaust pipewithacid-
based cleaning agents,suchasbathroom
cleaner orwheel cleaner.
! Mercedes-AMG
vehicleswithblack exhaust
pipes: theblack-chr ometailpipe finishers
should notbepolished withachrome polish.
They willotherwise losetheir black sheen. For
optimal care,thefaceplates shouldberubbed
with alightly oiledcloth afterevery carwash.
Commercially availableengine andcare oils
are suitable forthis.
For heavier soiling,youcan apply afine paint-
work polish withamicrofiber cloth.Remove
the excess polishresidue afterpolishing.
Impurities combinedwiththeeffect sof road grit
and corrosive environmentalfactors maycause
flash rusttoform onthe surface. Youcan
restore theoriginal shineofthe exhaust pipeby
cleaning itregularly ,especially inwinter and
after washing.
X Clean theexhaust pipewithacare product
tested andapproved byMercedes-Ben z. Interior
care
Cleanin gthe display !
For
cleaning, donot use anyofthe following:
R alcohol-based thinneror gasoline
R abrasive cleaningagents
R commerc ially-availabl ehousehold cleaning
agents
These maydamage thedisplay surface. Do
not putpressure onthe display surface when
cleaning. Thiscould leadtoirreparable dam-
age tothe display .
X Before cleaning thedisplay ,make surethatit
is switched offand hascooled down.
X Clean thedisplay surface usingacommer-
cially availa blemicrofiber clothandTFT/LCD
display cleaner.
X Dry thedisplay surface usingadry microfiber
cloth.
Cleanin gthe plastic trim G
WARNING
Care products andcleaning agentscontaining
solvents causesurfaces inthe cock pitto
become porous.Asaresult, plastic partsmay
come looseinthe event ofair bag deploy -
ment. Thereisarisk ofinjury.
Do not use anycare products andcleaning
agents toclean thecock pit.
! Never
attach thefollowing toplastic surfa-
ces:
R stick ers
R films
R perfume oilcont ainer orsimilar
You could otherwise damagetheplastic.
! Do
not allow cosmetic s,insect repellent or
sunscreen tocome intocont actwith theplas-
tic trim. Thismaintains thehigh-quali tylook of
the surfaces.
X Wipe theplastic trimwith adamp, lint-free
cloth, e.g.amicrofiber cloth.
X Heavy soiling:use care andcleaning prod-
ucts recommen dedandapproved by
Mercedes-Ben z.
The surface maychange colortemporarily.
Wait untilthesurface isdry again. 270
CareMaintenance
andcare
Page 276 of 330
Vehi
cle too lkit
Gen eral notes Veh
icles with aTIR EFIT kit:the TIREFIT kitis
lo cate din the stow agewe llund erthe trunk
flo or.
Veh icles with atire -cha nge tool kit:the tire-
cha nge tool kitisin the stow agewe llund erthe
trunk floor.
Apa rtfrom certaincou ntry -spe cificvar iatio ns,
the vehicles are not equipp ed with atire -cha nge
tool kit.Some toolsfor cha nging awh eelare
spe cificto the vehicle. For more informa tionon
wh ich tire changing tool sare required and
ap pro ved toperfor mawh eelcha nge onyour
veh icle, consu ltaqu alifi ed spe cialist wo rksh op.
Too lsreq uired forcha nging awh eelmay
incl ude,for exa mpl e:
R Jack
R Whe elchoc k
R Lu gwre nch
R Ali gnme ntbolt
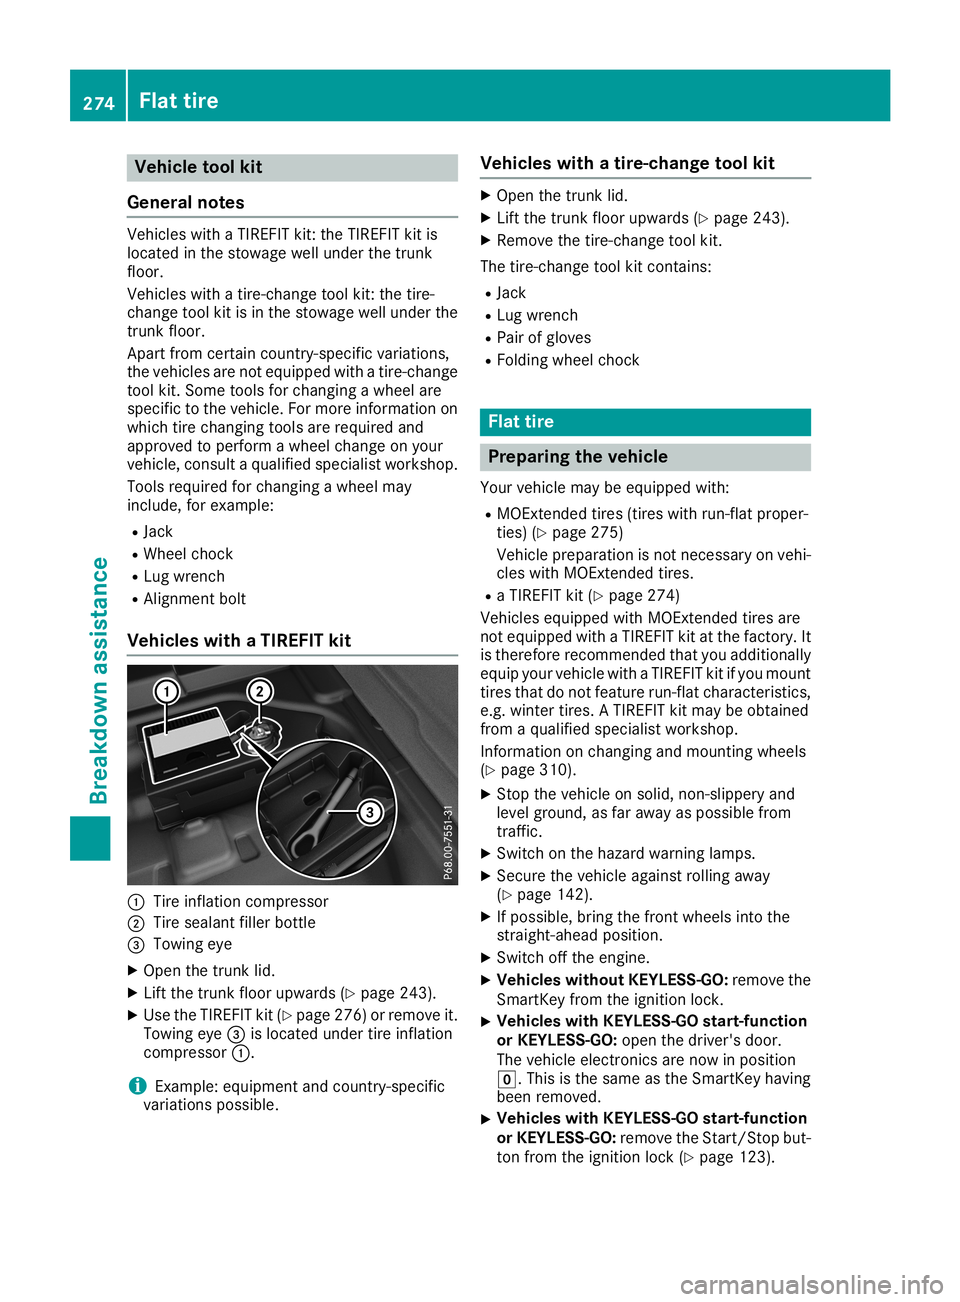
Vehi cles with aTIRE FITkit 0043
Tire infl ation comp ressor
0044 Tire sea lant fillerbo ttle
0087 Tow ingeye
X Ope nthe trunk lid.
X Lif tthe trunk floor upwa rds (Ypage 243) .
X Use theTIREFIT kit(Ypage 276 )orremove it.
Towi ngeye 0087islocated undertireinfla tion
compresso r0043.
i Example:
equipment andcountry-spe cific
varia tions possible. Vehic
leswith atire-chang etool kit X
Open thetrunk lid.
X Lift the trunk floorupwards (Ypag e243).
X Remo vethe tire-change toolkit.
The tire-change toolkitcontains:
R Jack
R Lug wrench
R Pai rof glove s
R Foldi ngwhee lchock Flat
tire Preparing
thevehic le
You rvehicl emay beequ ipped with:
R MOExtended tires(tires withrun-flat proper-
ties) (Ypag e275)
Vehicl eprepa ration isnot necessary onvehi-
cles with MOExtended tires.
R aTIREFIT kit(Ypag e274)
Vehicl esequ ipped with MOExtended tiresare
not equippedwith aTIREFIT kitatthe factory. It
is therefore recommended thatyouadditional ly
equ ipyou rvehicl ewith aTIREFIT kitifyou mount
tires thatdonot feature run-flat characteristics,
e.g. winter tires.ATIREFIT kitmay beobtai ned
from aqua lified specia listworkshop .
Information onchanging andmounting wheels
(Y pag e310).
X Stop thevehicl eon soli d,non-slipp eryand
level ground ,as far awa yas possi blefrom
traffic.
X Switch onthe hazard warninglamp s.
X Secure thevehicl eaga inst rolling awa y
(Y pag e142) .
X Ifpossi ble,bring thefront wheelsinto the
straigh t-ahead position.
X Switch offthe engine.
X Vehic leswitho utKE YLESS-GO :remove the
SmartKey fromtheignitio nlock.
X Vehic
leswith KEYLESS-GO start-function
or KEYLESS-GO :open thedriver' sdoor.
The vehicl eelectronics arenow inposi tion
005A. This isthe same asthe SmartKey having
been removed .
X Vehic
leswith KEYLESS-GO start-function
or KE YLESS-GO :remove theStart/Stop but-
ton from theignitio nlock (Ypag e123). 274
Fl
at tireBreakdown assistance
Page 277 of 330
X
Make surethattheengine cannot bestarted
via your smartphone (Ypage 124).
X Make surethatthepassengers arenot endan-
gered asthey doso. Make surethatnoone is
near thedanger areawhile awheel isbeing
changed. Anyonewhoisnot directly assisting
in the wheel change should,forexample,
stand behind thebarrier.
X Get outofthe vehicle. Payattent iontotraffic
condition swhen doing so.
X Close thedriver's door. MOExtended
tires(tires withrun-flat
proper ties)
General notes With
MOExt ended tires(tires withrunflatchar-
acteristics ),you can cont inue todrive yourvehi-
cle even ifthere isatotal lossofpressure inone
or more tires.Theaffected tiremust notshow
any clearly visibledamage.
You canrecogniz eaMOExt ended tirebythe
MOExt ended marking whichappears onthe
sidewa llof the tire. Youwillfind thismarking
next tothe tire size designation, theload-bear-
ing capacity andthespeed index(Ypage 305).
MOExt ended tiresmaybeused onlyinconj unc-
tion with anactivated tirepressure losswarning
system (Canada only)ortire pressure monitor
(USA only).
If apressur eloss warning message appears
in the multifu nctiondisplay:
R observe theinstruct ionsinthe display mes-
sages (Ypage 213).
R check thetire fordamage
R ifdriving on,observe thefollowing notes
The driving distance possibleinrun-flat modeis
approximately 50miles (80km) when thevehi-
cle ispartially laden.Whenthevehicle isfully
laden itis approximately 19miles (30km).
In addition tothe vehicle load,thedriving dis-
tance possible depends upon:
R vehicle speed
R road condition
R outside temperature
The driving distance possibleinrun-flat mode
may bereduced byextrem edriving condition s
or maneuvers, oritcan beincreased througha
moderate styleofdriving. The
driving distance possibleinrun-flat modeis
counted fromthemoment thetire pressure loss
warning appears inthe multifunction display.
You must notexceed amaximum speedof
50 mph (80km/h).
When replacing oneorall tires, please observe
the following specifications foryour vehicle's
tires:
R size
R type and
R the "MOExt ended" marking
If atire has gone flatand cannot bereplaced
with aMOExt ended tire,astandard tiremay be
used asatemporary measure.Makesurethat
you usetheproper sizeandtype (summer or
winter tire).
Vehicles equippedwith MOExt ended tiresare
not equipp edwith aTIREFIT kitatthe factory. It
is therefore recommen dedthat youadditionally
equip yourvehicle withaTIREFIT kitifyou mount
tires thatdonot feature run-flat properties, e.g.
winter tires.ATIREFIT kitmay beobtained from
a qual ified specialist workshop.
Import antsafety notes G
WARNING
When driving inemergency mode,thedriving
characterist icsdeteriorate, e.g.when corner-
ing, accelerating quicklyandwhen braking.
There isarisk ofan accident.
Do not exceed thestated maximum speed.
Avoid abrupt steering anddriving maneuvers,
and driving overobstacles (curbs,potholes,
off-road). Thisappli esinparticular toaladen
vehicle.
Stop driving inemergency modeif:
R you hear banging noises.
R the vehicle startstoshake.
R you seesmoke andsmell rubber.
R ESP ®
is interven ingconst antly.
R there aretears inthe sidewa llsofthe tire.
Aft erdriving inemergency mode,havethe
wheel rimscheck edataqual ified specialist
workshop withregard totheir further use.The
defective tiremust bereplaced inevery case. Flat
tire
275Breakdown assistance Z
Page 283 of 330
Only
replace abattery withabattery thathas
been recommended byMercedes-Benz .
Remove theSmartKey ifyou park thevehicle
and donot require anyelectrical consumers.
The vehicle willthen usevery little energy, thus
conserving batterypower.
If the power supply hasbeen interrupted, e.g.if
you reconnec tthe battery, youwillhave to:
R set the clock using themultimedia system
(see theDigital Operator's Manual)
R reset thefunction forfolding theexterior mir-
rors in/out automaticall y,by folding themir-
rors outonce (Ypage 98) Charging
thebatter y G
WARNING
During charging andjump-startin g,explosive
gases canescape fromthebattery. Thereisa
risk ofan explosion.
Particularl yavoid fire,open flames, creating
sparks andsmoking. Ensurethereissufficient
ventilation whilecharging andjump-startin g.
Do not lean over abattery. G
WARNING
Battery acidiscaustic. Thereisarisk ofinjury.
Avoid contactwith skin, eyesorclothing. Do
not inhale anybattery gases.Donot lean over
the battery. Keepchildren awayfrom batter-
ies. Wash awaybattery acidimmediately with
plenty ofclean water andseek medical atten-
tion. G
WARNING
A discharged batterycanfreeze attempera-
tures below freezing point.Whenjump-start-
ing the vehicle orcharging thebattery, gases
can escape fromthebattery. Thereisarisk of
an explosion.
Allow thefrozen battery tothaw outbefore
charging itor jump-startin g.
! Only
usebattery chargers withamaximum
charging voltageof14.8 V.
! Only
charge thebattery usingthejump-
starting connectionpoint. The
jump-startin gconnec tionpoint isin the
engine compartment (Ypage 282).
X Open thehood.
X Connect thebattery charger tothe positive
terminal andground pointinthe same order
as when connec tingthedonor battery inthe
jump-startin gprocedure (Ypage 282).
If the <004C00510047004C004600440057005200550012005A004400550051004C0051
004A[ lampsdonot light upin
the instrument clusteratlow temperatures, itis
very likely thatthedischarged batteryhasfro-
zen. Inthis case youmay neither jump-start the
vehicle norcharge thebattery. Theservice lifeof
a thawed-out batterymaybeshorter. Thestart-
ing characteristics canbeimpaired ,particularl y
at low temperatures. Havethethawed-out bat-
tery checked ataqual ified speciali stworkshop.
Only charge theinstalled batterywithabattery
charger whichhasbeen tested andapproved by
Mercedes-Benz .A battery charger unitspeciall y
adap tedforMercedes-Benz vehiclesandtested
and approved byMercedes-Benz isavail able as
an accessory. Itpermits thecharging ofthe bat-
tery inits installed position. Contactanauthor-
ized Mercedes-Benz Centerforfurther informa-
tion andavail ability. Read thebattery charger's
operating instructionsbefore charging thebat-
tery. Replacing
the12Vbatter y
Observe thenotes onthe 12Vbattery
(Y page 279).
Mercedes-Benz recommendsthatyouhave the
12 Vbattery replaced ataqual ified speciali st
workshop, e.g.atan authorized Mercedes-Benz
Center.
If you want toreplace thebattery yourself,
observe thefollowi ngnotes:
R Alway sreplace adefective batterywithabat-
tery which meets thespecific requirements of
the vehicle.
The vehicle isequip pedwith abattery using
AGM (absorbe ntglass mat)technology ora
battery usingEFB(enhanced floodedbattery)
technology. Fullvehicle functionality isguar-
anteed onlywith anAGM orEFB battery. If
replacement isnecessary, alwaysuse thebat-
tery technology originallyinstalled. Switching
between thebattery technologies isnot per-
mitted. Forsafety reasons, Mercedes-Benz
recommends thatyouonly usebatteries Bat
tery (vehic le)
281Breakdown assistance Z
Page 288 of 330
The
towing eyeislocated withthevehicle tool
kit under thecargo compart mentfloor
(Y page 274).
Vehicles withtheTIREFIT kit:the towing eyeis
beneath thetire inflation compressor
(Y page 274).
X Press themark oncover 0043inwards inthe
direction ofthe arrow.
X Take cover 0043offthe opening.
X Scr ewinthe towing eyeclock wisetothe stop.
Removing thetowing eye X
Unsc rewand remove thetowing eye.
X Attach cover 0043tothe bumper andpress until
it engages.
X Place thetowing eyeinthe stowage well
beneath thecargo compart mentfloorinthe
cargo compart ment(Ypage 274).
X Vehicles withtheTIREFIT kit:put back thetire
inflation compressor (Ypage 274). Towing
thevehicle withthefront axle
raised
Observe theimportant safetynoteswhen tow-
ing your vehicle withthefront axleraised
(Y page 284).
Only vehicles without4MATICcanbetowed
with thefront axleraised.
! Vehicles
with4MATI Cmust notbetowed
with either thefront orthe rear axle raised, as
doing sowill damage thetrans mission.
Vehicles with4MATI Cmay either betowed away
with both axles onthe ground orbe loaded up
and trans ported.
! The
ignition mustbeswitched offifthe vehi-
cle isbeing towed withthefront axleraised.
Otherwise, ESP®
may intervene anddamage
the brake system.
X On
vehicles withKEYL ESS-GO orthe KEY-
LESS-GO startfunction: youmust usethe
Smart Keyinstead ofthe Start /Stopbutton
(Y page 124).
X Make surethatthevehicle isstation ary.
X Turn theSmart Keytoposition 0048inthe igni-
tion lock.
X When thevehicle isstation ary,depress the
brake pedalandkeep itdepressed. X
Shift theautomatic transmission toposition
005D.
X Release thebrake pedal.
X Release theelectric parking brake.
X Switch offthe automatic locking
(Y page 189).
X Switch onthe hazard warning lamps
(Y page 103).
X Turn theSmart Keyinthe ignition locktoposi-
tion 005Aand leave theSmart Keyinthe ignition
lock. Towing
avehicle withboth axles on
the ground
It is important thatyouobserve thesafety
instr uctions whentowing awayyourvehicle
(Y page 284).
X On
vehicles withKEYL ESS-GO orthe KEY-
LESS-GO startfunction: youmust usethe
Smart Keyinstead ofthe Start /Stopbutton
(Y page 124).
The automatic transmission automatically shifts
to position 005Dwhen youopen thedriver's or
front -passenger doororwhen youremove the
Smart Keyfrom theignition lock.Inorder to
ensure thattheautomatic transmission staysin
position 005Cwhen towing awaythevehicle, you
must observe thefollowing points:
X Make surethatthevehicle isstation ary.
X Turn theSmart Keytoposition 0048inthe igni-
tion lock.
X Depress andhold thebrake pedal.
X Shift theautomatic transmission toposition
005C.
X Leave theSmart Keyinposition 0048inthe igni-
tion lock.
X Release thebrake pedal.
X Release theelectric parking brake.
X Switch onthe hazard warning lamps
(Y page 103).
i In
order tosignal achange ofdirection when
towing thevehicle withthehazard warning
lamps switched on,use thecombinat ion
switch asusual. Inthis case, onlytheindicator
lamps forthe direction oftravel flash.After
resett ingthe combinat ionswitch, thehazard
warning lampstartsflashing again. 286
Towing
andtow-sta rtingBr eakdown assistance
Page 289 of 330
Permit
tedtowing method s
Mercedes-B enzrecommen dstransport ingyour
vehicle inthe case ofabreakdown, ratherthan
towing itaway .
When towing away,use atowing ropeoratow-
ing bar with both axles onthe ground. Donot use
any tow barsystems. Tr
ansport ingthe vehicle
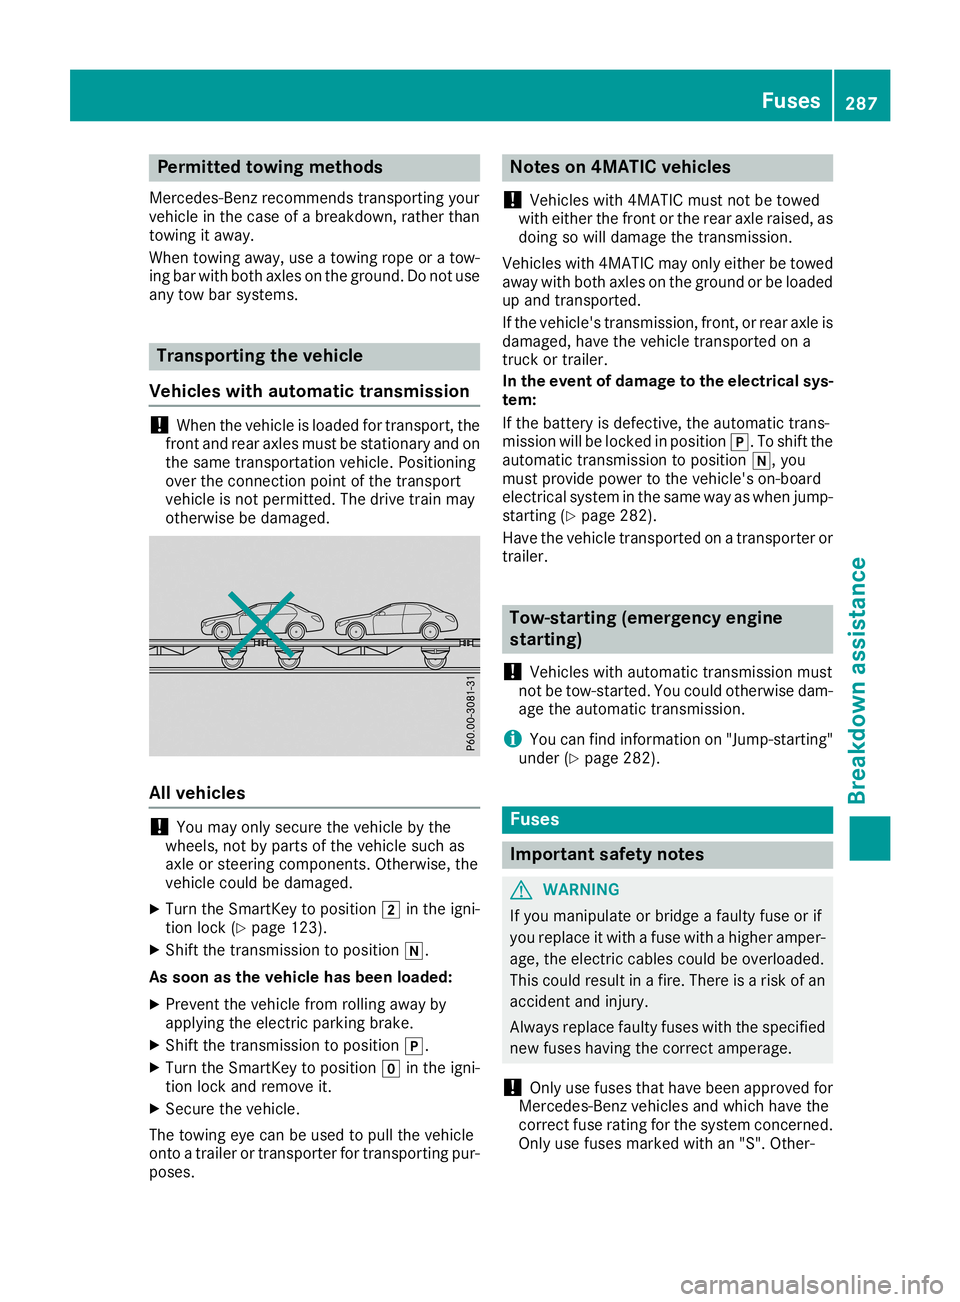
Vehicles withautom atictransmission !
When
thevehicle isloaded fortransport ,the
front andrear axles mustbestationary andon
the same transport ationvehicle. Positioning
over theconn ection pointofthe transport
vehicle isnot permitted. Thedrive trainmay
otherwise bedamaged. All
vehicle s !
You
may onlysecure thevehicle bythe
wheels, notbyparts ofthe vehicle suchas
axle orsteering componen ts.Otherwise, the
vehicle couldbedamaged.
X Turn theSmartK eytoposition 0048inthe igni-
tion lock (Ypage 123).
X Shift thetransm issiontoposition 005C.
As soon asthe vehicle hasbeen loaded:
X Prevent thevehicle fromrolling awayby
apply ingthe electric parking brake.
X Shift thetransm issiontoposition 005D.
X Turn theSmartK eytoposition 005Ainthe igni-
tion lock andremove it.
X Secure thevehicle.
The towing eyecan beused topull thevehicle
onto atrailer ortransport erfor transport ingpur-
poses. Notes
on4MATIC vehicles
! Vehicles
with4MATIC mustnotbetowed
with either thefront orthe rear axle raised, as
doing sowill damage thetransm ission.
Vehicles with4MATIC mayonlyeither betowed
away withboth axles onthe ground orbe loaded
up and transport ed.
If the vehicle's transmission,front,or rear axle is
damaged, havethevehicle transport edon a
truck ortrailer.
In the event ofdam agetothe elec trical sys-
tem:
If the battery isdefective, theautomatic trans-
mission willbelocked inposition 005D.Toshift the
automatic transmissiontoposition 005C,you
must provide powertothe vehicle's on-board
electrical systeminthe same wayaswhen jump-
startin g(Y page 282).
Have thevehicle transport edon atransport eror
trailer. Tow-star
ting(emergency engine
star ting)
! Vehicles
withautomatic transmissionmust
not betow-st arted. Youcould otherwise dam-
age theautomatic transmission.
i You
canfind information on"Jump-starting"
under (Ypage 282). Fuses
Import
antsafety notes G
WARNING
If you manipulate orbridge afaulty fuseorif
you replace itwith afuse withahigher amper-
age, theelectric cablescouldbeoverloaded.
This could result inafire. There isarisk ofan
accident andinjury.
Always replace faultyfuseswiththespecified
new fuses having thecorrect amperage.
! Only
usefuses thathave been approved for
Mercedes-B enzvehicles andwhich havethe
correct fuserating forthe system concerned.
Only usefuses marked withan"S". Other- Fuses
287Breakdown assistance Z
Page 295 of 330
When
youhave mount edthe M+S tires:
X Check thetire pressures (Ypage 293).
X Restart thetire pressure monitor(USA only)
(Y page 300).
X Restart thetire pressure losswarning system
(Canada) (Ypage 297) Snow
chains G
WARNIN
G
If snow chains aremount edon the rear
wheels, thesnow chains couldcause abrasion
to the vehicle bodyortochassis compon ents.
This could cause damage tothe vehicle orthe
tires. There isarisk ofan accident .
To avoid hazardous situations:
R never mount snowchains onthe rear
wheels
R only mount snowchains inpairs onthe
fron twheels.
! On
some tiresizes there isnot enough space
for snow chains. Toavoid damage tothe vehi-
cle ortires, observe the"Wheel andtirecom-
bination s"sect ionunder "Tiresandwheels".
For safety reasons, Mercedes- Benzrecom-
mends thatyouonly usesnow chains thathave
been specially approved foryour vehicle by
Mercedes- Benz,or are ofacorr esponding
standard ofquality. Formore inform ation,
please contactaqualified specialist workshop.
If you inten dto mount snowchains, pleasebear
the following pointsinmind:
R Sno wchains maynotbemount edon all
wheel/tire combinations.Permissible wheel-
tire combin ations(Ypage 315).
R Only usesnow chains whendriving onroads
complet elycovered bysnow. Remove the
snow chains assoon aspossible whenyou
come toaroad thatisnot snow-c overed.
R Local regulations mayrestr ictthe use ofsnow
chains. Observe theappropriate regulationsif
you wish tomount snowchains.
R Do not exceed themaximum permissible
speed of30mph (50km/ h).
R Ifsnow chains areinstalled, youcann otuse
Act ive Parking Assist(Ypage 167). You
may wish todeactivat eES P®
when pulling
away withsnow chains installed .This allows the
wheels tospin inacont rolled manner,achieving
incr eased propulsive force(cutt ingaction ).
R Deact ivateESP®
(all vehicles except
Mercedes- AMGvehicles) (Ypage 65)
R Deact ivateESP®
(Mercedes- AMGvehicles)
(Y page 66)
Inf ormation aboutdriving withanemergen cy
spare wheel (Ypage 315). Tir
epr essure Tir
epr essure specifications
Impor tantsafety notes G
WARNIN
G
Underin flatedoroverinf latedtirespose the
following risks:
R the tires mayburst, especially asthe load
and vehicle speedincrease.
R the tires maywear exces sively and/or
unevenly, whichmaygreatly impairtire
trac tion.
R the driving charact eristics,as well assteer-
ing and braking, maybegreatly impaired.
There isarisk ofan accident .
Follow recomm endedtireinflation pressures
and check thepressure ofall the tires includ-
ing the spare wheel:
R mont hly,atleast
R ifthe load changes
R before beginnin galong journ ey
R under differen toperating conditions,e.g.
off- road driving
If neces sary,correctthe tire pressure.
i The
data onthe Tire andLoading Informa-
tion placard andtirepressure tableshown
here areexamples. Tirepressure specifica-
tions arevehicle-s pecificandmay deviate
from thedata shown here.Thetirepressure
specificat ionsthatarevalid foryour vehicle
can befound onthe Tire andLoading Infor-
mation placard andtirepressure tableonthe
vehicle. Tir
epr essure
293Wheelsandtires Z
Page 297 of 330
If
the tire pressu reshave been settothe lowe r
valu esfor lighter loadsand/or lowerroad
speed s,the pressu resshoul dbe reset tothe
higher values:
R ifyou want todrive withanincreased load
and/or
R ifyou want todrive athigher speeds
i The
tirepressu resforincreased loadsand/
or higher roadspeed s,shown inthe tire pres-
sure table, mayhave anegative effectondriv-
ing comfort.
If the tire pressu reisnot setcorrectly, thiscan
lea dto an excessive build-up ofheat andasud-
den loss ofpressu re.
For more information, contactaqua lifiedspe-
ciali stworkshop. Important
notesontire pressure G
WARNING
If the tire pressu redrops repeatedly,the
wheel ,valve ortire may bedama ged.Tire
pressu rethat istoo low may resul tin atire
blow -out. There isarisk ofan accident.
R Check thetire forforeign objects.
R Check whether thewheel islosing airorthe
valve islea king.
If you areunabl eto rectify thedama ge,con-
tact aqua lifiedspecia listworkshop. G
WARNING
If you fitunsui table accessorie sonto tire
valves ,the tire valves maybeoverloa dedand
malfu nction, whichcancause tirepressu re
loss. Duetotheir desig n,retrofitted tirepres-
sure monitors keepthetire valve open. This
can also resul tin tire pressu reloss. There isa
risk ofan accident.
Only screw thestandard valvecaporother
valve capsappro vedbyMercedes-Benz for
you rvehicle ontothetire valve.
Use asuita blepressu regau getocheck thetire
pressu re.The outer appearance ofatire does
not permit anyrelia bleconclusion aboutthe tire
pressu re.On vehicle sequi pped withtheelec-
tronic tirepressu remonitor, thetire pressu re
can bechecked inthe on-board computer. The
tiretemperature andpressu reincrease
when thevehicle isin motion. Thisisdepende nt
on the driving speedandtheload .
Therefore, youshoul donly correct tirepres-
sures whenthetires arecold.
The tires arecold:
R ifthe vehicle hasbeen parked withthetires
out ofdirect sunlightfor atlea stthree hours
and
R ifthe vehicle hasbeen driven lessthan 1mile
(1.6 km)
The tiretemperature changesdependingon the
outsid etemperature ,the vehicle speedandthe
tire load .If the tire temperature changesby
18 ‡(10 †), thetire pressu rechanges by
appro ximately 10kPa (0.1 bar/ 1.5psi).Take
this into account whenchecking thepressu reof
warm tires.Onlycorrect thetire pressu reifit is
too low forthe current operatingconditions. If
you check thetire pressu rewhen thetires are
warm, theresul tingvaluewil lbe highe rthan if
the tires were cold.Thisisnormal. Donot
reduce thetire pressu reto the valu especifie d
for cold tires. Thetirepressu rewou ldotherwise
be too low.
Observe therecommended tirepressu resfor
cold tires:
R on the Tire andLoadi ngInformation placard
on the B-pilla ron the driver's side
R in the tire pressu retable inthe fuel fillerflap
(Y page 141) Underinfl
atedoroverin flated tires
Underinfl atedtires G
WARNING
Tires withpressu rethat istoo low can over-
heat andburst asaconsequence. Inaddi tion,
they alsosuffer fromexcessive and/orirreg-
ula rwea r,which canseverel yimpa irthe brak-
ing propertie sand thedriving characteristics.
There isarisk ofan accident.
Avoid tirepressu resthat aretoo low inall the
tires, includi ngthe spare wheel.
Underinfla tedtires may:
R overhea t,lea ding totire defects
R adverse lyaffect handling Tire
pressure
295Wheelsand tires Z