2019 MERCEDES-BENZ AMG GT ROADSTER open hood
[x] Cancel search: open hoodPage 198 of 298
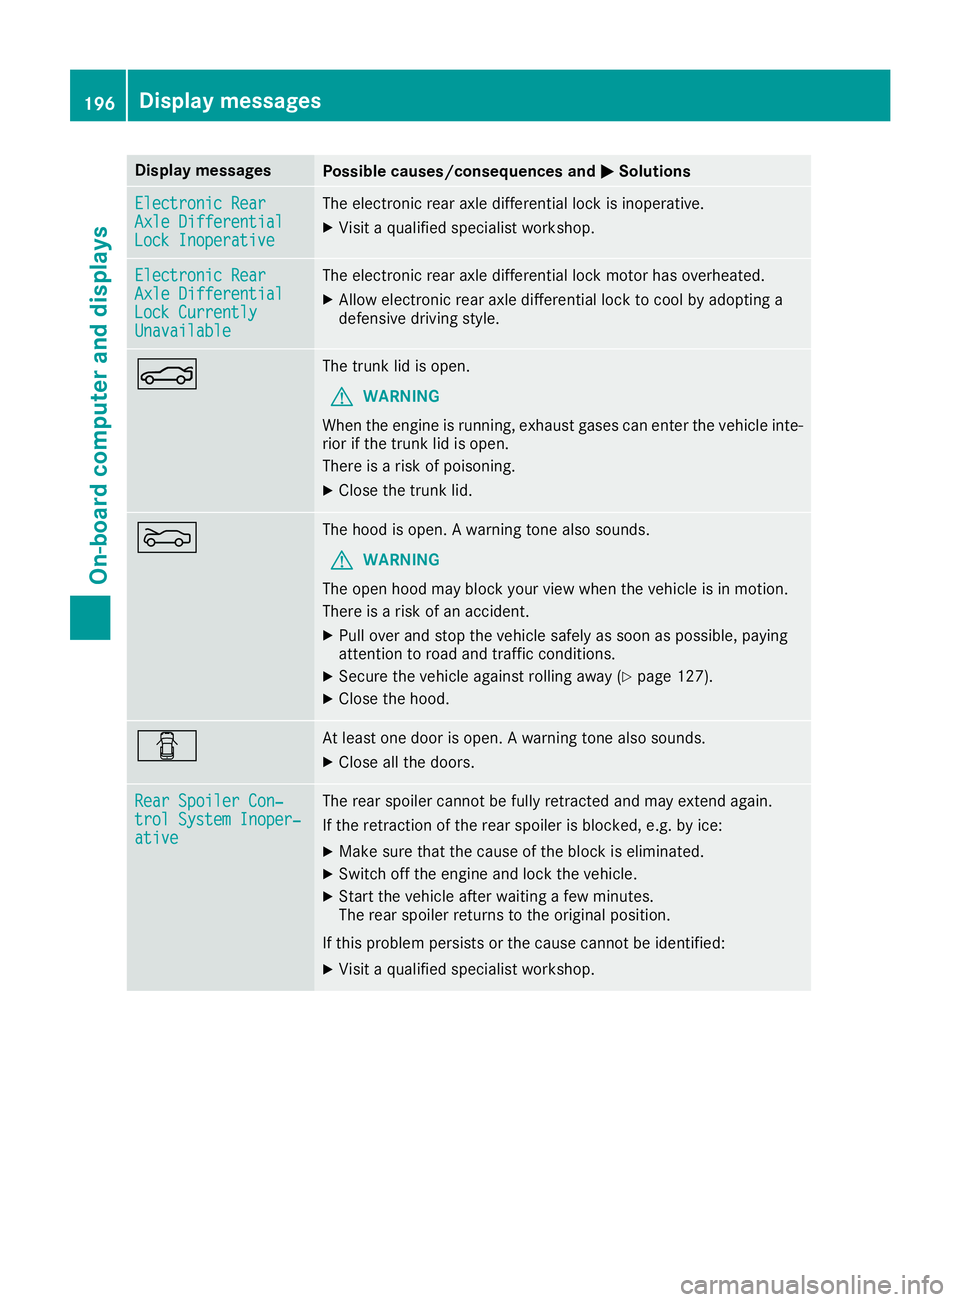
Display messages
Possible causes/consequences and
0050
0050Solutions Electronic Rear
Electronic Rear
Axle Differential Axle Differential
Lock Inoperative Lock Inoperative The electronic rear axle differential lock is inoperative.
X Visit a qualified specialist workshop. Electronic Rear
Electronic Rear
Axle Differential Axle Differential
Lock Currently Lock Currently
Unavailable Unavailable The electronic rear axle differential lock motor has overheated.
X Allow electronic rear axle differential lock to cool by adopting a
defensive driving style. 0084 The trunk lid is open.
G WARNING
When the engine is running, exhaust gases can enter the vehicle inte- rior if the trunk lid is open.
There is a risk of poisoning.
X Close the trunk lid. 0083 The hood is open. A warning tone also sounds.
G WARNING
The open hood may block your view when the vehicle is in motion.
There is a risk of an accident.
X Pull over and stop the vehicle safely as soon as possible, paying
attention to road and traffic conditions.
X Secure the vehicle against rolling away (Y page 127).
X Close the hood. 0051 At least one door is open. A warning tone also sounds.
X Close all the doors. Rear Spoiler Con‐ Rear Spoiler Con‐
trol System Inoper‐ trol System Inoper‐
ative ative The rear spoiler cannot be fully retracted and may extend again.
If the retraction of the rear spoiler is blocked, e.g. by ice:
X Make sure that the cause of the block is eliminated.
X Switch off the engine and lock the vehicle.
X Start the vehicle after waiting a few minutes.
The rear spoiler returns to the original position.
If this problem persists or the cause cannot be identified:
X Visit a qualified specialist workshop. 196
Display
messagesOn-board computer and displays
Page 207 of 298
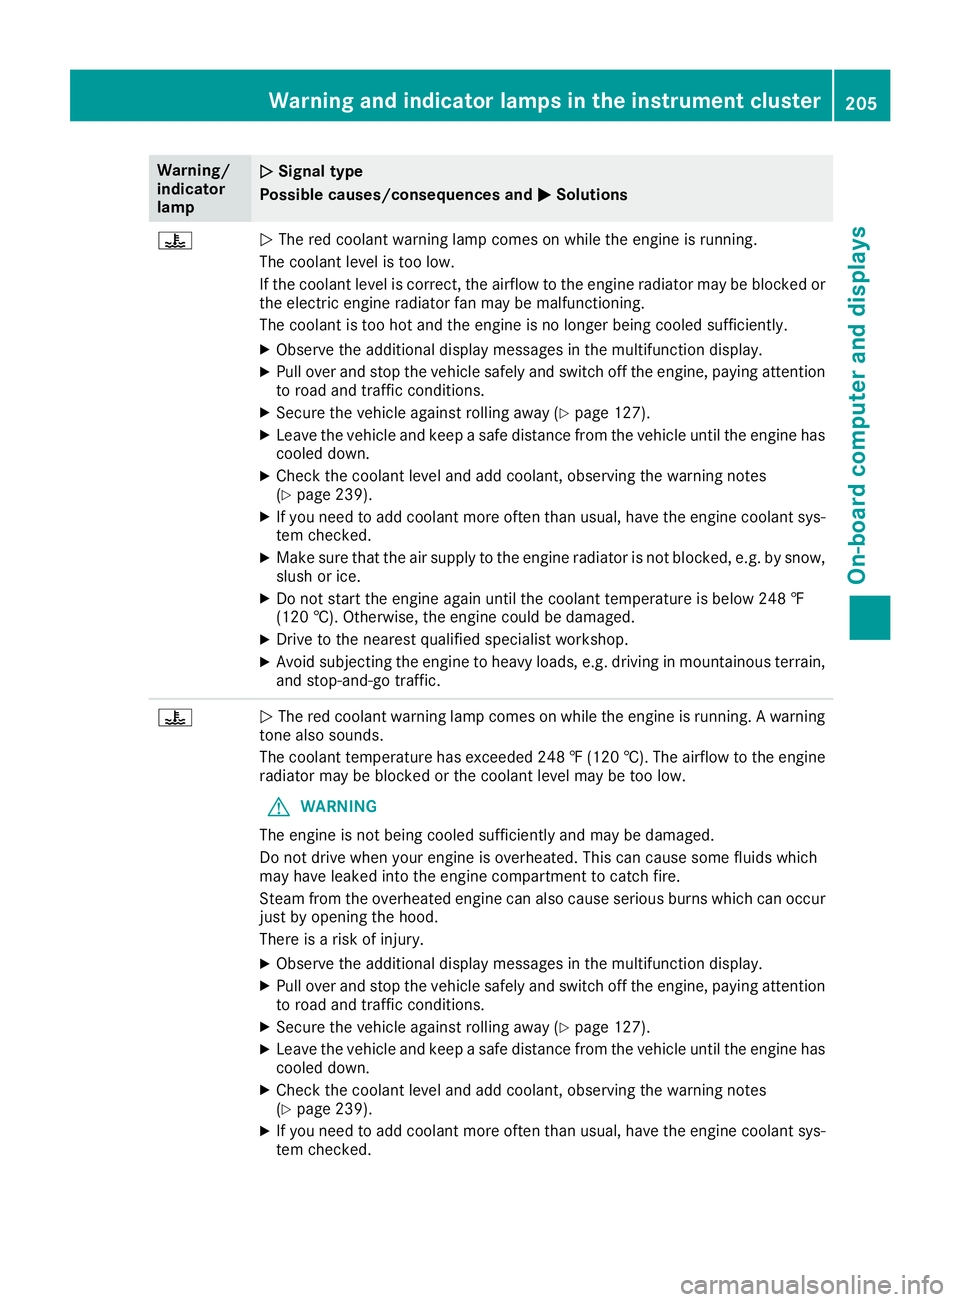
Warning/
indicator
lamp
0051 0051
Signal type
Possible causes/consequences and 0050
0050Solutions 00AC
0051
The red coolant warning lamp comes on while the engine is running.
The coolant level is too low.
If the coolant level is correct, the airflow to the engine radiator may be blocked or the electric engine radiator fan may be malfunctioning.
The coolant is too hot and the engine is no longer being cooled sufficiently.
X Observe the additional display messages in the multifunction display.
X Pull over and stop the vehicle safely and switch off the engine, paying attention
to road and traffic conditions.
X Secure the vehicle against rolling away (Y page 127).
X Leave the vehicle and keep a safe distance from the vehicle until the engine has
cooled down.
X Check the coolant level and add coolant, observing the warning notes
(Y page 239).
X If you need to add coolant more often than usual, have the engine coolant sys-
tem checked.
X Make sure that the air supply to the engine radiator is not blocked, e.g. by snow,
slush or ice.
X Do not start the engine again until the coolant temperature is below 248 ‡
(120 †). Otherwise, the engine could be damaged.
X Drive to the nearest qualified specialist workshop.
X Avoid subjecting the engine to heavy loads, e.g. driving in mountainous terrain,
and stop-and-go traffic. 00AC
0051
The red coolant warning lamp comes on while the engine is running. A warning
tone also sounds.
The coolant temperature has exceeded 248 ‡(120 †). The airflow to the engine
radiator may be blocked or the coolant level may be too low.
G WARNING
The engine is not being cooled sufficiently and may be damaged.
Do not drive when your engine is overheated. This can cause some fluids which
may have leaked into the engine compartment to catch fire.
Steam from the overheated engine can also cause serious burns which can occur just by opening the hood.
There is a risk of injury.
X Observe the additional display messages in the multifunction display.
X Pull over and stop the vehicle safely and switch off the engine, paying attention
to road and traffic conditions.
X Secure the vehicle against rolling away (Y page 127).
X Leave the vehicle and keep a safe distance from the vehicle until the engine has
cooled down.
X Check the coolant level and add coolant, observing the warning notes
(Y page 239).
X If you need to add coolant more often than usual, have the engine coolant sys-
tem checked. Warning and indicator lamps in the instrument cluster
205On-board computer and displays Z
Page 235 of 298
Proceed as follows:
R if you live in Canada.
R if you have difficulties programming the
garage door opener (regardless of where you
live) when following the programming steps.
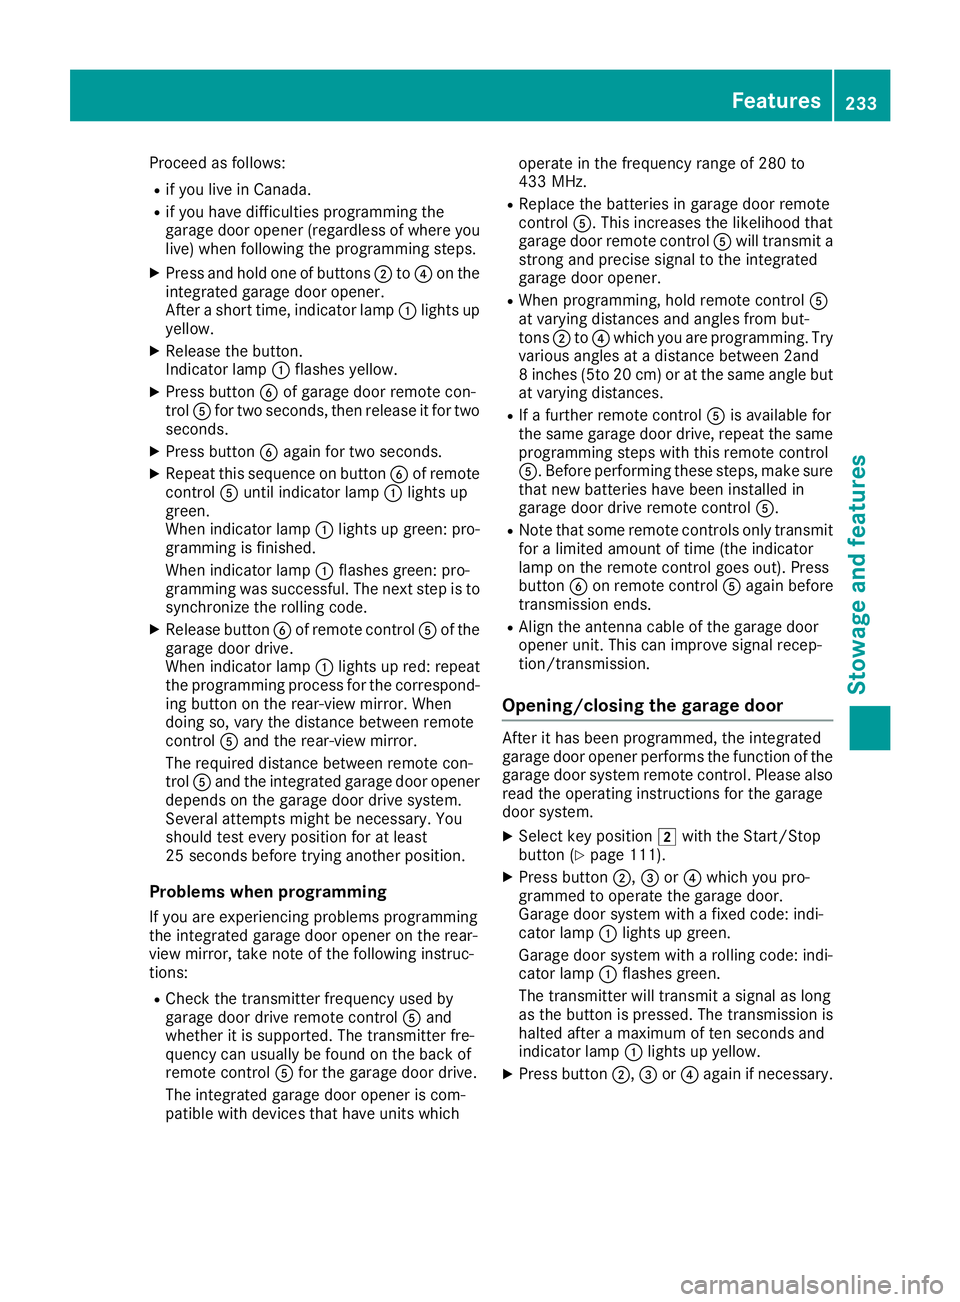
X Press and hold one of buttons 0044to0085 on the
integrated garage door opener.
After a short time, indicator lamp 0043lights up
yellow.
X Release the button.
Indicator lamp 0043flashes yellow.
X Press button 0084of garage door remote con-
trol 0083for two seconds, then release it for two
seconds.
X Press button 0084again for two seconds.
X Repeat this sequence on button 0084of remote
control 0083until indicator lamp 0043lights up
green.
When indicator lamp 0043lights up green: pro-
gramming is finished.
When indicator lamp 0043flashes green: pro-
gramming was successful. The next step is to
synchronize the rolling code.
X Release button 0084of remote control 0083of the
garage door drive.
When indicator lamp 0043lights up red: repeat
the programming process for the correspond- ing button on the rear-view mirror. When
doing so, vary the distance between remote
control 0083and the rear-view mirror.
The required distance between remote con-
trol 0083and the integrated garage door opener
depends on the garage door drive system.
Several attempts might be necessary. You
should test every position for at least
25 seconds before trying another position.
Problems when programming If you are experiencing problems programming
the integrated garage door opener on the rear-
view mirror, take note of the following instruc-
tions:
R Check the transmitter frequency used by
garage door drive remote control 0083and
whether it is supported. The transmitter fre-
quency can usually be found on the back of
remote control 0083for the garage door drive.
The integrated garage door opener is com-
patible with devices that have units which operate in the frequency range of 280 to
433 MHz.
R Replace the batteries in garage door remote
control 0083. This increases the likelihood that
garage door remote control 0083will transmit a
strong and precise signal to the integrated
garage door opener.
R When programming, hold remote control 0083
at varying distances and angles from but-
tons 0044to0085 which you are programming. Try
various angles at a distance between 2and
8 inches (5to 20 cm) or at the same angle but at varying distances.
R If a further remote control 0083is available for
the same garage door drive, repeat the same
programming steps with this remote control
0083. Before performing these steps, make sure
that new batteries have been installed in
garage door drive remote control 0083.
R Note that some remote controls only transmit
for a limited amount of time (the indicator
lamp on the remote control goes out). Press
button 0084on remote control 0083again before
transmission ends.
R Align the antenna cable of the garage door
opener unit. This can improve signal recep-
tion/transmission.
Opening/closing the garage door After it has been programmed, the integrated
garage door opener performs the function of the garage door system remote control. Please also
read the operating instructions for the garage
door system.
X Select key position 0048with the Start/Stop
button (Y page 111).
X Press button 0044,0087or0085 which you pro-
grammed to operate the garage door.
Garage door system with a fixed code: indi-
cator lamp 0043lights up green.
Garage door system with a rolling code: indi-
cator lamp 0043flashes green.
The transmitter will transmit a signal as long
as the button is pressed. The transmission is
halted after a maximum of ten seconds and
indicator lamp 0043lights up yellow.
X Press button 0044,0087or0085 again if necessary. Features
233Stowage and features Z
Page 237 of 298
Engine compartment
Hood
Important safety notes G
WARNING
If the hood is unlatched, it may open up when the vehicle is in motion and block your view.
There is a risk of an accident.
Never unlatch the hood while driving. Before
every trip, ensure that the hood is locked. G
WARNING
When opening and closing the hood, it may
suddenly fall into the closed position. There is a risk of injury to persons within range of
movement of the hood.
Open and close the hood only when no one is
within its range of movement. G
WARNING
Opening the hood when the engine is over-
heated or when there is a fire in the engine
compartment could expose you to hot gases
or other service products. There is a risk of
injury.
Let an overheated engine cool down before
opening the hood. If there is a fire in the
engine compartment, keep the hood closed
and contact the fire department. G
WARNING
The engine compartment contains moving
components. Certain components, such as
the radiator fan, may continue to run or start
again suddenly when the ignition is off. There is a risk of injury.
If you need to do any work inside the engine
compartment:
R switch off the ignition
R never reach into the area where there is a
risk of danger from moving components,
such as the fan rotation area R
remove jewelry and watches
R keep items of clothing and hair, for exam-
ple, away from moving parts G
WARNING
The ignition system and the fuel injection sys- tem work under high voltage. If you touch
components which are under voltage, you
could get an electric shock. There is a risk of
injury.
Never touch components of the ignition sys-
tem or fuel injection system when the ignition is switched on.
Opening the hood G
WARNING
Certain components in the engine compart-
ment, such as the engine, radiator and parts
of the exhaust system, can become very hot.
Working in the engine compartment poses a
risk of injury.
Where possible, let the engine cool down and touch only the components described in the
following. G
WARNING
When the hood is open and the windshield
wipers are set in motion, you can be injured by the wiper linkage. There is a risk of injury.
Always switch off the windshield wipers and
the ignition before opening the hood.
! Make sure that the windshield wipers are
not folded away from the windshield. You
could otherwise damage the windshield wip-
ers or the hood. Engine compartment
235Maintenance and care Z
Page 238 of 298
X
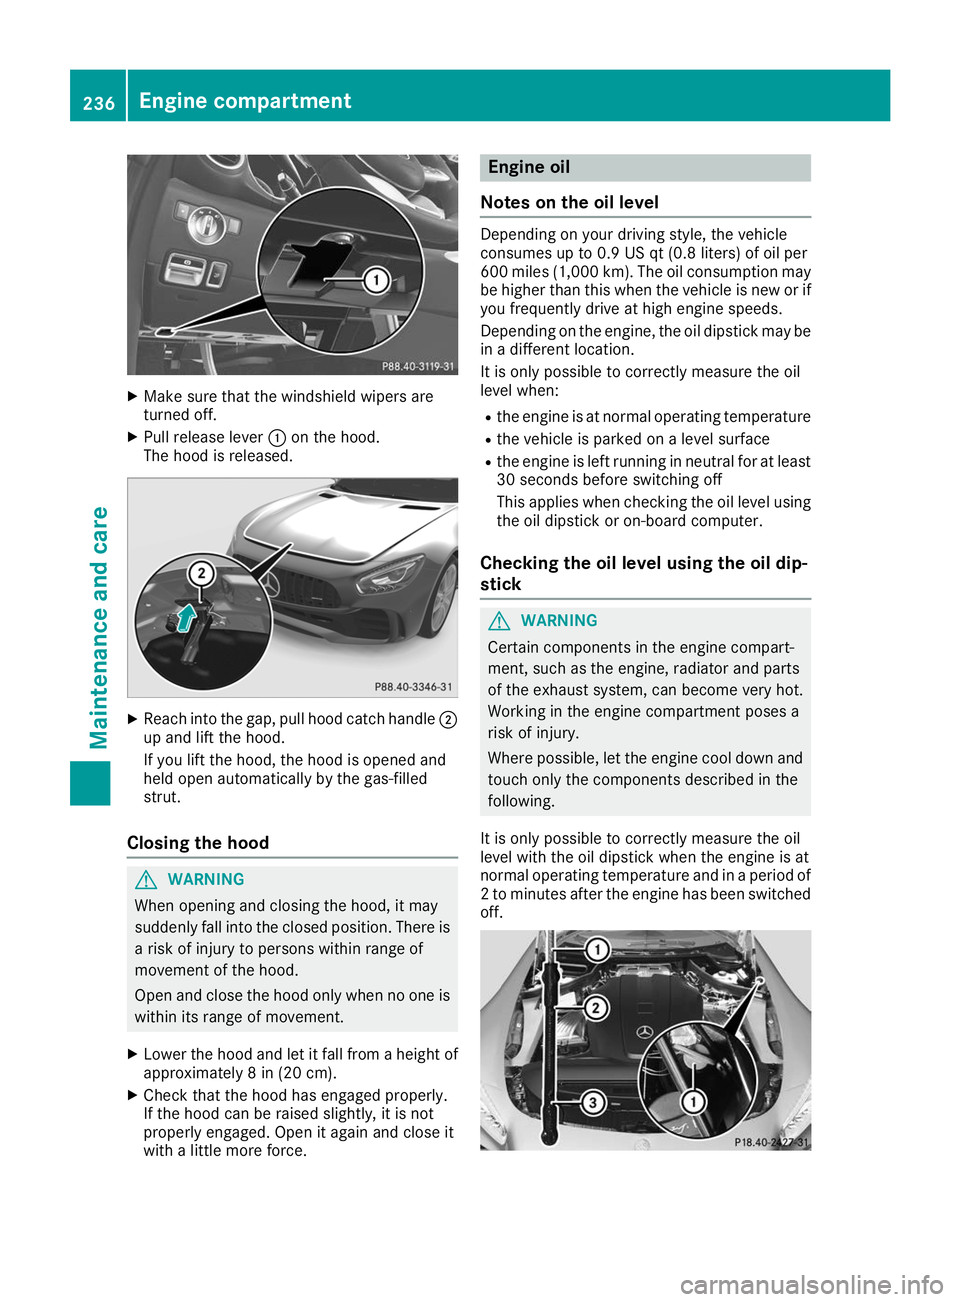
Make sure that the windshield wipers are
turned off.
X Pull release lever 0043on the hood.
The hood is released. X
Reach into the gap, pull hood catch handle 0044
up and lift the hood.
If you lift the hood, the hood is opened and
held open automatically by the gas-filled
strut.
Closing the hood G
WARNING
When opening and closing the hood, it may
suddenly fall into the closed position. There is a risk of injury to persons within range of
movement of the hood.
Open and close the hood only when no one is
within its range of movement.
X Lower the hood and let it fall from a height of
approximately 8 in (20 cm).
X Check that the hood has engaged properly.
If the hood can be raised slightly, it is not
properly engaged. Open it again and close it
with a little more force. Engine oil
Notes on the oil level Depending on your driving style, the vehicle
consumes up to 0.9 US qt (0.8 liters) of oil per
600 miles (1,000 km). The oil consumption may
be higher than this when the vehicle is new or if
you frequently drive at high engine speeds.
Depending on the engine, the oil dipstick may be in a different location.
It is only possible to correctly measure the oil
level when:
R the engine is at normal operating temperature
R the vehicle is parked on a level surface
R the engine is left running in neutral for at least
30 seconds before switching off
This applies when checking the oil level using
the oil dipstick or on-board computer.
Checking the oil level using the oil dip-
stick G
WARNING
Certain components in the engine compart-
ment, such as the engine, radiator and parts
of the exhaust system, can become very hot.
Working in the engine compartment poses a
risk of injury.
Where possible, let the engine cool down and touch only the components described in the
following.
It is only possible to correctly measure the oil
level with the oil dipstick when the engine is at
normal operating temperature and in a period of 2 to minutes after the engine has been switchedoff. 236
Engine compartmentMaintenance and care
Page 241 of 298
Additional service products
Checking coolant level G
WARNING
Certain components in the engine compart-
ment, such as the engine, radiator and parts
of the exhaust system, can become very hot.
Working in the engine compartment poses a
risk of injury.
Where possible, let the engine cool down and touch only the components described in the
following. G
WARNING
Opening the hood when the engine is over-
heated or when there is a fire in the engine
compartment could expose you to hot gases
or other service products. There is a risk of
injury.
Let an overheated engine cool down before
opening the hood. If there is a fire in the
engine compartment, keep the hood closed
and contact the fire department. G
WARNING
The cooling system is pressurized, particularly when the motor is warm. If you open the cap, you could be scalded if hot coolant sprays out.
There is a risk of injury.
Let the engine cool down before you open the
cap. Wear protective gloves and protective
eyewear when opening. Open the cap slowly
to release pressure.
! Before starting your journey, make sure that
all engine covers are installed. Otherwise, the engine can be damaged, e.g. through over-
heating. Example
X Park the vehicle on a level surface.
Only check the coolant level when the vehicle
is on a level surface and the engine has cooled
down.
X Select key position 0048with the Start/Stop
button.
X Check the coolant temperature display in the
instrument cluster.
The coolant temperature must be below
158 ‡ (70 †).
X Select key position 0092with the Start/Stop
button.
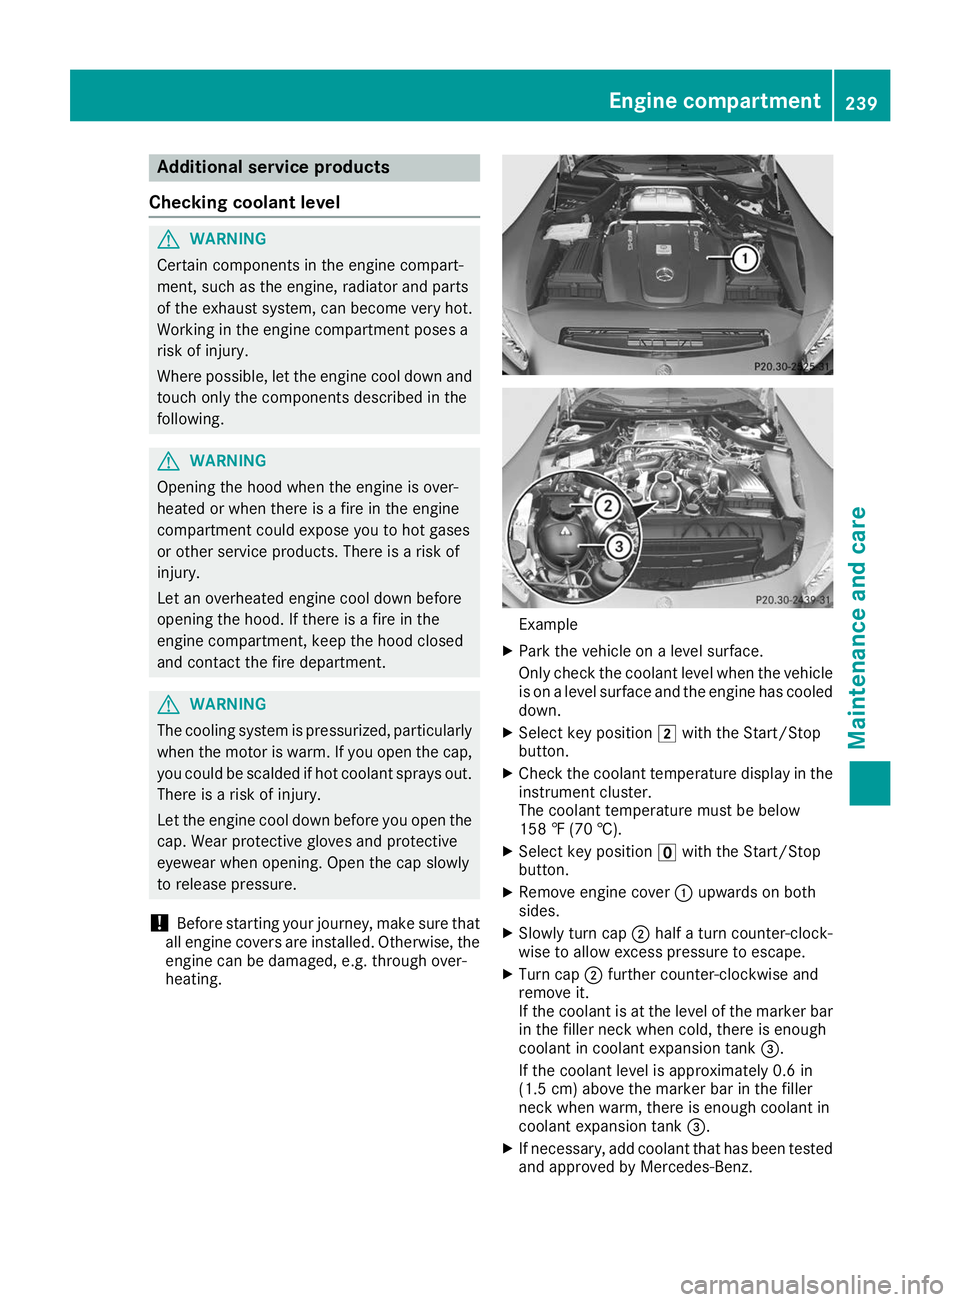
X Remove engine cover 0043upwards on both
sides.
X Slowly turn cap 0044half a turn counter-clock-
wise to allow excess pressure to escape.
X Turn cap 0044further counter-clockwise and
remove it.
If the coolant is at the level of the marker bar in the filler neck when cold, there is enough
coolant in coolant expansion tank 0087.
If the coolant level is approximately 0.6 in
(1.5 cm) above the marker bar in the filler
neck when warm, there is enough coolant in
coolant expansion tank 0087.
X If necessary, add coolant that has been tested
and approved by Mercedes-Benz. Engine compartment
239Maintenance and care Z
Page 257 of 298
Should it, in exceptional circumstances, be
absolutely necessary to disconnect the 12-
volt battery yourself, please observe the fol-
lowing:
R Secure the vehicle to prevent it from rolling
away.
R Switch off the ignition.
R Disconnect the negative terminal first and
then the positive terminal.
The transmission is locked in position 005D
after disconnecting the battery.
After the work has been done, install the bat-
tery and replace the cover of the positive ter- minal clamp firmly.
Comply with safety precautions and take pro-
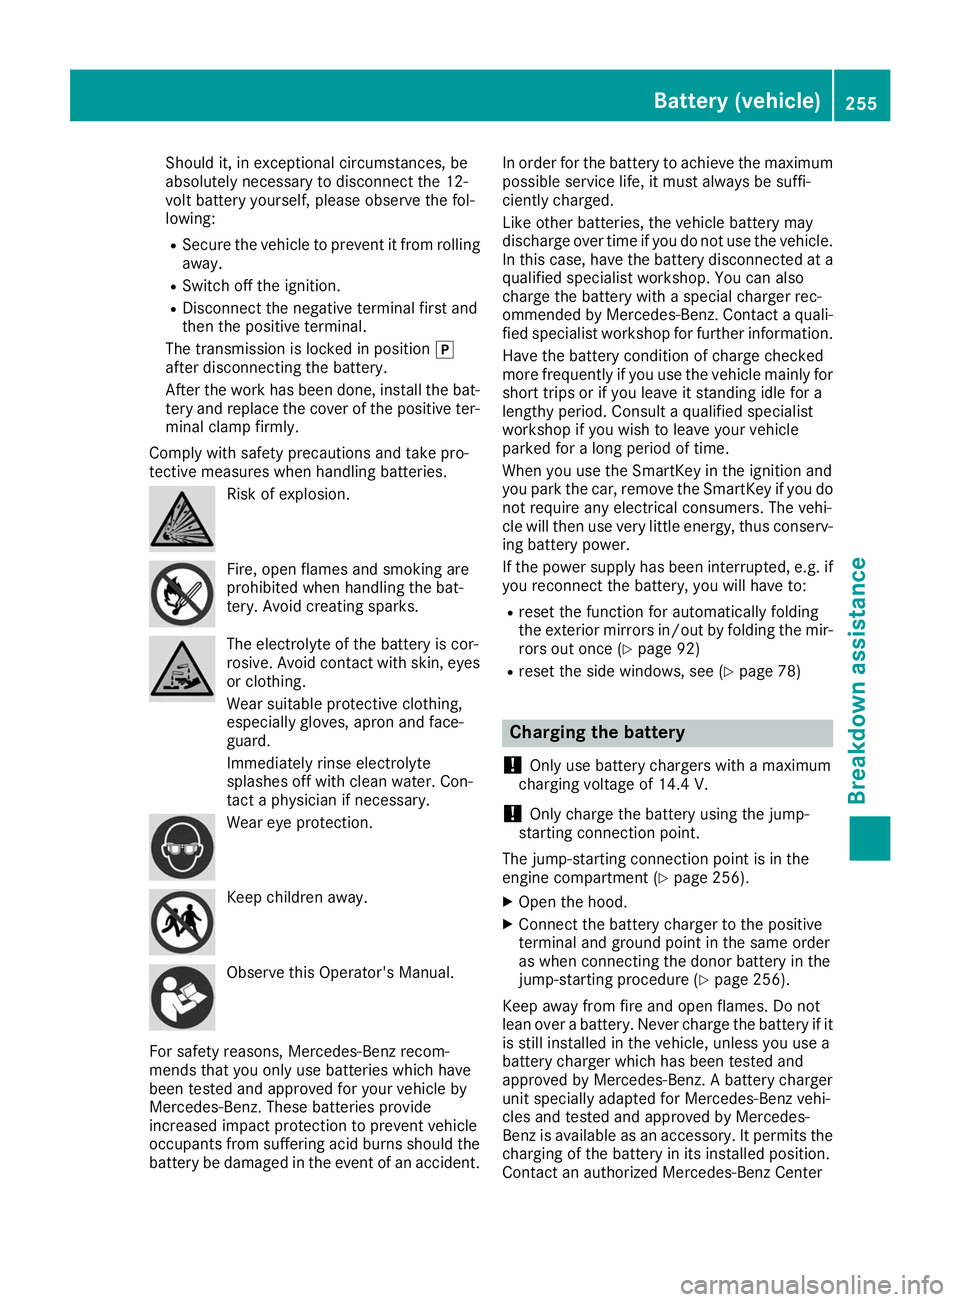
tective measures when handling batteries. Risk of explosion.
Fire, open flames and smoking are
prohibited when handling the bat-
tery. Avoid creating sparks.
The electrolyte of the battery is cor-
rosive. Avoid contact with skin, eyes
or clothing.
Wear suitable protective clothing,
especially gloves, apron and face-
guard.
Immediately rinse electrolyte
splashes off with clean water. Con-
tact a physician if necessary. Wear eye protection.
Keep children away.
Observe this Operator's Manual.
For safety reasons, Mercedes-Benz recom-
mends that you only use batteries which have
been tested and approved for your vehicle by
Mercedes-Benz. These batteries provide
increased impact protection to prevent vehicle
occupants from suffering acid burns should the battery be damaged in the event of an accident. In order for the battery to achieve the maximum
possible service life, it must always be suffi-
ciently charged.
Like other batteries, the vehicle battery may
discharge over time if you do not use the vehicle.In this case, have the battery disconnected at a
qualified specialist workshop. You can also
charge the battery with a special charger rec-
ommended by Mercedes-Benz. Contact a quali- fied specialist workshop for further information.
Have the battery condition of charge checked
more frequently if you use the vehicle mainly for
short trips or if you leave it standing idle for a
lengthy period. Consult a qualified specialist
workshop if you wish to leave your vehicle
parked for a long period of time.
When you use the SmartKey in the ignition and
you park the car, remove the SmartKey if you do not require any electrical consumers. The vehi-
cle will then use very little energy, thus conserv-
ing battery power.
If the power supply has been interrupted, e.g. if
you reconnect the battery, you will have to:
R reset the function for automatically folding
the exterior mirrors in/out by folding the mir-
rors out once (Y page 92)
R reset the side windows, see (Y page 78) Charging the battery
! Only use battery chargers with a maximum
charging voltage of 14.4 V.
! Only
charge the battery using the jump-
starting connection point.
The jump-starting connection point is in the
engine compartment (Y page 256).
X Open the hood.
X Connect the battery charger to the positive
terminal and ground point in the same order
as when connecting the donor battery in the
jump-starting procedure (Y page 256).
Keep away from fire and open flames. Do not
lean over a battery. Never charge the battery if it is still installed in the vehicle, unless you use a
battery charger which has been tested and
approved by Mercedes-Benz. A battery charger
unit specially adapted for Mercedes-Benz vehi-
cles and tested and approved by Mercedes-
Benz is available as an accessory. It permits the
charging of the battery in its installed position.
Contact an authorized Mercedes-Benz Center Battery (vehicle)
255Breakdown assistance Z
Page 259 of 298
X
Secure the vehicle by applying the electric parking brake.
X Shift the transmission to position 005D.
X Make sure the ignition and all electrical consumers are switched off.
All indicator lamps in the instrument cluster must be off. When using the SmartKey, turn the
SmartKey to position 0092in the ignition lock and remove it (Y page 111).
X Open the hood.
i Right-hand-drive vehicle:
the jump-starting connection points may be located on the other
side of the vehicle. Vehicles with a carbon-fiber engine cover
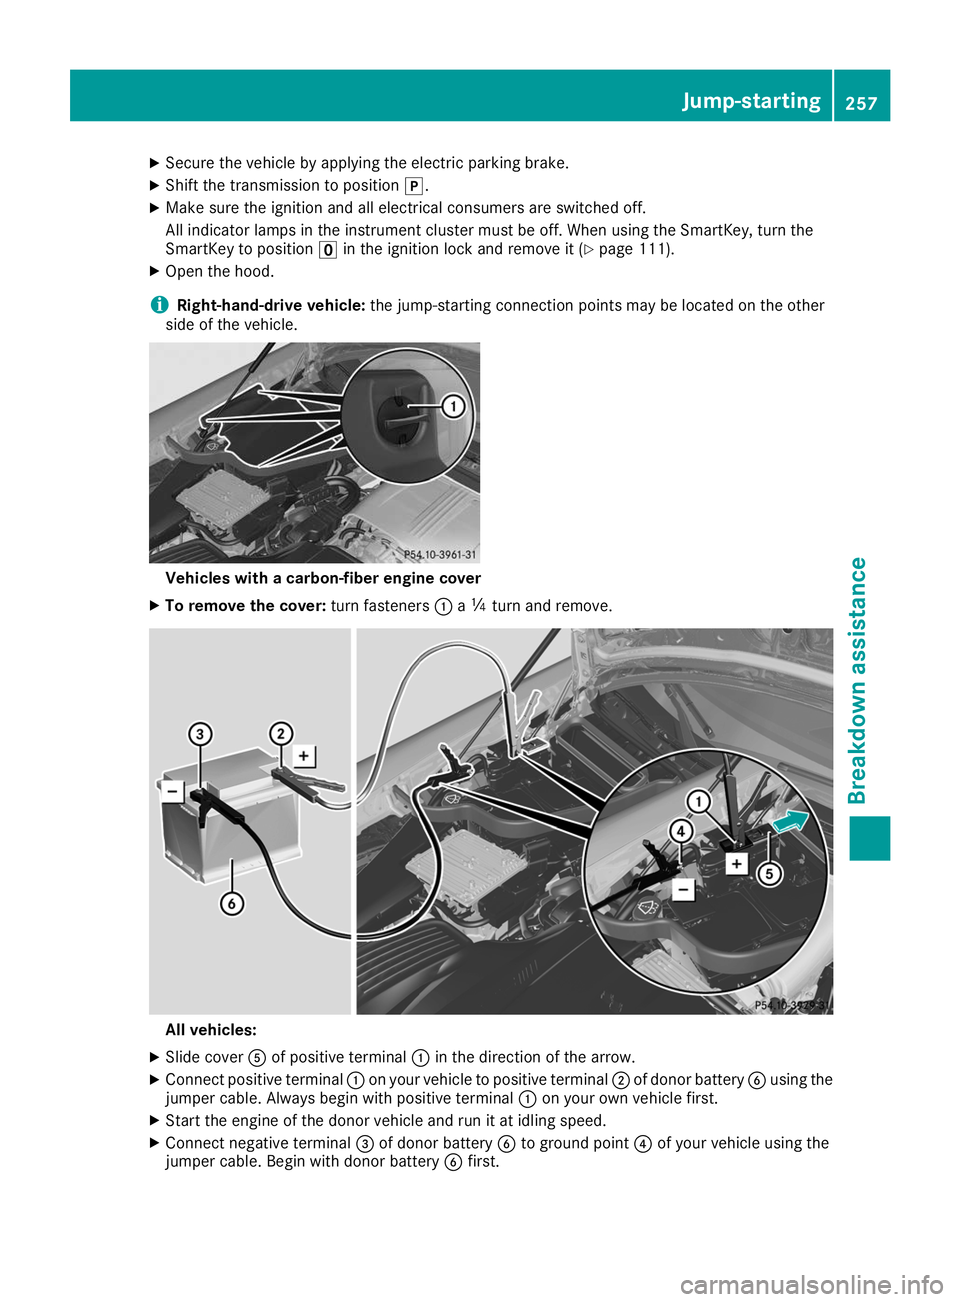
X To remove the cover: turn fasteners0043a00C4 turn and remove. All vehicles:
X Slide cover 0083of positive terminal 0043in the direction of the arrow.
X Connect positive terminal 0043on your vehicle to positive terminal 0044of donor battery 0084using the
jumper cable. Always begin with positive terminal 0043on your own vehicle first.
X Start the engine of the donor vehicle and run it at idling speed.
X Connect negative terminal 0087of donor battery 0084to ground point 0085of your vehicle using the
jumper cable. Begin with donor battery 0084first. Jump-starting
257Breakdown assistance Z