2019 MERCEDES-BENZ AMG GT ROADSTER light
[x] Cancel search: lightPage 225 of 298
The system is available if:
R it has been activated and is operational
R the corresponding mobile phone network is
available for transmitting data to the Cus-
tomer Center
R a service subscription is available
Determining the location of the vehicle on a map
is only possible if:
R GPS reception is available
R the vehicle position can be forwarded to the
Customer Assistance Center
The mbrace system To adjust the volume during a call, proceed as
follows:
X Press the 0081or0082 button on the multi-
function steering wheel.
or X Use the multimedia system volume control.
The system offers various services, e.g.: R Automatic and manual emergency call
R Roadside Assistance call
R Info call
You can find information and a description of all
available features under "Owners Online" at
http://www.mbusa.com.
System self-test After you have switched on the ignition, the sys-
tem carries out a self-diagnosis.
A malfunction in the system has been detected
if one of the following occurs:
R The indicator lamp in the SOS button does not
come on during the system self-test.
R The indicator lamp in the 0052Roadside
Assistance call button does not light up dur-
ing self-diagnosis of the system.
R The indicator lamp in the 00D9Info call button
does not light up during the system self-diag-
nosis. R
The indicator lamp in one or more of the fol-
lowing buttons continues to light up red after
the system self-diagnosis:
- SOS button
- 0052 Roadside Assistance call button
- 00D9 Info call button
R The Inoperative
Inoperative or theService Not Service Not
Activated
Activated message appears in the multi-
function display after the system self-diagno- sis.
If a malfunction is indicated as outlined above,
the system may not operate as expected. In the
event of an emergency, help will have to be
summoned by other means.
Have the system checked at the nearest author- ized Mercedes-Benz Center or call the following
telephone assistance services:
Mercedes-Benz Customer Assistance Center at 1-800-FOR-MERCedes (1-800-367-6372) or
1-866-990-9007.
Emergency call Important safety notes
G
WARNING
It can be dangerous to remain in the vehicle,
even if you have pressed the SOS button in an emergency if:
R you see smoke inside or outside of the vehi-
cle, e.g. if there is a fire after an accident
R the vehicle is on a dangerous section of
road
R the vehicle is not visible or cannot easily be
seen by other road users, particularly whendark or in poor visibility conditions
There is a risk of an accident and injury.
Leave the vehicle immediately in this or simi-
lar situations as soon as it is safe to do so.
Move to a safe location along with other vehi-
cle occupants. In such situations, secure the
vehicle in accordance with national regula-
tions, e. g. with a warning triangle.
General notes
Observe the notes on system activation
(Y page 222).
The emergency call is triggered automatically if
an air bag is deployed or an Emergency Ten- Features
223Stowage and features Z
Page 231 of 298
Information on Roadside Assistance
(Y
page 26).
Downloading routes Downloading routes allows you to transfer and
save predefined routes in the navigation sys-
tem.
A route can be prepared and sent either by a
customer service representative or under "Own- ers Online" at http://www.mbusa.com.
Each route can include up to four way points.
Once a route has been received by the naviga-
tion system, you will see the Do
Do you you want
want to
to
start route guidance? Destination
start route guidance? Destination
Received destination has been saved Received destination has been saved
in "Previous destinations".
in "Previous destinations". message on
the multimedia system display.
The route is saved.
X To start route guidance: selectYes
Yes.
An overview of the route is shown in the dis-
play.
If you select No
No, the saved route can be called
up later in the navigation menu.
X Select Start
Start.
Route guidance starts.
Downloaded and saved routes can be called up again.
Speed alert You can define the upper speed limit, which
must not be exceeded by the vehicle.
If the vehicle exceeds the set speed, a message
is sent to the Customer Assistance Center. The
Customer Assistance Center then forwards this
information to you.
You can select the way in which you receive this information beforehand. Possible options
include text message, e-mail or an automated
call.
The data you receive contains the following
information:
R the location where the speed limit was excee-
ded
R the time at which the speed limit was excee-
ded
R the selected speed limit which was exceeded Geo fencing Geo fencing allows you to select areas which the
vehicle should not enter or leave. You will be
informed if the vehicle crosses the boundaries
of the selected areas. You can select the way in
which you receive this information beforehand.
Possible options include text message, e-mail or an automated call.
The area can be determined as either a circle or
a polygon with a maximum of ten corners. You
can specify up to ten areas simultaneously. Dif- ferent settings are possible for each area.
These settings can be called up under "Owners
Online" at http://www.mbusa.com.
Alternatively, you can also trigger an Info call
and notify the customer service representative
that you wish to activate geo-fencing.
Currently inactive areas can be activated by text message.
Triggering the vehicle alarm With this function, you can trigger the vehicle's
panic alarm via text message. An alarm sounds
and the exterior lighting flashes. Depending on
the setting, the panic alarm lasts five or ten sec-
onds. Afterwards, the alarm switches off. Rear spoiler
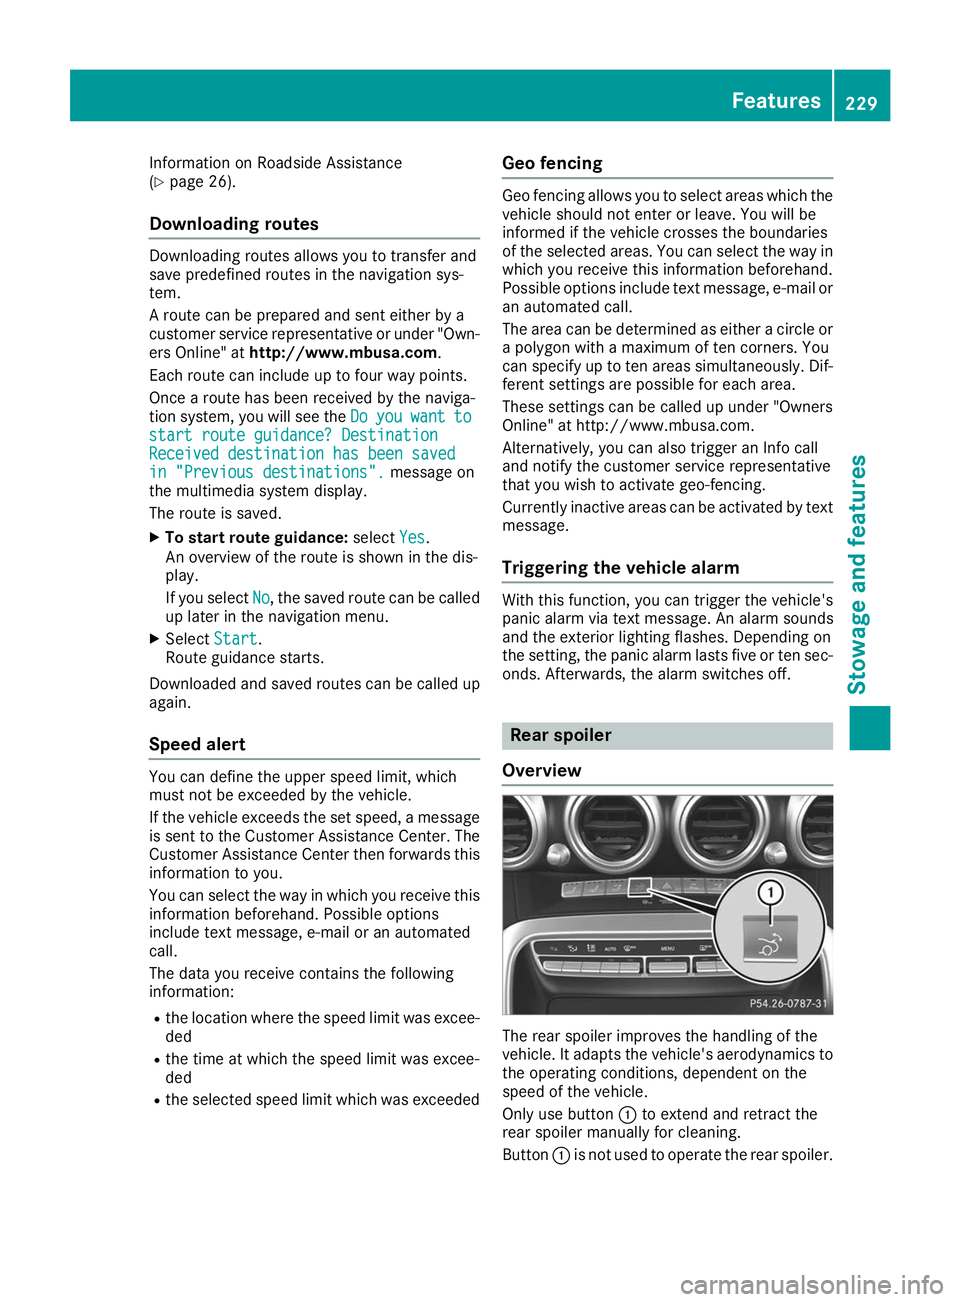
Overview The rear spoiler improves the handling of the
vehicle. It adapts the vehicle's aerodynamics to
the operating conditions, dependent on the
speed of the vehicle.
Only use button 0043to extend and retract the
rear spoiler manually for cleaning.
Button 0043is not used to operate the rear spoiler. Features
229Stowage and features Z
Page 232 of 298
The rear spoiler is extended automatically if you
drive faster than:
R 75 mph (120 km/h) in drive programs C,S
and S+
R 44 mph (70 km/h) in drive program RACE
Button 0043flashes until the rear spoiler has
extended and then lights up in red.
The rear spoiler is retracted automatically when
you drive slower than:
R 50 mph (80 km/h) in drive programs C,Sand
S+
R 19 mph (30 km/h) in drive program RACE
Button 0043flashes until the rear spoiler has
retracted and then goes out.
Extending and retracting the rear
spoiler manually G
WARNING
Body parts could become trapped if you man- ually extend/retract the rear spoiler. There is a risk of injury.
Make sure that nobody is within the range of
movement of the rear spoiler.
If someone becomes trapped during retrac-
tion of the rear spoiler, release the button
immediately. The rear spoiler then extends
again. When leaving the vehicle, always take the
SmartKey with you and lock the vehicle. Never
leave children unsupervised in the vehicle.
! Do not enter an automatic car wash with the
rear spoiler extended. Otherwise, the rear
spoiler may be damaged.
Only extend the rear spoiler in order to clean
it by hand. Retract it again when you have fin-
ished cleaning it.
You can extend and retract the rear spoiler man- ually for cleaning.
X Close the trunk lid.
X Select key position 0048with the Start/Stop
button (Y page 111).
X To extend: press button 0043.
The rear spoiler is extended.
Button 0043flashes until the rear spoiler has
extended and then lights up in red.
X To retract: press and hold button 0043until the
rear spoiler is completely retracted.
Button 0043flashes until the rear spoiler has
retracted and then goes out.
Rear Spoiler Retracts Manually Rear Spoiler Retracts Manually
appears in the display.
If you release button 0043while retracting the rear
spoiler, it extends again automatically.
Problems with the rear spoiler Problem
Possible causes/consequences and
0050 0050Solutions The rear spoiler stops
before reaching the end
position when retracting
manually. You have opened the trunk lid while manually retracting the rear
spoiler.
X Close the trunk lid.
The rear spoiler extends or, if you press and hold the ¬button,
continues retracting. The rear spoiler stops
before reaching the end
position when retract-
ing/extending manually. You have switched off the ignition.
X Switch the ignition back on.
X Press the ¬button.
The rear spoiler extends/retracts. 230
FeaturesStowage and features
Page 234 of 298
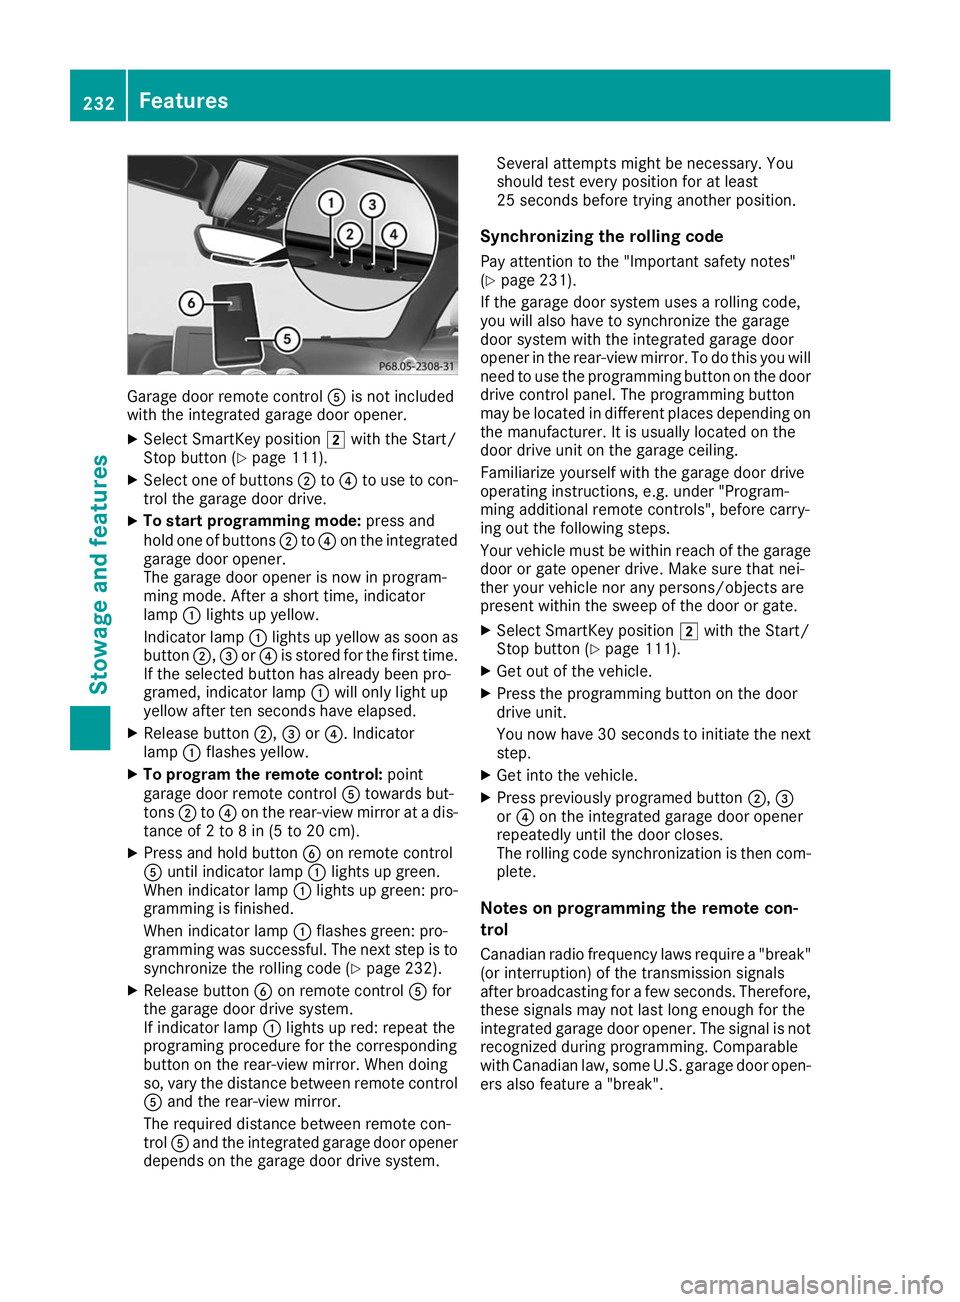
Garage door remote control
0083is not included
with the integrated garage door opener.
X Select SmartKey position 0048with the Start/
Stop button (Y page 111).
X Select one of buttons 0044to0085 to use to con-
trol the garage door drive.
X To start programming mode: press and
hold one of buttons 0044to0085 on the integrated
garage door opener.
The garage door opener is now in program-
ming mode. After a short time, indicator
lamp 0043lights up yellow.
Indicator lamp 0043lights up yellow as soon as
button 0044,0087or0085 is stored for the first time.
If the selected button has already been pro-
gramed, indicator lamp 0043will only light up
yellow after ten seconds have elapsed.
X Release button 0044,0087or0085. Indicator
lamp 0043flashes yellow.
X To program the remote control: point
garage door remote control 0083towards but-
tons 0044to0085 on the rear-view mirror at a dis-
tance of 2 to 8 in (5 to 20 cm).
X Press and hold button 0084on remote control
0083 until indicator lamp 0043lights up green.
When indicator lamp 0043lights up green: pro-
gramming is finished.
When indicator lamp 0043flashes green: pro-
gramming was successful. The next step is to
synchronize the rolling code (Y page 232).
X Release button 0084on remote control 0083for
the garage door drive system.
If indicator lamp 0043lights up red: repeat the
programing procedure for the corresponding
button on the rear-view mirror. When doing
so, vary the distance between remote control
0083 and the rear-view mirror.
The required distance between remote con-
trol 0083and the integrated garage door opener
depends on the garage door drive system. Several attempts might be necessary. You
should test every position for at least
25 seconds before trying another position.
Synchronizing the rolling code
Pay attention to the "Important safety notes"
(Y page 231).
If the garage door system uses a rolling code,
you will also have to synchronize the garage
door system with the integrated garage door
opener in the rear-view mirror. To do this you will
need to use the programming button on the door
drive control panel. The programming button
may be located in different places depending on the manufacturer. It is usually located on the
door drive unit on the garage ceiling.
Familiarize yourself with the garage door drive
operating instructions, e.g. under "Program-
ming additional remote controls", before carry-
ing out the following steps.
Your vehicle must be within reach of the garage
door or gate opener drive. Make sure that nei-
ther your vehicle nor any persons/objects are
present within the sweep of the door or gate.
X Select SmartKey position 0048with the Start/
Stop button (Y page 111).
X Get out of the vehicle.
X Press the programming button on the door
drive unit.
You now have 30 seconds to initiate the next
step.
X Get into the vehicle.
X Press previously programed button 0044,0087
or 0085 on the integrated garage door opener
repeatedly until the door closes.
The rolling code synchronization is then com- plete.
Notes on programming the remote con-
trol
Canadian radio frequency laws require a "break" (or interruption) of the transmission signals
after broadcasting for a few seconds. Therefore,
these signals may not last long enough for the
integrated garage door opener. The signal is not recognized during programming. Comparable
with Canadian law, some U.S. garage door open-
ers also feature a "break". 232
FeaturesStowage and features
Page 235 of 298
Proceed as follows:
R if you live in Canada.
R if you have difficulties programming the
garage door opener (regardless of where you
live) when following the programming steps.
X Press and hold one of buttons 0044to0085 on the
integrated garage door opener.
After a short time, indicator lamp 0043lights up
yellow.
X Release the button.
Indicator lamp 0043flashes yellow.
X Press button 0084of garage door remote con-
trol 0083for two seconds, then release it for two
seconds.
X Press button 0084again for two seconds.
X Repeat this sequence on button 0084of remote
control 0083until indicator lamp 0043lights up
green.
When indicator lamp 0043lights up green: pro-
gramming is finished.
When indicator lamp 0043flashes green: pro-
gramming was successful. The next step is to
synchronize the rolling code.
X Release button 0084of remote control 0083of the
garage door drive.
When indicator lamp 0043lights up red: repeat
the programming process for the correspond- ing button on the rear-view mirror. When
doing so, vary the distance between remote
control 0083and the rear-view mirror.
The required distance between remote con-
trol 0083and the integrated garage door opener
depends on the garage door drive system.
Several attempts might be necessary. You
should test every position for at least
25 seconds before trying another position.
Problems when programming If you are experiencing problems programming
the integrated garage door opener on the rear-
view mirror, take note of the following instruc-
tions:
R Check the transmitter frequency used by
garage door drive remote control 0083and
whether it is supported. The transmitter fre-
quency can usually be found on the back of
remote control 0083for the garage door drive.
The integrated garage door opener is com-
patible with devices that have units which operate in the frequency range of 280 to
433 MHz.
R Replace the batteries in garage door remote
control 0083. This increases the likelihood that
garage door remote control 0083will transmit a
strong and precise signal to the integrated
garage door opener.
R When programming, hold remote control 0083
at varying distances and angles from but-
tons 0044to0085 which you are programming. Try
various angles at a distance between 2and
8 inches (5to 20 cm) or at the same angle but at varying distances.
R If a further remote control 0083is available for
the same garage door drive, repeat the same
programming steps with this remote control
0083. Before performing these steps, make sure
that new batteries have been installed in
garage door drive remote control 0083.
R Note that some remote controls only transmit
for a limited amount of time (the indicator
lamp on the remote control goes out). Press
button 0084on remote control 0083again before
transmission ends.
R Align the antenna cable of the garage door
opener unit. This can improve signal recep-
tion/transmission.
Opening/closing the garage door After it has been programmed, the integrated
garage door opener performs the function of the garage door system remote control. Please also
read the operating instructions for the garage
door system.
X Select key position 0048with the Start/Stop
button (Y page 111).
X Press button 0044,0087or0085 which you pro-
grammed to operate the garage door.
Garage door system with a fixed code: indi-
cator lamp 0043lights up green.
Garage door system with a rolling code: indi-
cator lamp 0043flashes green.
The transmitter will transmit a signal as long
as the button is pressed. The transmission is
halted after a maximum of ten seconds and
indicator lamp 0043lights up yellow.
X Press button 0044,0087or0085 again if necessary. Features
233Stowage and features Z
Page 236 of 298
Clearing the memory
Make sure that you clear the memory of the
integrated garage door opener before selling the vehicle.
X Select key position 0048with the Start/Stop
button (Y page 111).
X Press and hold buttons 0044and 0085.
Indicator lamp 0043initially lights up yellow and
then green.
X Release buttons 0044and 0085.
The memory of the integrated garage door
opener in the rear-view mirror is cleared. Floormats
G
WARNING
Objects in the driver's footwell can restrict the pedal travel or obstruct a depressed pedal.
The operating and road safety of the vehicle is
jeopardized. There is a risk of an accident.
Make sure that all objects in the vehicle are
stowed correctly, and that they cannot enter
the driver's footwell. Install the floormats
securely and as specified in order to ensure
sufficient clearance for the pedals. Do not use loose floormats and do not place floormats on
top of one another. X
Slide the driver's seat backwards.
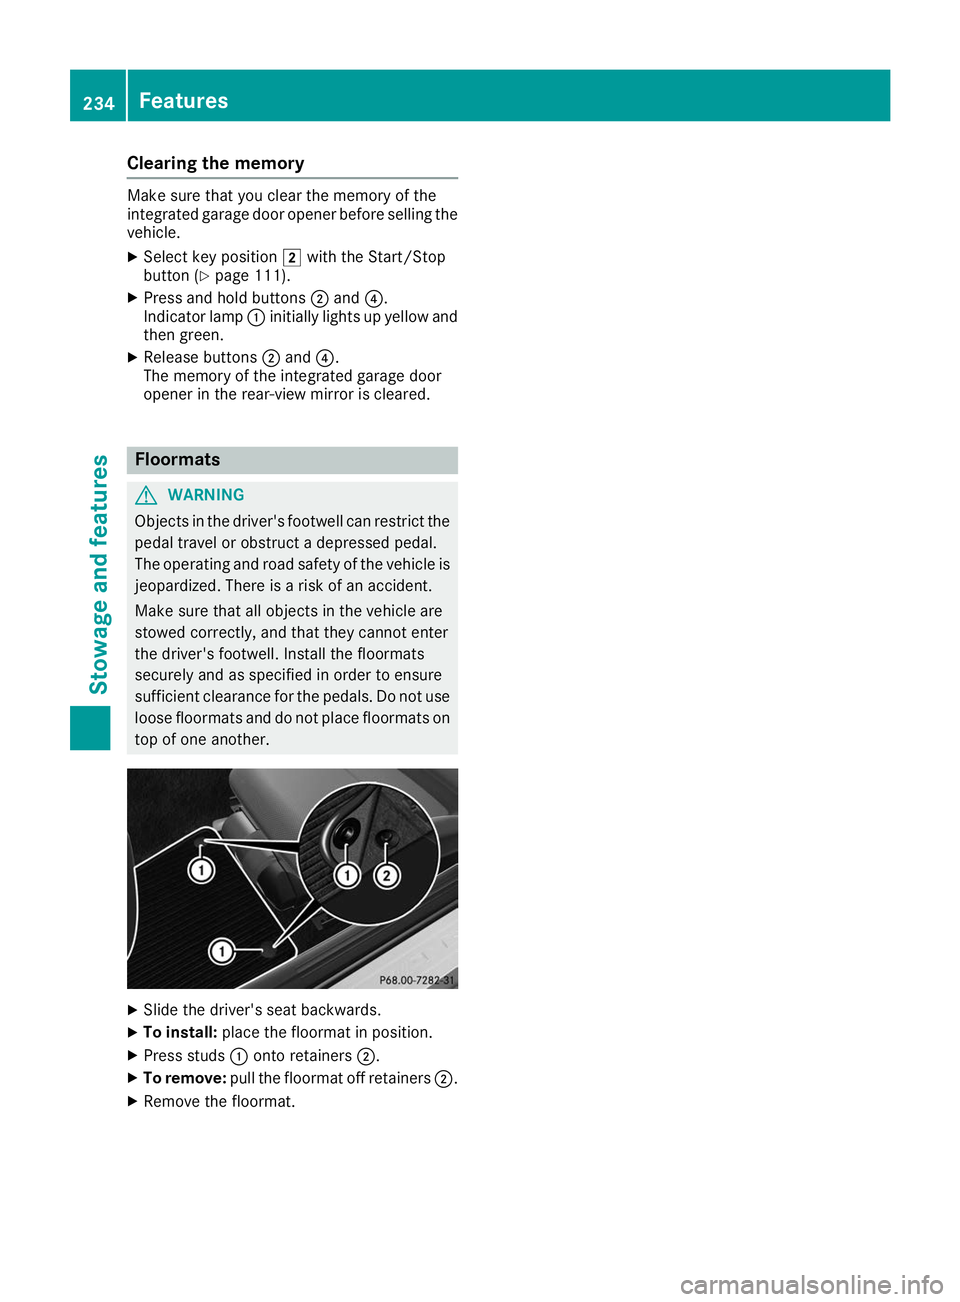
X To install: place the floormat in position.
X Press studs 0043onto retainers 0044.
X To remove: pull the floormat off retainers 0044.
X Remove the floormat. 234
FeaturesStowage and features
Page 238 of 298
X
Make sure that the windshield wipers are
turned off.
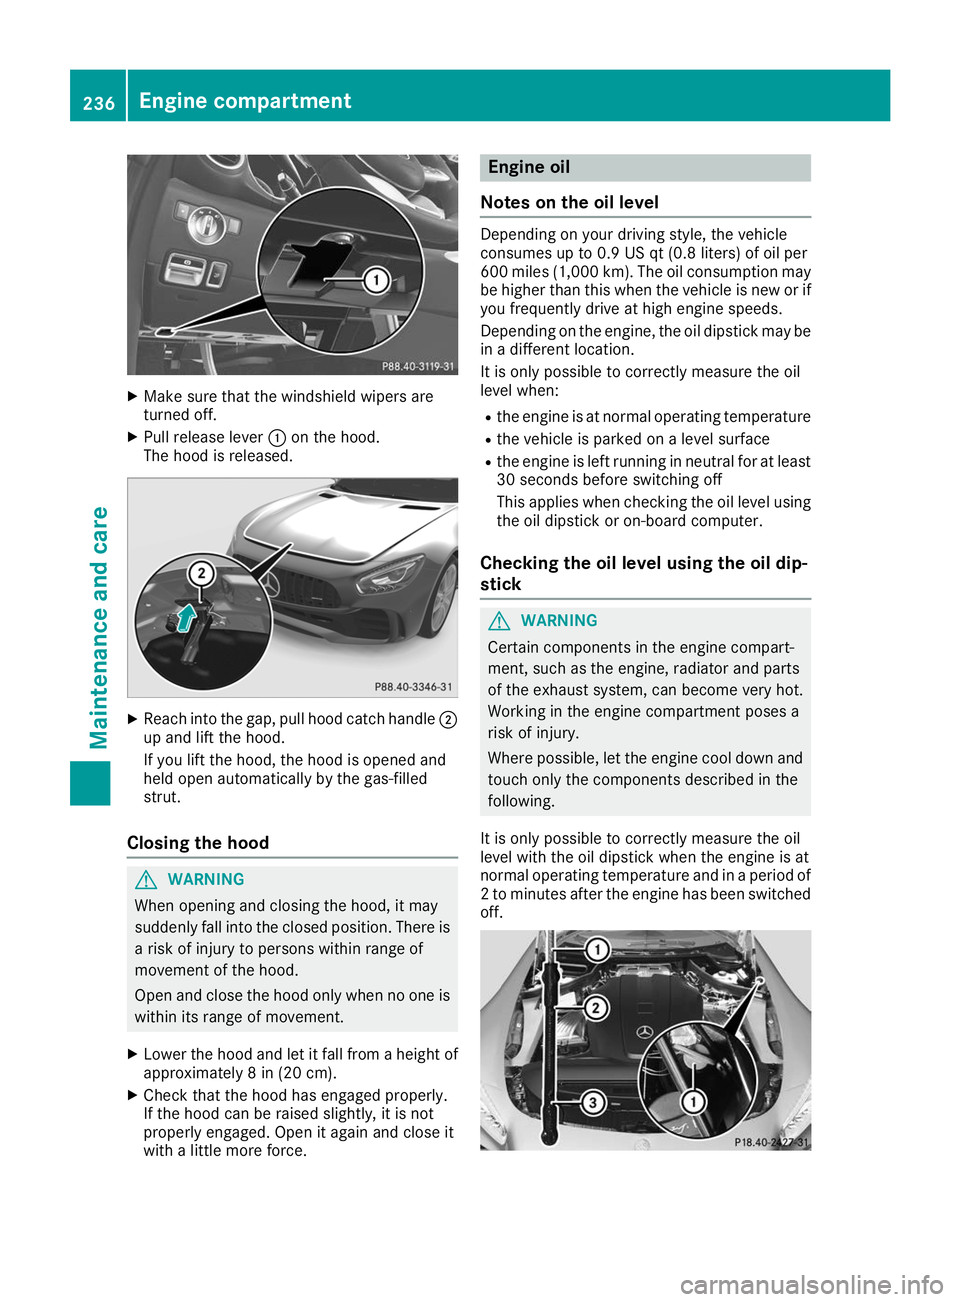
X Pull release lever 0043on the hood.
The hood is released. X
Reach into the gap, pull hood catch handle 0044
up and lift the hood.
If you lift the hood, the hood is opened and
held open automatically by the gas-filled
strut.
Closing the hood G
WARNING
When opening and closing the hood, it may
suddenly fall into the closed position. There is a risk of injury to persons within range of
movement of the hood.
Open and close the hood only when no one is
within its range of movement.
X Lower the hood and let it fall from a height of
approximately 8 in (20 cm).
X Check that the hood has engaged properly.
If the hood can be raised slightly, it is not
properly engaged. Open it again and close it
with a little more force. Engine oil
Notes on the oil level Depending on your driving style, the vehicle
consumes up to 0.9 US qt (0.8 liters) of oil per
600 miles (1,000 km). The oil consumption may
be higher than this when the vehicle is new or if
you frequently drive at high engine speeds.
Depending on the engine, the oil dipstick may be in a different location.
It is only possible to correctly measure the oil
level when:
R the engine is at normal operating temperature
R the vehicle is parked on a level surface
R the engine is left running in neutral for at least
30 seconds before switching off
This applies when checking the oil level using
the oil dipstick or on-board computer.
Checking the oil level using the oil dip-
stick G
WARNING
Certain components in the engine compart-
ment, such as the engine, radiator and parts
of the exhaust system, can become very hot.
Working in the engine compartment poses a
risk of injury.
Where possible, let the engine cool down and touch only the components described in the
following.
It is only possible to correctly measure the oil
level with the oil dipstick when the engine is at
normal operating temperature and in a period of 2 to minutes after the engine has been switchedoff. 236
Engine compartmentMaintenance and care
Page 245 of 298
Washing by hand
In some countries, washing by hand is only
allowed at specially equipped washing bays.
Observe the legal requirements in each country.
X Do not use hot water and do not wash the
vehicle in direct sunlight.
X Use a soft sponge to clean.
X Use a mild cleaning agent, such as a car
shampoo approved by Mercedes-Benz.
X Thoroughly hose down the vehicle with a gen-
tle jet of water.
X Do not point the water jet directly towards the
air inlet.
X Use plenty of water and rinse out the sponge
frequently.
X Rinse the vehicle with clean water and dry
thoroughly with a chamois.
X Do not let the cleaning agent dry on the paint-
work.
Carefully remove all deposits of road salt as
soon as possible when driving in winter.
Power washers G
WARNING
The water jet from a circular jet nozzle (dirt
blasters) can cause invisible exterior damage to the tires or chassis components. Compo-
nents damaged in this way may fail unexpect- edly. There is a risk of an accident.
Do not use power washers with circular jet
nozzles to clean the vehicle. Have damaged
tires or chassis components replaced imme-
diately.
! Always maintain a distance of at least
11.8 in (30 cm) between the vehicle and the
high-pressure cleaner nozzle. Information
about the correct distance is available from
the equipment manufacturer.
Move the power washer nozzle around when
cleaning your vehicle.
Do not aim directly at any of the following:
R tires
R door gaps, joints etc.
R soft top
R wind deflector net
R electrical components R
battery
R plug-type couplings
R lights
R seals
R trim
R ventilation slots
Damaged seals or electrical components can
lead to leaks or failures.
! Vehicles with decorative film: parts of your
vehicle are covered with decorative film.
Maintain a distance of at least 27.5 in (70 cm) between the film-covered parts of the vehicle
and the nozzle of the power washer.
Information about the correct distance is
available from the equipment manufacturer.
Move the power washer nozzle around when
cleaning your vehicle.
The water temperature of the power washer
must not exceed 140 ‡ (60 †).
! If the SmartKey is within the rear detection
range of KEYLESS-GO, the following situa-
tions, for example, could lead to the uninten-
tional opening of the trunk lid:
R when using an automatic car wash
R when using a power washer
Make sure that the SmartKey is at least 10 ft (3 m) away from the vehicle.
Cleaning the paintwork !
Do not affix:
R stickers
R films
R magnetic plates or similar items
to painted surfaces. You could otherwise
damage the paintwork.
Scratches, corrosive deposits, areas affected by corrosion and damage caused by inadequate
care cannot always be completely repaired. In
such cases, visit a qualified specialist workshop.
X Remove dirt immediately, where possible,
while avoiding rubbing too hard.
X Soak insect remains with insect remover and
rinse off the treated areas afterwards.
X Soak bird droppings with water and rinse off
the treated areas afterwards.
X Remove tree resin, oils, fuels and greases by
rubbing gently with a cloth soaked in petro-
leum ether or lighter fluid. Care
243Maintenance and care Z