2019 MASERATI QUATTROPORTE window
[x] Cancel search: windowPage 100 of 396

Front Dome Console
Components
1 Reading lights control button.
2 Central light control button.
3 Reading lights.
4 Central light.
5 Sunroof controls.
6 HomeLink controls (optional).
7 Button to open fully/partially
the power trunk lid.
8 Button to enable/disable front
sensors of the Park Assist system.
9 Button to switch off passenger
compartment lights. Front Doors Components
1 Internal door handle.
2 Driver’s seat, steering wheel,
adjustable pedals (if equipped)
and rear mirrors memory
switch.
3 Rear view mirrors switches.
4 Power window switch. 5 Power door unlocks/locks.
6 Rear windows and sunshade
lockout button.
7 Loudspeakers.
8 Storage compartment.
9 Internal door lock/unlock knob.
10 Passenger door panel grip.
11 Reflex reflector.
12 External door handle.
13 Door lock button with “Passive
Entry” function.
14 Door outboard opening lock.Understanding the Vehicle
3
96
Page 102 of 396
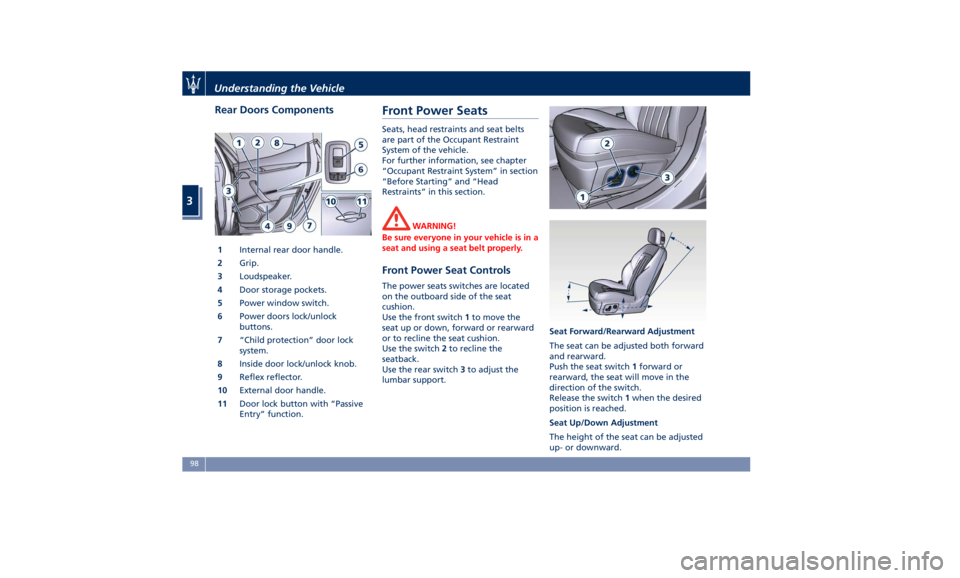
Rear Doors Components
1 Internal rear door handle.
2 Grip.
3 Loudspeaker.
4 Door storage pockets.
5 Power window switch.
6 Power doors lock/unlock
buttons.
7 “Child protection” door lock
system.
8 Inside door lock/unlock knob.
9 Reflex reflector.
10 External door handle.
11 Door lock button with “Passive
Entry” function. Front Power Seats Seats, head restraints and seat belts
are part of the Occupant Restraint
System of the vehicle.
For further information, see chapter
“Occupant Restraint System” in section
“Before Starting” and “Head
Restraints” in this section.
WARNING!
Be sure everyone in your vehicle is in a
seat and using a seat belt properly.
Front Power Seat Controls The power seats switches are located
on the outboard side of the seat
cushion.
Use the front switch 1 to move the
seat up or down, forward or rearward
or to recline the seat cushion.
Use the switch 2 to recline the
seatback.
Use the rear switch 3 to adjust the
lumbar support. Seat Forward/Rearward Adjustment
The seat can be adjusted both forward
and rearward.
Push the seat switch 1 forward or
rearward, the seat will move in the
direction of the switch.
Release the switch 1 when the desired
position is reached.
Seat Up/Down Adjustment
The height of the seat can be adjusted
up- or downward.Understanding the Vehicle
3
98
Page 108 of 396
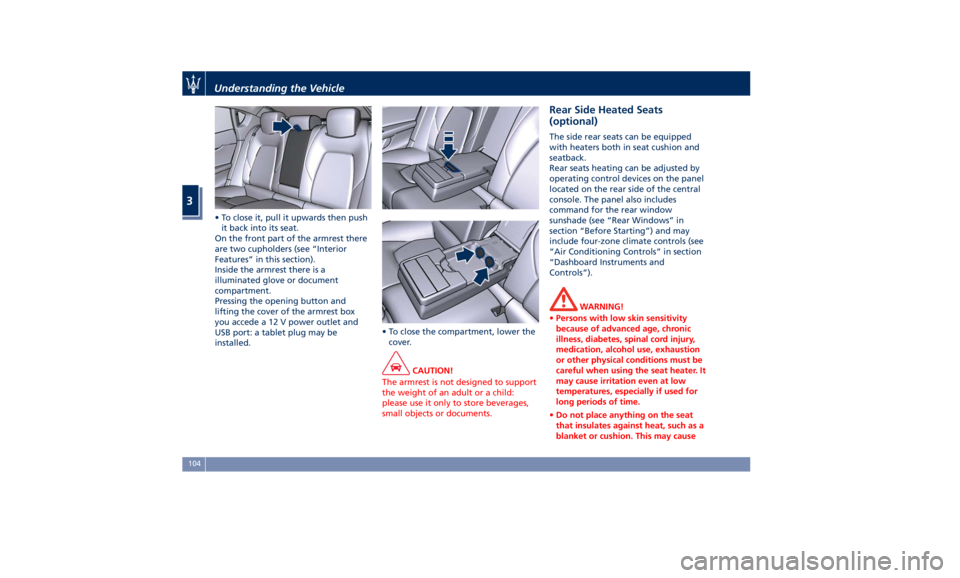
• To close it, pull it upwards then push
it back into its seat.
On the front part of the armrest there
are two cupholders (see “Interior
Features” in this section).
Inside the armrest there is a
illuminated glove or document
compartment.
Pressing the opening button and
lifting the cover of the armrest box
you accede a 12 V power outlet and
USB port: a tablet plug may be
installed. • To close the compartment, lower the
cover.
CAUTION!
The armrest is not designed to support
the weight of an adult or a child:
please use it only to store beverages,
small objects or documents. Rear Side Heated Seats
(optional) The side rear seats can be equipped
with heaters both in seat cushion and
seatback.
Rear seats heating can be adjusted by
operating control devices on the panel
located on the rear side of the central
console. The panel also includes
command for the rear window
sunshade (see “Rear Windows” in
section “Before Starting”) and may
include four-zone climate controls (see
“Air Conditioning Controls” in section
“Dashboard Instruments and
Controls”).
WARNING!
• Persons with low skin sensitivity
because of advanced age, chronic
illness, diabetes, spinal cord injury,
medication, alcohol use, exhaustion
or other physical conditions must be
careful when using the seat heater. It
may cause irritation even at low
temperatures, especially if used for
long periods of time.
• Do not place anything on the seat
that insulates against heat, such as a
blanket or cushion. This may causeUnderstanding the Vehicle
3
104
Page 109 of 396
the seat heater to overheat. Sitting
in a seat that has been overheated
could cause irritation due to the
increased surface temperature of the
seat.
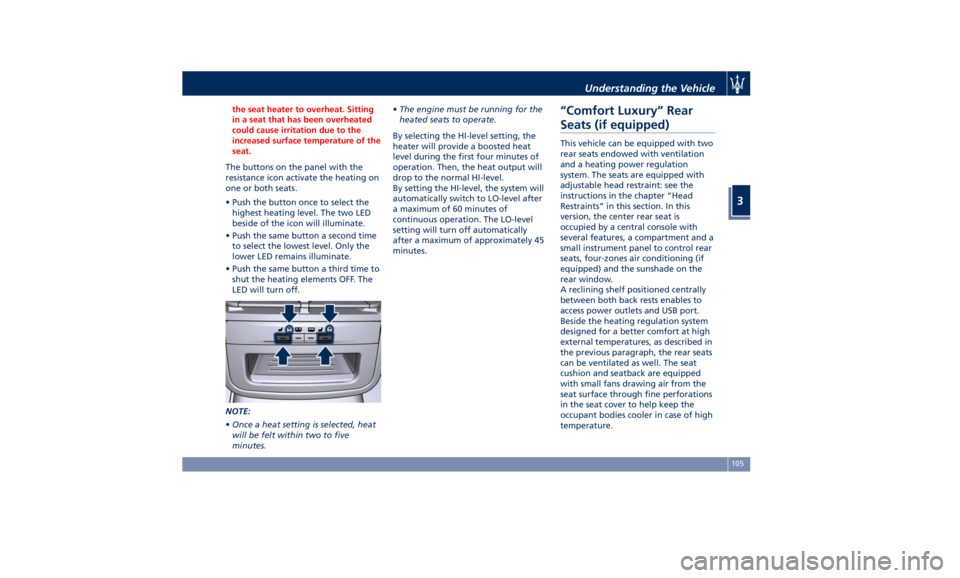
The buttons on the panel with the
resistance
icon activate the heating on
one or both seats.
• Push the button once to select the
highest heating level. The two LED
beside of the icon will illuminate.
• Push the same button a second time
to select the lowest level. Only the
lower LED remains illuminate.
• Push the same button a third time to
shut the heating elements OFF. The
LED will turn off.
NOTE:
• Once a heat setting is selected, heat
will be felt within two to five
minutes. • The engine must be running for the
heated seats to operate.
By selecting the HI-level setting, the
heater will provide a boosted heat
level during the first four minutes of
operation. Then, the heat output will
drop to the normal HI-level.
By setting the HI-level, the system will
automatically switch to LO-level after
a maximum of 60 minutes of
continuous operation. The LO-level
setting will turn off automatically
after a maximum of approximately 45
minutes.
“Comfort Luxury” Rear
Seats (if equipped) This vehicle can be equipped with two
rear seats endowed with ventilation
and a heating power regulation
system. The seats are equipped with
adjustable head restraint: see the
instructions in the chapter “Head
Restraints” in this section. In this
version, the center rear seat is
occupied by a central console with
several features, a compartment and a
small instrument panel to control rear
seats, four-zones air conditioning (if
equipped) and the sunshade on the
rear window.
A reclining shelf positioned centrally
between both back rests enables to
access power outlets and USB port.
Beside the heating regulation system
designed for a better comfort at high
external temperatures, as described in
the previous paragraph, the rear seats
can be ventilated as well. The seat
cushion and seatback are equipped
with small fans drawing air from the
seat surface through fine perforations
in the seat cover to help keep the
occupant bodies cooler in case of high
temperature.Understanding the Vehicle
3
105
Page 110 of 396
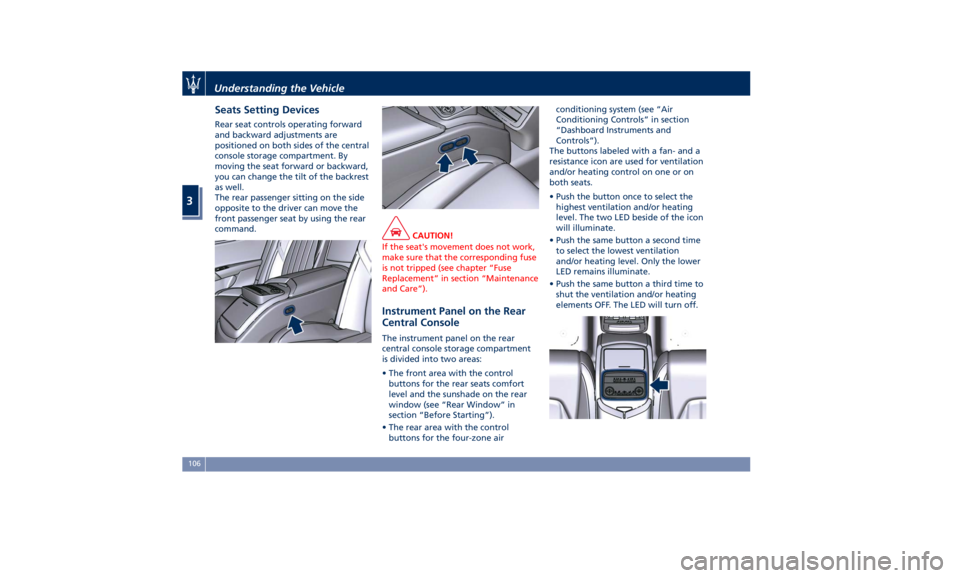
Seats Setting Devices Rear seat controls operating forward
and backward adjustments are
positioned on both sides of the central
console storage compartment. By
moving the seat forward or backward,
you can change the tilt of the backrest
as well.
The rear passenger sitting on the side
opposite to the driver can move the
front passenger seat by using the rear
command.
CAUTION!
If the seat's movement does not work,
make sure that the corresponding fuse
is not tripped (see chapter “Fuse
Replacement” in section “Maintenance
and Care”).
Instrument Panel on the Rear
Central Console The instrument panel on the rear
central console storage compartment
is divided into two areas:
• The front area with the control
buttons for the rear seats comfort
level and the sunshade on the rear
window (see “Rear Window” in
section “Before Starting”).
• The rear area with the control
buttons for the four-zone air conditioning system (see “Air
Conditioning Controls” in section
“Dashboard Instruments and
Controls”).
The buttons labeled with a fan- and a
resistance icon are used for ventilation
and/or heating control on one or on
both seats.
• Push the button once to select the
highest ventilation and/or heating
level. The two LED beside of the icon
will illuminate.
• Push the same button a second time
to select the lowest ventilation
and/or heating level. Only the lower
LED remains illuminate.
• Push the same button a third time to
shut the ventilation and/or heating
elements OFF. The LED will turn off.Understanding the Vehicle
3
106
Page 146 of 396
(Continued)
the passenger compartment.
• In a collision, there is a greater risk
of being thrown from the vehicle if
the sunroof is open. Always fasten
your seat belt properly and make
sure all passengers are properly
secured too.
• Do not allow small children to
operate the sunroof. Never insert
fingers, other body parts, or any
object through the opening sunroof.
CAUTION!
• In the event of rain, always close the
sunroof to prevent water infiltrations
from staining the fabric/leather
upholstery.
• Do not open the sunroof if there is
ice on it: risk of damage.
Slide Opening Sunroof • Full automatic express opening
Press the right rear button for more
than half second and the sunroof
will open automatically regardless
of any previous position. The
sunroof will open fully and stop
automatically. During this operation, if any sunroof button is pressed, the
sunroof will stop.
• Full or partial manual opening
To open the sunroof manually press
the right rear button for less than
half second to move step by step the
sunroof panel.
Venting Sunroof Press and release the left button, and
the sunroof will open to the vent
position. This is called “Express Vent”,
and will occur regardless of sunroof
position. During this opening
operation, any movement of the
button will stop the sunroof.
Pinch Protect Feature This feature will detect an obstruction
in the opening of the sunroof during
express close operation. If an
obstruction is detected, the sunroof
will automatically retract. If this occurs,
remove the obstruction then press the
right front button and release to
express close. NOTE:
If three consecutive attempts to close
in express mode the sunroof result in
pinch protect reversals, the fourth
attempt will be manual, with pinch
protect feature disabled.
Pinch Protect Override
If any obstruction (ice, debris, etc.)
prevents closing the sunroof, press the
right front button and hold for two
seconds after the reversal occurs. This
allows the sunroof to move toward the
closed position.
NOTE:
Pinch protection is disabled while
pressing the right front button.
Wind Buffeting Wind buffeting can be described as
the perception of pressure or a
helicopter-type sound. Your vehicle
may exhibit wind buffeting with the
windows down, or the sunroof in
certain open or partially open
positions. This is a normal occurrence
and can be minimised. If the buffeting
occurs with the rear windows open,
then open the front and rear windows
together to minimise the buffeting. If
the buffeting occurs with the sunroofUnderstanding the Vehicle
3
142
Page 153 of 396
Adjustable and fixed air vents allow
passengers to achieve the optimal
comfort conditions.
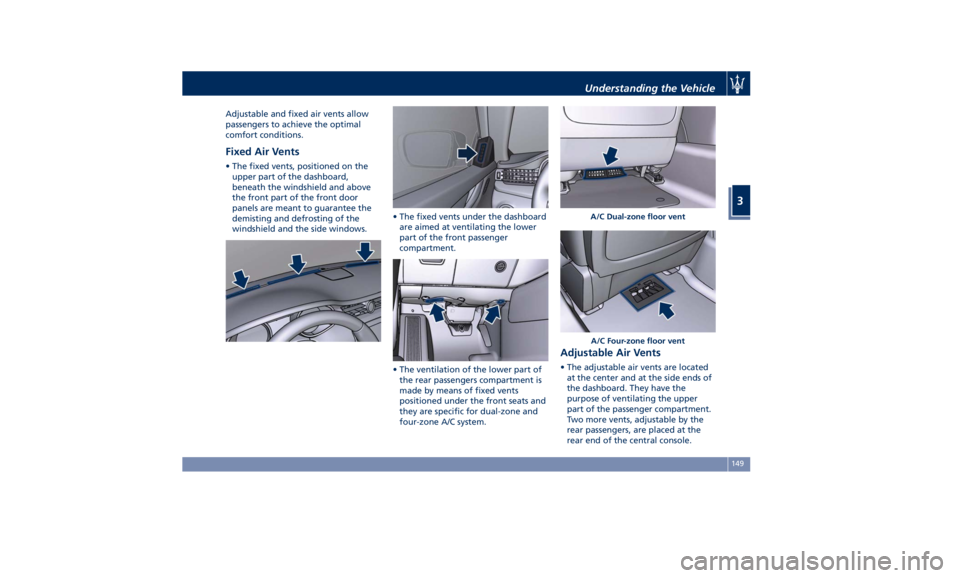
Fixed Air Vents • The fixed vents, positioned on the
upper part of the dashboard,
beneath the windshield and above
the front part of the front door
panels are meant to guarantee the
demisting and defrosting of the
windshield and the side windows. • The fixed vents under the dashboard
are aimed at ventilating the lower
part of the front passenger
compartment.
• The ventilation of the lower part of
the rear passengers compartment is
made by means of fixed vents
positioned under the front seats and
they are specific for dual-zone and
four-zone A/C system. Adjustable Air Vents • The adjustable air vents are located
at the center and at the side ends of
the dashboard. They have the
purpose of ventilating the upper
part of the passenger compartment.
Two more vents, adjustable by the
rear passengers, are placed at the
rear end of the central console. A/C Dual-zone floor vent
A/C Four-zone floor ventUnderstanding the Vehicle
3
149
Page 154 of 396
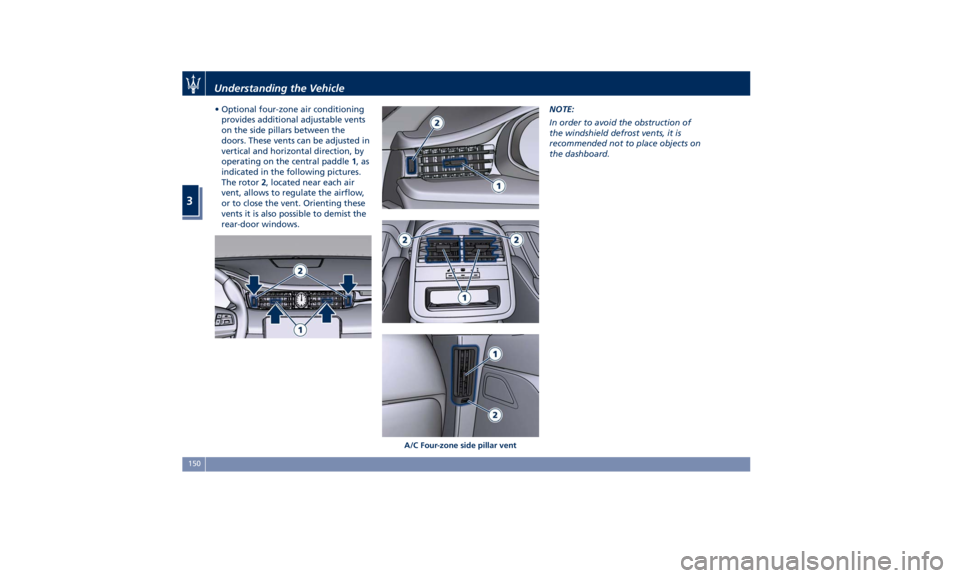
• Optional four-zone air conditioning
provides additional adjustable vents
on the side pillars between the
doors. These vents can be adjusted in
vertical and horizontal direction, by
operating on the central paddle 1 ,as
indicated in the following pictures.
The rotor 2 , located near each air
vent, allows to regulate the airflow,
or to close the vent. Orienting these
vents it is also possible to demist the
rear-door windows. NOTE:
In order to avoid the obstruction of
the windshield defrost vents, it is
recommended not to place objects on
the dashboard.
A/C Four-zone side pillar ventUnderstanding the Vehicle
3
150