2019 MASERATI QUATTROPORTE seats
[x] Cancel search: seatsPage 34 of 396

To disarm the System Use any of the following steps to
disarm the vehicle security alarm.
• Press the button on key fob RKE
transmitter.
• Grasp the “Passive Entry” unlock
door handle (see “Passive Entry
System” in this section for further
information).
• Press the START/STOP button so as to
release the OFF position.
NOTE:
• When the vehicle security alarm is
armed, the interior power door lock
switch will not allow unlocking of
the doors.
• The use of the emergency key into
the driver door lock and the use of
the button
on the key fob
cannot arm or disarm the security
alarm of the vehicle.
• The vehicle security alarm remains
engaged while accessing the power
trunk lid. Pressing the button
between the license plate lights will
not disarm the vehicle security alarm.
If anyone enters the vehicle through
the trunk lid and opens a door, the
alarm will trigger. The vehicle security alarm is designed
to protect your vehicle; however, you
can create conditions where the
system will give you a false alarm. If
one of the previously described arming
sequences has occurred, the vehicle
security alarm will arm regardless of
whether you are in the vehicle or not.
If you remain in the vehicle and open a
door, the alarm will activate. If this
occurs, disarm the vehicle security
alarm.
If the vehicle security alarm is armed
and the battery becomes disconnected,
the vehicle security alarm will remain
armed when the battery is
reconnected; the exterior lights will
flash, the buzzer will activate. If this
occurs, disarm the vehicle security
alarm.
Tamper Alert If something has triggered the vehicle
security alarm in your absence, the
horn will sound three times when you
disarm the vehicle security alarm.
Check the vehicle for tampering.Illuminated Entry/Exit Lights will turn on and off when you
enter/exit the vehicle and operate the
buttons on the key fob RKE
transmitter and/or on the “Passive
Entry” system as follows:
• If the unlock command is enabled by
pressing the specific
button on the
key fob RKE transmitter or by the
“Passive Entry” system, the
“illuminated entry” mode will
activate. Courtesy & dimmable
internal lighting, night front seats
lighting, and approach lighting will
stay on for 27 seconds.Before Starting
2
30
Page 36 of 396

Vehicle Lighting with
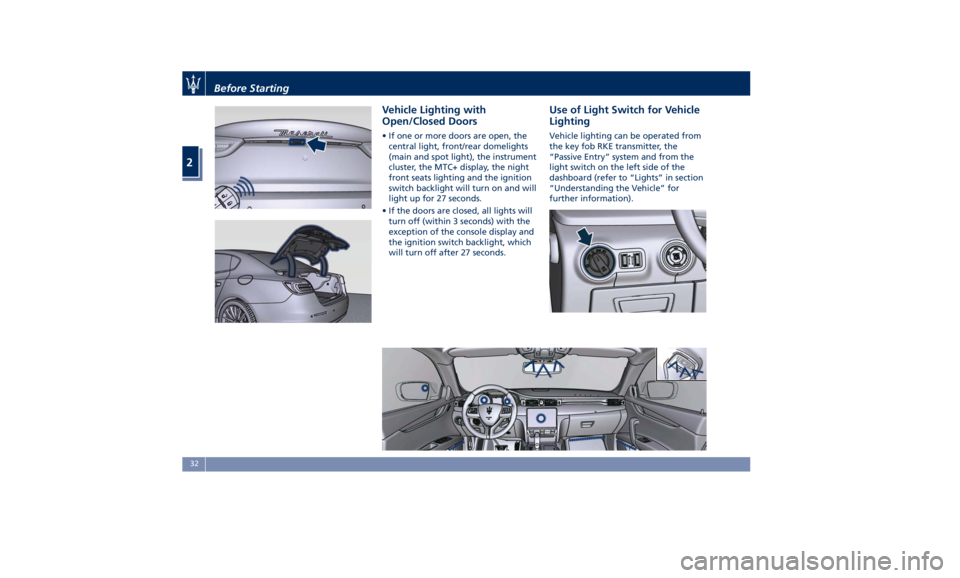
Open/Closed Doors • If one or more doors are open, the
central light, front/rear domelights
(main and spot light), the instrument
cluster, the MTC+ display, the night
front seats lighting and the ignition
switch backlight will turn on and will
light up for 27 seconds.
• If the doors are closed, all lights will
turn off (within 3 seconds) with the
exception of the console display and
the ignition switch backlight, which
will turn off after 27 seconds. Use of Light Switch for Vehicle
Lighting Vehicle lighting can be operated from
the key fob RKE transmitter, the
“Passive Entry” system and from the
light switch on the left side of the
dashboard (refer to “Lights” in section
“Understanding the Vehicle” for
further information).Before Starting
2
32
Page 37 of 396

• If the light switch is in the “0” (OFF)
mode all switch backlights and the
front seats lighting will turn off.
• If the light switch is in the
position and the ignition switch
is in OFF position, the front low
intensity LEDs of the external
headlight and rear position light
guide LED will turn on and will turn
off automatically after 8 minutes to
preserve the battery charge.
• If the light switch is in
position
and the ignition switch is in RUN
position, no lighting feature will be
available.
• If the light switch is in
position
(Low beam mode) the front
domelight LED (if enabled), the
switches backlighting, the
instrument cluster’s display, the night
front seats lighting will turn on. The
front domelight LED and the night
lighting of the front seats will light
up with the intensity set by the
right-hand regulator. If the regulator
is in "0" (OFF) position, the night
lighting will turn off.
• If the light switch is turned in
“AUTO” position (on/off AUTO
mode) and the ignition is switched in
RUN position, as in “low beam
mode” all lights turn on either in “DAY” or “NIGHT” mode according
to the twilight sensor. In “DAY”
mode the switches backlighting will
be at 100% intensity, in “NIGHT”
mode they will be as set by the left
dimmer control switch.
NOTE:
In “DAY” mode, the switches are not
backlit, except the windows and
steering switches.
Light Dimmer Controls The light dimmer controls are part of
the headlight switch and are
positioned beside the switcher itself
(see “Lights” in section
"Understanding the Vehicle" for
further information).Unlock the Vehicle with
Key fob The RKE system allows you to unlock
the doors and the fuel filler door,
open the trunk and turn the approach
and courtesy lights on from a distance
up to approximately 33 ft (10 m). The
key fob RKE transmitter does not need
to be pointed at the vehicle to
activate the system. See “Illuminated
Entry/Exit” in this section for further
information.
NOTE:
Driving at speeds of 5 mph (8 km/h)
and above disables the system from
responding to all key fobs RKE
transmitter buttons.Before Starting
2
33
Page 45 of 396

Child-Protection Door Lock
System — Rear Doors To provide a safer environment for
small children sitting in the rear seats,
the rear doors are equipped with a
child-protection door lock system.
Engage or Disengage the
Child-Protection Door Lock
• Open the rear door.
• Insert the tip of the emergency key
into the lock and rotate to the lock
or unlock position.
• Repeat the first two steps on the
opposite rear door.
WARNING!
Avoid trapping anyone in a vehicle in
a collision. Remember that the rear
doors can only be opened from the outside when the child-protection
locks are engaged (locked).
NOTE:
For
emergency exit from the rear seats
when the child-protection door lock
system is engaged, manually raise the
door lock knob to the unlocked
position, roll down the window, and
open the door using the outside door
handle.
Soft Door Close System (if
equipped) This system makes doors easier to shut
without having to slam if you do not
get it closed the first time. It increases
the vehicle's safety and comfort, in
particular for children in the back seat,
it is not necessary to slam the door
and it also prevents the risk of
traveling with the door ajar.
The system uses a sensor to detect the
door ajar and an electric actuator to
close it. The sensor detects your
attempt to close the door and once
the latch catches the handle the
electric actuator pulls the door firmly
bringing the door to the fully closed
position.
During the soft closing phase
operated by the system, it is possible to intervene manually by opening or
closing the door.
If you are pushing the door hard
enough to close just like a regular
one, the system still works, but only to
check whether the door is properly
closed.
WARNING!
The system works properly if the ajar
door has a gap , between exterior
door panel surface and exterior
bodyshell surface in the latch area , of
max 0.23 in (6 mm). In the presence of
higher gap, the system is not able to
close the door with the risk of
travelling with the door not
completely closed.Before Starting
2
41
Page 54 of 396

C. Sunshade fully rolled down (DOWN
position) and Window completely
open (DOWN position)
• Pulling the control to 1 or 2 detent:
the window closes partially or
completely and the sunshade
remains rolled.
• Pressing the control to 1 or 2 detent:
no action (NOP).
Teaching Cycle
After battery disconnection, the
following teaching cycle is required to
store the limit positions the sunshades.
Use the controls on the rear doors to
move the sunshades.
• With glass closed, lift rear sunshade
control on driver side for a few
seconds. It is not necessary that the
sunshade reaches its upper limit.
• Reverse the sunshade movement by
pressing the control downwards.
Once the lower limit is reached, press
and hold the control for at least 10
seconds. This action allows setting
the control unit in initialisation
status.
• Release the movement command.
• Within maximum 15 seconds:
• Press once the control downwards
(first or second detent). In this way
the control unit stores the lower limit position. During this
operation a slight click of the
sunshade motor that switches to
mechanical lock condition can be
heard.
• Lift the control and hold it up until
the sunshade completes its
upstroke and reaches the car body
pillar, fully home. Once the upper
limit stop is reached, the sunshade
will move downwards for approx.
2-3 millimetres and the control unit
will store this height as the upper
limit. Now the teaching of the
driver side rear sunshade is
complete.
• Repeat the same operations for the
passenger side rear sunshade to
complete the teaching procedure.Rear Window Rear Window Defroster The rear window defroster button is
located on the climate control panel.
See “Air Conditioning Controls” in
section “Dashboard Instruments and
Controls”.
Power Sunshade (if equipped) Your vehicle can be equipped on
request with a power sunshade that
will reduce the amount of sunlight
that will enter through the rear
window.
The sunshade is rolled in and stored
inside the cover behind the rear seats;
when activated, it rolls out upwards.
The power sunshade can be operated
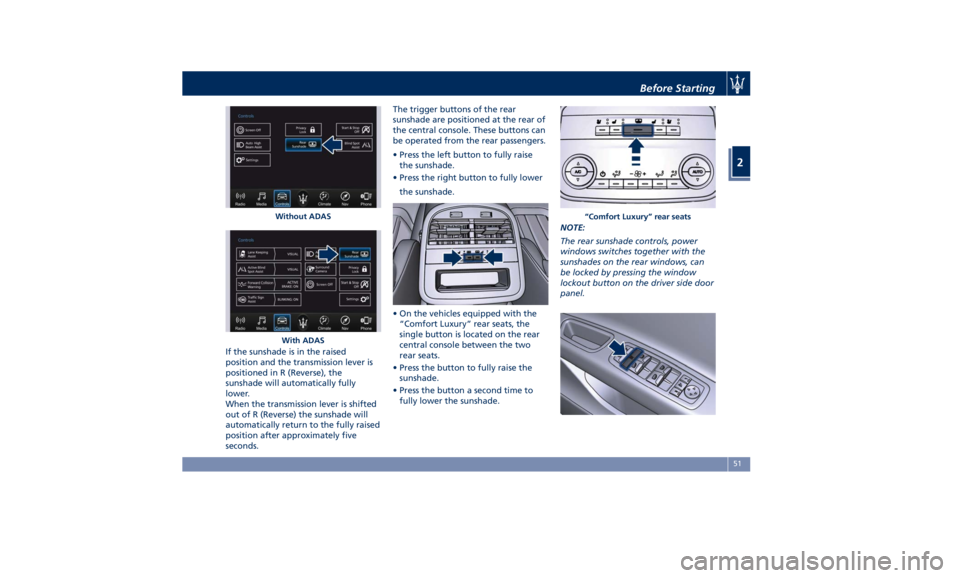
using the MTC+ System.
• Touch the “Controls” soft-key.
• Within 15 seconds, touch the “Rear
Sunshade” soft-key to raise the
power sunshade.
• Within 15 seconds, touch the “Rear
Sunshade” soft-key a second time to
lower the sunshade.Before Starting
2
50
Page 55 of 396

If the sunshade is in the raised
position and the transmission lever is
positioned in R (Reverse), the
sunshade will automatically fully
lower.
When the transmission lever is shifted
out of R (Reverse) the sunshade will
automatically return to the fully raised
position after approximately five
seconds. The trigger buttons of the rear
sunshade are positioned at the rear of
the central console. These buttons can
be operated from the rear passengers.
• Press the left button to fully raise
the sunshade.
• Press the right button to fully lower
the sunshade.
• On the vehicles equipped with the
“Comfort Luxury” rear seats, the
single button is located on the rear
central console between the two
rear seats.
• Press the button to fully raise the
sunshade.
• Press the button a second time to
fully lower the sunshade. NOTE:
The rear sunshade controls, power
windows switches together with the
sunshades on the rear windows, can
be locked by pressing the window
lockout button on the driver side door
panel.Without ADAS
With ADAS “Comfort Luxury” rear seatsBefore Starting
2
51
Page 60 of 396

sideways and immediately pull it back:
from this moment, the power trunk lid
will activate within two seconds.
If closed, with the foot movement the
power trunk lid will:
• unlock and completely open;
• after another kick, will stop;
• after another kick, will reverse its
movement and completely close
unless stopped again.
If open, with the foot movement the
power trunk lid will:
• completely close but not lock;
• another kick before the completed
closing can stop the movement;
• if the movement was stopped
another kick operation will invert a
complete opening.
NOTE:
• If your foot movement fails to
activate the power trunk lid
movement, wiggling your foot under
the bumper will not help. Repeat the
whole kick movement.
• In particular situations, external
factors affecting the sensor area may
trigger the Hands free power trunk
lid release feature. For example,
when washing the vehicle, a water
jet aimed at the sensor area may trigger the “Hands free” power
trunk release feature. Keep the key
fob RKE transmitter away from the
sensing range of the sensors (10 ft/3
m) or disable the “Hands free”
feature from the MTC+ menu (see
“MTC+ Settings” in section
“Dashboard Instruments and
Controls”). A key fob RKE transmitter
located in the front seat passenger
area is considered out of range of
the “Hands free” trunk lid release
sensor.
• If somebody or something knocks
against the power trunk lid while it is
moving, the safety system might stop
lid opening or closing movement.
Trunk Lid Emergency Release If accessing the trunk from the rear
seats, operate the emergency release
lever (see the chapter "Trunk Safety"
in this section) in order to lower the
rear seat backrest (see "Cargo Area" in
section “Understanding the Vehicle”).
If the power release control operated
by pressing the button on the dome
console fails, which may occur when
the battery is low on voltage, it is
possible to temporarily power the
system by using the battery remote
poles located inside the engine compartment (see “Auxiliary
Jump-Start Procedure” in section “In
an Emergency”). Thus it is possible to
normally open the trunk lid by using
the key fob RKE transmitter. Have the
vehicle checked by an Authorized
Maserati Dealer in order to solve the
failure.Before Starting
2
56
Page 63 of 396

Please pay close attention to the
information in this section. It tells you
how to use your restraint system
properly, to keep you and your
passengers as safe as possible.
If you are carrying children too small
for adult-sized seat belts, the seat
belts or the Lower Anchors and Tether
for CHildren (LATCH) feature also can
be used to hold infant and child
restraint systems. For more
information on LATCH, refer to
“Lower Anchors and Tether for
CHildren (LATCH)” in this section.
WARNING!
To help provide maximum protection,
you are advised to keep the seatback
in the most upright position possible
and the seat belt close to your chest
and pelvis. If the seat belt is loose, in
the event of an accident you could
move too far forward and could be
injured. Travelling with the seatback
too far reclined could also be
dangerous: even if the seat belts are
fastened, they may not work
correctly. In fact, the belt itself may
not be close enough to your body
and, if it is in front of you, it could
cause neck wounds or other injuries in
an accident. Additionally, in an accident, the lower section of the belt
could press against the upper part of
your stomach rather than the pelvic
area, causing serious internal injuries.
NOTE:
The
advanced air
bags have a multi
stage inflator. This allows the air bag
to have different stages of inflation
based on the severity and type of
collision.
Here are some simple steps you can
take to minimize the risk of harm
from a deploying air bag:
• Children 12 years old and under
should always ride buckled up in a
rear seat.
WARNING!
Infants in rear facing child restraints
should never ride in the front seat of
a vehicle with a passenger Advanced
Front Air Bag. An air bag deployment
can cause severe or fatal injury to
infants in that position.
Do not use child seats or child booster
cushions/backrests in the front
passenger seat. Occupants in the front
passenger seat must never sit on the
edge of the seat, leaning toward the dashboard or otherwise sit out of
position. The occupants’ back must be
as upright as comfort allows, and
must rest against the seatback with
the seat belt properly fastened. Feet
must be on the floor (i.e. not on the
dashboard, seat or out of the
window).
Children that are not big enough to
wear
the vehicle
seat belt properly
(see “Child Restraints System” in this
section) should be secured in the rear
seat in child restraints seats or
belt-positioning booster seats. Older
children who do not use child
restraints seats or belt-positioning
booster seats should ride properly
buckled up in the rear seat. Never
allow children to slide the shoulder
belt behind them or under their arm.
The safest place for a child that has
outgrown the child safety seat is in
the rear seat using the standard seat
belt in combination with a suitable
booster seat if needed so the seat belt
is properly located on the child.
You should read the instructions
provided with your child restraint
system to make sure that you are
using it properly.Before Starting
2
59