2019 MASERATI QUATTROPORTE key
[x] Cancel search: keyPage 229 of 396
2 nd
gear, it is necessary to keep the
brake pedal fully depressed.
WARNING!
• It is dangerous to move the shift
lever out of P (Park) or N (Neutral) if
the engine speed is higher than
idlespeed. If your foot is not firmly
pressing on the brake pedal, the
vehicle could accelerate quickly
forward or in reverse. You could lose
control of the vehicle and hit
someone or something. Only shift
into gear when the engine is idling
normally and when your foot is
firmly pressing on the brake pedal.
• Unintended movement of a vehicle
could injure those in or near the
vehicle. As with all vehicles, you
should never exit a vehicle while the
engine is running. Before exiting a
vehicle, always apply the electronic
parking brake, shift the transmission
into P (Park), and turn the engine
off.
• Never leave children alone in a
vehicle, or with access to an
unlocked vehicle. Allowing children
to be in a vehicle unattended is
dangerous for a number of reasons. A child or others could be seriously
or fatally injured. Children should be
warned not to touch the parking
brake, brake pedal or the shift lever.
• When leaving the vehicle, always
remove the key fob and lock your
vehicle.
• Do not leave the key fob in or near
the vehicle. A child could operate
power windows, other controls, or
move the vehicle.
This vehicle is equipped with a feature
which
requires the transmission to be
placed in P (Park) before the engine
can be turned off. This prevents the
driver from inadvertently leaving the
vehicle without having placed the
transmission in P (Park). This system
also locks the transmission in P (Park)
whenever the ignition switch is in the
OFF position.
Automatic Transmission Lever Automatic transmission is operated by
a shift lever with unlock button,
located on the central console, which
can have the following operating
positions:
• P (Park): button control;
• R (Reverse);
• N (Neutral); • D (Drive) automatic forward speed;
• M -/+ (Manual): “+” shifting to
higher gear or “–“ shifting to lower
gear in manual mode (see “Drive
Mode” in this section).
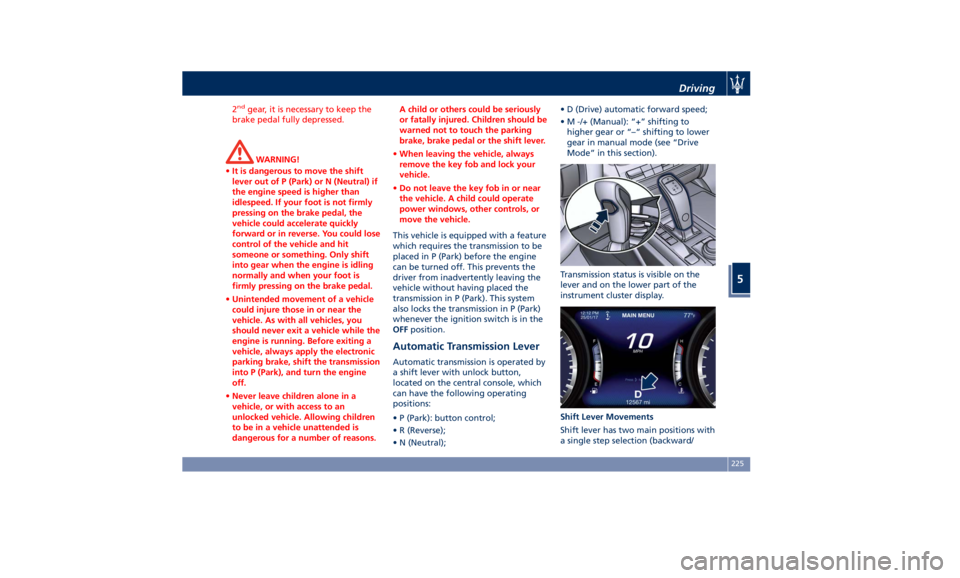
Transmission status is visible on the
lever and on the lower part of the
instrument cluster display.
Shift Lever Movements
Shift lever has two main positions with
a single step selection (backward/Driving
5
225
Page 238 of 396
Drive Mode Controls Preview Drive modes can be set using the
buttons on central console.
CAUTION!
“NORMAL” is the default drive mode,
optimized for the best balance
between performance, fuel
consumption and emissions in the
standard conditions use of the car.
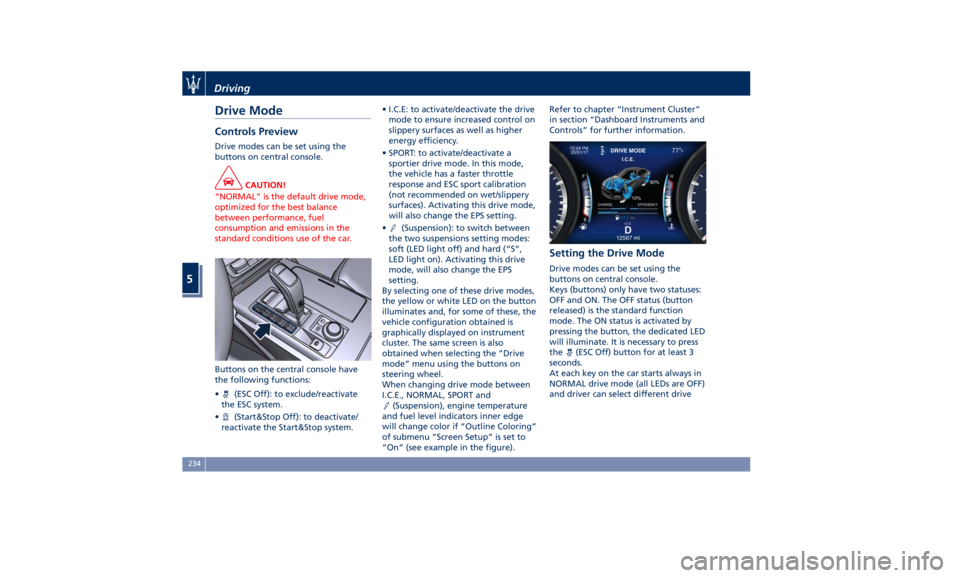
Buttons on the central console have
the
following functions:
•
(ESC Off): to exclude/reactivate
the ESC system.
•
(Start&Stop Off): to deactivate/
reactivate the Start&Stop system. • I.C.E: to activate/deactivate the drive
mode to ensure increased control on
slippery surfaces as well as higher
energy efficiency.
• SPORT: to activate/deactivate a
sportier drive mode. In this mode,
the vehicle has a faster throttle
response and ESC sport calibration
(not recommended on wet/slippery
surfaces). Activating this drive mode,
will also change the EPS setting.
•
(Suspension): to switch between
the two suspensions setting modes:
soft (LED light off) and hard (“S”,
LED light on). Activating this drive
mode, will also change the EPS
setting.
By selecting one of these drive modes,
the yellow or white LED on the button
illuminates and, for some of these, the
vehicle configuration obtained is
graphically displayed on instrument
cluster. The same screen is also
obtained when selecting the “Drive
mode” menu using the buttons on
steering wheel.
When changing drive mode between
I.C.E., NORMAL, SPORT and
(Suspension), engine temperature
and fuel level indicators inner edge
will change color if “Outline Coloring”
of submenu “Screen Setup” is set to
“On” (see example in the figure). Refer to chapter “Instrument Cluster”
in section “Dashboard Instruments and
Controls” for further information.
Setting the Drive Mode Drive modes can be set using the
buttons on central console.
Keys (buttons) only have two statuses:
OFF and ON. The OFF status (button
released) is the standard function
mode. The ON status is activated by
pressing the button, the dedicated LED
will illuminate. It is necessary to press
the
(ESC Off) button for at least 3
seconds.
At each key on the car starts always in
NORMAL drive mode (all LEDs are OFF)
and driver can select different driveDriving
5
234
Page 270 of 396

require cleaning or removal of an
obstruction.
When the condition that created
limited functionality is no longer
present, the ACC and FCW systems will
return to full functionality.
NOTE:
If the windshield wiper warning
message occurs frequently (e.g. more
than once on every trip) without any
snow, rain, mud, or other obstruction,
have the windshield and forward-
facing camera inspected at an
Authorized Maserati Dealer .
Service ACC/FCW Warning
If the ACC and FCW systems turn off,
and the system displays a service
warning, there may be an internal
system fault or a temporary
malfunction that limits functionality.
Although the vehicle is still driveable
under normal conditions, ACC and
FCW will be temporarily unavailable. If
this occurs, try activating ACC and FCW
again later, following a key cycle. If the
problem persists, contact an
Authorized Maserati Dealer .Precautions while Driving with
ACC Offset Driving
ACC may not detect a vehicle in the
same lane that is offset from your
direct line of travel, or a vehicle
merging in from a side lane. There
may not be sufficient distance to the
vehicle ahead. The offset vehicle may
move in and out of the line of travel,
which can cause your vehicle to brake
or accelerate unexpectedly. Turns and Bends
When driving on a curve with ACC
engaged, the system may decrease the
vehicle speed and acceleration for
stability reasons, with no target vehicle
detected. Once the vehicle is out of
the curve the system will resume your
original Set Speed. This is a part of
normal ACC system functionality.
Moreover, the radar sensor might
detect a vehicle on a nearby lane or no
longer detect the target vehicle.Driving
5
266
Page 273 of 396

system will compensate and provide
additional brake force as required.
When the system determines a
collision with the vehicle in front of
you is no longer probable, the
warning messages will be deactivated.
NOTE:
• Bad weather conditions, like heavy
rain, snow, etc., can lead to reduced
system performance. Under these
conditions relevant objects will not
be detected or detected late by the
system.
• FCW is designed to react in specific
situations in typical traffic scenarios
with objects in the same lane driving
in the same direction, but under
certain conditions it can also react
on stationary objects in the same
lane. It is not designed to react to
oncoming traffic or crossing traffic.
• The FCW alerts may be triggered to
objects other than vehicles such as
guard rails or sign posts based on
the course prediction. This is
expected and is a part of normal
FCW activation and functionality.
• It is unsafe to test the FCW system.
To prevent such misuse of the
system, after four Active Braking
events within a key cycle, the Active
Braking portion of FCW will be deactivated until the next key cycle.
The limit of four events applies to
the brake actuation too.
• FCW will automatically deactivated
when
(ESC OFF) button is pressed
(LED light up).
WARNING!
• Forward Collision Warning (FCW) is
not intended to avoid a collision on
its own, nor can FCW detect every
type of potential collision. The
driver has the responsibility to avoid
a collision by controlling the vehicle
via braking and steering. Failure to
follow this warning could lead to
serious injury or death. The driver is
always in charge to safely drive and
to avoid critical situations, and not
rely on the support of the FCW
system. Driver has to keep in mind
that the system and therefore its
intervention is always subject to the
prevailing physical limits.
• Forward Collision Warning (FCW) is
not intended either to warn or to
apply any brake aid/brake
intervention in case of collisions
with pedestrians (if not equipped with PEB sub-system), bicycles and
not licensable vehicles in general.
Speed Range of Use Speed mph (km/h)
Minimum 0 (0)
Engaged/activated 1.12 (1.8)
Maximum 155 (250)
When the speed is outside the
specified limits, the system
automatically disables without turning
on the corresponding warning light
on the instrument cluster.
FCW Status The driver can adjust FCW sensitivity
or enable/disable the brake actuation
with the other emergency brakings by
touching "Controls" soft-key on MTC+
display. The current setting is indicated
beside to the "Forward Collision
Warning" soft-key. If you want to
change the setting, touch the soft-key
on the side to enter FCW page.Driving
5
269
Page 274 of 396
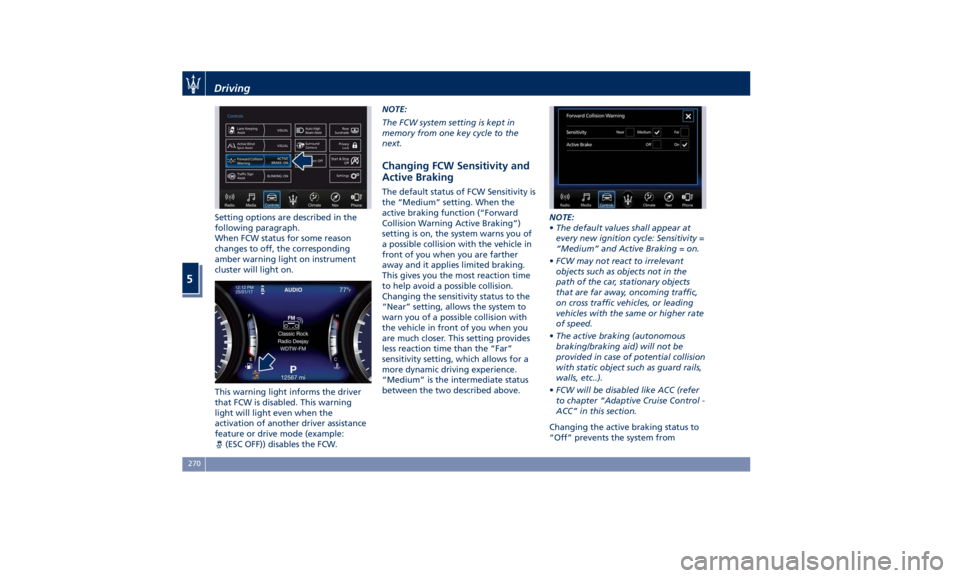
Setting options are described in the
following paragraph.
When FCW status for some reason
changes to off, the corresponding
amber warning light on instrument
cluster will light on.
This warning light informs the driver
that FCW is disabled. This warning
light will light even when the
activation of another driver assistance
feature or drive mode (example:
(ESC OFF)) disables the FCW. NOTE:
The FCW system setting is kept in
memory from one key cycle to the
next.
Changing FCW Sensitivity and
Active Braking The default status of FCW Sensitivity is
the “Medium” setting. When the
active braking function (“Forward
Collision Warning Active Braking”)
setting is on, the system warns you of
a possible collision with the vehicle in
front of you when you are farther
away and it applies limited braking.
This gives you the most reaction time
to help avoid a possible collision.
Changing the sensitivity status to the
“Near” setting, allows the system to
warn you of a possible collision with
the vehicle in front of you when you
are much closer. This setting provides
less reaction time than the “Far”
sensitivity setting, which allows for a
more dynamic driving experience.
“Medium” is the intermediate status
between the two described above. NOTE:
• The default values shall appear at
every new ignition cycle: Sensitivity =
“Medium” and Active Braking = on.
• FCW may not react to irrelevant
objects such as objects not in the
path of the car, stationary objects
that are far away, oncoming traffic,
on cross traffic vehicles, or leading
vehicles with the same or higher rate
of speed.
• The active braking (autonomous
braking/braking aid) will not be
provided in case of potential collision
with static object such as guard rails,
walls, etc..).
• FCW will be disabled like ACC (refer
to chapter “Adaptive Cruise Control -
ACC” in this section.
Changing the active braking status to
“Off” prevents the system fromDriving
5
270
Page 276 of 396
NOTE:
In case of wet road or raining
conditions the function could be
disabled by the system in order to
minimize the risks.
Speed Range of Use Speed mph (km/h)
Minimum 37 (60)
Engaged/activated 37 (60)
Maximum 112 (180)
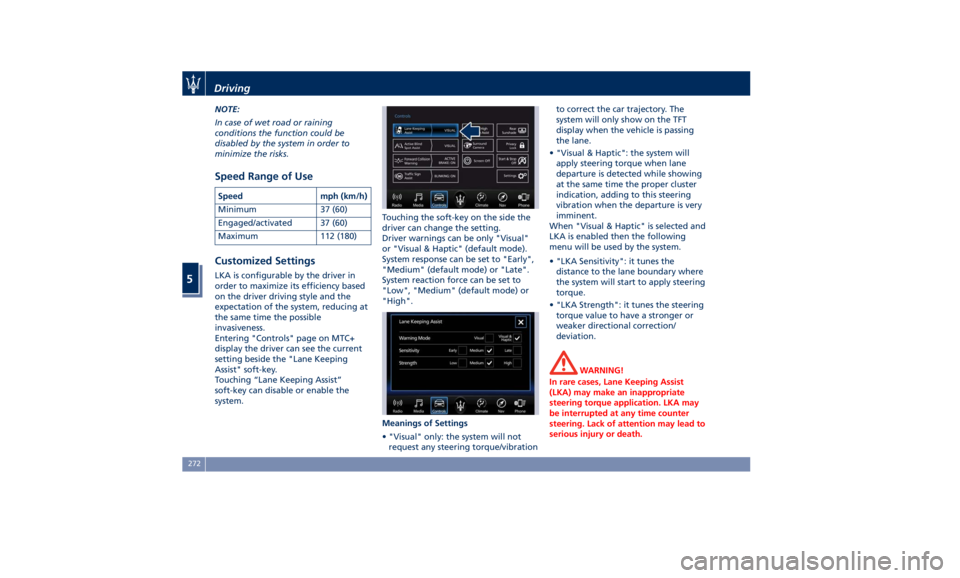
Customized Settings LKA is configurable by the driver in
order to maximize its efficiency based
on the driver driving style and the
expectation of the system, reducing at
the same time the possible
invasiveness.
Entering "Controls" page on MTC+
display the driver can see the current
setting beside the "Lane Keeping
Assist" soft-key.
Touching “Lane Keeping Assist”
soft-key can disable or enable the
system. Touching the soft-key on the side the
driver can change the setting.
Driver warnings can be only "Visual"
or "Visual & Haptic" (default mode).
System response can be set to "Early",
"Medium" (default mode) or "Late".
System reaction force can be set to
"Low", "Medium" (default mode) or
"High".
Meanings of Settings
• "Visual" only: the system will not
request any steering torque/vibration to correct the car trajectory. The
system will only show on the TFT
display when the vehicle is passing
the lane.
• "Visual & Haptic": the system will
apply steering torque when lane
departure is detected while showing
at the same time the proper cluster
indication, adding to this steering
vibration when the departure is very
imminent.
When "Visual & Haptic" is selected and
LKA is enabled then the following
menu will be used by the system.
• "LKA Sensitivity": it tunes the
distance to the lane boundary where
the system will start to apply steering
torque.
• "LKA Strength": it tunes the steering
torque value to have a stronger or
weaker directional correction/
deviation.
WARNING!
In rare cases, Lane Keeping Assist
(LKA) may make an inappropriate
steering torque application. LKA may
be interrupted at any time counter
steering. Lack of attention may lead to
serious injury or death.Driving
5
272
Page 283 of 396

detect pedestrians, cyclists, or
animals.
• Even if your vehicle is equipped
with the BSA system, always check
your vehicle’s outside and rearview
mirrors for any vehicles approaching
from behind or overtaking.
• Use your turn signal before
changing lanes.
RCP - Rear Cross Path The Rear Cross Path (RCP) feature is
intended to aid the drivers when gear
in reverse of parking spaces where
their vision of oncoming vehicles may
be blocked.
The RCP system monitors the rear
detection zones on both sides of the
vehicle. Using sensors located on
either side of the rear bumper, it
detects any vehicles or objects that are
moving toward the side of the vehicle
with a minimum speed of
approximately 1 to 2 mph (1 km/h to
3 km/h) to a maximum of
approximately 10 mph (16 km/h), such
as in parking lot situations. NOTE:
In a parking lot situation, oncoming
vehicles can be obscured by vehicles
parked on either side. If the sensors
are blocked by other structures or
vehicles, the system will not be able to
alert the driver.
Proceed slowly and cautiously out of
the parking space until the rear end of
the vehicle is moderately exposed.
The RCP system will then have a clear
view of the cross traffic. If an
oncoming vehicle is detected, the RCP
system will alert the driver using both
the visual and audible alarms. If the
radio is on, it will also reduce the
radio volume.
WARNING!
RCP is not a Back Up Aid system. More specifically, it is intended to be used
to help a driver detect an oncoming
vehicle in a parking lot situation.
Drivers must be careful when backing
up, even when using RCP. Always
check carefully behind your vehicle,
look behind you, and be sure to check
for pedestrians, animals, other
vehicles, obstructions, and blind spots
before backing up. Failure to do so
can result in serious injury or death.
BSA and RCP Setting Setting modes can be selected from
the MTC+ System.
Touch “Controls” soft-key and then
“Blind Spot Assist” soft-key to enter
the setting page.
Refer to chapter “MTC+ “Controls”
Screen” in section “Dashboard
Instruments and Controls” for further
information.Driving
5
279
Page 286 of 396
Highly dynamic behaviours, driving on
the lane boundary, off course will
prevent the function from working.
FCW braking and stability system
interventions (ESC, ABS) will also
prevent the system from operating.
Changing lane results in system
inhibition for a certain time.
In addition the road must respect some
characteristics such as minimum-
maximum width, lane clearly defined
by two lane boundaries and only in
limited case for a limited time at least
one.
NOTE:
• In case of wet road or raining
conditions the function could be
disabled by the system in order to
minimize the risks.
• With lane boundaries it is mainly
referred to painted lines,
nevertheless the system in good
conditions might properly recognise
as valid lane boundaries also other
types (for example road edges, curbs,
etc..). Speed Range of Use Speed mph (km/h)
Minimum 37 (60)
Engaged/activated 37 (60)
Maximum 112 (180)
System Limitation Because of physical limits the system to
properly operate needs good visibility
(it might not work or not properly
operate in case of heavy rain, snow,
wet roads, fog, direct sun on the
camera, dirty windshield, low
illumination etc.)
Sharp turns, slopes and change in
slopes, poor lane boundaries, as well
as construction areas and all the
scenarios described in this paragraph
may challenge the system, therefore
be always ready to prevent any
unexpected behaviour of the car.
Damaged front bumper, windshield
replaced without proper technical
intervention may also lead to system
malfunction or system unavailability.
Other conditions such as faults, but
not explicitly indicated here may also
prevent/interrupt the system
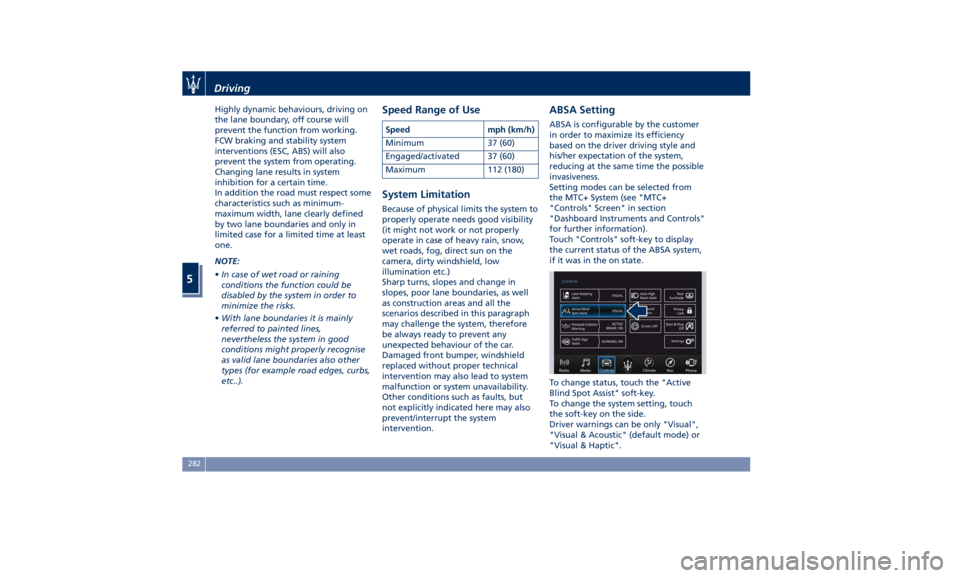
intervention. ABSA Setting ABSA is configurable by the customer
in order to maximize its efficiency
based on the driver driving style and
his/her expectation of the system,
reducing at the same time the possible
invasiveness.
Setting modes can be selected from
the MTC+ System (see "MTC+
"Controls" Screen" in section
"Dashboard Instruments and Controls"
for further information).
Touch "Controls" soft-key to display
the current status of the ABSA system,
if it was in the on state.
To change status, touch the "Active
Blind Spot Assist" soft-key.
To change the system setting, touch
the soft-key on the side.
Driver warnings can be only "Visual",
"Visual & Acoustic" (default mode) or
"Visual & Haptic".Driving
5
282