2019 MASERATI LEVANTE headlights
[x] Cancel search: headlightsPage 354 of 436

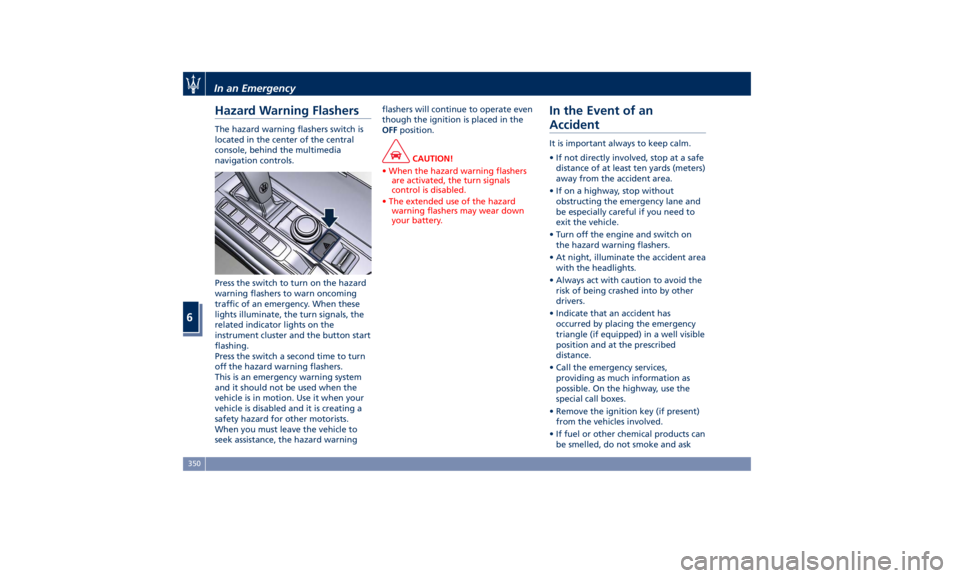
Hazard Warning Flashers The hazard warning flashers switch is
located in the center of the central
console, behind the multimedia
navigation controls.
Press the switch to turn on the hazard
warning flashers to warn oncoming
traffic of an emergency. When these
lights illuminate, the turn signals, the
related indicator lights on the
instrument cluster and the button start
flashing.
Press the switch a second time to turn
off the hazard warning flashers.
This is an emergency warning system
and it should not be used when the
vehicle is in motion. Use it when your
vehicle is disabled and it is creating a
safety hazard for other motorists.
When you must leave the vehicle to
seek assistance, the hazard warning flashers will continue to operate even
though the ignition is placed in the
OFF position.
CAUTION!
• When the hazard warning flashers
are activated, the turn signals
control is disabled.
• The extended use of the hazard
warning flashers may wear down
your battery.
In the Event of an
Accident It is important always to keep calm.
• If not directly involved, stop at a safe
distance of at least ten yards (meters)
away from the accident area.
• If on a highway, stop without
obstructing the emergency lane and
be especially careful if you need to
exit the vehicle.
• Turn off the engine and switch on
the hazard warning flashers.
• At night, illuminate the accident area
with the headlights.
• Always act with caution to avoid the
risk of being crashed into by other
drivers.
• Indicate that an accident has
occurred by placing the emergency
triangle (if equipped) in a well visible
position and at the prescribed
distance.
• Call the emergency services,
providing as much information as
possible. On the highway, use the
special call boxes.
• Remove the ignition key (if present)
from the vehicles involved.
• If fuel or other chemical products can
be smelled, do not smoke and askIn an Emergency
6
350
Page 371 of 436

Interval running coupons: every 12,500 mi (20,000 km)
or 1 year
Service coupons 1° 2° 3° 4°
5° 6°
Main operations Available Pre-Paid Maintenance
Program
Correct operation and reliability of the seats and seat belts IIIIII
Pollen filter RRR
Windshield fluid level - Windshield washer and headlight
cleaner IIIIII
Headlight leveling IIIIII
Controls and adjustment systems in general, hinges, doors,
engine compartment lid and luggage compartment III
Condition of leather interiors III
(1) In case of heavy-duty use of the vehicle, highlighted by the presence of mud and dust in the engine compartment,
proceed to the preventive replacement of the alternator belt.
I = Inspect and carry out any other necessary operation.
R = Replace.
Periodic Maintenance Every 600 mi (1,000 km) or before
long journeys
Check:
• engine coolant;
• brake fluid;
• windshield washer fluid level;
• tire inflation pressure and condition; • operation of lighting system
(headlights, direction indicators,
hazard warning flashers, etc.);
• operation of windshield
washer/wiper system and wear of
windshield wiper blades.
Every 1,900 mi (3,000 km)
Check and top up, if required, the
engine oil level. WARNING!
California Proposition 65
Operating, servicing and maintaining
a passenger vehicle or off-road vehicle
can expose you to chemicals including
such as, engine exhaust, carbon
monoxide, phthalates and lead, that
which are known to the State of
California to cause cancer and birth
(Continued)Maintenance and Care
7
367
Page 380 of 436

(Continued)
mineral type. Using mineral fluids
damages the special rubber linings of
the brake system irreparably.
WARNING!
• To avoid contamination from foreign
materials or moisture, use only new
brake fluid or fluid that has been in
a tightly closed container. Keep the
master cylinder reservoir cap secured
at all times.
• Overfilling the brake fluid reservoir
can result in spilling brake fluid.
Brake fluid can also damage painted
and vinyl surfaces, make sure it does
not spill over these surfaces.
• Do not allow petroleum based fluid
to contaminate the brake fluid.
Brake seal components could be
damaged.
Adding Windshield/Headlight Washer
Fluid
The
reservoir on the
left side of the
engine compartment contains the fluid
to wash the windshield, the window
liftgate and headlights (if equipped).
During scheduled services or when the
message of low level of the washer fluid appears together with the
related telltale
add more fluid as
soon as possible.
Depending on the system installed in
the vehicle, the fluid reservoir may
contain nearly 5.3 Quarts (5 liters) of
windshield/headlight washer fluid or
nearly 3.7 Quarts (3.5 liters) of washer
fluid.
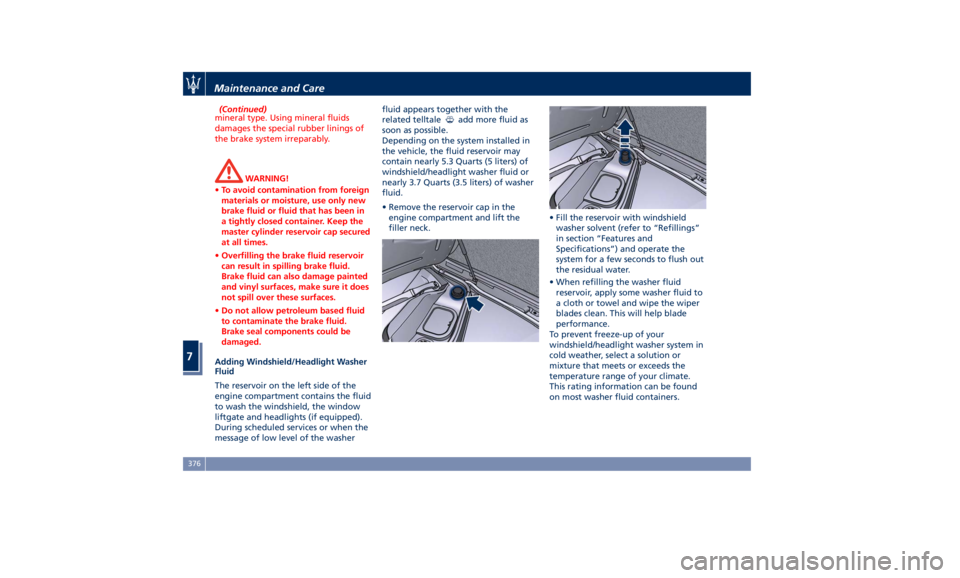
• Remove the reservoir cap in the
engine compartment and lift the
filler neck. • Fill the reservoir with windshield
washer solvent (refer to “Refillings”
in section “Features and
Specifications”) and operate the
system for a few seconds to flush out
the residual water.
• When refilling the washer fluid
reservoir, apply some washer fluid to
a cloth or towel and wipe the wiper
blades clean. This will help blade
performance.
To prevent freeze-up of your
windshield/headlight washer system in
cold weather, select a solution or
mixture that meets or exceeds the
temperature range of your climate.
This rating information can be found
on most washer fluid containers.Maintenance and Care
7
376
Page 392 of 436

Ref. Type Function
20 Maxi – 30A Wiper motor
relay output
21 Maxi – 20A LH low beam
relay input (with
Bi-Xenon
headlight) Ref. Type Function
22 Maxi – 20A RH low beam
relay input (with
Bi-Xenon
headlight)
23 – –
24 – – Ref. Type Function
28 Mini – 7,5A Drive Assist
System Module
(DASM)
29 Mini – 10A PCM module -
Starter solenoid
relay coil
30 Mini – 5A ORC- Air bag
module
31 Mini – 5A ABS-ESP module
32 Mini – 5A AWD module,
EPS and AQS
33 Mini – 10A HDLP Headlights
- AFLS
34 Mini – 15A Primary load to
engine harness
LH side
35 Mini – 15A Primary load to
engine harness
RH side
36 Mini – 30A PCM module
primary load
37 Mini – 15A Engine
secondary load
38 Mini – 15A Lambda sensorMaintenance and Care
7
388
Page 403 of 436

External plastic parts must be cleaned
with the same procedure followed for
the normal washing of the bodywork.
Avoid, as far as possible, parking the
vehicle under trees; the resinous
substances that very often drop from
the trees give the paint a dull
appearance and increase the
possibility of originating corrosive
processes.
It is important that the drain holes in
the lower sides of the doors, rocker
panels, and trunk bottom be kept
clear and open.
CAUTION!
• Bird droppings must be washed off
immediately and thoroughly, since
their acidity is particularly corrosive.
• To provide better protection for the
paint, polish the vehicle at intervals
with a suitable product leaving a
protective film on the paint.
• If the vehicle is washed using
high-pressure water jets or cleaners,
it is important that the nozzle of the
jet be kept at a distance of at least
16 in (40 cm) from the bodywork to
avoid damaging it. Glass Surfaces
All
glass surfaces should be cleaned on
a regular basis with any commercial
household-type glass cleaner.
Never use an abrasive type cleaner.
Use caution when cleaning the inside
rear window on the liftgate equipped
with electric defrosters. Do not use
scrapers or other sharp instrument
that may scratch the elements.
When cleaning the rearview mirror,
spray cleaner on the towel or rag that
you are using. Do not spray cleaner
directly on the mirror.
Labels can be peeled off after soaking
with warm water.
When cleaning is performed, keep all
metal objects at a safe distance from
the window.
Cleaning Headlights
Your vehicle has plastic headlights that
are lighter and less susceptible to
stone breakage than glass headlights.
Plastic is not as scratch-resistant as
glass and therefore different lens
cleaning procedures must be followed.
To minimize the possibility of
scratching the lenses and reducing
light output, avoid wiping with a dry
cloth. To remove road dirt, wash with
a mild soap solution followed by
rinsing. Do not use abrasive cleaning
components, solvents, steel wool or
other aggressive material to clean the
lenses.
Condensation and Fogging on the
Light Clusters
With cold or humid climates, after a
driving rain or after cleaning the car,
the surface of the front and rear light
clusters could fog and/or form
condensate drops on the inside. This is
a natural phenomenon due to the
temperature and humidity differences
between the lens internal and
external surface, which nevertheless
does not indicate a fault and does not
compromise the regular operation of
the lights. The fogging/condensate
disappears when switching on the
lights, starting from the centre of the
diffuser and gradually going to the
edges.
Moldings and Aluminum Trims
• For cleaning moldings and aluminum
trims, avoid the use of acidic or
alkaline cleaning agents that can
destroy the protecting surface
treatment.
• After washing aluminum trim with
warm water, apply the cleaning
agent with a clean tissue or a soft
sponge on the surface. Do not useMaintenance and Care
7
399
Page 430 of 436

Handholds and Cloth Hooks . . . .138
Hazard Warning Flashers ....... .350
Head Restraints ...............98
Highway Assist - HAS ......... .313
Hill Descend Control (HDC) ..... .277
HomeLink ................. .150
Security ................. .153
Troubleshooting Tips ........ .153
Using HomeLink ........... .153
Hood
Open and Close the Hood ......56
Hood Operation ..............56
HSA (Hill Start Assist) ......... .276
Identification Labels ............19
Illuminated Entry/Exit ...........30
Immobilizer (Sentry Key) .........26
Indicator Lights/Warning Lights
Air Bag Warning Light .........90
TFT Display: Menus and Settings .165
TFT Display: Warning/Indicator
Lights of Set Modes/Functions. . .178
Warning and Indicator Lights on
Analog Instrument ......... .161
Infotainment System .......... .185
Main Menu Bar on MTC+
Display ................. .187
Manual Controls and Devices . . .186
Personalized the Main Menu Bar.188
Instrument Cluster ........... .160
Interior Components ...........94
Interior Maintenance and Care. . . .400 Interiors Features ............ .133
iPad Holder ................ .139
iPod Connection ............. .136
Jump Start Procedure ......... .358
KeyFob ....................25
Key fob Battery Replacement ....35
Preventing Inadvertent Locking of
key fob RKE Transmitter Inside the
Vehicle ...................43
Replacement ...............27
Requiring and setting Additional
Key Fobs ..................34
Unlock the Vehicle with Key fob . .33
Keys .......................24
Lane Departure Warning (LDW) . . .301
Level Checks ............... .374
Brake Fluid Level Check ...... .375
Engine Coolant Level Check . . . .374
Engine Oil Level Check ....... .374
Fluid Level Check for Coolant
Transmission System ........ .379
Transmission Oil Check ....... .378
Washer/Headlight Fluid, adding .376
Liftgate
Automatic
Opening and Closing
Movement
of the Power Liftgate .51
Liftgate and Hood Ajar
Indicators ................ .180
Power Liftgate Emergency
Release ...................55 Power Liftgate Operation ......50
Unlatch the Liftgate ..........34
Lights .................... .113
Automatic Headlights ....... .115
Automatic Headlights Leveling . .126
Automatic High Beam ....... .120
Bi-Xenon Headlight ......... .117
Bulb Replacement .......... .393
Cargo Lamps ............. .127
Dome Lights .............. .126
DRL, Daytime Running Lights . . .116
Fog Lights ............... .123
Headlight Time Delay ....... .115
Headlight with AFS ......... .117
High Beam and Flashing ..... .124
Interior Lights ............. .125
Light Switch .............. .113
Multifunction Lever ......... .124
SmartBeam System ......... .116
Turn Signals .............. .124
Loading the Vehicle
Loading with Rear Seatbacks
Down .................. .141
Vehicle Load Carrying Capacity . .139
Main- and Submenu .......... .166
Maintenance ..................5
A/C System Maintenance ..... .395
Air Bag System Maintenance ....72
Bodywork Maintenance and
Care ................... .397
Emissions Inspection and
Maintenance Programs ...... .369Index
9 426