2019 MASERATI LEVANTE dashboard
[x] Cancel search: dashboardPage 237 of 436
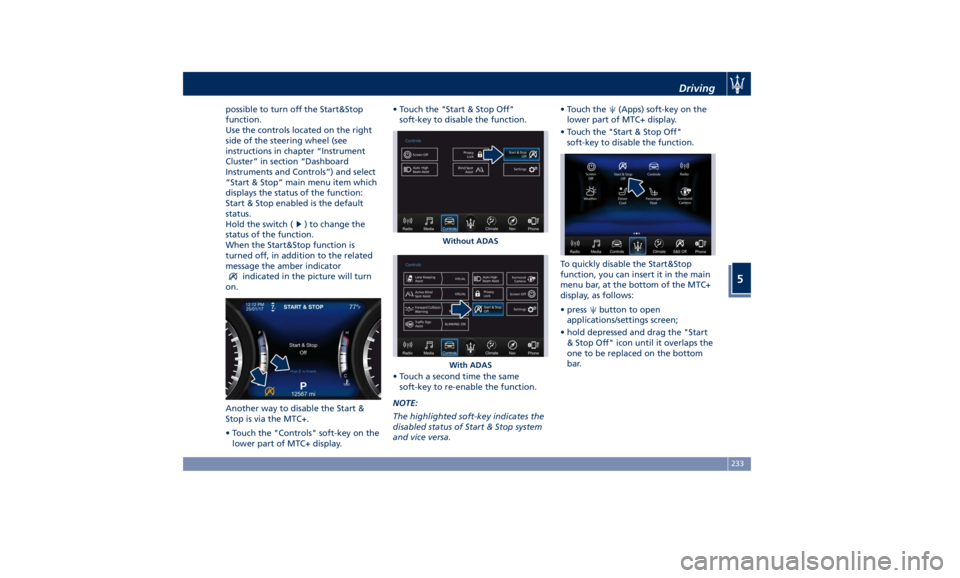
possible to turn off the Start&Stop
function.
Use the controls located on the right
side of the steering wheel (see
instructions in chapter “Instrument
Cluster” in section “Dashboard
Instruments and Controls”) and select
“Start & Stop” main menu item which
displays the status of the function:
Start & Stop enabled is the default
status.
Hold the switch (
) to change the
status of the function.
When the Start&Stop function is
turned off, in addition to the related
message the amber indicator
indicated in the picture will turn
on.
Another way to disable the Start &
Stop is via the MTC+.
• Touch the "Controls" soft-key on the
lower part of MTC+ display. • Touch the "Start & Stop Off"
soft-key to disable the function.
• Touch a second time the same
soft-key to re-enable the function.
NOTE:
The highlighted soft-key indicates the
disabled status of Start & Stop system
and vice versa. • Touch the
(Apps) soft-key on the
lower part of MTC+ display.
• Touch the "Start & Stop Off"
soft-key to disable the function.
To quickly disable the Start&Stop
function, you can insert it in the main
menu bar, at the bottom of the MTC+
display, as follows:
• press
button to open
applications/settings screen;
• hold depressed and drag the "Start
& Stop Off" icon until it overlaps the
one to be replaced on the bottom
bar.Without ADAS
With ADAS Driving
5
233
Page 238 of 436
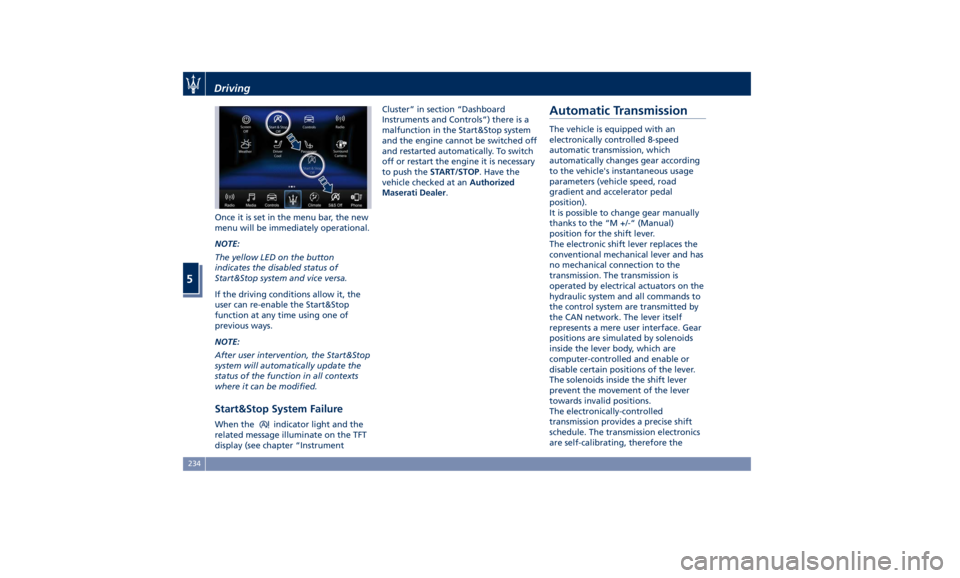
Once it is set in the menu bar, the new
menu will be immediately operational.
NOTE:
The yellow LED on the button
indicates the disabled status of
Start&Stop system and vice versa.
If the driving conditions allow it, the
user can re-enable the Start&Stop
function at any time using one of
previous ways.
NOTE:
After user intervention, the Start&Stop
system will automatically update the
status of the function in all contexts
where it can be modified.
Start&Stop System Failure When the indicator light and the
related message illuminate on the TFT
display (see chapter “Instrument Cluster” in section “Dashboard
Instruments and Controls”) there is a
malfunction in the Start&Stop system
and the engine cannot be switched off
and restarted automatically. To switch
off or restart the engine it is necessary
to push the START/STOP . Have the
vehicle checked at an Authorized
Maserati Dealer .
Automatic Transmission The vehicle is equipped with an
electronically controlled 8-speed
automatic transmission, which
automatically changes gear according
to the vehicle's instantaneous usage
parameters (vehicle speed, road
gradient and accelerator pedal
position).
It is possible to change gear manually
thanks to the “M +/-“ (Manual)
position for the shift lever.
The electronic shift lever replaces the
conventional mechanical lever and has
no mechanical connection to the
transmission. The transmission is
operated by electrical actuators on the
hydraulic system and all commands to
the control system are transmitted by
the CAN network. The lever itself
represents a mere user interface. Gear
positions are simulated by solenoids
inside the lever body, which are
computer-controlled and enable or
disable certain positions of the lever.
The solenoids inside the shift lever
prevent the movement of the lever
towards invalid positions.
The electronically-controlled
transmission provides a precise shift
schedule. The transmission electronics
are self-calibrating, therefore theDriving
5
234
Page 247 of 436

perform the following procedure
preferably at an Authorized Maserati
Dealer .
In the event of a momentary problem,
the transmission can be reset to regain
all forward gears by performing the
following steps.
• Stop the vehicle.
• Shift the transmission into P (Park), if
possible.
• Turn the engine off.
• Wait approximately 30 seconds.
• Restart the engine.
• Shift the transmission into D (Drive)
and then into the desired gear
range. If the problem is no longer
detected, the transmission will
return to normal operation.
NOTE:
Even if the transmission can be reset,
we recommend that you visit an
Authorized Maserati Dealer at your
earliest possible convenience, which
has diagnostic equipment to
determine if the problem could recur.
Transmission Manual Release of P
(Park) Position
See chapter “Transmission Manual
Release of P (Park) Position” in section
“In an Emergency”. All-Wheel Drive The active on-demand All-Wheel Drive
(AWD) system provides available
optimum traction for a wide variety of
road and off-road surface and driving
conditions. The system minimizes
wheel slip by automatically redirecting
torque to the front and rear wheels as
necessary.
To maximize fuel economy, the AWD
system automatically disengages
torque distribution on front axle when
road and environmental conditions
are such that wheel slip is unlikely to
occur. When specific road and
environmental conditions require
increased levels of road traction, the
AWD system automatically distributes
the torque between front and rear
axle in order to grant the best driving
experience. Torque distribution is
displayed on the TFT in the “Drive
Mode” main menu. Refer to
paragraph “TFT Display: Menus and
Settings” in chapter “Instrument
Cluster” of section “Dashboard
Instruments and Controls” for further
information. WARNING!
There may be a slight delay for AWD
engagement after a wheel slip
condition occurs.
NOTE:
If the A WD
system service warning
light and message appears after
engine start up, or during driving, it
means that the AWD system is not
functioning properly or is in recovery
mode due to overheating caused by
the excessive wheel spin. In this
condition the vehicle can continue
driving but only rear wheel drive is
working. If the warning light and
message are often activated, it is
recommended to have the vehicle
serviced at an Authorized Maserati
Dealer .Driving
5
243
Page 249 of 436
• SPORT (NOT for TROFEO version): to
activate/deactivate a sportier drive
mode. In this mode, the vehicle has a
faster throttle response and ESC
sport calibration (not recommended
on wet/slippery surfaces). Activating
this drive mode, will also change the
EPS setting.
• SPORT and CORSA (TROFEO version
only): to activate/deactivate the
sportier and the race drive mode.
When in "SPORT" drive mode, the
vehicle has a faster throttle response
and ESC sport calibration (not
recommended on wet/slippery
surfaces). Activating this drive mode,
will also change the EPS setting.
When in "CORSA" drive mode, in
addition to what indicated for the
sposts mode, the transmission use a
specific gear shift pattern and the
traction is shifted more on the rear
wheels with increased oversteering
behavior. Traction control with
dedicated calibration to maximize
traction vs stability and "Launch
Control" start mode.
•
(Suspension): to switch between
the two suspension setting modes:
soft (LED light off) and hard ("S" on
the cluster and LED light on).
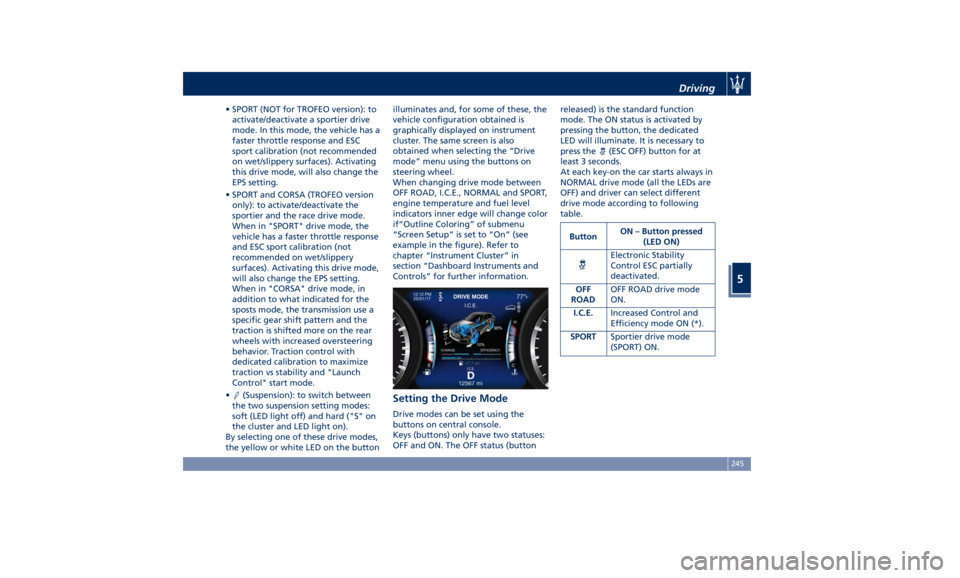
By selecting one of these drive modes,
the yellow or white LED on the button illuminates and, for some of these, the
vehicle configuration obtained is
graphically displayed on instrument
cluster. The same screen is also
obtained when selecting the “Drive
mode” menu using the buttons on
steering wheel.
When changing drive mode between
OFF ROAD, I.C.E., NORMAL and SPORT,
engine temperature and fuel level
indicators inner edge will change color
if“Outline Coloring” of submenu
“Screen Setup” is set to “On” (see
example in the figure). Refer to
chapter “Instrument Cluster” in
section “Dashboard Instruments and
Controls” for further information.
Setting the Drive Mode Drive modes can be set using the
buttons on central console.
Keys (buttons) only have two statuses:
OFF and ON. The OFF status (button released) is the standard function
mode. The ON status is activated by
pressing the button, the dedicated
LED will illuminate. It is necessary to
press the
(ESC OFF) button for at
least 3 seconds.
At each key-on the car starts always in
NORMAL drive mode (all the LEDs are
OFF) and driver can select different
drive mode according to following
table.
Button ON – Button pressed
(LED ON)
Electronic Stability
Control ESC partially
deactivated.
OFF
ROAD OFF ROAD drive mode
ON.
I.C.E. Increased Control and
Efficiency mode ON (*).
SPORT Sportier drive mode
(SPORT) ON.Driving
5
245
Page 264 of 436
the position of the vehicle with little
suspension movements to ensure a
proper appearance.
Display Messages
After shifting selector to change
position, a pop-up message will
indicate for 5 seconds when set
position has been reached (after
pneumatic suspension system
intervention that might last up to 30
seconds).
This type of message will be displayed
only if the option to view all
pneumatic suspension system messages
was set (For further details, refer to
“MTC+ Settings” in section
“Dashboard Instruments and
Controls”).
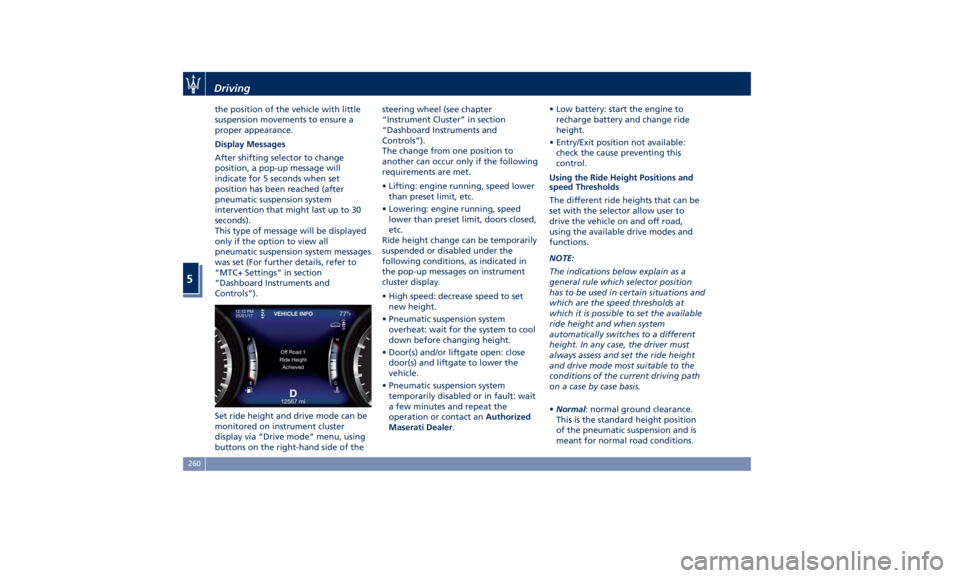
Set ride height and drive mode can be
monitored on instrument cluster
display via “Drive mode” menu, using
buttons on the right-hand side of the steering wheel (see chapter
“Instrument Cluster” in section
“Dashboard Instruments and
Controls”).
The change from one position to
another can occur only if the following
requirements are met.
• Lifting: engine running, speed lower
than preset limit, etc.
• Lowering: engine running, speed
lower than preset limit, doors closed,
etc.
Ride height change can be temporarily
suspended or disabled under the
following conditions, as indicated in
the pop-up messages on instrument
cluster display.
• High speed: decrease speed to set
new height.
• Pneumatic suspension system
overheat: wait for the system to cool
down before changing height.
• Door(s) and/or liftgate open: close
door(s) and liftgate to lower the
vehicle.
• Pneumatic suspension system
temporarily disabled or in fault: wait
a few minutes and repeat the
operation or contact an Authorized
Maserati Dealer . • Low battery: start the engine to
recharge battery and change ride
height.
• Entry/Exit position not available:
check the cause preventing this
control.
Using the Ride Height Positions and
speed Thresholds
The different ride heights that can be
set with the selector allow user to
drive the vehicle on and off road,
using the available drive modes and
functions.
NOTE:
The indications below explain as a
general rule which selector position
has to be used in certain situations and
which are the speed thresholds at
which it is possible to set the available
ride height and when system
automatically switches to a different
height. In any case, the driver must
always assess and set the ride height
and drive mode most suitable to the
conditions of the current driving path
on a case by case basis.
• Normal : normal ground clearance.
This is the standard height position
of the pneumatic suspension and is
meant for normal road conditions.Driving
5
260
Page 266 of 436

“NORMAL”, “SPORT ”, “
(Suspension)“ or “I.C.E.” After
selecting this height, once the vehicle
speed goes below 15 mph (24 km/h),
the vehicle height will begin to
lower. To exit “Entry/Exit” mode,
move selector to another position or
drive the vehicle over 15 mph (24
km/h). Automatic lowering of the
vehicle into “Entry/Exit” mode can be
enabled through the MTC+ (refer to
“MTC+ Settings” in section
“Dashboard Instruments and
Controls”). If this feature is enabled,
the vehicle will only lower if the
gearshift lever is in P (Park), the
engine is running, doors and liftgate
are closed and the Pneumatic
Suspension System should be either
in “NORMAL” or “Aero”. The Vehicle
will not automatically lower if the
pneumatic suspension system is in
“Off Road 2” or “Off Road 1” mode.
The lowering will be suppressed
when the ignition is switched off and
a door is opened to prevent setting
the alarm off.
Lowering Vehicle Height for Inactivity
Lowering of vehicle ground clearance
after a long period of inactivity should
be considered normal since it is due to a drop of pressure in the pneumatic
suspension system.
Approximately, after one week of
inactivity, vehicle ground clearance will
lower by 0.4 in (10 mm). To set off the
drop of pressure due to inactivity, it is
necessary to start the engine and allow
some time until system reaches
operating pressure and lifts the vehicle
to set ride height. A message on
instrument cluster display will warn
driver when set ride height is reached.
Driving vehicle before the set riding
height is reached is not safe and could
damage suspension components.
WARNING!
After a long period of vehicle
inactivity, drive only when vehicle
reaches set ride height to prevent any
problems of the pneumatic suspension system from limiting occupants'
safety.
"Launch Control" Mode
(TROFEO version only) "Launch Control" mode is a
performance start procedure.
By activating this procedure you get
the best possible acceleration from
standstill of the car.
This mode allows you to ground the
torque necessary to prevent the
wheels from slipping during
acceleration performance.
To make a performance start in
"Launch Control" mode, the following
conditions must be met:
• Water and transmission temperature
in proper range.
• No engine, AWD and on board
systems faults.
• The vehicle must be traveled at least
440 mi (700 km).
• "CORSA" drive mode on.
• Shift lever in "D" or"M +/-" position.
• The vehicle must be stationary on a
level road surface.
• The driver door closed and the safety
belt fastened.Driving
5
262
Page 272 of 436
Parking Brake The vehicle is equipped with an
electric automatic parking brake, also
called EPB (Electric Parking Brake).
The braking action is ensured by a
power actuator directly working on
the brake pad inside each caliper of
the rear brake system.
It can be automatically engaged when
the engine is turned off and
disengaged with engine running,
driver seatbelt latched and driver door
closed, while pressing the brake pedal
and operating the shift lever.
Furthermore, EPB can be automatically
engaged above a slope threshold with
gearshift in park to avoid damage to
the vehicle. EPB can be disengaged
before turning off the vehicle.
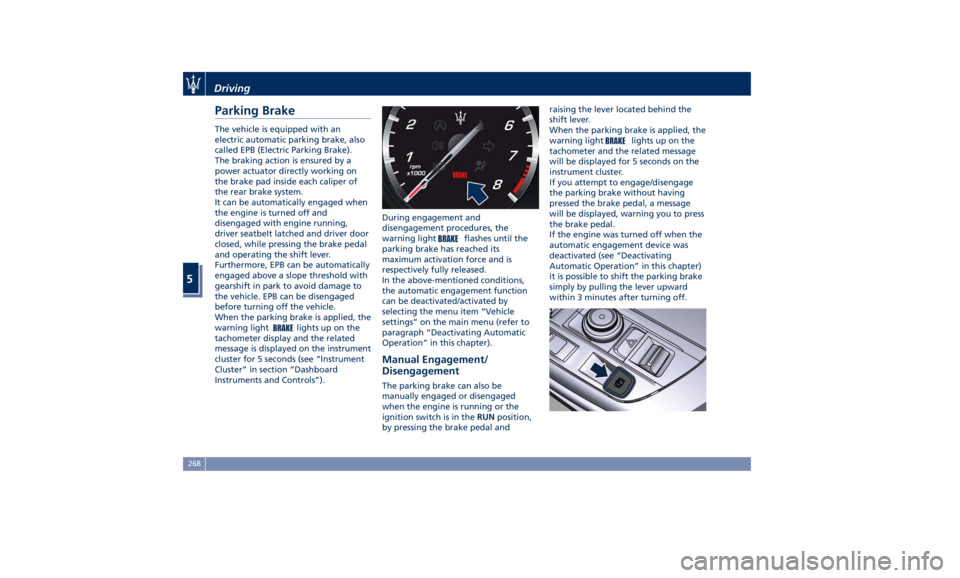
When the parking brake is applied, the
warning light
lights up on the
tachometer display and the related
message is displayed on the instrument
cluster for 5 seconds (see “Instrument
Cluster” in section “Dashboard
Instruments and Controls”). During engagement and
disengagement procedures, the
warning light
flashes until the
parking brake has reached its
maximum activation force and is
respectively fully released.
In the above-mentioned conditions,
the automatic engagement function
can be deactivated/activated by
selecting the menu item “Vehicle
settings” on the main menu (refer to
paragraph “Deactivating Automatic
Operation” in this chapter).
Manual Engagement/
Disengagement The parking brake can also be
manually engaged or disengaged
when the engine is running or the
ignition switch is in the RUN position,
by pressing the brake pedal and raising the lever located behind the
shift lever.
When the parking brake is applied, the
warning light
lights up on the
tachometer and the related message
will be displayed for 5 seconds on the
instrument cluster.
If you attempt to engage/disengage
the parking brake without having
pressed the brake pedal, a message
will be displayed, warning you to press
the brake pedal.
If the engine was turned off when the
automatic engagement device was
deactivated (see “Deactivating
Automatic Operation” in this chapter)
it is possible to shift the parking brake
simply by pulling the lever upward
within 3 minutes after turning off.Driving
5
268
Page 273 of 436
CAUTION!
The main function of the EPB is to
allow safe parking of the vehicle,
therefore it must only be applied
when the vehicle is already stationary.
If the EPB is used while the vehicle is
moving and decelerating until a speed
lower of 3 mph (5 km/h) and, in
particular, until complete stop
(typically in a sudden brake), it is
necessary to have the EPB system
checked by an Authorized Maserati
Dealer .
WARNING!
• Always hold the brake pedal pressed
during engagement or
disengagement of the parking
brake.
• The EPB command activation while
running generates a deceleration of
the vehicle with strong deceleration
(Dynamic Braking). It is therefore
recommended to use this feature
only in case of emergency. The
stability of the car is guaranteed by
the action of the activated ESC
system. • It is advisable to keep the "Auto
Apply" function always active (On)
so that the vehicle is properly
secured with electric parking brake.
Deactivating Automatic
Operation The automatic engagement function
can be deactivated/reactivated by
selecting the menu item “Vehicle
settings” through the switch on the
right side of the steering wheel (refer
to “Instrument Cluster” in section
“Dashboard Instruments and
Controls”).
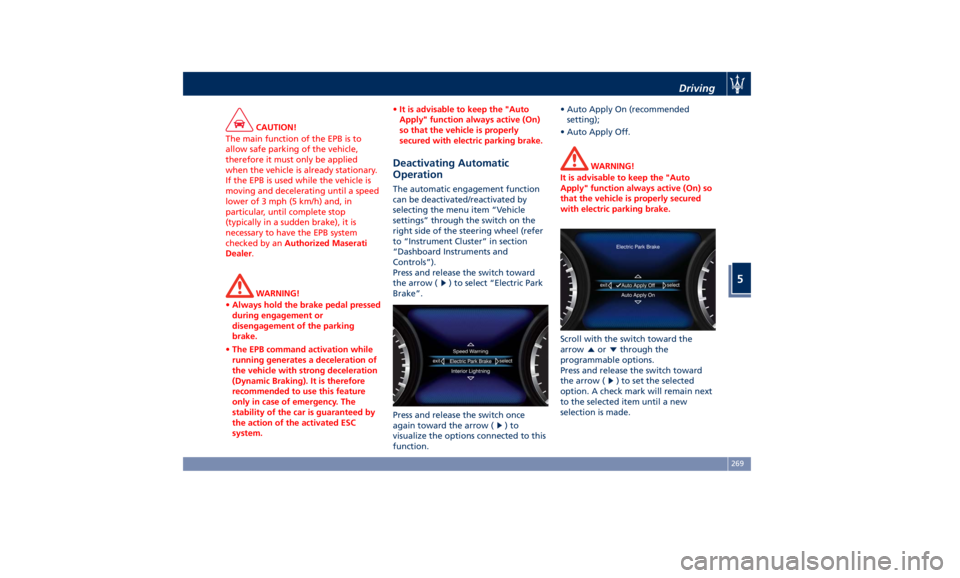
Press and release the switch toward
the arrow (
) to select “Electric Park
Brake”.
Press and release the switch once
again toward the arrow (
)to
visualize the options connected to this
function. • Auto Apply On (recommended
setting);
• Auto Apply Off.
WARNING!
It is advisable to keep the "Auto
Apply" function always active (On) so
that the vehicle is properly secured
with electric parking brake.
Scroll with the switch toward the
arrow
or through the
programmable options.
Press and release the switch toward
the arrow (
) to set the selected
option. A check mark will remain next
to the selected item until a new
selection is made.Driving
5
269