2019 MASERATI LEVANTE BLOCK
[x] Cancel search: BLOCKPage 60 of 436
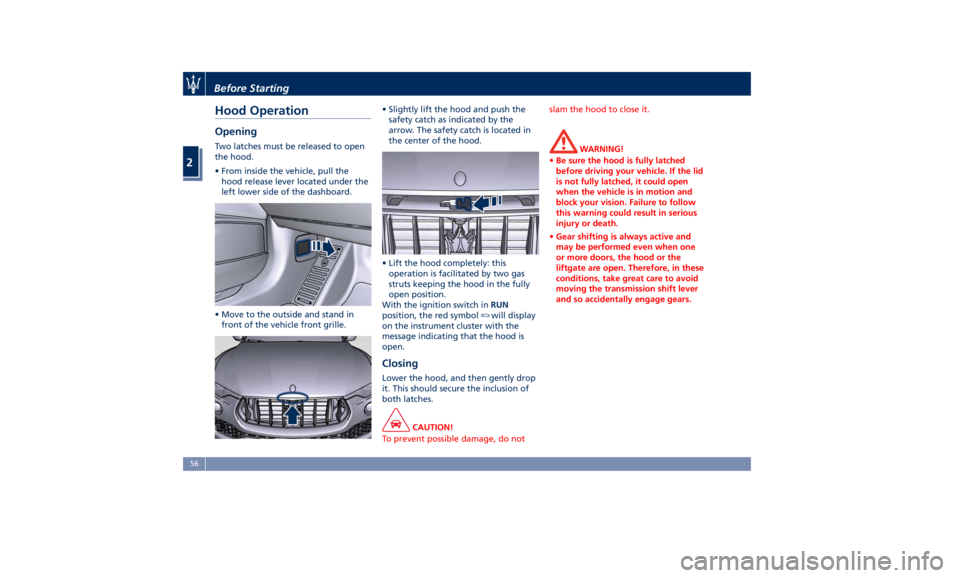
Hood Operation Opening Two latches must be released to open
the hood.
• From inside the vehicle, pull the
hood release lever located under the
left lower side of the dashboard.
• Move to the outside and stand in
front of the vehicle front grille. • Slightly lift the hood and push the
safety catch as indicated by the
arrow. The safety catch is located in
the center of the hood.
• Lift the hood completely: this
operation is facilitated by two gas
struts keeping the hood in the fully
open position.
With the ignition switch in RUN
position, the red symbol
will display
on the instrument cluster with the
message indicating that the hood is
open.
Closing Lower the hood, and then gently drop
it. This should secure the inclusion of
both latches.
CAUTION!
To prevent possible damage, do not slam the hood to close it.
WARNING!
• Be sure the hood is fully latched
before driving your vehicle. If the lid
is not fully latched, it could open
when the vehicle is in motion and
block your vision. Failure to follow
this warning could result in serious
injury or death.
• Gear shifting is always active and
may be performed even when one
or more doors, the hood or the
liftgate are open. Therefore, in these
conditions, take great care to avoid
moving the transmission shift lever
and so accidentally engage gears.Before Starting
2
56
Page 76 of 436
(Continued)
a passenger vehicle or off-road vehicle
can expose you to chemicals including
such as, engine exhaust, carbon
monoxide, phthalates and lead, that
which are known to the State of
California to cause cancer and birth
defects or other reproductive harm. To
minimize exposure, avoid breathing
exhaust, do not idle the engine except
as necessary, service your vehicle in a
well-ventilated area and wear gloves
or wash your hands frequently when
servicing your vehicle. For more
information go to:
www.P65Warnings.ca.gov/passenger-
vehicle
WARNING!
• Deployed air bags and seat belt
pretensioners cannot protect you in
another collision. Have the air bags,
seat belt pretensioners, and the
front seat belt retractor assemblies
replaced by an Authorized Maserati
Dealer. Also, have the Occupant
Restraint Controller (ORC) system
serviced as well.
• Have the air bag checked, serviced
and replaced only by an Authorized Maserati Dealer.
Air Bag System Maintenance
WARNING!
• Modifications to any part of the air
bag system could cause it to fail;
thus you could be injured if the air
bag system is not there to protect
you. Do not modify the components
or wiring. Do not modify the front
bumper, vehicle body structure, or
add aftermarket side steps or
running boards.
• It is dangerous to try to repair any
part of the air bag system without
the necessary know-how.
• Do not attempt to modify any part
of your air bag system. The air bag
may inflate accidentally or may not
function properly if modifications
are made. Take your vehicle to an
Authorized Maserati Dealer for any
air bag system service. If your seat
including your trim cover and
cushion needs to be serviced in any
way (including removal or
loosening/tightening of seat
attachment bolts), take the vehicle
to an Authorized Maserati Dealer.
• Only Maserati manufacturer approved seat accessories may be
used. If it is necessary to modify the
air bag system for persons with
disabilities, contact an Authorized
Maserati Dealer.
• If the speedometer, Rev Counter, or
any engine related gauges are not
working, the Occupant Restraint
Controller (ORC) may also be
disabled. The air bags may not be
ready to inflate for your protection.
Promptly check the fuse block for
blown fuses. To identify the air bag
fuse see “Fuse Replacement” in
section "Maintenance and Care". See
an Authorized Maserati Dealer if the
fuse does not fix the problem.
Transport of persons with
disability If it is necessary to modify the
advanced air bag system of your
vehicle to accommodate a person with
disabilities, contact an Authorized
Maserati Dealer .
WARNING!
• The advanced air bag system of your
vehicle is not designed to protect
adults with disabilities that requireBefore Starting
2
72
Page 87 of 436

Enabling and Disabling Park
Assist By accessing the submenu “Safety &
Driving Assistant” from MTC+ System,
the “Park Assist” can be disabled
(option “Off”). The available options
regarding the warning alerts are:
“Sound” or “Sound + Display”. Refer
to “MTC+ Settings” in section
“Dashboard Instruments and
Controls” for further information.
The front sensors can be enabled or
disabled at any time by pressing the
button on the front dome console.
After pressing the button the
instrument cluster will display the
state of front parking sensors for
approximately five seconds. The
button LED will be on when the front
sensors are disabled. The button LED
will be off when the front sensors are
enabled. If the button is pressed and the system requires service, the LED
will blink momentarily, and then the
LED will be on.
When the shift lever is moved to R
(Reverse) or to D (Drive) at a speed of
7 mph (11 km/h) or below and the
system is disabled, the instrument
cluster will display the “PARK ASSIST
Off” message for 5 seconds until the
shift lever remains in R (Reverse) or
when the shift lever is moved in D
(Drive).
Service the Park Assist System In case of malfunction of the Park
Assist system, the instrument cluster
will actuate a single sound, once per
ignition cycle. The instrument cluster
will display a message when any of
the rear or front sensor(s) are blocked
by snow, mud, or ice and the vehicle is
shifted into R (Reverse) or D (Drive).
The instrument cluster will display a
message when any of the rear or front
sensors are damaged and require
service.
When the shift lever is moved to R
(Reverse) or D (Drive) and the system
has detected a faulted condition, the
instrument cluster will display the
corresponding message for the time
lapse the vehicle is in R (Reverse) or D
(Drive) at speeds less than 7 mph (11 km/h). Under this condition Park
Assist will not operate. See
“Instrument Cluster” in section
“Dashboard Instruments and
Controls” for further information.
If the instrument cluster displays a
message prompting you to clean the
sensors, make sure the outer surface
and the underside of the rear bumper
and/or front bumper is clean and clear
of snow, ice, mud, dirt or other
obstruction and then cycle the ignition
switch. If the message continues to
appear contact the Authorized
Maserati Dealer .
If a failure message is displayed on the
instrument cluster, contact the
Authorized Maserati Dealer .Before Starting
2
83
Page 135 of 436
necessary to shift the multifunction
lever to “OFF” and the ignition switch
to OFF position.
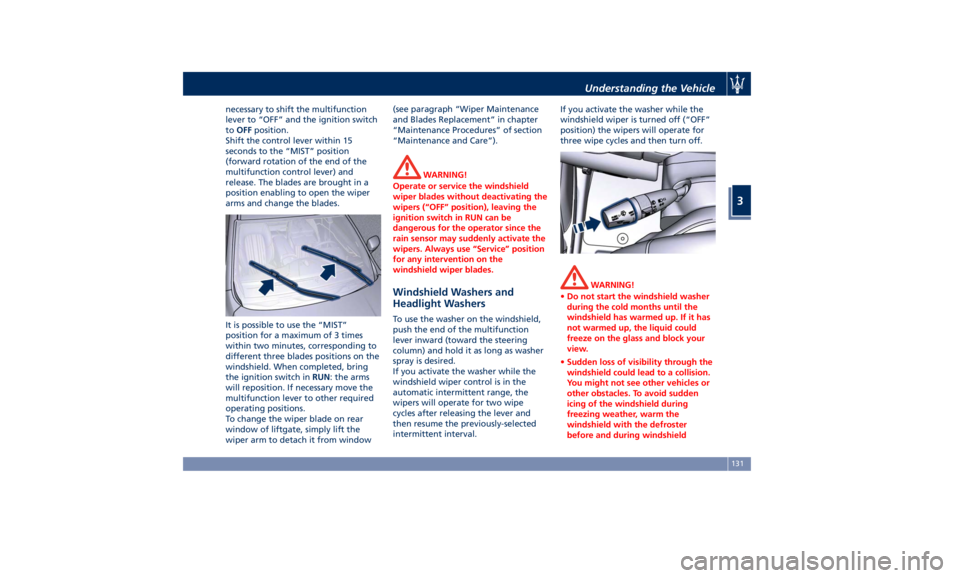
Shift the control lever within 15
seconds to the “MIST” position
(forward rotation of the end of the
multifunction control lever) and
release. The blades are brought in a
position enabling to open the wiper
arms and change the blades.
It is possible to use the “MIST”
position for a maximum of 3 times
within two minutes, corresponding to
different three blades positions on the
windshield. When completed, bring
the ignition switch in RUN : the arms
will reposition. If necessary move the
multifunction lever to other required
operating positions.
To change the wiper blade on rear
window of liftgate, simply lift the
wiper arm to detach it from window (see paragraph “Wiper Maintenance
and Blades Replacement” in chapter
“Maintenance Procedures” of section
“Maintenance and Care”).
WARNING!
Operate or service the windshield
wiper blades without deactivating the
wipers (“OFF” position), leaving the
ignition switch in RUN can be
dangerous for the operator since the
rain sensor may suddenly activate the
wipers. Always use “Service” position
for any intervention on the
windshield wiper blades.
Windshield Washers and
Headlight Washers To use the washer on the windshield,
push the end of the multifunction
lever inward (toward the steering
column) and hold it as long as washer
spray is desired.
If you activate the washer while the
windshield wiper control is in the
automatic intermittent range, the
wipers will operate for two wipe
cycles after releasing the lever and
then resume the previously-selected
intermittent interval. If you activate the washer while the
windshield wiper is turned off (“OFF”
position) the wipers will operate for
three wipe cycles and then turn off.
WARNING!
• Do not start the windshield washer
during the cold months until the
windshield has warmed up. If it has
not warmed up, the liquid could
freeze on the glass and block your
view.
• Sudden loss of visibility through the
windshield could lead to a collision.
You might not see other vehicles or
other obstacles. To avoid sudden
icing of the windshield during
freezing weather, warm the
windshield with the defroster
before and during windshieldUnderstanding the Vehicle
3
131
Page 142 of 436
lighter can be inserted into the power
outlet at the end of the central
console.
Press the central button to activate the
cigarette lighter. After about 20
seconds the button returns
automatically to the initial position
and stops the heating: from this time
the cigarette lighter is ready for use.
CAUTION!
After use, always make sure that the
cigarette lighter is switched off.
WARNING!
• The cigarette lighter reaches high
temperatures. Handle it carefully and
do not allow children to use it so as
to avoid risk of fire and injury!
• The cigarette lighter may not be
used as a power outlet.
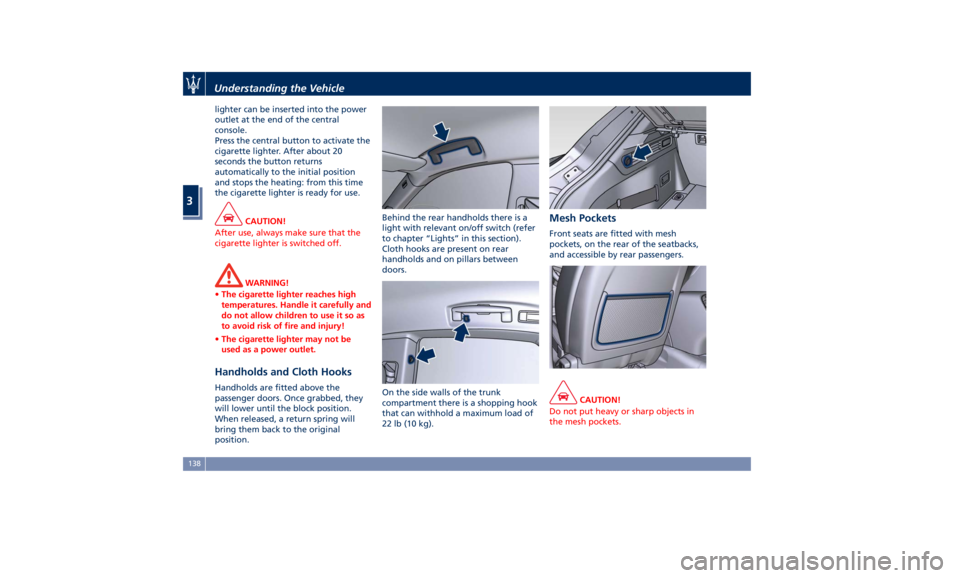
Handholds and Cloth Hooks Handholds are fitted above the
passenger doors. Once grabbed, they
will lower until the block position.
When released, a return spring will
bring them back to the original
position. Behind the rear handholds there is a
light with relevant on/off switch (refer
to chapter “Lights” in this section).
Cloth hooks are present on rear
handholds and on pillars between
doors.
On the side walls of the trunk
compartment there is a shopping hook
that can withhold a maximum load of
22 lb (10 kg). Mesh Pockets Front seats are fitted with mesh
pockets, on the rear of the seatbacks,
and accessible by rear passengers.
CAUTION!
Do not put heavy or sharp objects in
the mesh pockets.Understanding the Vehicle
3
138
Page 144 of 436
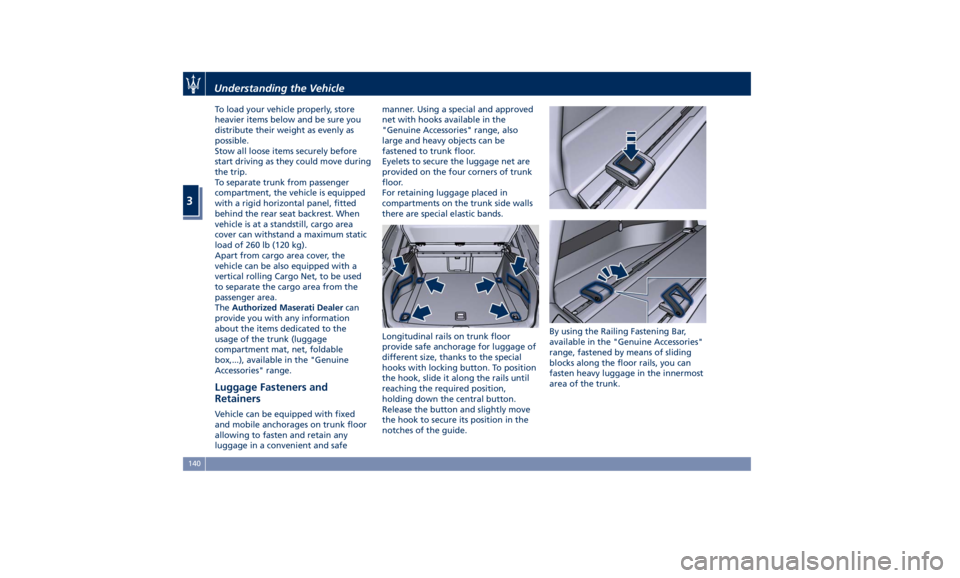
To load your vehicle properly, store
heavier items below and be sure you
distribute their weight as evenly as
possible.
Stow all loose items securely before
start driving as they could move during
the trip.
To separate trunk from passenger
compartment, the vehicle is equipped
with a rigid horizontal panel, fitted
behind the rear seat backrest. When
vehicle is at a standstill, cargo area
cover can withstand a maximum static
load of 260 lb (120 kg).
Apart from cargo area cover, the
vehicle can be also equipped with a
vertical rolling Cargo Net, to be used
to separate the cargo area from the
passenger area.
The Authorized Maserati Dealer can
provide you with any information
about the items dedicated to the
usage of the trunk (luggage
compartment mat, net, foldable
box,...), available in the "Genuine
Accessories" range.
Luggage Fasteners and
Retainers Vehicle can be equipped with fixed
and mobile anchorages on trunk floor
allowing to fasten and retain any
luggage in a convenient and safe manner. Using a special and approved
net with hooks available in the
"Genuine Accessories" range, also
large and heavy objects can be
fastened to trunk floor.
Eyelets to secure the luggage net are
provided on the four corners of trunk
floor.
For retaining luggage placed in
compartments on the trunk side walls
there are special elastic bands.
Longitudinal rails on trunk floor
provide safe anchorage for luggage of
different size, thanks to the special
hooks with locking button. To position
the hook, slide it along the rails until
reaching the required position,
holding down the central button.
Release the button and slightly move
the hook to secure its position in the
notches of the guide. By using the Railing Fastening Bar,
available in the "Genuine Accessories"
range, fastened by means of sliding
blocks along the floor rails, you can
fasten heavy luggage in the innermost
area of the trunk.Understanding the Vehicle
3
140
Page 186 of 436

WARNING!
Do not drive with this warning light
on. Check that the fuel filler cap is
tightened correctly.
Electric Parking Brake Failure Warning
Light
This
warning light and
related
message illuminate when
there is an EPB system failure.
The failure could also
completely or partially block the
vehicle because the parking brake
could remain on even after it has been
automatically or manually disengaged
though its controls.
If it is still possible to use the vehicle
(parking brake not engaged) drive to
the nearest Authorized Maserati
Dealer and remember to performing
each operation/command that the
electric parking brake is not
functioning.
Start&Stop Disable Indicator
This indicator illuminates
when Start&Stop is turned off
through the controls located
on the right side of the
steering wheel or through the relevant
soft-key of the MTC+. See chapter “Automatic Start&Stop System” of
section “Driving” for further
information.
Start&Stop Failure Warning Light
This warning light illuminates
when there is a failure in the
Start&Stop system. Switch the
engine on or off using the
normal procedure with the ignition
device START/STOP and have the
vehicle checked at an Authorized
Maserati Dealer .
Scheduled Maintenance (Service)
Indicator
This indicator illuminates and
a message flashes on the
display for approximately 5
seconds after an acoustic
signal to indicate that the next
scheduled maintenance is due or is
already overdue.
Unless reset, the message will continue
to display each time you cycle the
ignition to the RUN position.
To turn off the message temporarily,
press and release the
button on the
steering wheel. To reset the service
indicator system, please visit an
Authorized Maserati Dealer . ADAS Status Indicators (If equipped)
When you are not viewing the
“Drive Assist” page, the
indicators at the top left-hand
side of the display indicate
status of individual ADAS system or
the combination of them (see
examples).
For further details, refer to
“Adaptive Cruise Control -
ACC”, “Lane Keeping Assist -
LKA” and “Highway Assist - HAS” in
section “Driving”.
Forward Collision Warning (FCW) Off
(If equipped)
This warning light informs the
driver that Forward Collision
Warning (FCW) is disabled. If
this light occurs together with
other specific messages, take your
vehicle to an Authorized Maserati
Dealer for service. This warning light
will light even when the activation of
another driver assistance feature or
drive mode (such as “
-ESC OFF”)
disables the FCW.
Forward Collision Warning (FCW) Fault
(If equipped)
This warning light informs that
FCW is in fault state. If this
occurred together with other
specific messages, could meanDashboard Instruments and Controls
4
182
Page 227 of 436
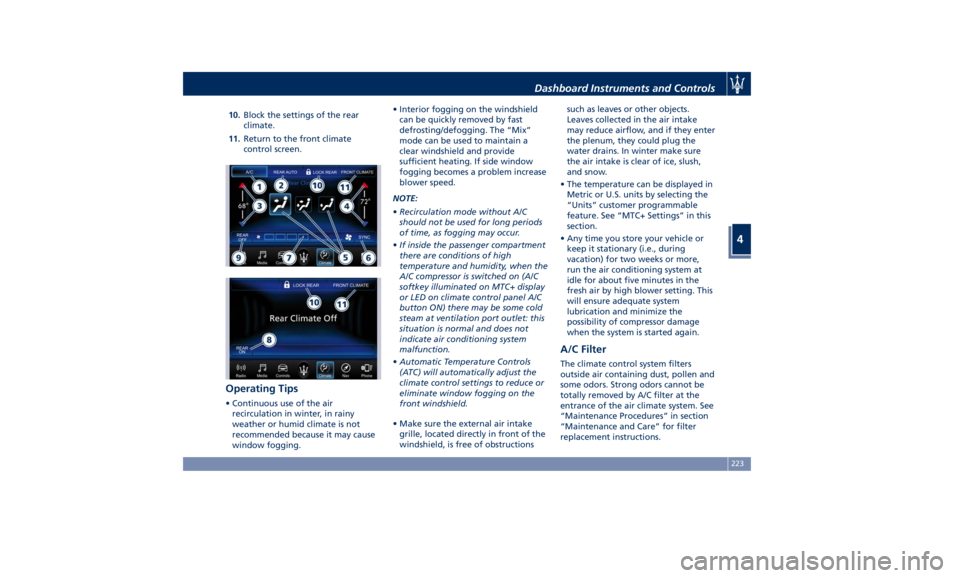
10. Block the settings of the rear
climate.
11. Return to the front climate
control screen.
Operating Tips • Continuous use of the air
recirculation in winter, in rainy
weather or humid climate is not
recommended because it may cause
window fogging. • Interior fogging on the windshield
can be quickly removed by fast
defrosting/defogging. The “Mix”
mode can be used to maintain a
clear windshield and provide
sufficient heating. If side window
fogging becomes a problem increase
blower speed.
NOTE:
• Recirculation mode without A/C
should not be used for long periods
of time, as fogging may occur.
• If inside the passenger compartment
there are conditions of high
temperature and humidity, when the
A/C compressor is switched on (A/C
softkey illuminated on MTC+ display
or LED on climate control panel A/C
button ON) there may be some cold
steam at ventilation port outlet: this
situation is normal and does not
indicate air conditioning system
malfunction.
• Automatic Temperature Controls
(ATC) will automatically adjust the
climate control settings to reduce or
eliminate window fogging on the
front windshield.
• Make sure the external air intake
grille, located directly in front of the
windshield, is free of obstructions such as leaves or other objects.
Leaves collected in the air intake
may reduce airflow, and if they enter
the plenum, they could plug the
water drains. In winter make sure
the air intake is clear of ice, slush,
and snow.
• The temperature can be displayed in
Metric or U.S. units by selecting the
“Units” customer programmable
feature. See “MTC+ Settings” in this
section.
• Any time you store your vehicle or
keep it stationary (i.e., during
vacation) for two weeks or more,
run the air conditioning system at
idle for about five minutes in the
fresh air by high blower setting. This
will ensure adequate system
lubrication and minimize the
possibility of compressor damage
when the system is started again.
A/C Filter The climate control system filters
outside air containing dust, pollen and
some odors. Strong odors cannot be
totally removed by A/C filter at the
entrance of the air climate system. See
“Maintenance Procedures” in section
“Maintenance and Care” for filter
replacement instructions.Dashboard Instruments and Controls
4
223