2019 MASERATI GRANTURISMO CONVERTIBLE ignition
[x] Cancel search: ignitionPage 88 of 296

Adaptive Bi-Xenon Headlights The gas-discharge (xenon) headlights
operate with an electric arc saturated
with Xenon gas under pressure,
instead of the incandescent filament.
The light produced is assuredly higher
compared to traditional light bulbs, in
terms of quality (brighter light) as well
as of the span and positioning of the
illuminated area.
In addition, the headlights are
equipped with an ALC system
(Adaptive Light Control).
This system combines the light beam
with the steering angle to assure
better visibility of the road surface
when driving in a curve, steering or in
the event of road deviations.
The advantages offered by improved
lighting system are perceived
especially in case of bad weather, fog
and/or insufficient road indications
providing broader illumination of the
side zones, which are normally left in
the dark, and for highway driving (see
comparison rendered below).
This surely increases driving safety as it
offers less eye strain and increased
orientation for the driver and better
detection of other persons on the road
sides (pedestrians, bicycle riders and
motorcycle drivers). The electric arc requires very high
voltage for activation, but afterward
power is supplied at a lower voltage.
The headlights reach maximum
brightness about 0,5 seconds after
being turned on.
The strong light produced by this type
of headlight requires the use of an
automatic system to keep the position
of the headlights constant and to
prevent dazzling approaching cars, in
the case of braking, acceleration or
load transport.
WARNING!
If xenon headlamp replacement is
necessary, contact the Authorized
Maserati Dealer only: DANGER - RISK
OF ELECTRICAL SHOCK.
Parking Lights The parking lights only work with the
key in the ignition switch turned to
STOP (OFF) or ACC position, or with
the key removed.
They are activated by turning the light
switch to
position.
It is harder to turn the switch to
position than to the other
positions. This is to avoid activating the parking lights unintentionally and
wasting power.
When the parking lights are on, the
warning light on the instrument
cluster illuminates.
With parking lights on, move down
left-hand multifunction lever to switch
on position lights on left-hand side,
and move it up to switch on only the
ones on right-hand side.
Automatic Headlights When the light switch is turned to
"AUTO" position and the key in the
ignition switch is in MAR (ON)
position, the position lights, low beam
lights and license plate lights turn on
and off automatically, depending on
the light outside.
NOTE:
The high beams can only be turned on
manually by pushing the left-hand
multifunction lever forward.
WARNING!
• If the low beams are activated, they
will come on automatically every
time the lights are turned on. You
are therefore advised to turn off the
high beams every time the twilightUnderstanding the Vehicle
3
84
Page 91 of 296

You can signal another vehicle with
your headlights by lightly pulling the
left-hand multifunction lever toward
you. This will turn on the high beams
headlights until the lever is released.
Flashing occurs also with lights off
(light switch in position “0”) if the key
in the ignition switch is in MAR (ON)
position. CAUTION!
The high beams can only be switched
on manually by pushing the left-hand
multifunction lever forward.
WARNING!
If the high beams are activated, they
will turn on automatically every time
the low beams are switched on either
manually or automatically. We
recommend therefore that you switch
them off when they are no longer
necessary and every time the twilight
sensor deactivates the external lights.
“Follow me Home” Function
This
function allows you to set a
timing for activation of the position
lights and low beams, so that they
may remain on for a set time after
turning off the vehicle.
This function is activated by pushing
the left-hand multifunction lever on
the steering column, used to flash the
headlights.
The position lights and low beams
turn on for 30 seconds, the message
“Follow me” appears on the
instrument cluster display for 20 seconds, and the light activation time
is displayed.
When this function is active, every
time the left-hand multifunction lever
for flashing the headlights is
operated, the time the lights remain
on is increased by 30 seconds, with a
maximum total time of 210 seconds.
The display will show the time set.
If the left-hand multifunction lever for
flashing the headlights is operated for
more than 2 seconds, the function is
deactivated, and the indicator on the
instrument cluster display goes off.
When the function is active, turning
the key in the ignition switch back to
MAR (ON) position deactivates the
system.
Front Domelights The front domelight includes a central
and two reading lights.
The central light automatically turns
on together with the two lights on the
sides of the rear seats (see "Rear Side
Interior Lights" in this chapter) when
one of the doors is opened and turns
off when the door is closed (timed
switching off). These lights may be
switched on manually by pressing the
central button
The reading lights are controlled by
the respective side buttons.Understanding the Vehicle
3
87
Page 92 of 296
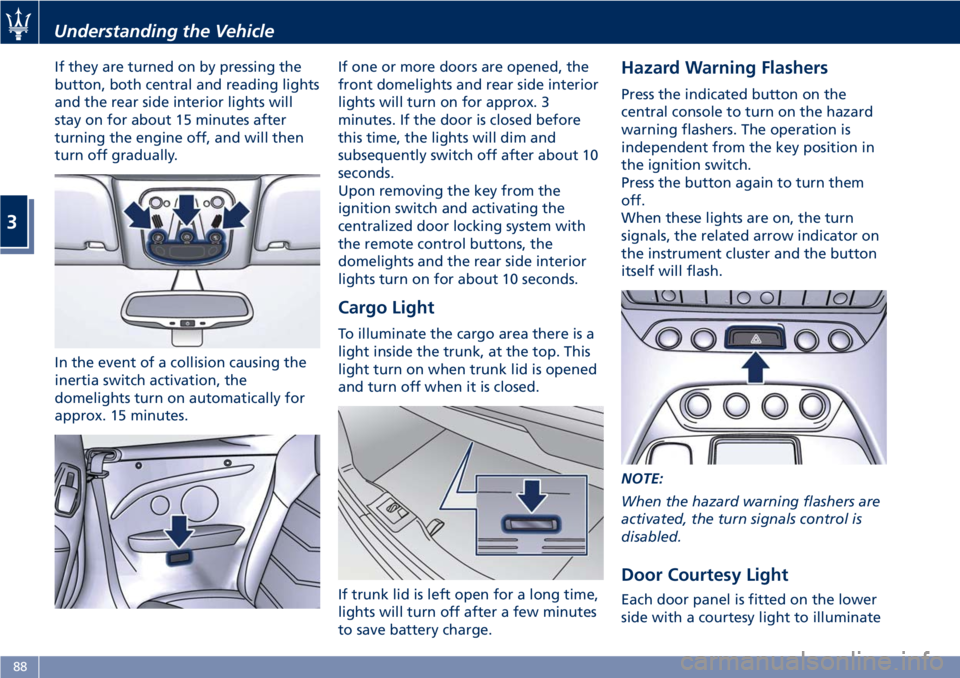
If they are turned on by pressing the
button, both central and reading lights
and the rear side interior lights will
stay on for about 15 minutes after
turning the engine off, and will then
turn off gradually.
In the event of a collision causing the
inertia switch activation, the
domelights turn on automatically for
approx. 15 minutes. If one or more doors are opened, the
front domelights and rear side interior
lights will turn on for approx. 3
minutes. If the door is closed before
this time, the lights will dim and
subsequently switch off after about 10
seconds.
Upon removing the key from the
ignition switch and activating the
centralized door locking system with
the remote control buttons, the
domelights and the rear side interior
lights turn on for about 10 seconds.
Cargo Light To illuminate the cargo area there is a
light inside the trunk, at the top. This
light turn on when trunk lid is opened
and turn off when it is closed.
If trunk lid is left open for a long time,
lights will turn off after a few minutes
to save battery charge. Hazard Warning Flashers Press the indicated button on the
central console to turn on the hazard
warning flashers. The operation is
independent from the key position in
the ignition switch.
Press the button again to turn them
off.
When these lights are on, the turn
signals, the related arrow indicator on
the instrument cluster and the button
itself will flash.
NOTE:
When the hazard warning flashers are
activated, the turn signals control is
disabled.
Door Courtesy Light
Each door panel is fitted on the lower
side with a courtesy light to illuminateUnderstanding the Vehicle
3
88
Page 93 of 296

the area where passengers enter/exit
the vehicle.
Windshield Wipers and
Washers The multifunction lever on the
right-hand side of the steering column
operates the windshield wipers and
washer when the key in the ignition
switch is turned in MAR (ON) position.
The windshield washer and headlight
washer share the same fluid reservoir,
and a low fluid level is indicated by
the
same warning light and by the
message on the instrument cluster.
To refill the fluid, see “Maintenance
Procedures” in section “Maintenance
and Care”.
Windshield Wipers
Starting from the not-active position
"OFF", the right-hand multifunction
lever can be moved downward (three stable positions) or upward (one
unstable position).
AUTO Automatic operation. In this
position the rain sensor
adapts the windshield wiper
frequency to the intensity of
the rain.
1 Slow continuous operation.
2 Fast continuous operation.
– Fast temporary operation by
pushing the multifunction
lever upward.
CAUTION!
• Turn the windshield wipers off when
driving through an automatic car
wash. The windshield wipers may be
(Continued)Understanding the Vehicle
3
89
Page 95 of 296
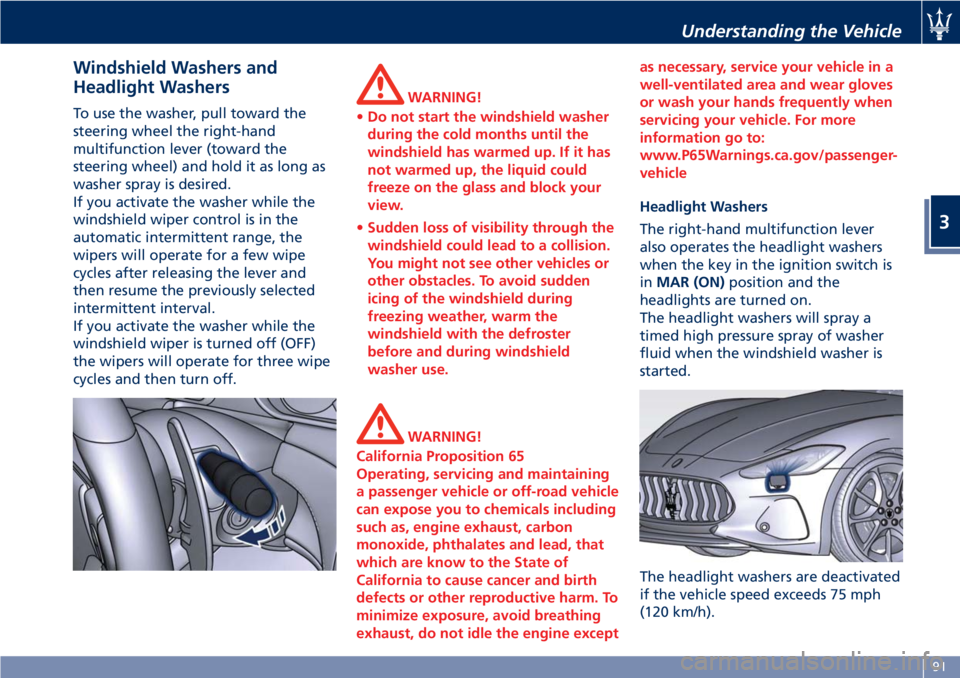
Windshield Washers and
Headlight Washers To use the washer, pull toward the
steering wheel the right-hand
multifunction lever (toward the
steering wheel) and hold it as long as
washer spray is desired.
If you activate the washer while the
windshield wiper control is in the
automatic intermittent range, the
wipers will operate for a few wipe
cycles after releasing the lever and
then resume the previously selected
intermittent interval.
If you activate the washer while the
windshield wiper is turned off (OFF)
the wipers will operate for three wipe
cycles and then turn off. WARNING!
• Do not start the windshield washer
during the cold months until the
windshield has warmed up. If it has
not warmed up, the liquid could
freeze on the glass and block your
view.
• Sudden loss of visibility through the
windshield could lead to a collision.
You might not see other vehicles or
other obstacles. To avoid sudden
icing of the windshield during
freezing weather, warm the
windshield with the defroster
before and during windshield
washer use.
WARNING!
California Proposition 65
Operating, servicing and maintaining
a passenger vehicle or off-road vehicle
can expose you to chemicals including
such as, engine exhaust, carbon
monoxide, phthalates and lead, that
which are know to the State of
California to cause cancer and birth
defects or other reproductive harm. To
minimize exposure, avoid breathing
exhaust, do not idle the engine except as necessary, service your vehicle in a
well-ventilated area and wear gloves
or wash your hands frequently when
servicing your vehicle. For more
information go to:
www.P65Warnings.ca.gov/passenger-
vehicle
Headlight Washers
The
right-hand multifunction lever
also operates the headlight washers
when the key in the ignition switch is
in MAR (ON) position and the
headlights are turned on.
The headlight washers will spray a
timed high pressure spray of washer
fluid when the windshield washer is
started.
The headlight washers are deactivated
if the vehicle speed exceeds 75 mph
(120 km/h).Understanding the Vehicle
3
91
Page 98 of 296
Soft Top Operation The soft top must be opened and
closed with the vehicle stationary and,
as a rule, with the engine running at
idle speed.
If necessary (e.g. in closed places) the
operation can be performed with the
engine off and the key in the ignition
switch in MAR (ON) position. This
operation involves an extremely high
power consumption, which causes the
battery to discharge faster.
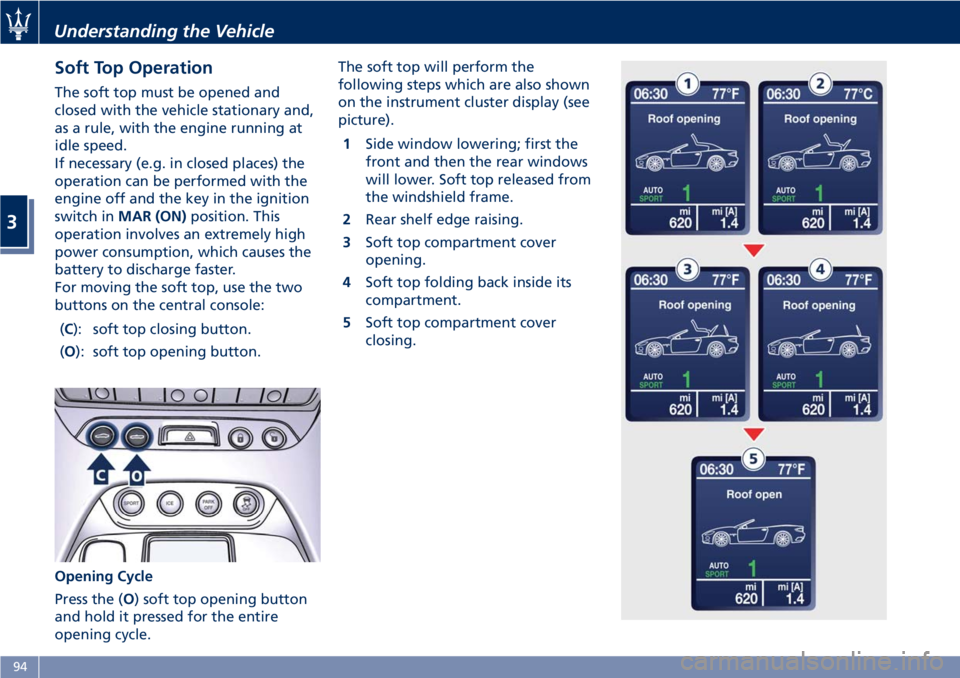
For moving the soft top, use the two
buttons on the central console:
( C ): soft top closing button.
( O ): soft top opening button.
Opening Cycle
Press the ( O ) soft top opening button
and hold it pressed for the entire
opening cycle. The soft top will perform the
following steps which are also shown
on the instrument cluster display (see
picture).
1 Side window lowering; first the
front and then the rear windows
will lower. Soft top released from
the windshield frame.
2 Rear shelf edge raising.
3 Soft top compartment cover
opening.
4 Soft top folding back inside its
compartment.
5 Soft top compartment cover
closing.Understanding the Vehicle
3
94
Page 102 of 296
NOTE:
The soft top failure temporarily
disables, for approx. 10 minutes, the
power windows’ operation. After this
time, the power windows will resume
normal functioning.
Soft Top Manual Closing
Operation In case of need, the soft top may be
closed manually.
WARNING!
• Manual operation of the soft top for
emergency closing requires the
presence of two persons in order to
prevent personal injury or damage
to the car.
• When moving the soft top by hand,
take the greatest care as its movable
parts could squeeze or trap objects
or parts of your body.
CAUTION!
The emergency procedure described
below must be used to close the soft
top if it is not possible for you to
contact the Authorized Maserati
Dealer immediately and you cannot
keep the soft top open. If the failure occurs when the opening
procedure
is already in progress, do
not attempt to complete the
procedure - close back the soft top
manually according to the following
instructions. After depressurizing the
hydraulic circuit by turning the key in
the ignition switch to STOP (OFF)
position, perform the emergency
procedure starting from the point at
which the opening stage jammed.
WARNING!
After depressurizing the system, the
soft top will move freely. Therefore, if
it is not in a balanced position, it will
close or open as a consequence of its
weight. Take the greatest care to
avoid being squeezed or trapped by
its levers and mechanisms.
Before Starting
NOTE:
• During
emergency closing, the side
windows must be lowered.
•
To move the soft top manually, you
must depressurize the hydraulic system
by turning the key in the ignition
switch to
STOP (OFF) position and
waiting approx. 10 minutes. • To avoid unintentional activations,
we recommend that you remove the
key from the ignition switch. Take
the flat-head screwdriver and the
wrench to lock/unlock the soft top
hinges out of the tool kit located in
the trunk compartment (see "Tool
Kit" in section "In an Emergency").
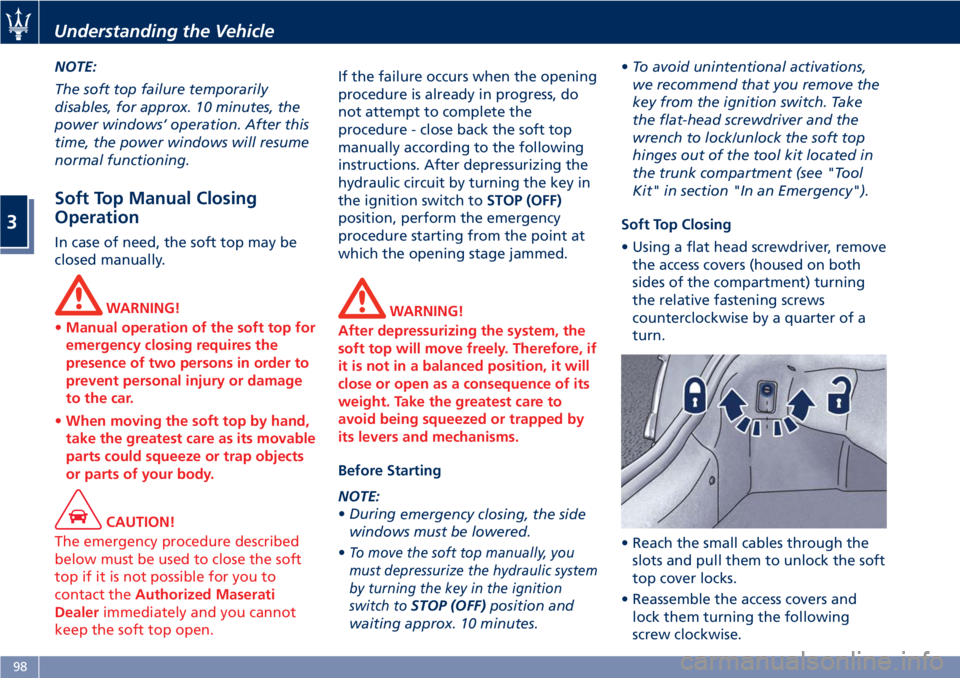
Soft Top Closing
• Using a flat head screwdriver, remove
the access covers (housed on both
sides of the compartment) turning
the relative fastening screws
counterclockwise by a quarter of a
turn.
• Reach the small cables through the
slots and pull them to unlock the soft
top cover locks.
• Reassemble the access covers and
lock them turning the following
screw clockwise.Understanding the Vehicle
3
98
Page 106 of 296
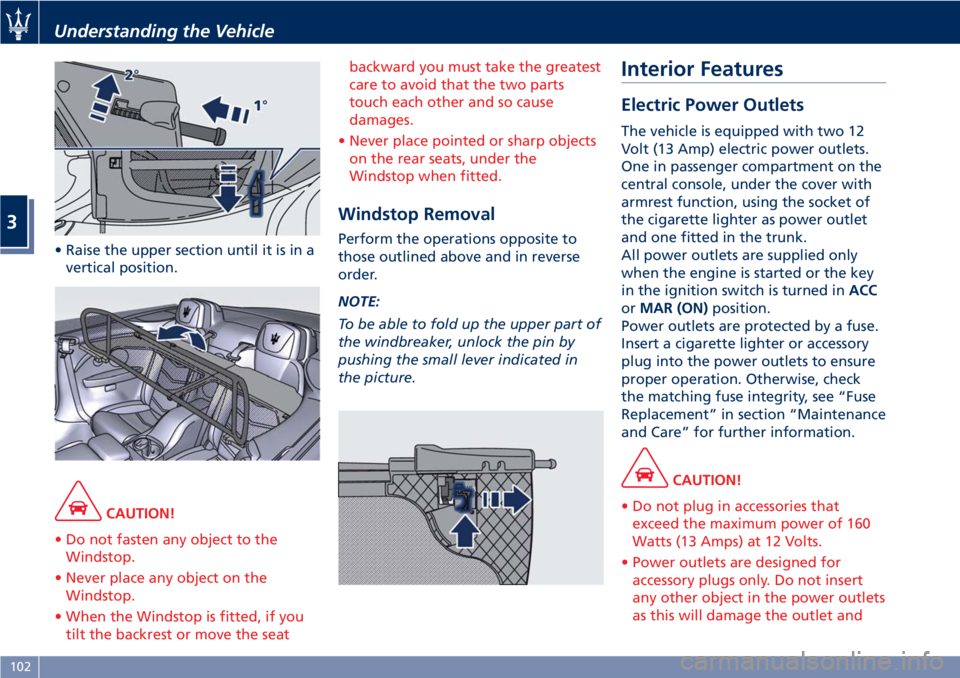
• Raise the upper section until it is in a
vertical position.
CAUTION!
• Do not fasten any object to the
Windstop.
• Never place any object on the
Windstop.
• When the Windstop is fitted, if you
tilt the backrest or move the seat backward you must take the greatest
care to avoid that the two parts
touch each other and so cause
damages.
• Never place pointed or sharp objects
on the rear seats, under the
Windstop when fitted.
Windstop Removal Perform the operations opposite to
those outlined above and in reverse
order.
NOTE:
To be able to fold up the upper part of
the windbreaker, unlock the pin by
pushing the small lever indicated in
the picture. Interior Features Electric Power Outlets The vehicle is equipped with two 12
Volt (13 Amp) electric power outlets.
One in passenger compartment on the
central console, under the cover with
armrest function, using the socket of
the cigarette lighter as power outlet
and one fitted in the trunk.
All power outlets are supplied only
when the engine is started or the key
in the ignition switch is turned in ACC
or MAR (ON) position.
Power outlets are protected by a fuse.
Insert a cigarette lighter or accessory
plug into the power outlets to ensure
proper operation. Otherwise, check
the matching fuse integrity, see “Fuse
Replacement” in section “Maintenance
and Care” for further information.
CAUTION!
• Do not plug in accessories that
exceed the maximum power of 160
Watts (13 Amps) at 12 Volts.
• Power outlets are designed for
accessory plugs only. Do not insert
any other object in the power outlets
as this will damage the outlet andUnderstanding the Vehicle
3
102