2019 MASERATI GRANTURISMO CONVERTIBLE start stop button
[x] Cancel search: start stop buttonPage 157 of 296
• left-hand/right-hand vent airdistribution;
• fan speed (stepless change);
• compressor activation;
• air recirculation.
All the functions listed above can be
modified manually, i.e. the user can
select one or more of these functions
as desired, using the control panel.
The manual selections always have
priority over the automatic ones and
are memorized until the user chooses
the automatic control again.
When a function has been set
manually, the other automatic
functions will not be affected.
The following parameters/functions
can be set/modified manually:
• left-hand/right-hand side air temperature;
• fan speed;
• air distribution on 7 positions (left-hand/ right-hand);
• compressor activation;
• single/dual-zone distribution priority;
• defrosting/defogging function (MAX DEF);
• air recirculation;
• automatic/manual control of the system; • heated rear window;
• system deactivation;
• opening/closing of air duct leading
to rear vents.
Activation
The system can be started up in a
number of ways. It is however
advisable to begin by pressing one of
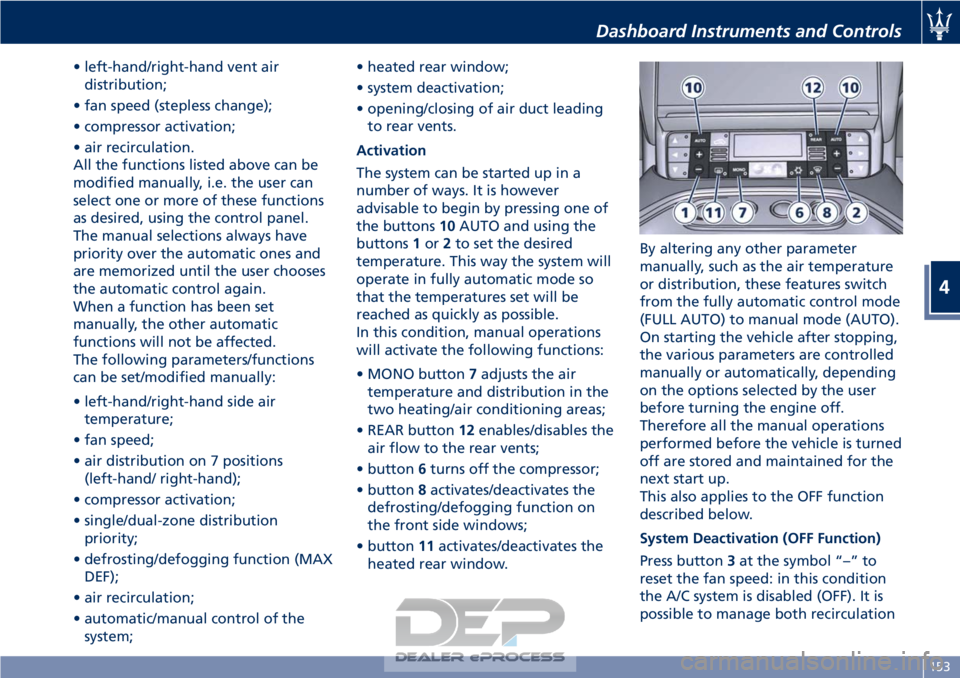
the buttons 10AUTO and using the
buttons 1or 2to set the desired
temperature. This way the system will
operate in fully automatic mode so
that the temperatures set will be
reached as quickly as possible.
In this condition, manual operations
will activate the following functions:
• MONO button 7adjusts the air
temperature and distribution in the
two heating/air conditioning areas;
• REAR button 12enables/disables the
air flow to the rear vents;
• button 6turns off the compressor;
• button 8activates/deactivates the
defrosting/defogging function on
the front side windows;
• button 11activates/deactivates the
heated rear window. By altering any other parameter
manually, such as the air temperature
or distribution, these features switch
from the fully automatic control mode
(FULL AUTO) to manual mode (AUTO).
On starting the vehicle after stopping,
the various parameters are controlled
manually or automatically, depending
on the options selected by the user
before turning the engine off.
Therefore all the manual operations
performed before the vehicle is turned
off are stored and maintained for the
next start up.
This also applies to the OFF function
described below.
System Deactivation (OFF Function)
Press button
3at the symbol “–” to
reset the fan speed: in this condition
the A/C system is disabled (OFF). It is
possible to manage both recirculation
Dashboard Instruments and Controls
4
153
Page 163 of 296
Engine Start Failure
CAUTION!
• Do not attempt to push or tow your vehicle to get it started. Vehicles
equipped with an automatic
transmission cannot be started this
way.
• If the vehicle battery is dead, booster cables may be used to obtain a start
from a booster battery or the
battery in another vehicle. This type
of start can be dangerous if done
improperly. See “Auxiliary Jump
Start Procedure” in section “In an
Emergency” for further information.
Starting by cold engine
Start-of
f slowly, avoiding sudden
acceleration and rev the engine up at
low medium speeds. High-
performance driving should be
avoided until the engine temperature
reaches 149-158°F (65-70°C).
Engine Turn-Off
• Place the shift lever in P (Park) (see “Automatic Transmission” in this
section).
• With the engine at idle, turn the key in the ignition switch to STOP (OFF)position. A burst on the accelerator
pedal before turning off the engine
has no purpose and increases fuel
consumption.
WARNING!
Never leave a vehicle out of the P
(Park) position, as it could move.
The key can only be removed from the
ignition
switch when the transmission
is in P (Park) position and within 30
seconds after turning the key to STOP
(OFF) position. If you do not remove
the key within 30 seconds, you will
need to turn it back to MAR (ON)and
then to STOP (OFF) position to have a
further 30 seconds within which to
remove the key from the ignition
switch.
In the event that the key unlocking
system fails or if it is not possible to
shift the transmission to P (Park)
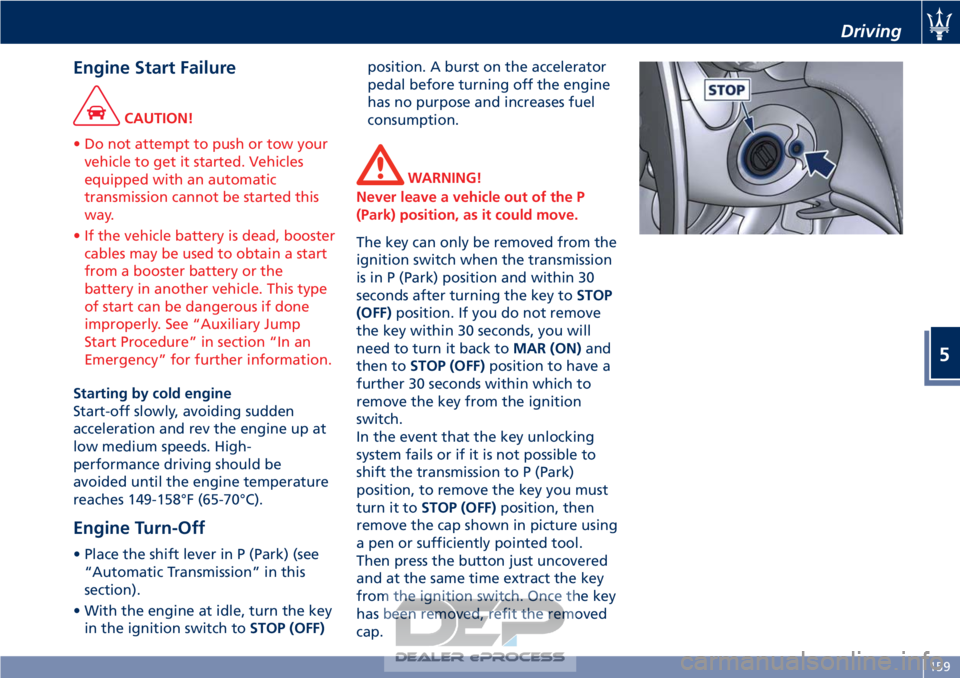
position, to remove the key you must
turn it to STOP (OFF) position, then
remove the cap shown in picture using
a pen or sufficiently pointed tool.
Then press the button just uncovered
and at the same time extract the key
from the ignition switch. Once the key
has been removed, refit the removed
cap.
Driving
5
159
Page 164 of 296
Automatic Transmission
The electronic shift lever replaces the
conventional mechanical lever and has
no mechanical connection to the
transmission. The transmission is
operated by electrical actuators on the
hydraulic system and all commands to
the control system are transmitted by
the CAN network.
The automatic transmission has six
forward gear ratios and one reverse
gear. The gears can also be engaged
manually once you have shifted the
transmission shift lever to the sector
provided.
CAUTION!
In order to properly use the automatic
transmission, it is essential that you
read through the whole chapter, so
that you can understand right from
the start what the correct and
permitted operations are.
Damage to the transmission may occur
if the following precautions are not
observed:
• Shift into P (Park) only after the vehicle has come to a complete stop.
This is the default position of the
lever and should be used every time the key in the ignition switch is
turned to
STOP (OFF) position.
• Shift into or out of R (Reverse) only after the vehicle has come to a
complete stop and the engine is at
idle speed.
• Do not shift between P (Park), R (Reverse), N (Neutral) or D (Drive)
when the engine is above idle speed.
• To effect any change from vehicle stop to R (Reverse), D (Drive), 1
stor
2ndgear, it is necessary to keep the
brake pedal fully depressed.
WARNING!
• It is dangerous to move the shift
lever out of P (Park) or N (Neutral) if
the engine speed is higher than idle
speed. Only shift into gear when the
engine is idling normally and when
your foot is firmly pressing on the
brake pedal.
• As with all vehicles, you should
never exit a vehicle while the engine
is running. Before exiting a vehicle,
always apply the electronic parking
brake, shift the transmission into P
(Park), and turn the engine off.
• When leaving the vehicle, always
remove the key from the ignition switch and lock your vehicle.
• Do not leave the key in or near the
vehicle.
The transmission system is equipped
with
"Shift-Lock" and "Key-Lock"
safety functions.
Shift-Lock
This safety function allows you to shift
from P (Park) to another position only
if the brake pedal is depressed. This
prevents the vehicle from involuntarily
jumping forward or backward.
Key-Lock
This function allows you to remove the
key from the ignition switch only
when the transmission shift lever is in
P (Park) position and within a
maximum time of 30 seconds. When
this time has elapsed, the key can no
longer be removed.
Automatic Transmission Lever
Automatic transmission is operated by
a lever with unlock button to engage
R (Reverse) and P (Park) located on the
central console.
By using the transmission shift lever it
is possible to select following
positions, indicated on the gear display
at the side of the transmission shift
Driving
5
160
Page 167 of 296
pedal pressed. To move the shift lever
from P (Park) position to any other
position, the engine must be switched
on. The engine can be regularly
started in P (Park) range. Never
attempt to use P (Park) while the
vehicle is in motion.
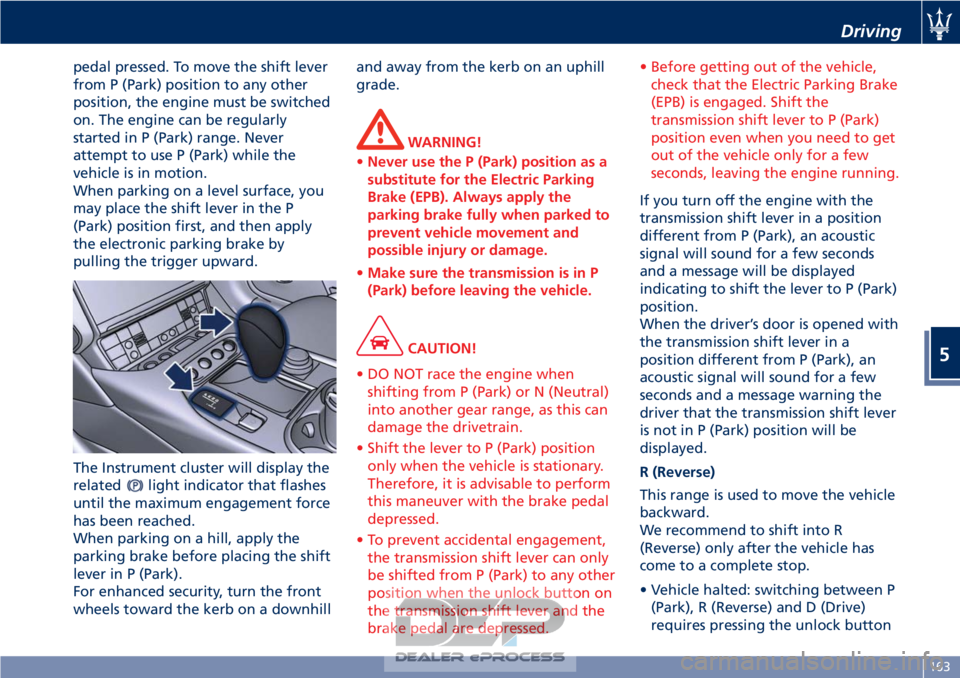
When parking on a level surface, you
may place the shift lever in the P
(Park) position first, and then apply
the electronic parking brake by
pulling the trigger upward.
The Instrument cluster will display the
related
light indicator that flashes
until the maximum engagement force
has been reached.
When parking on a hill, apply the
parking brake before placing the shift
lever in P (Park).
For enhanced security, turn the front
wheels toward the kerb on a downhill and away from the kerb on an uphill
grade.
WARNING!
• Never use the P (Park) position as a
substitute for the Electric Parking
Brake (EPB). Always apply the
parking brake fully when parked to
prevent vehicle movement and
possible injury or damage.
• Make sure the transmission is in P
(Park) before leaving the vehicle.
CAUTION!
• DO NOT race the engine when shifting from P (Park) or N (Neutral)
into another gear range, as this can
damage the drivetrain.
• Shift the lever to P (Park) position only when the vehicle is stationary.
Therefore, it is advisable to perform
this maneuver with the brake pedal
depressed.
• To prevent accidental engagement, the transmission shift lever can only
be shifted from P (Park) to any other
position when the unlock button on
the transmission shift lever and the
brake pedal are depressed. • Before getting out of the vehicle,
check that the Electric Parking Brake
(EPB) is engaged. Shift the
transmission shift lever to P (Park)
position even when you need to get
out of the vehicle only for a few
seconds, leaving the engine running.
If you turn off the engine with the
transmission
shift lever in a position
different from P (Park), an acoustic
signal will sound for a few seconds
and a message will be displayed
indicating to shift the lever to P (Park)
position.
When the driver’s door is opened with
the transmission shift lever in a
position different from P (Park), an
acoustic signal will sound for a few
seconds and a message warning the
driver that the transmission shift lever
is not in P (Park) position will be
displayed.
R (Reverse)
This range is used to move the vehicle
backward.
We recommend to shift into R
(Reverse) only after the vehicle has
come to a complete stop.
• Vehicle halted: switching between P (Park), R (Reverse) and D (Drive)
requires pressing the unlock button
Driving
5
163
Page 174 of 296
(gears are shifted at low engine
speeds).
In NORMAL mode, the system
controlling suspension damping uses a
shock absorber "softer" setting (see
"Skyhook Suspension" in section
"Understanding the Vehicle").
As SPORT mode has a lower priority
than ICE (low-grip) mode, if this is
already active when activating SPORT
mode, the system will ignore the
command.
CAUTION!
• Vs NORMAL mode, SPORT mode is characterized by faster gearshifting,
electronic suspension management
(Skyhook), opening of by-pass
exhaust valves (above 3000 rpm with
the vehicle in motion).
• In addition to enhancing performance, opening of the exhaust
also increases noise levels of the
vehicle.
In SPORT mode, fast gearshifting
however
, always depends on the
accelerator pedal travel and on the
engine rpm, as in NORMAL mode.
When in SPORT mode, the system
controlling suspension damping uses a
shock absorber "harder" setting (see "Skyhook Suspension" in section
"Understanding the Vehicle").
In MANUAL mode, DOWN-shifts with
the accelerator pedal released, will
have a braking effect approaching the
skidding limit of the driving wheels on
dry asphalt.
Under sports-style driving conditions
with gearshifts at high engine rpm,
double-clutching when up-shifting is
performed automatically.
WARNING!
It is advisable not to use SPORT mode
on roads with low or medium grip
conditions (e.g. ice, snow, or wet
roads) as the driving wheels could skid
during gearshifts.
Therefore, excessive use of the vehicle
in SPORT mode is advisable only on
race tracks.
If you use MANUAL and SPORT mode
in
combination for sports-style driving,
when starting-off or shifting gears,
you may perceive an initial slipping of
the driving wheels even on dry roads.
ICE (low-grip) Mode
This mode can be used on particularly
slippery road surfaces (e.g., rain, snow,
ice). To activate/deactivate this mode, press button "ICE" on the central
console. The word “ICE” will illuminate
on the instrument cluster display.
In “low-grip” mode, the system uses
2nd instead of 1st gear; this means
that 2nd gear will automatically be
engaged (gearshift lever in D (Drive)
position) in the event of standing
starts in automatic mode; on the other
hand, when in sequential manual
mode (transmission lever in MANUAL
"+"), moving the transmission lever
from N (Neutral), or R (Reverse) or
when the vehicle stops, 2nd gear will
automatically be engaged.
When sequential manual mode is
selected with 2nd gear engaged, a
downshift request will be ignored.
While driving, the system
automatically switches to the upper
gear if the engine reaches the
preestablished speed rate (3000 rpm).
ICE (low-grip) mode has priority over
SPORT mode and assists the ESC
system.
WARNING!
A downshift request from 6th to 5th
gear will only be accepted if the
engine speed rate in 5th gear is lower
than 3000 rpm. As ICE (low-grip) mode
Driving
5
170
Page 175 of 296
can be activated at any time and the
system limits the engine speed rate to
3000 rpm in all gears except for the
6th, unrequested gearshifts could take
place.
In any case, it is advisable to
deactivate
SPORT mode before
selecting ICE (low-grip) mode.
When sequential manual gearshifting
is active, regardless of the mode set
(NORMAL / SPORT / ICE), the
transmission will automatically upshift
or downshift when reaching the
minimum and maximum rpm. This is
to prevent engine overrevving or
underrevving.
(ESC Off) Mode
The ESC system is designed to
automatically activate every time the
engine is started and can be
deactivated by pressing
(ESC Off)
button on the central console for
about 2 seconds. The
(ESC Off)
amber warning light illuminates on
the instrument cluster as well as on
the display, where it is accompanied
by a specific message.
The ESC (Electronic Stability Control)
antiyawing system incorporates all of
the vehicle control systems: ABS, EBD,
ASR and MSR (see "Brake and Stability Control System" in this section for
further information).
The system is fitted with a unit that
predicts the vehicle behavior with
extreme accuracy. The system can
detect when the driver is about to lose
control of the vehicle. In this case, it
can activate the brake calipers
individually and engine control, in
order to create a torque sufficient to
resist the vehicle’s yawing moment.
Press
(ESC Off) button again to
reactivate the system.
The
(ESC On) amber warning light
on the instrument cluster flashes
during all the operating phases.
, the system is automatically disabled
and cannot be re-activated. While
driving, this condition is signaled by
the
(ESC On) amber warning light,
that illuminates both on the
instrument cluster as well as on the
multi-function display, where it is
accompanied by the message “ESC
unavailable go to dealer”.
When the engine is started, the system
malfunction is indicated by the
illumination of the
(ESC On) amber
warning light.
CAUTION!
• In the event of a fault, and with the ESC system disabled (
(ESC Off)
button pressed), the vehicle behaves
as if it were not equipped with this
system: however, we recommend
you contact the Authorized Maserati
Dealer as soon as possible to have
the system checked.
• If you have to tow the vehicle with 2 wheels raised, make sure the key in
the ignition switch is in the STOP
(OFF) position. Otherwise, with the
ESC system active (
(ESC Off)
button not pressed), the control unit
will store a malfunction with
consequent illumination of the
(ESC On) amber warning lights on
the instrument cluster and on the
display. Should this occur, contact
the Authorized Maserati Dealer to
have the system repaired.
• In low- and medium-grip conditions (e.g., rain, snow, ice, sand, etc.) it is
advisable not to activate SPORT
mode, even with the ESC system
active (
(ESC Off) button not
pressed).
Driving
5
171
Page 179 of 296

If you attempt to disengage the
parking brake without having
depressed the service brake pedal, a
message will be displayed to warn
you to do so.
• The EPB command activation while
running, generates a deceleration of
the vehicle with strong deceleration
(Dynamic Braking). It is therefore
recommended to use of this feature
only in case of emergency. The
stability of the car is guaranteed by
the action of the activated ESC
system.
Deactivating Automatic
Operation
To deactivate automatic operation of
the parking brake, with the engine
on, press the "PARK OFF" button on
the central console. The words “PARK OFF” appear on the
display for 5 seconds, after which they
remain displayed but in smaller size.
To reactivate automatic operation,
press the "PARK OFF" button once
again, the words “PARK ON” appear
on the display for 5 seconds.
CAUTION!
• In certain conditions when the battery voltage is low, the electric
parking brake system may
temporarily be deactivated for safety
reasons. Therefore, typically upon
starting the engine, when the
battery voltage drops, the message
“PARK OFF” may temporarily be
displayed on the instrument cluster,
indicating that automatic operation
is temporarily disabled. • In the case of performance starting,
check that the parking brake is
disengaged.
Failure Indication
In the event of electric parking brake
system failure, the
warning light
on the display will light up.
Depending on the message displayed,
it signals the following failures of the
EPB system:
• “Parking brake failure: go to dealer” If the message warning you to go to
the nearest Authorized Maserati
Dealer is displayed, drive slowly and
remember that the electric parking
brake device is not functioning.
• “EPB is overheated” If the vehicle has been stationary
(key in the ignition switch to STOP
(OFF) position) for about 15 minutes
without using the parking brake,
and the warning light illuminates
again after restarting the engine,
slowly drive to the nearest
Authorized Maserati Dealer .
• “EPB failure only manual unlock allowed: see handbook”
In this case, follow the manual
emergency deactivation procedure
in order to release the parking brake
(see “Emergency Release of the
Driving
5
175
Page 207 of 296
the amount of fuel allowed by the
system is very low, we recommend
therefore not to persist further.
• Wait approximately 10 seconds before removing the fuel nozzle in
order to ensure completed supply of
residual fuel and restrict the risk of
fouling the fuel filler door area.
• Remove the fuel nozzle.
• Insert the cap on the fuel filler neck.
• Tighten the cap, turning it clockwise until it stops.
• Close the fuel tank door.
CAUTION!
To avoid fuel spillage and overfilling,
do not “top off” the fuel tank after
filling.
Emergency Fuel Filler Door
Release
If you are unable to unlock the fuel
filler door using the dedicated button,
use the fuel filler door emergency
release located in the trunk.
• Open the trunk lid (see “Open and Close the Trunk Lid” in section
“Before Starting”).
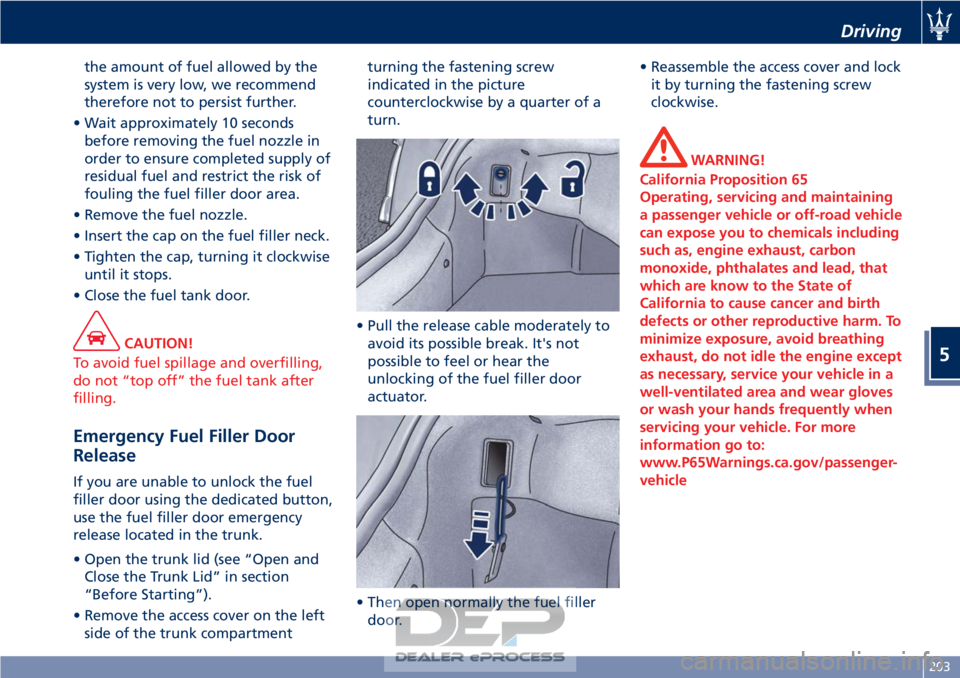
• Remove the access cover on the left side of the trunk compartment turning the fastening screw
indicated in the picture
counterclockwise by a quarter of a
turn.
• Pull the release cable moderately to avoid its possible break. It's not
possible to feel or hear the
unlocking of the fuel filler door
actuator.
• Then open normally the fuel filler door. • Reassemble the access cover and lock
it by turning the fastening screw
clockwise.
WARNING!
California Proposition 65
Operating, servicing and maintaining
a passenger vehicle or off-road vehicle
can expose you to chemicals including
such as, engine exhaust, carbon
monoxide, phthalates and lead, that
which are know to the State of
California to cause cancer and birth
defects or other reproductive harm. To
minimize exposure, avoid breathing
exhaust, do not idle the engine except
as necessary, service your vehicle in a
well-ventilated area and wear gloves
or wash your hands frequently when
servicing your vehicle. For more
information go to:
www.P65Warnings.ca.gov/passenger-
vehicle
Driving
5
203