Page 313 of 595
Moving the Air Filter Assembly (Accessingthe Dipstick)
WARNING: Do not start the engine withthe air filter removed. This can causedamage not covered by the vehicle Warrantyand can result in serious injury.
1. Shut the engine off.
2. Clean the area around the clamp thatconnects the air filter assembly to therubber hose (A).
3. Remove the bolt cover (if equipped).
4.Remove two bolts that attach the air filterassembly to the front of the vehicle (B).
5. Loosen the clamp holding the air filterassembly to the rubber hose (A).
6. Remove the harness retaining clip bypulling up (C). Do not disconnect thesensor (D).
7.Without disconnecting the sensor (D), pullthe air filter assembly up to disconnectthe air filter assembly from the seatedgrommets located underneath the airfilter assembly.
310
MKZ (CC9) Canada/United States of America, enUSA, Edition date: 201805, First-Printing
MaintenanceE158839
A
BCD E158840
Page 314 of 595
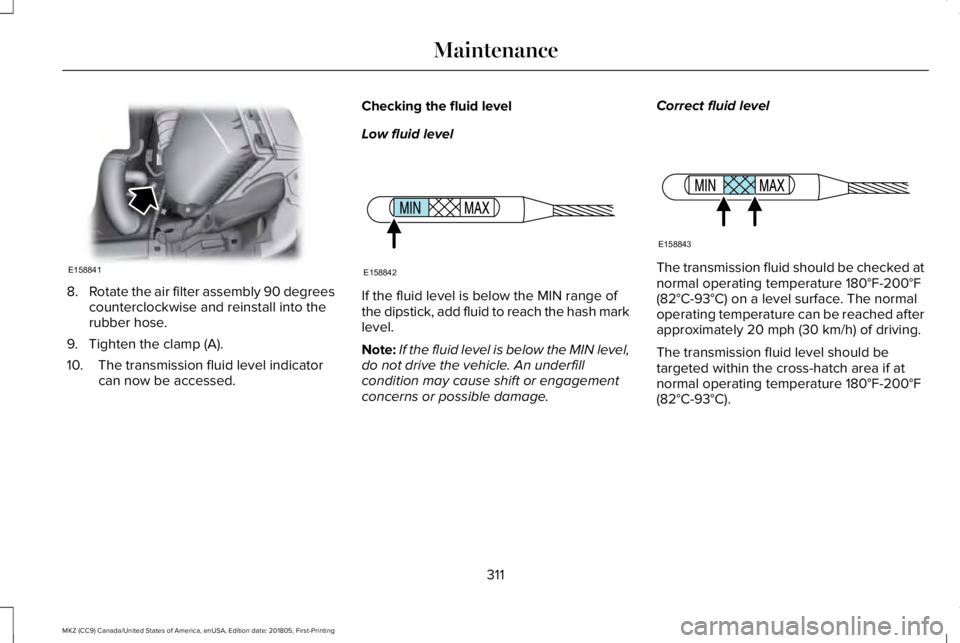
8.Rotate the air filter assembly 90 degreescounterclockwise and reinstall into therubber hose.
9. Tighten the clamp (A).
10. The transmission fluid level indicatorcan now be accessed.
Checking the fluid level
Low fluid level
If the fluid level is below the MIN range ofthe dipstick, add fluid to reach the hash marklevel.
Note:If the fluid level is below the MIN level,do not drive the vehicle. An underfillcondition may cause shift or engagementconcerns or possible damage.
Correct fluid level
The transmission fluid should be checked atnormal operating temperature 180°F-200°F(82°C-93°C) on a level surface. The normaloperating temperature can be reached afterapproximately 20 mph (30 km/h) of driving.
The transmission fluid level should betargeted within the cross-hatch area if atnormal operating temperature 180°F-200°F(82°C-93°C).
311
MKZ (CC9) Canada/United States of America, enUSA, Edition date: 201805, First-Printing
MaintenanceE158841 E158842 E158843
Page 315 of 595

High fluid level
If the fluid level is above the MAX range ofthe dipstick, remove fluid to reach thehashmark level.
Note:Fluid level above the MAX level maycause shift or engagement concerns orpossible damage. High fluid levels can becaused by an overheating condition. If yourvehicle has been operated for an extendedperiod at high speeds, in city traffic duringhot weather or pulling a trailer, the vehicleshould be switched off until normal operatingtemperatures are reached. Depending onvehicle use, cooling times could take up to30 minutes or longer.
Adjusting Automatic Transmission FluidLevels
Before adding any fluid, make sure thecorrect type is used. The type of fluid usedis normally indicated on the dipstick and alsoin the Technical Specifications section in thischapter.
Note:An overfill condition of transmissionfluid may cause shift or engagementconcerns or possible damage.
Do not use supplemental transmission fluidadditives, treatments or cleaning agents. Theuse of these materials may affecttransmission operation and result in damageto internal transmission components.Reinstall the air filter assembly. After the fluidlevel has been checked and adjusted asnecessary, do the following:
1. Shut the engine off.
2. Loosen the clamp holding the air filterassembly to the rubber hose.
3.Rotate the air filter assembly 90 degreesclockwise without disconnecting thesensor.
4.Seat the air filter assembly back into thegrommets by pushing down on the airfilter assembly.
5. Tighten the clamp.
6. Install and tighten two bolts that attachair filter assembly to the front of thevehicle.
7. Install the bolt cover (if equipped).
312
MKZ (CC9) Canada/United States of America, enUSA, Edition date: 201805, First-Printing
MaintenanceE158844 E158845 E158846
Page 316 of 595

8. Reinstall the harness retaining clip intothe front of the air filter assembly.
BRAKE FLUID CHECK
WARNING: Do not use any fluid otherthan the recommended brake fluid as thiswill reduce brake efficiency. Use of incorrectfluid could result in the loss of vehiclecontrol, serious personal injury or death.
WARNING: Only use brake fluid froma sealed container. Contamination with dirt,water, petroleum products or other materialsmay result in brake system damage or failure.Failure to adhere to this warning could resultin the loss of vehicle control, seriouspersonal injury or death.
WARNING: Do not allow the fluid totouch your skin or eyes. If this happens, rinsethe affected areas immediately with plentyof water and contact your physician.
WARNING: A fluid level between theMAX and MIN lines is within the normaloperating range and there is no need to addfluid. A fluid level not in the normal operatingrange could compromise the performanceof the system. Have your vehicle checkedimmediately.
To avoid fluid contamination, the reservoircap must remain in place and fully tight,unless you are adding fluid.
Only use fluid that meets Ford specifications.See Capacities and Specifications (page366).
WASHER FLUID CHECK
WARNING: If you operate your vehiclein temperatures below 41.0°F (5°C), usewasher fluid with antifreeze protection.Failure to use washer fluid with antifreezeprotection in cold weather could result inimpaired windshield vision and increase therisk of injury or accident.
Note:The front and rear washer systemsare supplied from the same reservoir.
Add fluid to fill the reservoir if the level is low.Only use a washer fluid that meets ourspecifications. See Capacities andSpecifications (page 366).
State or local regulations on volatile organiccompounds may restrict the use of methanol,a common windshield washer antifreezeadditive. Washer fluids containingnon-methanol antifreeze agents should beused only if they provide cold weatherprotection without damaging the vehicle’spaint finish, wiper blades or washer system.
FUEL FILTER
2.0L Engines and 3.0L Engines withFWD
Your vehicle is equipped with a lifetime fuelfilter that is integrated with the fuel tank.Regular maintenance or replacement is notneeded.
313
MKZ (CC9) Canada/United States of America, enUSA, Edition date: 201805, First-Printing
Maintenance
Page 317 of 595

3.0L Engines with AWD
The fuel filter on your vehicle must bereplaced at the specified service interval.See Scheduled Maintenance (page 504).
CHANGING THE 12V BATTERY
WARNING: Batteries normally produceexplosive gases which can cause personalinjury. Therefore, do not allow flames, sparksor lighted substances to come near thebattery. When working near the battery,always shield your face and protect youreyes. Always provide correct ventilation.
WARNING: When lifting a plastic-casedbattery, excessive pressure on the end wallscould cause acid to flow through the ventcaps, resulting in personal injury and damageto the vehicle or battery. Lift the battery witha battery carrier or with your hands onopposite corners.
WARNING: Keep batteries out of reachof children. Batteries contain sulfuric acid.Avoid contact with skin, eyes or clothing.Shield your eyes when working near thebattery to protect against possible splashingof acid solution. In case of acid contact withskin or eyes, flush immediately with waterfor a minimum of 15 minutes and get promptmedical attention. If acid is swallowed, call aphysician immediately.
WARNING: Battery posts, terminalsand related accessories contain lead andlead compounds. Wash hands after handling.
WARNING: For vehicles withAuto-Start-Stop the battery requirement isdifferent. You must replace the battery withone of exactly the same specification.
Your vehicle is fitted with a Motorcraftmaintenance-free battery which normallydoes not require additional water.
When a battery replacement is required, youmust use a recommended replacementbattery that matches the electricalrequirements of the vehicle.
Note:If your vehicle has a battery cover,after cleaning or replacing the battery, makesure you reinstall it.
Note:See an authorized dealer for batteryaccess, testing, or replacement.
To make sure the battery managementsystem works correctly, do not connect anelectrical device ground connection directlyto the battery negative post. This can causeinaccurate measurements of the batterycondition and potential incorrect systemoperation.
Note:If you add electrical accessories orcomponents to the vehicle, it may adverselyaffect battery performance and durability.This may also affect the performance ofother electrical systems in the vehicle.
If you see any corrosion on the battery orterminals, remove the cables from theterminals and clean with a wire brush. Youcan neutralize the acid with a solution ofbaking soda and water.
314
MKZ (CC9) Canada/United States of America, enUSA, Edition date: 201805, First-Printing
Maintenance
Page 318 of 595

Because your vehicle’s engine iselectronically-controlled by a computer,some engine control settings are maintainedby power from the battery. Some enginecomputer settings, like the idle trim and fueltrim strategy, optimize the driveability andperformance of the engine. The clock andradio station presets are also maintained inmemory by power from the low-voltagebattery. These settings are erased when atechnician disconnects and connects thelow-voltage battery.
To restore the settings, do the following:
Note:Until you switch the ignition to the onposition, you will receive a message in yourinformation display stating that your vehicleis not in park.
1. Apply the parking brake.
2. Shift into park (P) or neutral (N).
3. Switch off all accessories.
4. Press the brake pedal and start yourvehicle.
5. Run the engine until it reaches normaloperating temperature. While the engineis warming up, complete the following:Reset the clock. See Audio Unit (page391). Reset the power windowsbounce-back feature. See PowerWindows (page 95). Reset the radiostation presets. See Audio Unit (page391).
6. Allow the engine to idle for at least oneminute.
7.Drive the vehicle at least 10 mi (16 km) tocompletely relearn the idle trim and fueltrim strategy.
Note:If you do not allow the engine torelearn the idle and fuel trim strategy, theidle quality of your vehicle may be adverselyaffected until the engine computereventually relearns the idle trim and fuel trimstrategy.
Note:Certain features may not operate ifthe battery monitor system is not reset witha scan tool following a jump start or batteryreplacement. Normal electrical accessoryoperation should resume after your vehicleis left undisturbed for 8 hours.
Make sure that you dispose of old batteriesin an environmentally friendly way. Seekadvice from your local authority aboutrecycling old batteries.
If storing your vehicle for more than 30 dayswithout recharging the battery, werecommend that you disconnect the batterycables to maintain battery charge for quickstarting.
CHECKING THE WIPER BLADES
Run the tip of your fingers over the edge ofthe blade to check for roughness.
Clean the wiper blades with washer fluid orwater applied with a soft sponge or cloth.
315
MKZ (CC9) Canada/United States of America, enUSA, Edition date: 201805, First-Printing
MaintenanceE142463
Page 319 of 595

CHANGING THE WIPER BLADES
Replace the wiper blades at least annuallyfor optimum performance.
You can improve poor wiper quality bycleaning the wiper blades and thewindshield.
Note:Do not hold the wiper blade whenlifting the wiper arm.
Note:Make sure that the wiper arm doesnot spring back against the glass when thewiper blade is not attached.
1. Pull the wiper blade and arm away fromthe glass. Press the locking buttonstogether.
2. Slightly rotate the wiper blade.
3. Remove the wiper blade.
4. Install in the reverse order.
Note:Make sure that the wiper blade locksinto place.
ADJUSTING THE HEADLAMPS
Vertical Aim Adjustment
The headlamps on your vehicle are properlyaimed at the assembly plant. If your vehiclehas been in an accident, the alignment ofyour headlamps should be checked by yourauthorized dealer.
Headlamp Aiming Target
8 feet (2.4 meters)A
Center height of lamp to groundB
25 feet (7.6 meters)C
Horizontal reference lineD
Vertical Aim Adjustment Procedure
1.Park the vehicle directly in front of a wallor screen on a level surface,approximately 25 ft (7.6 m) away.
316
MKZ (CC9) Canada/United States of America, enUSA, Edition date: 201805, First-Printing
MaintenanceE129990
1
1 2 E142592
Page 320 of 595

2.Measure the height of the headlamp bulbcenter from the ground and mark an 8 ft(2.4 m) horizontal reference line on thevertical wall or screen at this height.
Note:To see a clearer light pattern foradjusting, you may want to block the lightfrom one headlamp while adjusting theother.
3. Turn on the low beam headlamps toilluminate the wall or screen and openthe hood.
4.On the wall or screen you will observe aflat zone of high intensity light located atthe top of the right hand portion of thebeam pattern. If the top edge of the highintensity light zone is not at the horizontalreference line, the headlamp will needto be adjusted.
5. Locate the vertical adjuster on eachheadlamp. Using a Phillips #2screwdriver, turn the adjuster eitherclockwise or counterclockwise in orderto adjust the vertical aim of theheadlamp. The horizontal edge of thebrighter light should touch the horizontalreference line.
6. Close the hood and turn off the lamps.
Horizontal Aim Adjustment
The horizontal aim does not require anyadjustment for this vehicle. If a fault occurs,have the system checked by an authorizeddealer.
CHANGING A BULB
Replacing Bulbs
For replacing bulbs, see your authorizeddealer.
CHANGING THE ENGINE AIR
FILTER
WARNING: Do not start the engine withthe air filter removed. This can causedamage not covered by the vehicle Warrantyand can result in serious injury.
317
MKZ (CC9) Canada/United States of America, enUSA, Edition date: 201805, First-Printing
MaintenanceE142465 E150095