2019 LINCOLN CONTINENTAL engine
[x] Cancel search: enginePage 333 of 627
For turbocharged equipped vehicles: When
servicing the air cleaner, it is important that
no foreign material enter the air induction
system. The engine and turbocharger are
susceptible to damage from even small
particles.
Change the air filter element at the proper
interval. See Scheduled Maintenance (page
528).
Note: Failure to use the correct air filter
element may result in severe engine
damage. The customer warranty may be
void for any damage to the engine if the
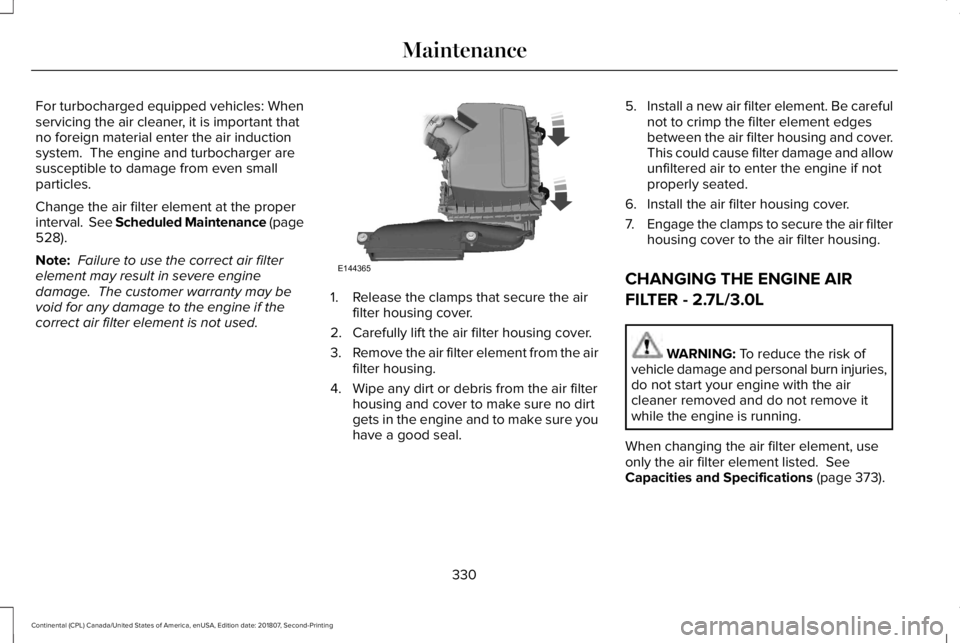
correct air filter element is not used. 1. Release the clamps that secure the air
filter housing cover.
2. Carefully lift the air filter housing cover.
3. Remove the air filter element from the air
filter housing.
4. Wipe any dirt or debris from the air filter housing and cover to make sure no dirt
gets in the engine and to make sure you
have a good seal. 5.
Install a new air filter element. Be careful
not to crimp the filter element edges
between the air filter housing and cover.
This could cause filter damage and allow
unfiltered air to enter the engine if not
properly seated.
6. Install the air filter housing cover.
7. Engage the clamps to secure the air filter
housing cover to the air filter housing.
CHANGING THE ENGINE AIR
FILTER - 2.7L/3.0L WARNING:
To reduce the risk of
vehicle damage and personal burn injuries,
do not start your engine with the air
cleaner removed and do not remove it
while the engine is running.
When changing the air filter element, use
only the air filter element listed.
See
Capacities and Specifications (page 373).
330
Continental (CPL) Canada/United States of America, enUSA, Edition date: 201807, Second-Printing MaintenanceE144365
Page 334 of 627
For Turbocharged equipped vehicles: When
servicing the air cleaner, it is important that
no foreign material enter the air induction
system. The engine and turbocharger are
susceptible to damage from even small
particles.
Change the air filter element at the proper
interval. See Scheduled Maintenance (page
528).
Note: Failure to use the correct air filter
element may result in severe engine
damage. The customer warranty may be
void for any damage to the engine if the
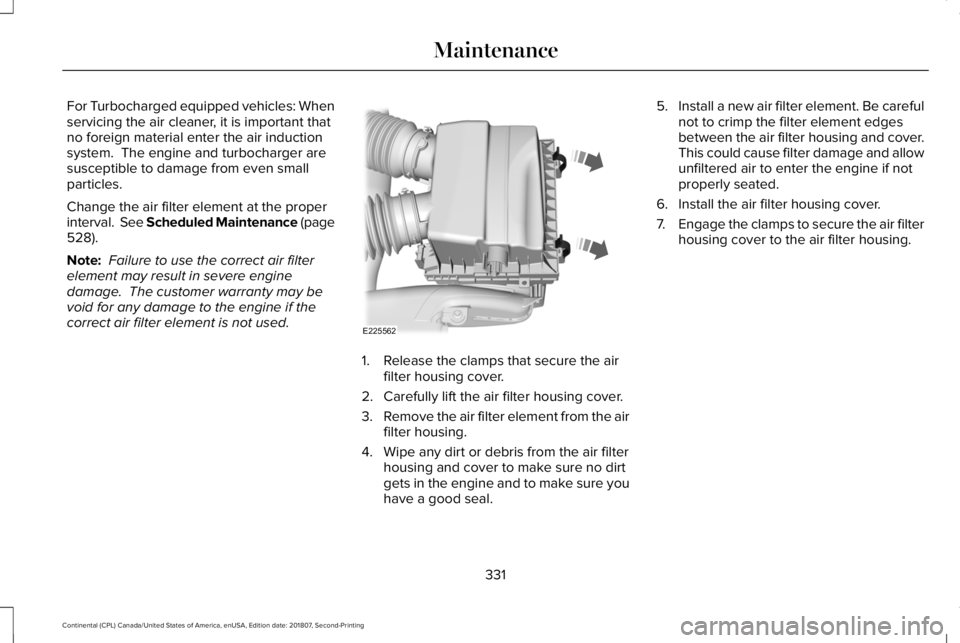
correct air filter element is not used. 1. Release the clamps that secure the air
filter housing cover.
2. Carefully lift the air filter housing cover.
3. Remove the air filter element from the air
filter housing.
4. Wipe any dirt or debris from the air filter housing and cover to make sure no dirt
gets in the engine and to make sure you
have a good seal. 5.
Install a new air filter element. Be careful
not to crimp the filter element edges
between the air filter housing and cover.
This could cause filter damage and allow
unfiltered air to enter the engine if not
properly seated.
6. Install the air filter housing cover.
7. Engage the clamps to secure the air filter
housing cover to the air filter housing.
331
Continental (CPL) Canada/United States of America, enUSA, Edition date: 201807, Second-Printing MaintenanceE225562
Page 335 of 627
GENERAL INFORMATION
Your dealer has many quality products
available to clean your vehicle and protect
its finishes.
CLEANING PRODUCTS
Materials
For best results, use the following products
or products of equivalent quality: Specification
Name
Motorcraft® Bug and Tar Remover, ZC-42 (U.S. & Canada) ESR-M5B194-B
Motorcraft® Custom Bright Metal Cleaner, ZC-15 (U.S. & Canada)
ESR-M14P4-A
Motorcraft® Detail Wash, ZC-3-A (U.S. & Canada)
ESR-M14P3-A
Motorcraft® Engine Shampoo and Degreaser, ZC-20 (U.S.)
Motorcraft® Engine Shampoo, CXC-66-A (Canada)
Motorcraft® Premium Leather and Vinyl Cleaner, ZC-56 (U.S. & Canada)
Motorcraft® Multi-Purpose Cleaner, CXC-101 (Canada)
WSS-M14P19-A
Motorcraft® Premium Windshield Wash Concentrate with Bitterant, ZC-32-B2 (U.S.)
WSS-M14P19-A
Motorcraft® Premium Quality Windshield Washer Fluid, CXC-37-A/B/D/F (Canada)
Motorcraft® Professional Strength Carpet & Upholstery Cleaner, ZC-54 (U.S. & Canada)
ESR-M14P5-A
Motorcraft® Premium Glass Cleaner, CXC-100 (Canada)
332
Continental (CPL) Canada/United States of America, enUSA, Edition date: 201807, Second-Printing Vehicle Care
Page 338 of 627
•
Do not allow wax to come in contact with
any non-body (low-gloss black) colored
trim. The wax will discolor or stain the
parts over time.
•Roof racks.
• Bumpers.
• Grained door handles.
• Side moldings.
• Mirror housings.
• Windshield cowl area.
• Do not apply wax to glass areas.
• After waxing, your car's paint should feel
smooth, and be free of streaks and
smudges.
CLEANING THE ENGINE
Engines are more efficient when they are
clean because grease and dirt buildup keep
the engine warmer than normal. When washing:
•
Take care when using a power washer
to clean the engine. The high-pressure
fluid could penetrate the sealed parts
and cause damage.
• Do not spray a hot engine with cold water
to avoid cracking the engine block or
other engine components.
• Spray Motorcraft Engine Shampoo and
Degreaser on all parts that require
cleaning and pressure rinse clean. In
Canada, use Motorcraft Engine Shampoo.
Note: If your vehicle has an engine cover
remove the cover before application of
Motorcraft Engine Shampoo and Degreaser.
Immediately rinse away any over spray.
• Never wash or rinse the engine while it
is hot or running; water in the running
engine may cause internal damage.
• Never wash or rinse any ignition coil,
spark plug wire or spark plug well, or the
area in and around these locations.
• Cover the battery, power distribution box,
and air filter assembly to prevent water
damage when cleaning the engine. CLEANING THE WINDOWS AND
WIPER BLADES
Car wash chemicals and environmental
fallout can result in windshield and wiper
blade contamination. Dirty windshield and
wipers will result in poor windshield wiper
operation. Keep the windshield and wiper
blades clean to maintain windshield wiper
performance.
To clean the windshield and wiper blades:
•
Clean the windshield with a non-abrasive
glass cleaner. When cleaning the interior
of the windshield, avoid getting any glass
cleaner on the instrument panel or door
panels. Wipe any glass cleaner off these
surfaces immediately.
• For windshields contaminated with tree
sap, chemicals, wax or bugs, clean the
entire windshield using steel wool (no
greater than 0000 grade) in a circular
motion and rinse with water.
• Clean the wiper blades with isopropyl
rubbing alcohol or windshield washer
concentrate.
335
Continental (CPL) Canada/United States of America, enUSA, Edition date: 201807, Second-Printing Vehicle Care
Page 343 of 627
VEHICLE STORAGE
If you plan on storing your vehicle for 30
days or more, read the following
maintenance recommendations to make sure
your vehicle stays in good operating
condition.
We engineer and test all motor vehicles and
their components for reliable, regular driving.
Under various conditions, long-term storage
may lead to degraded engine performance
or failure unless you use specific precautions
to preserve engine components.
General
•
Store all vehicles in a dry, ventilated
place.
• Protect from sunlight, if possible.
• If vehicles are stored outside, they
require regular maintenance to protect
against rust and damage. Body
•
Wash your vehicle thoroughly to remove
dirt, grease, oil, tar or mud from exterior
surfaces, rear-wheel housing and the
underside of front fenders.
• Periodically wash your vehicle if it is
stored in exposed locations.
• Touch-up exposed or primed metal to
prevent rust.
• Cover chrome and stainless steel parts
with a thick coat of auto wax to prevent
discoloration. Re-wax as necessary when
you wash your vehicle.
• Lubricate all hood, door and luggage
compartment hinges and latches with a
light grade oil.
• Cover interior trim to prevent fading.
• Keep all rubber parts free from oil and
solvents. Engine
•
Change the engine oil and filter prior to
storage because used engine oil contains
contaminates which may cause engine
damage.
• Start the engine every 15 days for a
minimum of 15 minutes. Run at fast idle
with the climate controls set to defrost
until the engine reaches normal
operating temperature.
• With your foot on the brake, shift through
all the gears while the engine is running.
• We recommend that you change the
engine oil before you use your vehicle
again.
Fuel system
• Fill the fuel tank with high-quality fuel
until the first automatic shutoff of the fuel
pump nozzle.
340
Continental (CPL) Canada/United States of America, enUSA, Edition date: 201807, Second-Printing Vehicle Care
Page 365 of 627
necessary. Check the air pressure in the road
tires. If any tire is under-inflated, carefully
drive the vehicle to the nearest location
where air can be added to the tires. Inflate
all the tires to the recommended inflation
pressure.
Tire Pressure Monitoring System Reset
Procedure
WARNING: To determine the
required pressure(s) for your vehicle, see
the Safety Compliance Certification Label
(on the door hinge pillar, door-latch post
or the door edge that meets the door-latch
post, next to the driver seat) or the Tire
Label on the B-Pillar or the edge of the
driver door.
Note: You need to perform the tire pressure
monitoring system reset procedure after
each tire rotation. To provide the vehicle's load carrying
capability, some vehicles require different
recommended tire pressures in the front tires
as compared to the rear tires. The tire
pressure monitoring system equipped on
these vehicles is designed to illuminate the
low tire pressure warning light at two
different pressures; one for the front tires
and one for the rear tires.
Since tires need to be rotated to provide
consistent performance and maximum tire
life, the tire pressure monitoring system
needs to know when the tires are rotated to
determine which set of tires are on the front
and which are on the rear. With this
information, the system can detect and
properly warn of low tire pressures.
System reset tips:
•
To reduce the chances of interference
from another vehicle, perform the system
reset procedure at least
3 ft (1 m) away
from another Ford Motor Company
vehicle undergoing the system reset
procedure at the same time.
• Do not wait more than two minutes
between resetting each tire sensor or the
system can time-out and you have to
repeat the entire procedure on all four
wheels.
• A double horn sounds indicating the
need to repeat the procedure.
Performing the System Reset Procedure
Read the entire procedure before attempting.
1. Drive the vehicle above
20 mph
(32 km/h) for at least two minutes, then
park in a safe location where you can
easily get to all four tires and have access
to an air pump.
2. Place the ignition in the off position and keep the key in the ignition.
3. Cycle the ignition to the on position with
the engine off.
362
Continental (CPL) Canada/United States of America, enUSA, Edition date: 201807, Second-Printing Wheels and Tires
Page 368 of 627

Use of one of the dissimilar spare tires listed
above at any one wheel location can lead to
impairment of the following:
•
Handling, stability and braking
performance.
• Comfort and noise.
• Ground clearance and parking at curbs.
• Winter weather driving capability.
• Wet weather driving capability.
• All-wheel driving capability, if applicable.
3. Full-size dissimilar spare without label
on wheel
When driving with the full-size dissimilar
spare wheel and tire assembly, do not:
• Exceed
70 mph (113 km/h).
• Use more than one dissimilar spare
wheel and tire assembly at a time.
• Use commercial car washing equipment.
• Use snow chains on the end of the
vehicle with the dissimilar spare wheel
and tire assembly. The usage of a full-size dissimilar spare
wheel and tire assembly can lead to
impairment of the following:
•
Handling, stability and braking
performance.
• Comfort and noise.
• Ground clearance and parking at curbs.
• Winter weather driving capability.
• Wet weather driving capability.
• All-wheel driving capability.
When driving with the full-size dissimilar
spare wheel and tire assembly additional
caution should be given to:
• Towing a trailer.
• Driving vehicles equipped with a camper
body.
• Driving vehicles with a load on the cargo
rack.
Drive cautiously when using a full-size
dissimilar spare wheel and tire assembly and
seek service as soon as possible. Tire Change Procedure
(If Equipped) WARNING:
The jack supplied with
this vehicle is only intended for changing
wheels. Do not use the vehicle jack other
than when you are changing a wheel in an
emergency. WARNING:
The jack should be used
on level firm ground wherever possible. WARNING:
Check that the vehicle
jack is not damaged or deformed and the
thread is lubricated and clean. WARNING:
Never place anything
between the vehicle jack and the ground. WARNING:
Never place anything
between the vehicle jack and your vehicle. WARNING:
Use only the specified
jacking points. If you use other positions,
you may damage the body, steering,
suspension, engine, braking system or the
fuel lines.
365
Continental (CPL) Canada/United States of America, enUSA, Edition date: 201807, Second-Printing Wheels and Tires
Page 376 of 627

ENGINE SPECIFICATIONS - 2.7L
Specification
Measurement
164
Cubic inches.
1-4-2-5-3-6
Firing order.
10.0:1
Compression ratio.
0.028–0.031 in (0.7–0.8 mm)
Spark plug gap.
Coil in plug
Ignition system.
Drivebelt Routing 373
Continental (CPL) Canada/United States of America, enUSA, Edition date: 201807, Second-Printing Capacities and SpecificationsE275291