Page 25 of 98
25
ES300h_QG_OM33D23U_(U)
To enter S mode, shift the shift lever to S. Shift ranges can be selected by operating the shift
lever or paddle shift switches, allowing you to drive in the shift range of your choosing.
1Upshifting
2Downshifting
The selected shift range, from S1 to S6, will
be displayed in the meter.
The initial shift range in S mode is set auto-
matically to S5 or S4 according to vehicle’s
speed.
Selecting shift ranges in the S mode
■ Shift ranges and their functions
●You can choose from 6 levels of accele rating force and engine braking force.
● A lower shift range will provide greater ac celerating force and engine braking force
than a higher shift range, and the en gine revolutions will also increase.
● If you accelerate while in ranges 1 to 4, the shift range may automatically increase in
accordance with the vehicle’s speed.
Page 26 of 98
26
ES300h_QG_OM33D23U_(U)
1Right turn
2Lane change to the right (move the
lever partway and release it)
The right hand signals will flash 3 times.
3Lane change to the left (move the lever
partway and release it)
The left hand signals will flash 3 times.
4Left turn
Turn Signal Lever
Page 27 of 98
27
ES300h_QG_OM33D23U_(U)
The parking brake can be set and released manually.
U.S.A.
Canada
1Push the switch to set the parking
brake
The parking brake indicator light will
turn on.
Press and hold the parking brake
switch if an emergency occurs and it is
necessary to operate the parking
brake while driving.
2Pull the switch to release the parking
brake
• Operate the parking brake switchwhile depressing the brake pedal.
• Using the parking brake automatic release function, the parking brake
can be released by depressing the
accelerator pedal. When using this
function, slowly depress the acceler-
ator pedal.
Make sure that the parking brake indi-
cator light turn off.
Parking Brake
The parking brake can be set or re leased automatically or manually.
Using the manual mode
A
B
Page 28 of 98
28
ES300h_QG_OM33D23U_(U)
In automatic mode, the parking brake can be set or released automatically according to shift
lever operation. Also, even in automatic mo de, the parking brake can be set or released
manually.
While the vehicle is stopped, press and hold
the parking brake switch until a message is
shown on the multi-information display
When the automatic mode is turned on, the
parking brake operates as follows.
●When the shift lever is shifted from P, the
parking brake will be released, and the
parking brake indicator light will turn off.
● When the shift lever is shifted to P, the
parking brake will be set, and the park-
ing brake indicator light will turn on.
Operate the shift lever with the vehicle stopped and the brake pedal depressed.
While the vehicle is stopped, pull and hold
the parking brake switch until a message is
shown on the multi-information display
Turns automatic mode on
Turns automatic mode off
Page 29 of 98
29
ES300h_QG_OM33D23U_(U)
Press the brake hold switch to turn the sys-
tem on
The brake hold standby indicator comes
on. While the system is holding the brake,
the brake hold operated indicator
comes on.
Brake Hold
The brake hold system keeps the brake applied wh en the shift lever is in D, S or N with the
system on and the brake pedal has been depressed to stop the vehicle. The system
releases the brake when the accelerator pedal is depressed with the shift lever in D or S to
allow smooth start off.
A
B
Page 30 of 98
 30
ES300h_QG_OM33D23U_(U)
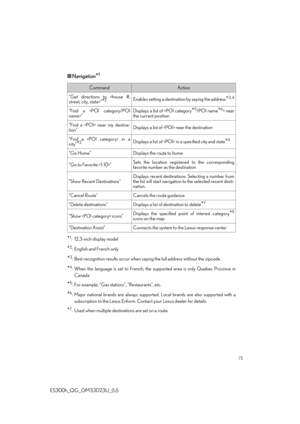
■Display
By selecting menu icons on the multi-infor-
mation display, a variety of driving-related
information can be displayed. The multi-
information display can also be u")
30
ES300h_QG_OM33D23U_(U)
■Display
By selecting menu icons on the multi-infor-
mation display, a variety of driving-related
information can be displayed. The multi-
information display can also be used to
change display settings and other vehicle
settings.
Warning or suggestion/advice pop-up dis-
plays are also displayed in certain situations.
■Menu icons
The menu icons will be displayed by pressing or of the meter control switches.
Multi-information Display
The multi-information display presents the driver with a variety of vehicle data.
Display and menu icons
Driving information display
Select to display various drive data.
Navigation system-linked display (if equipped)
Select to display the following na vigation system-linked information.
• Route guidance to destination
• Compass display (heading-up display)
Audio system-linked display
Select to enable selection of an audio source or track on the meter using the
meter control switches.
Driving support system information display
Select to display the operational status of the following systems:
• LTA (Lane Tracing Assist)
• Dynamic radar cruise cont rol with full-speed range
• RSA (Road Sign Assist) (if equipped)
Page 31 of 98
31
ES300h_QG_OM33D23U_(U)
/ : Select menu icons
/ : Change displayed content,
scroll up/down the screen and move
the cursor up/down
Press: Enter/Set
Press and hold: Reset
Return to the previous screen
Warning message display
Select to display warning messages and me
asures to be taken if a malfunction is
detected.
Settings display
Select to change the meter display settings
Changing the meter display
A
B
C
Page 32 of 98
32
ES300h_QG_OM33D23U_(U)
Illustrations used in this text are intended as examples, and may differ from the image that is
actually displayed by the head-up display.
Driving support system display area
Navigation system-linked di splay area (if equipped)
Driving informat ion display area
Hybrid System Indicator/tachometer display area
Head-up display switch
Head-up Display (if equipped)
The head-up display projects a variety of dr iving-related information and the operating
state of the driving support systems on the windshield.
System components
A
B
C
D


 25
ES300h_QG_OM33D23U_(U)
To enter S mode, shift the shift lever to S. Shift ranges can be selected by operating the shift
lever or paddle shift switches, allowing you to drive in the shift range of")
 26
ES300h_QG_OM33D23U_(U)
1Right turn
2Lane change to the right (move the
lever partway and release it)
The right hand signals will flash 3 times.
3Lane change to the left (move the lever
partway and")
 27
ES300h_QG_OM33D23U_(U)
The parking brake can be set and released manually.
U.S.A.
Canada
1Push the switch to set the parking
brake
The parking brake indicator light will
turn on.
Press and hold the")
 28
ES300h_QG_OM33D23U_(U)
In automatic mode, the parking brake can be set or released automatically according to shift
lever operation. Also, even in automatic mo de, the parking brake can be set or r")
 29
ES300h_QG_OM33D23U_(U)
Press the brake hold switch to turn the sys-
tem on
The brake hold standby indicator comes
on. While the system is holding the brake,
the brake hold operated indicator
com")
 31
ES300h_QG_OM33D23U_(U)
/ : Select menu icons
/ : Change displayed content,
scroll up/down the screen and move
the cursor up/down
Press: Enter/Set
Press and hold: Reset
Return to the previous screen")
 32
ES300h_QG_OM33D23U_(U)
Illustrations used in this text are intended as examples, and may differ from the image that is
actually displayed by the head-up display.
Driving support system display area")