2019 Lexus ES300h tires
[x] Cancel search: tiresPage 337 of 456

3376-3. Do-it-yourself maintenance
6
Maintenance and care
Use only Lexus wheel nuts and
wrenches designed for use with
your aluminum wheels.
When rotating, repairing or chang-
ing your tires, check that the wheel
nuts are still tight after driving 1000
miles (1600 km).
Vehicles with 17-inch tires: Be care-
ful not to damage the aluminum
wheels when using tire chains.
Use only Lexus genuine balance
weights or equivalent and a plastic or rubber hammer when balancing
your wheels.
WARNING
●Never use an inner tube in a leaking
wheel which is designed for a tubeless
tire. Doing so may result in an acci-
dent, causing death or serious injury.
■Use of defective wheels prohibited
Do not use cracked or deformed wheels.
Doing so could cause the tire to leak air
during driving, possibly causing an acci-
dent.
NOTICE
■Replacing tire pressure warning
valves and transmitters
●Because tire repair or replacement
may affect the tire pressure warning
valves and transmitters, make sure to
have tires serviced by your Lexus
dealer or other qualified service shop.
In addition, make sure to purchase
your tire pressure warning valves and
transmitters at your Lexus dealer.
●Ensure that only genuine Lexus wheels
are used on your vehicle.
Tire pressure warning valves and trans-
mitters may not work properly with
non-genuine wheels.
Aluminum wheel precautions
Page 356 of 456
3567-2. Steps to take in an emergency
7Shift the shift lever to N and release
the parking brake.
When the shift lever cannot be shifted:
P.142
■While towing
If the hybrid system is off, the power assist
for the brakes and steering will not function,
making steering and braking more difficult.
■Wheel nut wrench
Wheel nut wrench is installed in trunk.
( P.373)
Fluid leaks under the vehicle. (Water
dripping from the air conditioning
after use is normal.)
Flat-looking tires or uneven tire
wear
Engine coolant temperature gauge
continually points higher than nor-
mal.
Changes in exhaust sound
Excessive tire squeal when corner-
ing
Strange noises related to the sus-
pension system
Pinging or other noises related to
the hybrid system
Engine missing, stumbling or run-
ning roughly
Appreciable loss of power
Vehicle pulls heavily to one side
when braking
If you think something is
wrong
If you notice any of the following
symptoms, your vehicle probably
needs adjustment or repair. Con-
tact your Lexus dealer as soon as
possible.
Visible symptoms
Audible symptoms
Operational symptoms
Page 366 of 456

3667-2. Steps to take in an emergency
■Electric power steering system warning
light (warning buzzer)
When the 12-volt battery charge becomes
insufficient or the voltage temporarily
drops, the electric po wer steering system
warning light may come on and the warning
buzzer may sound.
■When the tire pressure warning light
comes on
Inspect the tires to check if a tire is punc-
tured.
If a tire is punctured: P.372
If none of the tires are punctured:
Turn the power switch off then turn it to ON
mode. Check if the tire pressure warning
light comes on or blinks.
If the tire pressure warning light blinks for
approximately 1 minute then stays on
There may be a malfunction in the tire pres-
sure warning system. Have the vehicle
inspected by your Lexus dealer immedi-
ately.
If the tire pressure warning light comes
on
1
After the temperature of the tires has
lowered sufficiently, check the inflation
pressure of each tire and adjust them to
the specified level.
2
If the warning light does not turn off
even after several minutes have
elapsed, check that the inflation pres-
sure of each tire is at the specified level
and perform initialization. ( P.331)
■The tire pressure warning light may
come on due to natural causes
The tire pressure warning light may come
on due to natural causes such as natural air
leaks and tire inflation pressure changes
caused by temperature. In this case, adjust-
ing the tire inflation pressure will turn off the
warning light (after a few minutes).
■When a tire is replaced with a spare tire
The compact spare tire is not equipped with
a tire pressure warning valve and transmit-
ter. If a tire goes flat, the tire pressure warn-
ing light will not turn off even though the flat
tire has been replaced with the spare tire.
Replace the spare tire with the repaired tire and adjust the tire inflation pressure. The
tire pressure warning light will go off after a
few minutes.
■Conditions that the tire pressure warn-
ing system may not function properly
P.329
WARNING
■If both the ABS and the brake system
warning lights remain on
Stop your vehicle in a safe place immedi-
ately and contact your Lexus dealer.
The vehicle will become extremely
unstable during braking, and the ABS
system may fail, which could cause an
accident resulting in death or serious
injury.
■When the electric power steering
system warning light comes on
When the light comes on yellow, the
assist to the power st eering is restricted.
When the light comes on red, the assist
to the power steering is lost and handling
operations of the steering wheel become
extremely heavy.
When steering wheel operations are
heavier than usual, grip the steering
wheel firmly and operate it using more
force than usual.
■If the tire pressure warning light
comes on
Be sure to observe the following precau-
tions.
Failure to do so could cause a loss of
vehicle control and result in death or
serious injury.
●Stop your vehicle in a safe place as
soon as possible. Check and adjust the
tire inflation pre ssure immediately.
●If the tire pressure warning light comes
on even after tire inflation pressure
adjustment, it is prob able that you have
a flat tire. Check the tire s. If a tire is flat,
change it with the spare tire and have
the flat tire repaired by the nearest
Lexus dealer.
Page 367 of 456
3677-2. Steps to take in an emergency
7
When trouble arises
WARNING
●Avoid abrupt maneuvering and brak-
ing.
If the vehicle tires deteriorate, you
could lose control of the steering
wheel or the brakes.
■If a blowout or sudden air leakage
should occur
The tire pressure warning system may
not activate immediately.
■Maintenance of the tires
Each tire, including the spare (if pro-
vided), should be checked monthly when
cold and inflated to the inflation pressure
recommended by the vehicle manufac-
turer on the vehicle placard or tire infla-
tion pressure label (tire and load
information label). (If your vehicle has
tires of a different size than the size indi-
cated on the vehicle placard or tire infla-
tion pressure label [tire and load
information label], yo u should determine
the proper tire infl ation pressure for
those tires.)
As an added safety feature, your vehicle
has been equipped with a tire pressure
monitoring system (TPMS-tire pressure
warning system) that illuminates a low
tire pressure telltale (tire pressure warn-
ing light) when one or more of your tires
is significantly under-inflated. Accord-
ingly, when the low tire pressure telltale
(tire pressure warnin g light) illuminates,
you should stop and check your tires as
soon as possible, and inflate them to the
proper pressure. Driving on a signifi-
cantly under-inflated tire causes the tire
to overheat and can lead to tire failure.
Under-inflation also reduces fuel effi-
ciency and tire tread life, and may affect
the vehicle’s handling and stopping abil-
ity.
Please note that the TPMS (tire pressure
warning system) is not a substitute for
proper tire maintenance, and it is the
driver’s responsibility to maintain correct
tire pressure, even if under-inflation has
not reached the level to trigger illumina-
tion of the TPMS low tire pressure telltale
(tire pressure warning light).
Your vehicle has also been equipped with
a TPMS (tire pressure warning system)
malfunction indicator to indicate when
the system is not operating properly. The
TPMS (tire pressure warning system)
malfunction indicator is combined with
the low tire pressure telltale (tire pres-
sure warning light) . When the system
detects a malfunction, the telltale will
flash for approximately one minute and
then remain continuously illuminated.
This sequence will continue upon subse-
quent vehicle start-ups as long as the
malfunction exists. When the malfunction
indicator is illuminated, the system may
not be able to detect or signal low tire
pressure as intended.
TPMS (tire pressure warning system)
malfunctions may occur for a variety of
reasons, including the installation of
replacement or alternate tires or wheels
on the vehicle that prevent the TPMS
(tire pressure warning system) from func-
tioning properly. Always check the
TPMS (tire pressure warning system)
malfunction telltale after replacing one
or more tires or wheels on your vehicle to
ensure that the replacement or alternate
tires and wheels allow the TPMS (tire
pressure warning system) to continue to
function properly.
NOTICE
■To ensure the tire pressure warning
system operates properly
Do not install tires with different specifi-
cations or makers, as the tire pressure
warning system may not operate prop-
erly.
Page 372 of 456
3727-2. Steps to take in an emergency
clean them.
• If the warning message is shown when the air intake vents and filters of the
hybrid battery (traction battery) are not
dirty, have the vehicle inspected by your
Lexus dealer.
Stop the vehicle in a safe place on a
hard, flat surface.
Set the parking brake.
Shift the shift lever to P.
Stop the hybrid system.
Turn on the emergency flashers.
( P.350)
NOTICE
■If “High Power Consumption Power
to Climate Temporarily Limited” is
displayed frequently
There is a possible malfunction relating
to the charging system or the 12-volt bat-
tery may be deteriorating. Have the vehi-
cle inspected by your Lexus dealer.
■If “Low Auxiliary Battery” is displayed
frequently
The 12-volt battery may have deterio-
rated. As the battery may discharge in
this state when left unattended, have the
battery inspected by your Lexus dealer.
If you have a flat tire
Your vehicle is equipped with a
spare tire. The flat tire can be
replaced with the spare tire.
For details about tires: P.326
WARNING
■If you have a flat tire
Do not continue driving with a flat tire.
Driving even a short distance with a flat
tire can damage the tire and the wheel
beyond repair, which could result in an
accident.
Before jacking up the vehicle
Page 373 of 456
3737-2. Steps to take in an emergency
7
When trouble arises
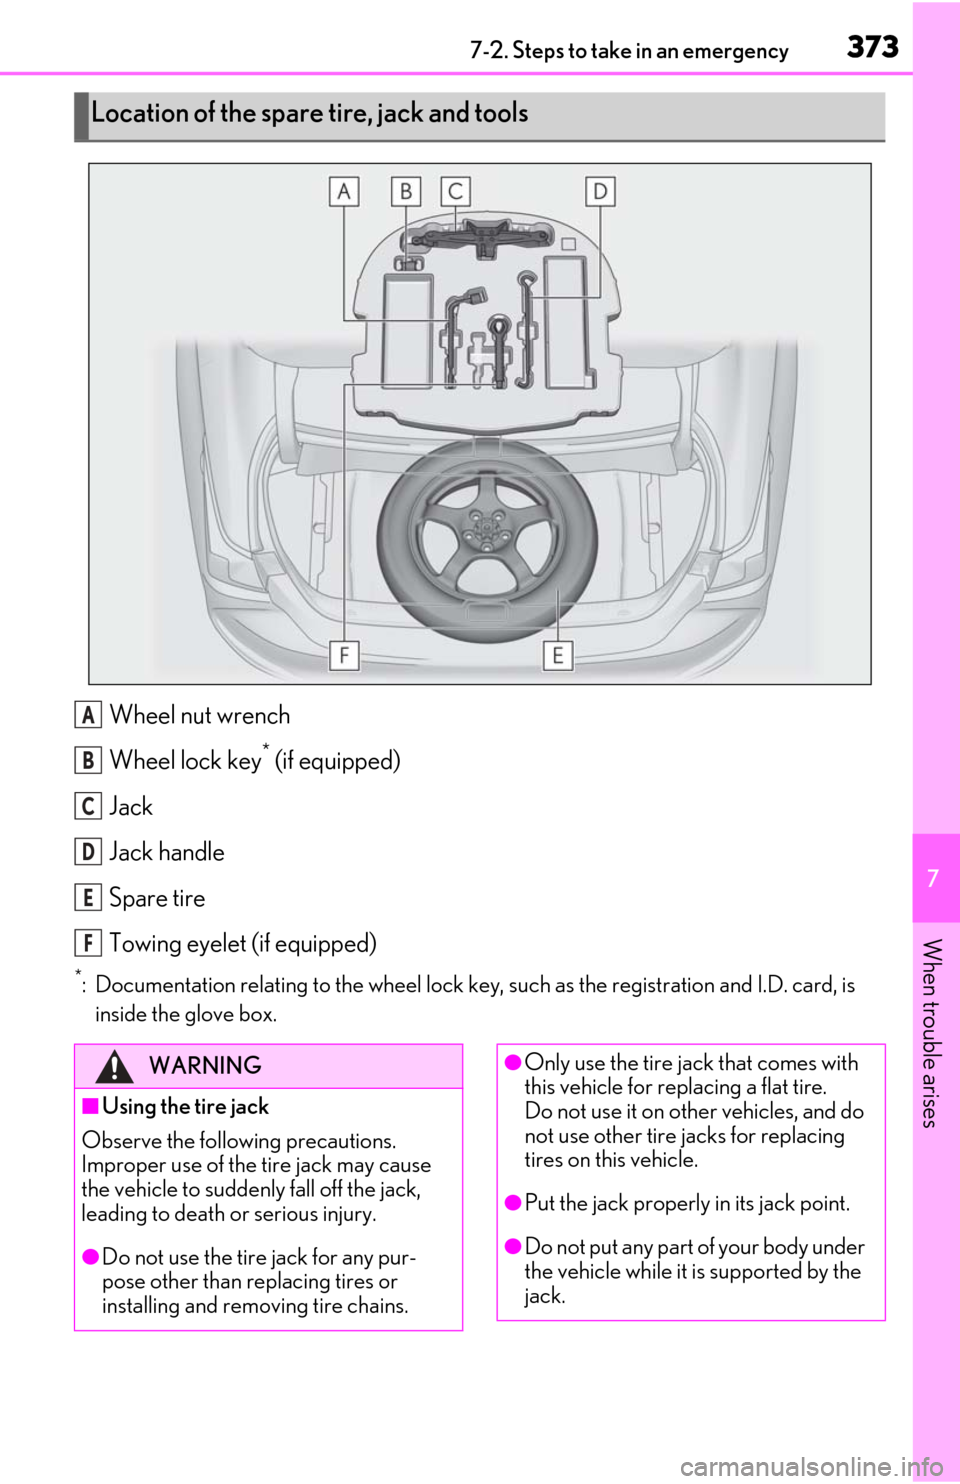
Wheel nut wrench
Wheel lock key
* (if equipped)
Jack
Jack handle
Spare tire
Towing eyelet (if equipped)
*: Documentation relating to the wheel lock key, such as the registration and I.D. card, is
inside the glove box.
Location of the spare tire, jack and tools
A
B
C
D
E
F
WARNING
■Using the tire jack
Observe the following precautions.
Improper use of the tire jack may cause
the vehicle to suddenly fall off the jack,
leading to death or serious injury.
●Do not use the tire jack for any pur-
pose other than replacing tires or
installing and removing tire chains.
●Only use the tire jack that comes with
this vehicle for replacing a flat tire.
Do not use it on other vehicles, and do
not use other tire jacks for replacing
tires on this vehicle.
●Put the jack properly in its jack point.
●Do not put any part of your body under
the vehicle while it is supported by the
jack.
Page 374 of 456

3747-2. Steps to take in an emergency
When replacing tires on a vehicle with
wheel lock nuts, use the following pro-
cedures to remove and install the
wheel lock nuts. The wheel lock key is
stored in the tray inside the luggage
compartment. Always return the wheel
lock key to its original position after
use, so that it does not get lost.
■Removal
For ease of removal, the wheel lock nut
should always be the first one loos-
ened.
1
Place the wheel lock key on top of
the wheel lock nut, turning until the
wheel lock key and wheel lock nut
patterns engage.
2
Place the wheel nut wrench on the
wheel lock key, and while applying pressure on the wheel lock key,
loosen the wheel lock nut.
■Installation
For ease of installation, the wheel lock
nut should always be the last one tight-
ened.
1
By hand, install a wheel lock nut on
each wheel.
2
Place the wheel lock key on top of
the wheel lock nut, turning until the
wheel lock key and wheel lock nut
patterns engage.
3
Place the wheel nut wrench on the
wheel lock key, and while applying
pressure on the wheel lock key,
tighten the wheel lock nut to the
recommended torque.
1
Open the trunk.
2
Pull the lever upwards when lifting
the luggage mat up.
WARNING
●Do not start the hybrid system or drive
the vehicle while the vehicle is sup-
ported by the jack.
●Do not raise the vehicle while some-
one is inside.
●When raising the vehicle, do not put an
object on or under the jack.
●Do not raise the vehicle to a height
greater than that required to replace
the tire.
●Use a jack stand if it is necessary to get
under the vehicle.
●When lowering the vehicle, make sure
that there is no-one near the vehicle. If
there are people nearby, warn them
vocally before lowering.
Wheel lock nut (if equipped)
NOTICE
Do not use an impact wrench. Using an
impact wrench may cause permanent
damage to wheel lock nut and wheel lock
key. If in doubt about wheel lock applica-
tion, contact your Lexus dealer.
Taking out the jack
Page 375 of 456
3757-2. Steps to take in an emergency
7
When trouble arises
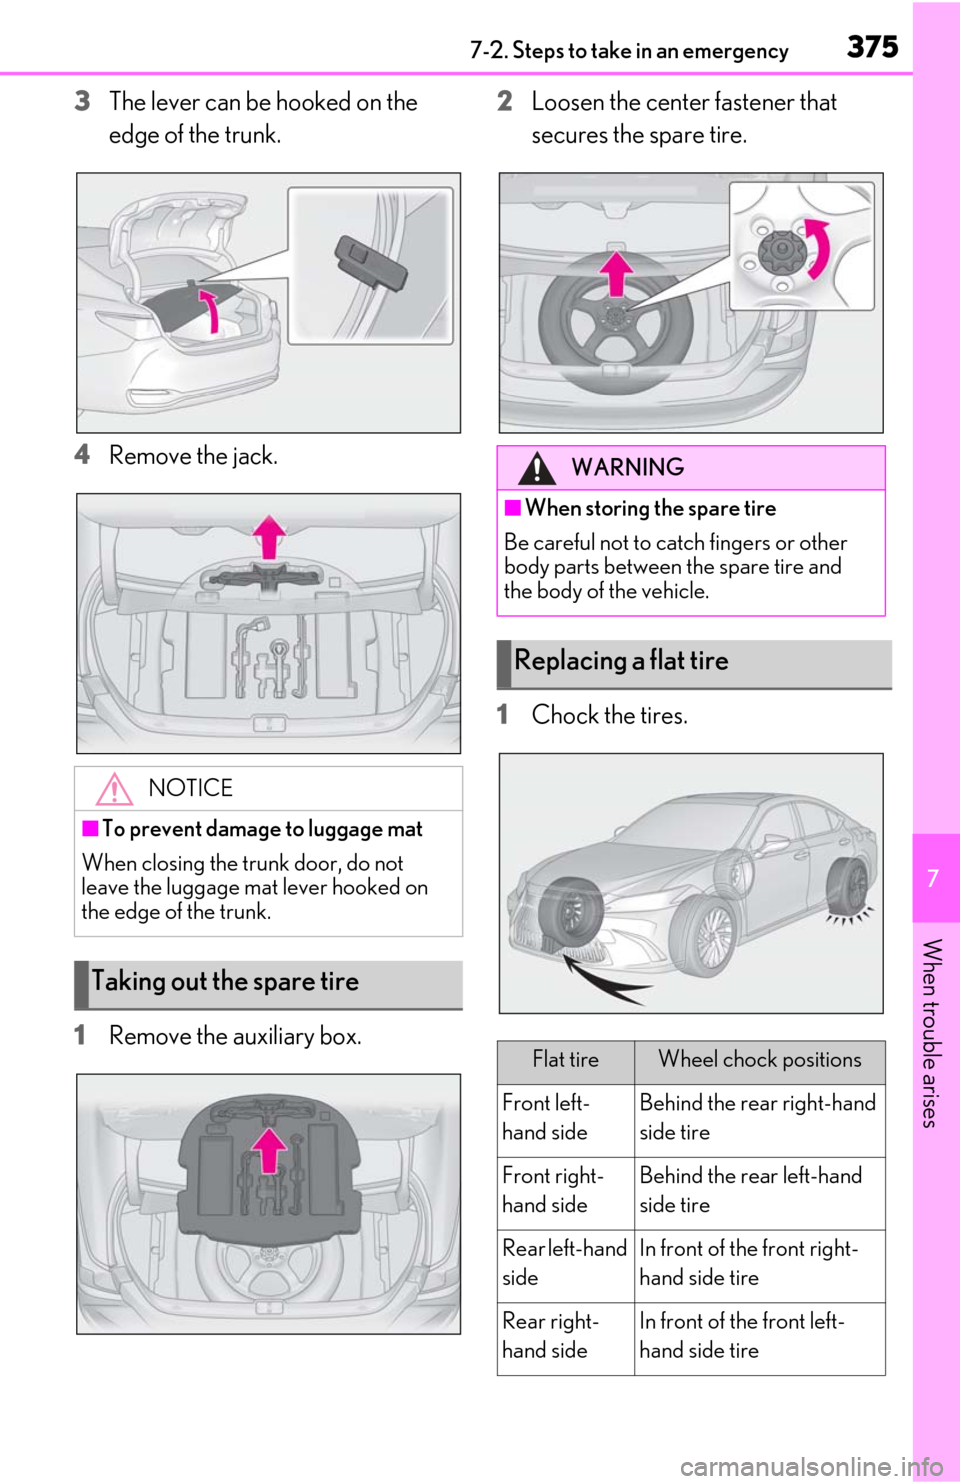
3The lever can be hooked on the
edge of the trunk.
4
Remove the jack.
1
Remove the auxiliary box. 2
Loosen the center fastener that
secures the spare tire.
1
Chock the tires.
NOTICE
■To prevent damage to luggage mat
When closing the trunk door, do not
leave the luggage mat lever hooked on
the edge of the trunk.
Taking out the spare tire
WARNING
■When storing the spare tire
Be careful not to catch fingers or other
body parts between the spare tire and
the body of the vehicle.
Replacing a flat tire
Flat tireWheel chock positions
Front left-
hand sideBehind the rear right-hand
side tire
Front right-
hand sideBehind the rear left-hand
side tire
Rear left-hand
sideIn front of the front right-
hand side tire
Rear right-
hand sideIn front of the front left-
hand side tire