Page 33 of 50

31
CENTER PANEL
ALWAYS CHECK THE OWNER’S MANUAL FOR COMPLETE OPER ATING INFORMATION AND SAFET Y WARNINGS *IF EQUIPPED †LEGAL DISCL AIMERS ON BACK INSIDE COVER
To start the vehicle:
1 Turn off all electrical devices
2 Depress the brake pedal
3 Press the POWER button while gear shift is in P (Park)
When the Ready Indicator Light is ON (located in the top left corner
of the LCD screen of the Instrument Cluster), the vehicle can be driven
To turn the power off, press the POWER button again, and ensure the gear
shift is in (P) Park
To use the POWER button, you must have the Smart Key fob on your
person or inside the vehicle
P
POWER
EV Power Button and Smart Key Video To view a video on your mobile device, snap this QR Code or visit the listed website
Refer to page 2 for more information
www.youtube.com/KiaFeatureVideos
AB
QR CODE Power Button†8
REMINDERS:
•When the Ready Indicator Light is illuminated, the vehicle can be operated
•Do not operate the vehicle if the Ready Indicator Light is not illuminated
•
In an emergency situation while the vehicle is in motion, you are able to turn the vehicle off by pressing the Power button for more than 2 seconds or 3 times within 3 seconds
•
If Smart Key fob battery is dead, with the lock button facing the POWER button, hold the fob up against the POWER button and press
To use electrical accessories: Accessory position • When in the OFF position (no light) and without depressing the brake pedal, press the POWER button once (Amber light A )
On position • When already in the ACC position (Amber light A ) and without depressing the brake pedal, press the POWER button again (Reddish-orange light B )
• When in the OFF position (no light) and without depressing the brake pedal, press the POWER button twice (Reddish-orange light B )
Keeping the vehicle in ACC or the ON position without driving may discharge the vehicle’s battery.
QUICK TIPS
For more info and detail steps on how to start the vehicle, please refer to the Owner’s Manual.
(Located on Center Panel near Gear Shift)
Page 34 of 50

Electronic Parking Brake Video To view a video on your mobile device, snap this")
32*IF EQUIPPED SOUL EV FEATURES & FUNCTIONS GUIDE
CENTER PANEL
ACTIVE ECOECOOFF
ECOOFF
A
(Located below Gear Shift)
Electronic Parking Brake Video To view a video on your mobile device, snap this QR Code or visit the listed website
Refer to page 2 for more information
www.youtube.com/KiaFeatureVideos
QR CODEElectronic Parking Brake (EPB)
The Electronic Parking Brake (EPB) system utilizes an electric motor to engage the
parking brake
Applying the Parking Brake
Depress the brake pedal and pull up the EPB switch A Ensure that the
indicator light is illuminated on the instrument cluster
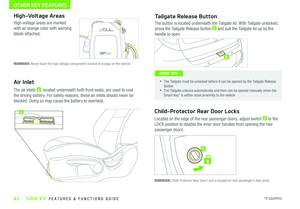
Releasing the Parking Brake
The EPB will automatically release when the shifter is placed in Reverse or Drive
To release EPB manually, depress the brake pedal, then press the EPB switch A, with
the ignition switch in the ON position Ensure that the indicator light i s O F F
REMINDERS:
• EPB will not release unless the hood, liftgate and all doors are closed and seat belts are fastened
•
As a bulb check, the EPB malfunction indicator will illuminate for approximately 3 seconds when the ignition switch is turned ON
•
If the warning light does not illuminate temporarily, or continues to remain lit, take your vehicle to an authorized Kia dealer and have the system checked
• The EPB should not be operated while the vehicle is moving
•
A click or electric brake motor sound may be heard while operating or releasing the EPB, but these conditions are normal and indicate that the EPB is functioning properly
•
•When leaving your keys with parking lot attendants or valet, make sure to inform them how to operate the EPB
•If parked on a steep incline/decline, pull up the EPB switch for more than 3 seconds for a firmer EPB application
•Pull up and hold EPB switch again to increase brake pressure if parked on a decline or incline
QUICK TIPS
Page 35 of 50
*IF EQUIPPED 33ALWAYS CHECK THE OWNER’S MANUAL FOR COMPLETE OPER ATING INFORMATION AND SAFET Y WARNINGS
CENTER PANEL
P
R
N
D
B
SHIFTLOCK
RELEASE
POWER
A
EV Regenerative Braking Video To view a video on your mobile device, snap this QR Code or visit the listed website
Refer to page 2 for more information
www.youtube.com/KiaFeatureVideos
QR CODEAutomatic Gear Shift with Regenerative Brake Mode
P: Park
R: Reverse
N: Neutral
D: Drive
B: Regenerative Brake Mode
Reduction Gear / Regenerative Brake Mode
“B” – Move the gear shift to the “B” position A
to enter the maximum regenerative braking drive
mode This mode helps to minimize energy loss
and may increase the distance to empty
For more information on Regenerative Brake Mode, refer to the Owner’s Manual.
Page 36 of 50

34SOUL EV FEATURES & FUNCTIONS GUIDE
CENTER PANEL
*IF EQUIPPED †LEGAL DISCL AIMERS ON BACK INSIDE COVER
AUTOOFF
FRONT
REAR
A/C MODE
CLIMATE
P A SSE NGE R
A IR BA GactiveECO
(Buttons located on Center Panel)
(Buttons located on Center Panel)
AUTO
OFF
FRONT
REAR
A/C MODE
CLIMATE
P A SSE NGE R
A IR BA GactiveECO
Warming ( Yellow LED)
Ventilating (Blue LED)
Heated and Ventilated Seats Video To view a video on your mobile device, snap this QR Code or visit the listed website
Refer to page 2 for more information
www.youtube.com/KiaFeatureVideos
QR CODESeat Warmers†17 / Ventilated Seats*
Seat Warmers – Press top of button once for high setting (3 LEDs lit)
Press button twice for medium setting (2 LEDs lit) Press a third time for
low setting (1 LED lit) and again to turn OFF
Ventilated Seats – Press bottom of button once for high setting (3 LEDs
lit) Press twice for medium setting (2 LEDs lit) Press a third time for low
setting (1 LED lit) and again to turn OFF
Seat Warmers*†17
Press button once for high setting (2 LEDs lit) Press button twice for low
setting (1 LED lit) Press again to turn OFF
•
•System turns OFF when ignition is cycled To turn system ON, press the seat warmer switch •With the seat warmer switch in the ON position, the heating system in the seat turns off or on automatically depending on the seat temperature
QUICK TIPS
REMINDER: Use extreme caution when using the seat warmers to avoid burns Refer to the Owner’s Manual for more information
REMINDER: Use extreme caution when using the seat warmers to avoid burns Refer to the Owner’s Manual for more information
Page 37 of 50

35
SEATING
ALWAYS CHECK THE OWNER’S MANUAL FOR COMPLETE OPER ATING INFORMATION AND SAFET Y WARNINGS *IF EQUIPPED †LEGAL DISCL AIMERS ON BACK INSIDE COVER
AB
C
6-Way Adjustable Driver’s Seat†15
Pull lever A to slide Seat forward/backward
Pull lever B up several times to raise Seat Height
Push lever B down several times to lower Seat Height
Pull lever C to adjust Seatback Recline
When adjusting seat forward or backwards, ensure seat clicks or locks into place before driving the vehicle
QUICK TIP
Front Seat Headrest Adjustment†9,15
To adjust headrest forward*: Pull headrest forward to one of
several positions
To adjust headrest back*: Pull headrest completely forward,
then release
To raise headrest: Pull headrest up
To lower headrest: Press lock, then press the headrest down
For easy adjustments, hold a headrest post with one hand while using the other hand to pull the headrest from underneath
QUICK TIP
REMINDER: Do not operate the vehicle with the headrests removed Headrests can provide critical neck and head support in an accident REMINDER: Do not attempt to adjust the seat while the vehicle is moving This could result in loss of control of the vehicle
Do not attempt to adjust the seat while the vehicle is moving. This could result in loss of control of the vehicle.
Page 38 of 50
SEATING
36SOUL EV FEATURES & FUNCTIONS GUIDE*IF EQUIPPED †LEGAL DISCL AIMERS ON BACK INSIDE COVER
A
Folding Rear Seatback†15
To F o l d :
1 Adjust the Front Seatback in the upright position and/or slide the
Front Seat forward
2 Insert the rear seat belt strap into the clip located on the side
panel next to the Seatback
3 Lower the Rear Headrests to the lowest position
4 Pull on the Rear Seatback folding lever A, then fold the seat
towards the front
REMINDER: Always make sure the seat back is locked in place (clicks) when unfolded
To U n f o l d :
1 Lift and pull the Seatback backward by pulling on the
folding lever A Pull the Seatback firmly until it clicks and is
locked into place
2 Return the rear seat belt to the proper position
Page 39 of 50

37
OTHER KEY FEATURES
ALWAYS CHECK THE OWNER’S MANUAL FOR COMPLETE OPER ATING INFORMATION AND SAFET Y WARNINGS *IF EQUIPPED †LEGAL DISCL AIMERS ON BACK INSIDE COVER
REMINDER: Remote button configuration may vary depending on vehicle options
HOLD
To view videos on your mobile device, snap these QR Codes or visit the listed website.
Refer to page 2 for more information .
EV Power Button and Smart Key Video
A
B
C
D
E
G
F
The Smart Key’s signal can be blocked by the normal operation of a cell or smart phone To help prevent this, store each device separately
QUICK TIP
QR CODESmart Key†8
A Press to lock All Doors
B Press to unlock Driver’s Door Press twice in 4 seconds to unlock All Doors
C Press and hold to unlock Liftgate Then lift lid by the handle to manually open Trunk
REMINDER: The Liftgate unlocks when the Smart Key fob is within close proximity of the vehicle
D Press and hold more than 1 second for Panic Alarm To turn off Alarm,
press any button
E Press to release Mechanical Key (Button located on back of Smart Key)
Driver’s Door Lock/Unlock button F:
•Press button once to unlock driver’s door
•Press again within 4 seconds to unlock all doors
•Press again to lock all doors
Mechanical Key G:
•Use to unlock driver’s door
•Use to turn Child-Protector Rear Door Locks
For more information on the Mechanical Key, please refer to your Owner’s Manual.
•Turn counterclockwise once to unlock Driver’s Door
•Turn counterclockwise again within 4 seconds to unlock All Doors
•Turn clockwise once to Lock All Doors
Double-Turn Lock/Unlock Allwww.youtube.com/KiaFeatureVideos
Kia Key Fob Video
Page 40 of 50

OTHER KEY FEATURES
38*IF EQUIPPED SOUL EV FEATURES & FUNCTIONS GUIDE
Panoramic Sunroof Operation*
The sunroof and sunshade operation is controlled through a multi-directional switch/lever A
The ignition needs to be in the ON position to operate the Sunroof and Sunshade
Slide the Sunshade and Sunroof:
• Auto Open: Slide lever A backward to the farthest position and release
• Auto Close: Slide the lever A forward to the farthest position
and release
Slide the Sunshade:
• Auto Open: Slide the lever A partially backward to the first
detent position
• Auto Close: Slide the lever A forward to the farthest position
Slide the Sunroof (with Sunshade open):
• Open: Slide the lever A backward and release
• Auto Close: Slide the lever A forward to the first detent position or
pull the lever downward
Tilt the Sunroof:
• Raise: Push lever A upward
• Lower: Push lever A forward
• Auto Close Sunroof and Sunshade: Slide the lever A forward
to the farthest position
REMINDERS:
•Sunshade needs to remain OPEN while sunroof is open and vehicle is moving
•Sunshade cannot slide when it is in the tilt position or tilt while in an open or slide position
To stop the Sunroof/Sunshade at any position, push or pull the sunroof control lever A in any direction
QUICK TIP
Sunroof Open Warning*
If the Sunroof is not fully closed, the warning will chime
and display on the LCD screen* when:
•The ignition is turned off (Smart Key*)
•The ignition key is removed
•The driver’s door is opened
A
Sunroof Operation Video To view a video on your mobile device, snap this QR Code or visit the listed website
Refer to page 2 for more information
www.youtube.com/KiaFeatureVideos
QR CODE
REMINDER: Do not adjust the sunroof or sunshade while driving This could result in loss of control of the vehicle