2019 KIA SOUL EV key battery
[x] Cancel search: key batteryPage 30 of 50

AUDIO SYSTEMS
28SOUL EV FEATURES & FUNCTIONS GUIDE*IF EQUIPPED †LEGAL DISCL AIMERS ON BACK INSIDE COVER
MAP
SEEK
TRACK
RADIO
MEDIA
SETUP
MAP NA V
POWER
VOLENTER
TUNE/FILE
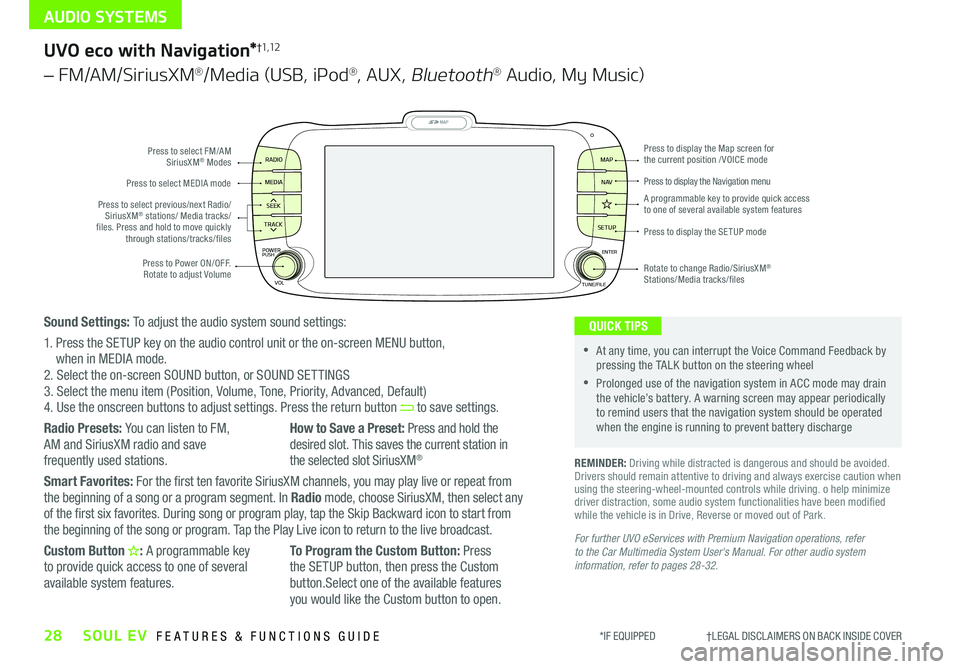
PUSHPress to Power ON/OFF Rotate to adjust Volume
Press to select FM/AM SiriusXM® Modes
Press to select MEDIA mode
Rotate to change Radio/SiriusXM® Stations/Media tracks/files
Press to display the Map screen for the current position / VOICE mode
Press to display the Navigation menu
Press to display the SE TUP mode
A programmable key to provide quick access to one of several available system featuresPress to select previous/next Radio/SiriusXM® stations/ Media tracks/ files Press and hold to move quickly through stations/tracks/files
UVO eco with Navigation*†1,12
– FM/AM/SiriusXM®/Media (USB, iPod®, AUX, Bluetooth® Audio, My Music)
For further UVO eServices with Premium Navigation operations, refer to the Car Multimedia System User's Manual. For other audio system information, refer to pages 28-32.
REMINDER: Driving while distracted is dangerous and should be avoided Drivers should remain attentive to driving and always exercise caution when using the steering-wheel-mounted controls while driving o help minimize driver distraction, some audio system functionalities have been modified while the vehicle is in Drive, Reverse or moved out of Park
•At any time, you can interrupt the Voice Command Feedback by pressing the TALK button on the steering wheel
•Prolonged use of the navigation system in ACC mode may drain the vehicle’s battery A warning screen may appear periodically to remind users that the navigation system should be operated when the engine is running to prevent battery discharge
QUICK TIPSSound Settings: To adjust the audio system sound settings:
1 Press the SETUP key on the audio control unit or the on-screen MENU button, when in MEDIA mode 2 Select the on-screen SOUND button, or SOUND SET TINGS3 Select the menu item (Position, Volume, Tone, Priority, Advanced, Default)4 Use the onscreen buttons to adjust settings Press the return button to save settings
Radio Presets: You can listen to FM, AM and SiriusXM radio and save
frequently used stations
How to Save a Preset: Press and hold the desired slot This saves the current station in
the selected slot SiriusXM®
Smart Favorites: For the first ten favorite SiriusXM channels, you may play live or repeat from the beginning of a song or a program segment In Radio mode, choose SiriusXM, then select any of the first six favorites During song or program play, tap the Skip Backward icon to start from the beginning of the song or program Tap the Play Live icon to return to the live broadcast
Custom Button : A programmable key to provide quick access to one of several available system features
To Program the Custom Button: Press the SETUP button, then press the Custom button Select one of the available features you would like the Custom button to open
Page 32 of 50

30*IF EQUIPPED SOUL EV FEATURES & FUNCTIONS GUIDE
CENTER PANEL
EV A /C and Driver Only Ventilation Video To view a video on your mobile device, snap this QR Code or visit the listed website
Refer to page 2 for more information
www.youtube.com/KiaFeatureVideos
QR CODES
AUTO
OFF
FRONT
DRIVER
EV
HEAT
REAR
ONLY
A/C MODE
CLIMATE
P
A SSE NGE R
A IR BA G
DRIVER
EV
ONLYPA SSE NGE R
A IR BA G
AB
(Buttons located on Center Panel)
Driver Only Ventilation
Driver Only Ventilation restricts air
flow to the driver’s side vents only
This can help to optimize driving
range by limiting the power drawn
from the battery
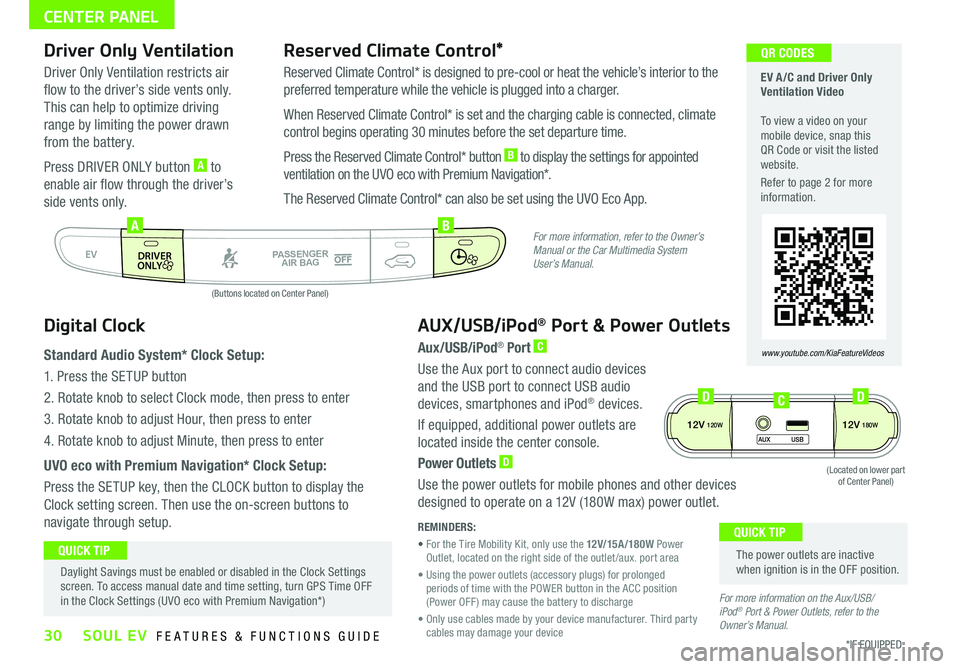
Press DRIVER ONLY button A to
enable air flow through the driver’s
side vents only
Reserved Climate Control*
Reserved Climate Control* is designed to pre-cool or heat the vehicle’s interior to the
preferred temperature while the vehicle is plugged into a charger
When Reserved Climate Control* is set and the charging cable is connected, climate
control begins operating 30 minutes before the set departure time
Press the Reserved Climate Control* button B to display the settings for appointed
ventilation on the UVO eco with Premium Navigation*
The Reserved Climate Control* can also be set using the UVO Eco App
Digital Clock
Standard Audio System* Clock Setup:
1 Press the SETUP button
2 Rotate knob to select Clock mode, then press to enter
3 Rotate knob to adjust Hour, then press to enter
4 Rotate knob to adjust Minute, then press to enter
UVO eco with Premium Navigation* Clock Setup:
Press the SETUP key, then the CLOCK button to display the
Clock setting screen Then use the on-screen buttons to
navigate through setup
AUX/USB/iPod® Port & Power Outlets
Aux/USB/iPod® Port C
Use the Aux port to connect audio devices
and the USB port to connect USB audio
devices, smartphones and iPod® devices
If equipped, additional power outlets are
located inside the center console
Power Outlets D
Use the power outlets for mobile phones and other devices
designed to operate on a 12V (180W max) power outlet
REMINDERS:
• For the Tire Mobility Kit, only use the 12V/15A/180W Power Outlet, located on the right side of the outlet /aux port area
• Using the power outlets (accessory plugs) for prolonged periods of time with the POWER button in the ACC position (Power OFF ) may cause the battery to discharge
• Only use cables made by your device manufacturer Third party cables may damage your device
The power outlets are inactive when ignition is in the OFF position
QUICK TIP Daylight Savings must be enabled or disabled in the Clock Settings screen To access manual date and time setting, turn GPS Time OFF in the Clock Settings (UVO eco with Premium Navigation*)
QUICK TIP
For more information, refer to the Owner’s Manual or the Car Multimedia System User’s Manual.
For more information on the Aux/USB/ iPod® Port & Power Outlets, refer to the Owner’s Manual.
12V120W12V180W
AUX USB
(Located on lower part of Center Panel)
DDC
Page 33 of 50

31
CENTER PANEL
ALWAYS CHECK THE OWNER’S MANUAL FOR COMPLETE OPER ATING INFORMATION AND SAFET Y WARNINGS *IF EQUIPPED †LEGAL DISCL AIMERS ON BACK INSIDE COVER
To start the vehicle:
1 Turn off all electrical devices
2 Depress the brake pedal
3 Press the POWER button while gear shift is in P (Park)
When the Ready Indicator Light is ON (located in the top left corner
of the LCD screen of the Instrument Cluster), the vehicle can be driven
To turn the power off, press the POWER button again, and ensure the gear
shift is in (P) Park
To use the POWER button, you must have the Smart Key fob on your
person or inside the vehicle
P
POWER
EV Power Button and Smart Key Video To view a video on your mobile device, snap this QR Code or visit the listed website
Refer to page 2 for more information
www.youtube.com/KiaFeatureVideos
AB
QR CODE Power Button†8
REMINDERS:
•When the Ready Indicator Light is illuminated, the vehicle can be operated
•Do not operate the vehicle if the Ready Indicator Light is not illuminated
•
In an emergency situation while the vehicle is in motion, you are able to turn the vehicle off by pressing the Power button for more than 2 seconds or 3 times within 3 seconds
•
If Smart Key fob battery is dead, with the lock button facing the POWER button, hold the fob up against the POWER button and press
To use electrical accessories: Accessory position • When in the OFF position (no light) and without depressing the brake pedal, press the POWER button once (Amber light A )
On position • When already in the ACC position (Amber light A ) and without depressing the brake pedal, press the POWER button again (Reddish-orange light B )
• When in the OFF position (no light) and without depressing the brake pedal, press the POWER button twice (Reddish-orange light B )
Keeping the vehicle in ACC or the ON position without driving may discharge the vehicle’s battery.
QUICK TIPS
For more info and detail steps on how to start the vehicle, please refer to the Owner’s Manual.
(Located on Center Panel near Gear Shift)
Page 41 of 50

OTHER KEY FEATURES
39ALWAYS CHECK THE OWNER’S MANUAL FOR COMPLETE OPER ATING INFORMATION AND SAFET Y WARNINGS *IF EQUIPPED †LEGAL DISCL AIMERS ON BACK INSIDE COVER
ON
DOOR
ROOM
ROOMDOOR( Type A )
( Type B)
AA
CB
D
( Type B)D
Map/Room Lamps
Push the lens A to turn the Map Lamp ON/OFF This light produces a spot beam for
convenient use as a map lamp or personal lamp for the driver or front passenger
When the DOOR button B is pressed, the Map Lamp turns ON when any door is opened
When the ROOM button C is pressed, the Map and Room Lamps turn ON
Room Lamp
When the Room Lamp button D is pressed, the lamp turns ON
Automatic turn off function*
The interior lights automatically turn off approximately 30 seconds after the Engine
System Start /Stop button* is OFF
•When doors are unlocked by the Smart Key*, the lamp turns ON for approximately 30 seconds •If your vehicle is equipped with the theft alarm system, the interior lights automatically turn off approximately 3 seconds after the system is in armed stage •Using interior lights for an extended period of time may cause battery discharge
QUICK TIPS
Sunvisor†20
Use the Sunvisor to shield direct light through the front or
side windows Slide the Sunvisor out and adjust as needed
REMINDERS:
•Sunvisor may not shield all direct light
•Do not operate the vehicle if the Sunvisor is impairing your visibility
•The Sunvisor may impair visibility if not adjusted properly
•
Be aware of your seating position when adjusting or swinging Sunvisor around to or from the front or side windows
Pedestrian Warning System
The Pedestrian Warning System generates an artificial engine
sound for pedestrians to hear the vehicle since the motor of an
Electric Vehicle makes no sound when operating
The Pedestrian Warning System will operate when:
•The EV vehicle is moving at a low speed
•The gear shift is moved to the (R) Reverse position
Page 44 of 50

42*IF EQUIPPED SOUL EV FEATURES & FUNCTIONS GUIDE
OTHER KEY FEATURES
A
B
C
High-Voltage Areas
High-voltage areas are marked
with an orange color with warning
labels attached
REMINDER: Never touch the high voltage components marked in orange on the vehicle
Air Inlet
The air inlets A, located underneath both front seats, are used to cool
the driving battery For safety reasons, these air inlets should never be
blocked Doing so may cause the battery to overheat
Tailgate Release Button
The button is located underneath the Tailgate lid With Tailgate unlocked,
press the Tailgate Release button B and pull the Tailgate lid up by the
handle to open
•The Tailgate must be unlocked before it can be opened by the Tailgate Release Button •The Tailgate unlocks automatically and then can be opened manually when the Smart Key* is within close proximity to the vehicle
QUICK TIPS
Child-Protector Rear Door Locks
Located on the edge of the rear passenger doors, adjust switch C to the
LOCK position to disable the inner door handles from opening the rear
passenger doors
REMINDER: Child-Protector Rear Door Lock is located on rear passenger’s door jamb