Page 194 of 580

4101
Features of your vehicle
Immobilizer IndicatorLight (With Smart Key)
This indicator light illuminates for up
to 30 seconds:
When the vehicle detects the smart key in the vehicle properly
while the Engine Start/Stop Button
is ACC or ON.
- At this time, you can start theengine.
- The indicator light goes off after starting the engine.
This indicator light blinks for a few
seconds:
When the smart key is not in the vehicle.
- At this time, you can not start theengine. This indicator light illuminates for 2
seconds and goes off:
When the vehicle cannot detect the
smart key which is in the vehicle
while the Engine Start/Stop Button
is ON.
In this case, have the vehicle inspect-
ed by an authorized K900 Kia dealer.
This indicator light blinks:
When the battery of the smart key is weak.
- At this time, you cannot start theengine. However, you can start the
engine if you press the Engine
Start/Stop Button with the smart
key. (For more details, refer to
“Starting the Engine” in chapter 5).
When there is a malfunction with the immobilizer system.
In this case, have the vehicle inspect-
ed by an authorized K900 Kia dealer.
Turn Signal Indicator
Light
This indicator light blinks:
When you switch on the turn signal light on.
If any of the following occurs, there
may be a malfunction with the turn
signal system. In this case, have the
vehicle inspected by an authorized
K900 Kia dealer. - The indicator light does not blinkbut illuminates.
- The indicator light blinks more rapidly.
- The indicator light does not illumi- nate at all.
Page 198 of 580
4105
Features of your vehicle
Head Up Display ON/OFF
The HUD display will be activated or
deactivated in Set Up mode while
engine is ON.
Head Up Display Information
1. Turn By Turn navigation information
2. Road signs
3. Speedometer
4. Cruise setting speed
5. Smart Cruise Control (SCC) infor-mation
6. Lane Keeping Assist information
7. Blind-spot Collision Warning infor- mation
8. Warning lights (Low fuel)
9. AV mode information
Head Up Display Setting
On the LCD display, you can change
the head up display settings as fol-
lows.
1. Display height
2. Rotation
3. Brightness
4. Content select
5. Speedometer size
6. Speedometer color
ORJ048159ORJ048176N
Page 201 of 580

Features of your vehicle
108
4
✽ ✽
NOTICE
• This system can only sense objects
within the range and location of
the sensors; It can not detect
objects in other areas where sen-
sors are not installed. Also, small
or slim objects, such as poles or
objects located between sensors
may not be detected by the sen-
sors. Always visually check behind
the vehicle when backing up.
• Be sure to inform any drivers of the vehicle that may be unfamiliar
with the system regarding the sys-
tems capabilities and limitations.
Non-operational conditions of
parking distance warning
parking distance warning may
not operate when:
1. Moisture is frozen to the sensor. (It will operate normally when the ice
melts.)
2. Sensor is covered with foreign matter, such as snow or water, or
the sensor cover is blocked. (It will
operate normally when the materi-
al is removed or the sensor is no
longer blocked.)
3. Driving on uneven road surfaces such as unpaved roads, gravel,
bumps, or gradient.
4. Objects generating excessive noise such as vehicle horns, loud
motorcycle engines, or truck air
brakes can interfere with the sen-
sor.
5. The weather conditions produce heavy rain or water spray.
6. Wireless transmitters or mobile phones present near the sensor.
Detecting range may decrease
when:
1. Outside air temperature is extremely hot or cold.
2. The sensor is covered with foreign matter such as snow or water.
(The sensing range will return to
normal when removed.)
The following objects may not be
recognized by the sensor:
1. Sharp or slim objects such as ropes, chains or small poles.
2. Objects, which tend to absorb sen- sor frequency such as clothes,
spongy material or snow.
3. Undetectable objects smaller than 4 in. (1 m) and narrower than 5.5
in. (14 cm) in diameter.
Page 204 of 580

4111
Features of your vehicle
The rear view monitor will activate
with the ignition switch ON, engine
ON and the shift lever in the R
(Reverse) position.This system is a supplemental sys-
tem that shows the area behind the
vehicle on the audio screen while
backing up. If the vehicle is equipped
with a navigation system, then the
system will display the image on the
navigation screen. Also, the system
displays the area behind the vehicle
when the vehicle is in Neutral or
Drive if the following conditions are
met:
- IGN Status : ON
- Gearshift Status : D or N
- Rear view camera switch (1) : ON
This system is a supplemental sys-
tem only. It is the responsibility of
the driver to always check the
inside/outside rearview mirrors and
the area behind the vehicle before
and while backing up.
Always keep the camera lens clean. If lens is covered with for-
eign matter, the camera may not
operate normally. ❈
If your vehicle is equipped with
AVN (Audio, Video and Navigation)
system, rearview display will show
behind the vehicle through the
AVN monitor while backing-up.
Refer to a separately supplied
manual for detailed information.
REAR VIEW MONITOR
ORJ048014
ORJ048015
WARNING
-
Backing & using monitor
Never rely solely on the rear view
monitor. You must always use
methods of viewing the area
behind you including looking
over both shoulders as well as
continuously checking all three
rear view mirrors. Due to the dif-
ficulty of ensuring that the area
behind you remains clear, always
back up slowly and stop immedi-
ately if you suspect that a per-
son, and especially a child, might
be behind you.
Page 205 of 580

Features of your vehicle
112
4
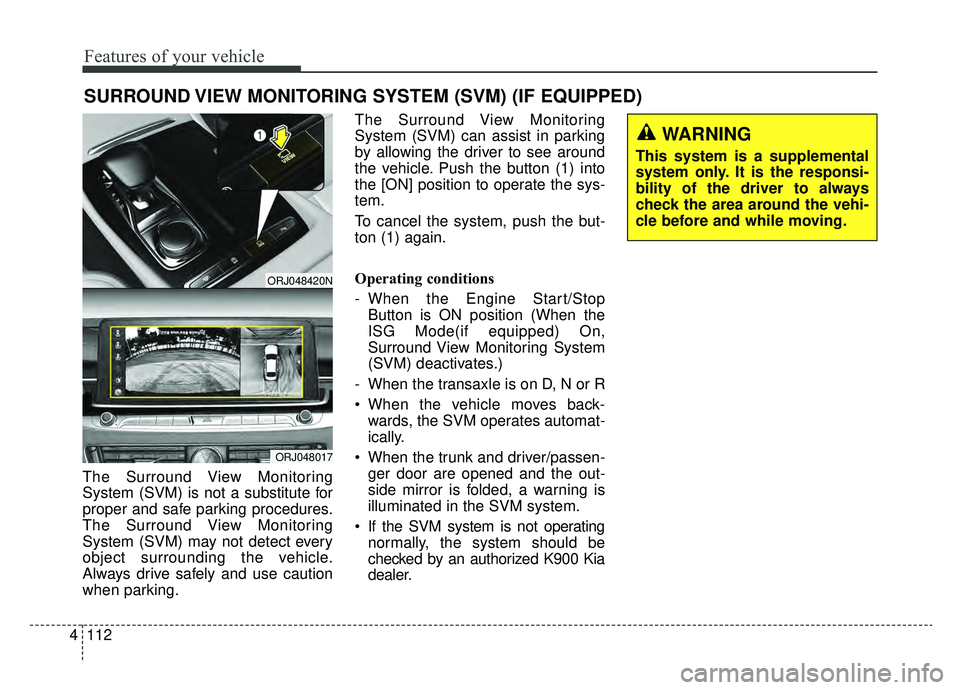
The Surround View Monitoring
System (SVM) is not a substitute for
proper and safe parking procedures.
The Surround View Monitoring
System (SVM) may not detect every
object surrounding the vehicle.
Always drive safely and use caution
when parking. The Surround View Monitoring
System (SVM) can assist in parking
by allowing the driver to see around
the vehicle. Push the button (1) into
the [ON] position to operate the sys-
tem.
To cancel the system, push the but-
ton (1) again.
Operating conditions
- When the Engine Start/Stop
Button is ON position (When the
ISG Mode(if equipped) On,
Surround View Monitoring System
(SVM) deactivates.)
- When the transaxle is on D, N or R
When the vehicle moves back- wards, the SVM operates automat-
ically.
When the trunk and driver/passen- ger door are opened and the out-
side mirror is folded, a warning is
illuminated in the SVM system.
If the SVM system is not operating normally, the system should be
checked by an authorized K900 Kia
dealer.
SURROUND VIEW MONITORING SYSTEM (SVM) (IF EQUIPPED)
ORJ048420N
ORJ048017
WARNING
This system is a supplemental
system only. It is the responsi-
bility of the driver to always
check the area around the vehi-
cle before and while moving.
Page 207 of 580

Features of your vehicle
114
4
Battery saver function
The purpose of this feature is to
prevent the battery from being dis-
charged if the lights are left in the
ON position. The system automati-
cally shuts off the parking lights 30
seconds after the ignition key is
removed and the driver’s door is
opened and closed.
With this feature, the parking lights will turn off automatically if the driver
parks on the side of the road at night
and opens the driver’s side door.
If necessary, to keep the parking
lights on when the ignition key is
removed, perform the following:
1) Open the driver-side door.
2) Turn the parking lights OFF and ON again using the light switch
on the steering column.
Daytime running light
The Daytime Running Lights (DRL)
can make it easier for others to see the
front of your vehicle during the day.
DRL can be helpful in many different
driving conditions, and it is especially
helpful after dawn and before sunset.
The DRL system will turn the dedi-
cated lamp OFF when :
1.The headlight switch is on
- It includes that the headlight is onin the dark when the headlight
switch is in the auto light position.
2.The engine is off
3.Engaging the Parking Brake
Lighting control
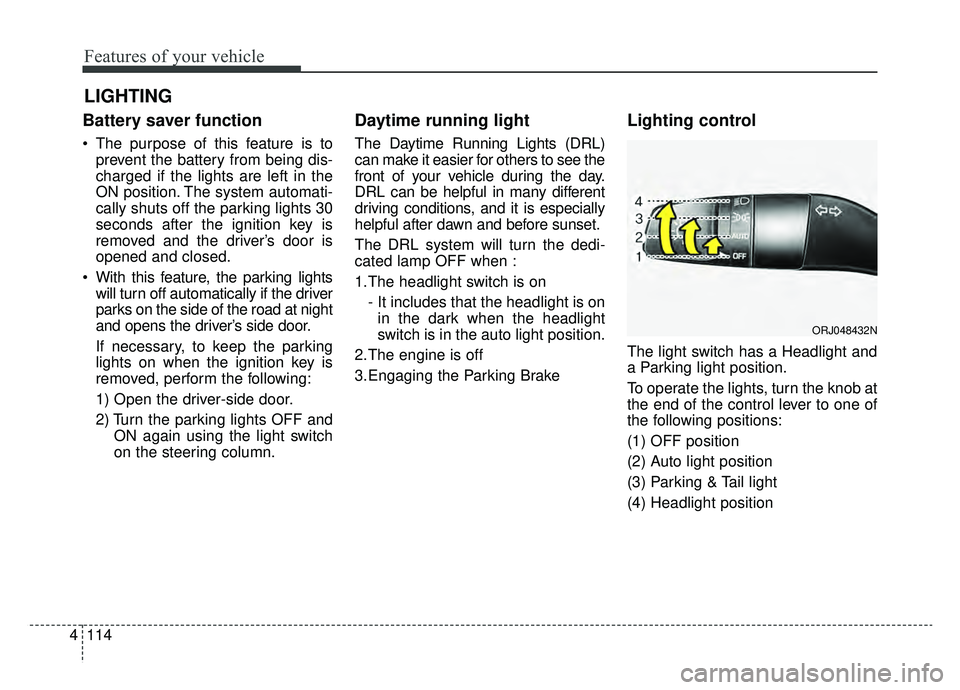
The light switch has a Headlight and
a Parking light position.
To operate the lights, turn the knob at
the end of the control lever to one of
the following positions:
(1) OFF position
(2) Auto light position
(3) Parking & Tail light
(4) Headlight position
LIGHTING
ORJ048432N
Page 209 of 580
Features of your vehicle
116
4
High beam operation
To turn on the high beam headlamp,
push the lever away from you. The
lever will return to its original posi-
tion. The high beam indicator will
light when the headlight high beams
are switched on.
To prevent the battery from being
discharged, do not leave the lights
on for a prolonged time while the
engine is not running.
WARNING - High beams
Do not use high beam when
there are other vehicles in front
of your vehicle. Using high
beam could obstruct the other
driver's vision.
ORJ048435N
CAUTION
Never place anything over the sensor (1) located on theinstrument panel, this willensure better auto-light sys-tem control.
Don’t clean the sensor using a window cleaner, the cleanermay leave a light film whichcould interfere with sensoroperation.
If your vehicle has window tint or other types of metallic coat-ing on the front windshield,the Auto light system may notwork properly.
Page 215 of 580
Features of your vehicle
122
4
Dynamic Bending Light (DBL)
(if equipped)
Dynamic Bending Light (DBL) uses
the steering angle and vehicle speed,
to keep your field of vision wide by
swiveling and leveling the headlamp.
Change the switch to the AUTO posi-
tion when the engine is running. The
dynamic Bending Light (DBL) will
operate when the headlamp is ON.
To turn off the DBL, change the
switch to other positions. After turn-
ing the DBL off, headlamp swiveling
no longer occurs, but leveling oper-
ates continuously. If the DBL malfunction indicator
comes on, the DBL is not working
properly. Drive to the nearest safe
location and restart the engine. If the
indicator continuously remains on,
have your vehicle checked by an
authorized K900 Kia dealer as soon
as possible.
ORJ048020N
ORJ048111