Page 30 of 626
WARNING!(Continued)
•Do not leave the key fob in or near the vehicle, or in
a location accessible to children, and do not leave the
ignition of a vehicle equipped with Keyless Enter-
N-Go in the ON/RUN mode. A child could operate
power windows, other controls, or move the vehicle.
• Do not leave children or animals inside parked
vehicles in hot weather. Interior heat build-up may
cause serious injury or death.
CAUTION!
An unlocked vehicle is an invitation for thieves. Al-
ways remove key fob from the vehicle and lock all
doors when leaving the vehicle unattended.
REMOTE STARTING SYSTEM — IF EQUIPPED
This system uses the key fob to start the engine
conveniently from outside the vehicle while still
maintaining security. The system has a range of
328 ft (100 m). The Remote Starting System also activates the Climate
Control, vented seats (if equipped) in temperatures above
80° F (26.7° C), and the optional heated seats, and optional
heated steering wheel in temperatures below 40° F (4.4° C).
Refer to “Seats” in “Getting To Know Your Vehicle” for
further information.
NOTE:
•
The vehicle must be equipped with an automatic trans-
mission to be equipped with Remote Start.
• Obstructions between the vehicle and key fob may
reduce this range.
Page 63 of 626
Adjustment — Rear Seats
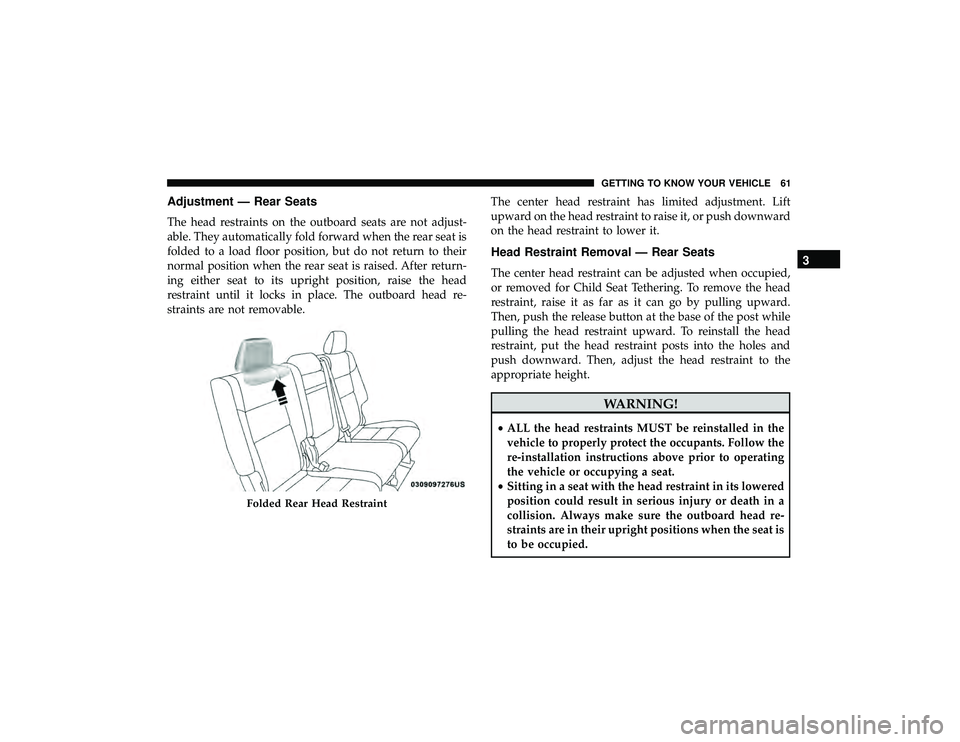
The head restraints on the outboard seats are not adjust-
able. They automatically fold forward when the rear seat is
folded to a load floor position, but do not return to their
normal position when the rear seat is raised. After return-
ing either seat to its upright position, raise the head
restraint until it locks in place. The outboard head re-
straints are not removable.The center head restraint has limited adjustment. Lift
upward on the head restraint to raise it, or push downward
on the head restraint to lower it.
Head Restraint Removal — Rear Seats
The center head restraint can be adjusted when occupied,
or removed for Child Seat Tethering. To remove the head
restraint, raise it as far as it can go by pulling upward.
Then, push the release button at the base of the post while
pulling the head restraint upward. To reinstall the head
restraint, put the head restraint posts into the holes and
push downward. Then, adjust the head restraint to the
appropriate height.
Folded Rear Head Restraint
3
GETTING TO KNOW YOUR VEHICLE 61
Page 231 of 626
WARNING!
•Improper installation can lead to failure of an infant
or child restraint. It could come loose in a collision.
The child could be badly injured or killed. Follow
the child restraint manufacturer ’s directions exactly
when installing an infant or child restraint.
• After a child restraint is installed in the vehicle, do
not move the vehicle seat forward or rearward be-
cause it can loosen the child restraint attachments.
Remove the child restraint before adjusting the ve-
hicle seat position. When the vehicle seat has been
adjusted, reinstall the child restraint.
• When your child restraint is not in use, secure it in
the vehicle with the seat belt or LATCH anchorages,
or remove it from the vehicle. Do not leave it loose in
the vehicle. In a sudden stop or accident, it could
strike the occupants or seatbacks and cause serious
personal injury.
Children Too Large For Booster Seats
Children who are large enough to wear the shoulder belt
comfortably, and whose legs are long enough to bend over
the front of the seat when their back is against the seatback,
should use the seat belt in a rear seat. Use this simple 5-step
test to decide whether the child can use the vehicle’s seat
belt alone:
1. Can the child sit all the way back against the back of the
vehicle seat?
2. Do the child’s knees bend comfortably over the front of the vehicle seat – while the child is still sitting all the
way back?
3. Does the shoulder belt cross the child’s shoulder be- tween the neck and arm?
4. Is the lap part of the belt as low as possible, touching the child’s thighs and not the stomach?
5. Can the child stay seated like this for the whole trip?
5
SAFETY 229
Page 239 of 626
To Install A LATCH-Compatible Child Restraint
If the selected seating position has a Switchable Automatic
Locking Retractor (ALR) seat belt, stow the seat belt,
following the instructions below. See the section “Installing
Child Restraints Using the Vehicle Seat Belt” to check what
type of seat belt each seating position has.
1. Loosen the adjusters on the lower straps and on thetether strap of the child seat so that you can more easily
attach the hooks or connectors to the vehicle anchor-
ages.
2. Place the child seat between the lower anchorages for that seating position. For some second row seats, you
may need to recline the seat and / or raise the head
restraint (if adjustable) to get a better fit. If the rear seat
can be moved forward and rearward in the vehicle, you
may wish to move it to its rear-most position to make
room for the child seat. You may also move the front seat
forward to allow more room for the child seat. 3. Attach the lower hooks or connectors of the child
restraint to the lower anchorages in the selected seating
position.
4. If the child restraint has a tether strap, connect it to the top tether anchorage. See the section “Installing Child
Restraints Using the Top Tether Anchorage” for direc-
tions to attach a tether anchor.
5. Tighten all of the straps as you push the child restraint rearward and downward into the seat. Remove slack in
the straps according to the child restraint manufactur-
er ’s instructions.
6. Test that the child restraint is installed tightly by pulling back and forth on the child seat at the belt path. It
should not move more than 1 inch (25.4 mm) in any
direction.
5
SAFETY 237
Page 497 of 626
Cleaning Plastic Instrument Cluster Lenses
The lenses in front of the instruments in this vehicle are
molded in clear plastic. When cleaning the lenses, care
must be taken to avoid scratching the plastic.
1. Clean with a wet soft cloth. A mild soap solution may beused, but do not use high alcohol content or abrasive
cleaners. If soap is used, wipe clean with a clean damp
cloth.
2. Dry with a soft cloth.
Leather Parts
Mopar Total Clean is specifically recommended for leather
upholstery.
Your leather upholstery can be best preserved by regular
cleaning with a damp soft cloth. Small particles of dirt can
act as an abrasive and damage the leather upholstery and
should be removed promptly with a damp cloth. Stubborn
soils can be removed easily with a soft cloth and Mopar
Total Clean. Care should be taken to avoid soaking your
leather upholstery with any liquid. Please do not use
polishes, oils, cleaning fluids, solvents, detergents, or
ammonia-based cleaners to clean your leather upholstery.
Application of a leather conditioner is not required to
maintain the original condition. NOTE:
If equipped with light colored leather, it tends to
show any foreign material, dirt, and fabric dye transfer
more so than darker colors. The leather is designed for easy
cleaning, and FCA recommends Mopar total care leather
cleaner applied on a cloth to clean the leather seats as
needed.