2019 JEEP GRAND CHEROKEE LIMITED run flat
[x] Cancel search: run flatPage 141 of 626

Secondary Method For Oil Change Reset Procedure
1. Without pushing the brake pedal, place the ignition inthe ON/RUN position (do not start the engine).
2. Fully press the accelerator pedal, slowly, three times within ten seconds.
3. Without pushing the brake pedal, place the ignition in the OFF/LOCK position.
NOTE: If the indicator message illuminates when you
start the vehicle, the oil change indicator system did not
reset. If necessary, repeat this procedure.
Instrument Cluster Display Messages
Includes the following, but not limited to:
• Front Seatbelts Unbuckled
• Driver Seat Belt Unbuckled
• Passenger Seat Belt Unbuckled
• Traction Control Off
• Washer Fluid Low
• Oil Pressure Low
• Oil Change Due •
Fuel Low
• Service Anti-lock Brake System
• Service Electronic Throttle Control
• Service Power Steering
• Cruise Control Off
• Cruise Control Ready
• ACC Driver Override
• Cruise Control Set To XXX MPH
• Tire Pressure Screen With Low Tire(s) “Inflate Tire to
XX”
• Service Tire Pressure System
• Speed Warning Set To XXX MPH
• Speed Warning Exceeded
• Parking Brake Engaged
• Brake Fluid Low
• Service Electronic Braking System
• Engine Temperature Hot
• Lights On
4
GETTING TO KNOW YOUR INSTRUMENT PANEL 139
Page 215 of 626

The ORC turns on the Air Bag Warning Light in the
instrument panel for approximately four to eight seconds
for a self-check when the ignition switch is first in the
ON/RUN position. After the self-check, the Air Bag Warn-
ing Light will turn off. If the ORC detects a malfunction in
any part of the system, it turns on the Air Bag Warning
Light, either momentarily or continuously. A single chime
will sound to alert you if the light comes on again after
initial startup.
The ORC also includes diagnostics that will illuminate the
instrument panel Air Bag Warning Light if a malfunction is
detected that could affect the air bag system. The diagnos-
tics also record the nature of the malfunction. While the air
bag system is designed to be maintenance free, if any of the
following occurs, have an authorized dealer service the air
bag system immediately.
•The Air Bag Warning Light does not come on during the
four to eight seconds when the ignition switch is first in
the ON/RUN position.
• The Air Bag Warning Light remains on after the four to
eight-second interval.
• The Air Bag Warning Light comes on intermittently or
remains on while driving. NOTE:
If the speedometer, tachometer, or any engine
related gauges are not working, the Occupant Restraint
Controller (ORC) may also be disabled. In this condition
the air bags may not be ready to inflate for your protection.
Have an authorized dealer service the air bag system
immediately.
5
SAFETY 213
Page 226 of 626
Maintaining Your Air Bag System
WARNING!
•Modifications to any part of the air bag system could
cause it to fail when you need it. You could be
injured if the air bag system is not there to protect
you. Do not modify the components or wiring, in-
cluding adding any kind of badges or stickers to the
steering wheel hub trim cover or the upper passenger
side of the instrument panel. Do not modify the front
bumper, vehicle body structure, or add aftermarket
side steps or running boards.
• It is dangerous to try to repair any part of the air bag
system yourself. Be sure to tell anyone who works on
your vehicle that it has an air bag system.
• Do not attempt to modify any part of your air bag
system. The air bag may inflate accidentally or may
not function properly if modifications are made.
Take your vehicle to an authorized dealer for any air
bag system service. If your seat, including your trim
cover and cushion, needs to be serviced in any way
(including removal or loosening/tightening of seat
attachment bolts), take the vehicle to an authorized
(Continued)
Page 284 of 626
WARNING!
The air suspension system uses a high pressure vol-
ume of air to operate the system. To avoid personal
injury or damage to the system, see your authorized
dealer for service.
Air Suspension Modes
The Air Suspension system has multiple modes to protect
the system in unique situations:
Tire/Jack Mode
To assist with changing a spare tire, the air suspension
system has a feature which allows the automatic leveling to
be disabled. Refer to “Uconnect Settings” in “Multimedia”
for further information.
NOTE:This mode is intended to be enabled with engine
running.
Auto Entry/Exit Mode
To assist in entering and exiting the vehicle, the air
suspension system has a feature which automatically low-
ers the vehicle to entry/exit ride height. Refer to “Uconnect
Settings” in “Multimedia” for further information. NOTE:
This mode is intended to be enabled with engine
running.
Transport Mode
To assist with flat bed towing, the air suspension system
has a feature which will put the vehicle into Entry/Exit
height and disable the automatic load leveling system.
Refer to “Uconnect Settings” in “Multimedia” for further
information.
NOTE: This mode is intended to be enabled with engine
running.
Suspension Display Messages Mode
The “Suspension Display Messages” setting allows you to
only display suspension warnings. Refer to “Uconnect
Settings” in “Multimedia” for further information.
NOTE: This mode is intended to be enabled with engine
running.
Wheel Alignment Mode
Before performing a wheel alignment this mode must be
enabled. Refer to “Uconnect Settings” in “Multimedia” for
further information.
282 STARTING AND OPERATING
Page 379 of 626
NOTE:
•When towing your vehicle, always follow applicable
state and provincial laws. Contact state and provincial
Highway Safety offices for additional details.
• Vehicles equipped with Quadra-Lift must be placed in
Transport Mode before tying them down (from the
body) on a trailer or flatbed truck. Refer to “Quadra-
Lift” in “Starting and Operating” for more information.
If the vehicle cannot be placed in Transport mode (for
example, engine will not run), tie-downs should be
fastened over the tires using specific straps (not to the
body). Failure to follow these instructions may cause
fault codes to be set and/or cause loss of proper
tie-down tension.
Recreational Towing — Two Wheel Drive Models
DO NOT flat tow this vehicle. Damage to the drivetrain
will result.
Recreational towing (for two-wheel drive models) is al-
lowed ONLY if the rear wheels are OFF the ground. This
may be accomplished using a tow dolly or vehicle trailer. If
using a tow dolly, follow this procedure: 1. Properly secure the dolly to the tow vehicle, following
the dolly manufacturer’s instructions.
NOTE: If vehicle is equipped with Quadra-Lift air suspen-
sion, ensure the vehicle is set to Normal Ride Height.
2. Drive the rear wheels onto the tow dolly.
3. Firmly apply the parking brake. Shift the transmission into PARK.
4. Turn the ignition OFF.
5. Properly secure the rear wheels to the dolly, following the dolly manufacturer ’s instructions.
6. Install a suitable clamping device, designed for towing, to secure the front wheels in the straight position.
Page 432 of 626
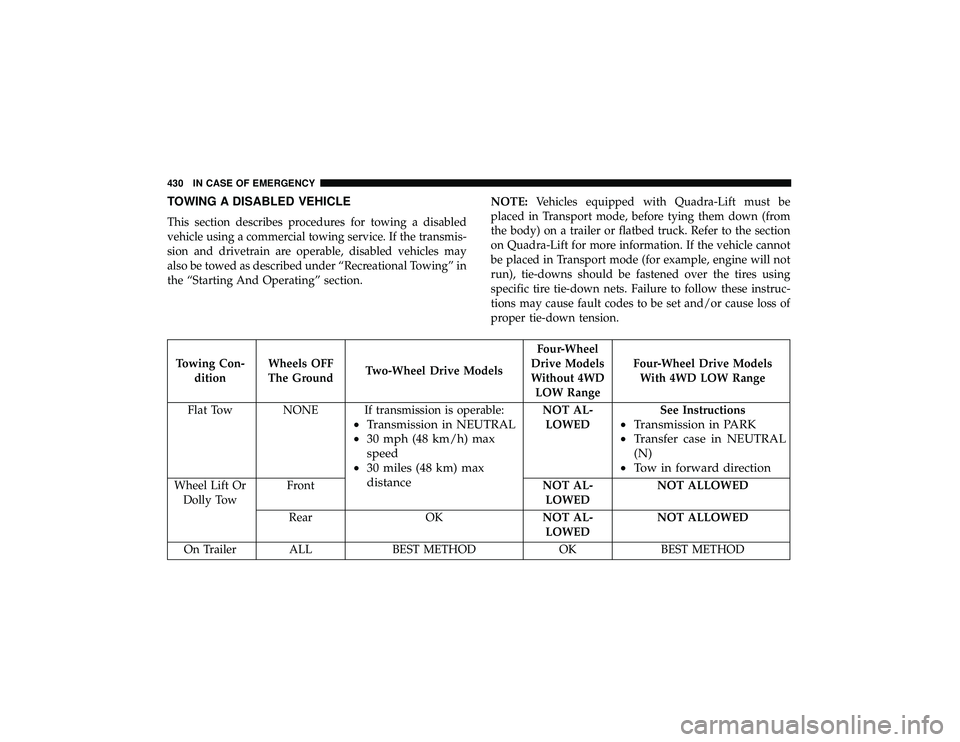
TOWING A DISABLED VEHICLE
This section describes procedures for towing a disabled
vehicle using a commercial towing service. If the transmis-
sion and drivetrain are operable, disabled vehicles may
also be towed as described under “Recreational Towing” in
the “Starting And Operating” section.NOTE:
Vehicles equipped with Quadra-Lift must be
placed in Transport mode, before tying them down (from
the body) on a trailer or flatbed truck. Refer to the section
on Quadra-Lift for more information. If the vehicle cannot
be placed in Transport mode (for example, engine will not
run), tie-downs should be fastened over the tires using
specific tire tie-down nets. Failure to follow these instruc-
tions may cause fault codes to be set and/or cause loss of
proper tie-down tension.
Page 439 of 626

SCHEDULED SERVICING
Scheduled Servicing — Gasoline Engine
Your vehicle is equipped with an automatic oil change
indicator system. The oil change indicator system will
remind you that it is time to take your vehicle in for
scheduled maintenance.
Based on engine operation conditions, the oil change
indicator message will illuminate. This means that service
is required for your vehicle. Operating conditions such as
frequent short-trips, trailer tow, extremely hot or cold
ambient temperatures, and E85 fuel usage will influence
when the “Oil Change Required” message is displayed.
Severe operating conditions can cause the change oil
message to illuminate as early as 3,500 miles (5,600 km)
since last reset. Have your vehicle serviced as soon as
possible, within the next 500 miles (805 km).
Your authorized dealer will reset the oil change indicator
message after completing the scheduled oil change.
NOTE:Under no circumstances should oil change inter-
vals exceed 10,000 miles (16,000 km), twelve months or 350
hours of engine run time, whichever comes first. The 350
hours of engine run or idle time is generally only a concern
for fleet customers. Severe Duty All Models
Change Engine Oil at 4,000 miles (6,500 km) or 350 hours of
engine run time if the vehicle is operated in a dusty and
off-road environment, or is operated predominantly at idle
or only very low engine RPM’s. This type of vehicle use is
considered Severe Duty.
Once A Month Or Before A Long Trip:
•
Check engine oil level.
• Check windshield washer fluid level.
• Check the tire inflation pressures and look for unusual
wear or damage.
• Check the fluid levels of the coolant reservoir, brake
master cylinder and fill as needed.
• Check function of all interior and exterior lights
Maintenance Plan
Required Maintenance
Refer to the Maintenance Plans on the following pages for
required maintenance.
8
SERVICING AND MAINTENANCE 437
Page 482 of 626
Radial Ply Tires
WARNING!
Combining radial ply tires with other types of tires on
your vehicle will cause your vehicle to handle poorly.
The instability could cause a collision. Always use
radial ply tires in sets of four. Never combine them
with other types of tires.
Tire Repair
If your tire becomes damaged, it may be repaired if it meets
the following criteria:
• The tire has not been driven on when flat.
• The damage is only on the tread section of your tire
(sidewall damage is not repairable).
• The puncture is no greater thana¼ofaninch (6 mm).
Consult an authorized tire dealer for tire repairs and
additional information.
Damaged Run Flat tires, or Run Flat tires that have experi-
enced a loss of pressure should be replaced immediately with
another Run Flat tire of identical size and service description (Load Index and Speed Symbol). Replace the tire pressure
sensor as well as it is not designed to be reused.
Run Flat Tires — If Equipped
Run Flat tires allow you the capability to drive 50 miles
(80 km) at 50 mph (80 km/h) after a rapid loss of inflation
pressure. This rapid loss of inflation is referred to as the
Run Flat mode. A Run Flat mode occurs when the tire
inflation pressure is of/or below 14 psi (96 kPa). Once a
Run Flat tire reaches the run flat mode it has limited
driving capabilities and needs to be replaced immediately.
A Run Flat tire is not repairable. When a run flat tire is
changed after driving with underinflated tire condition,
please replace the TPM sensor as it is not designed to be
reused when driven under run flat mode (14 psi (96 kPa))
condition.
NOTE:
TPM Sensor must be replaced after driving the
vehicle on a flat tire condition.
It is not recommended driving a vehicle loaded at full
capacity or to tow a trailer while a tire is in the run flat
mode.
See the tire pressure monitoring section for more informa-
tion.
480 SERVICING AND MAINTENANCE