Page 240 of 626
How To Stow An Unused Switchable-ALR (ALR)
Seat Belt:
When using the LATCH attaching system to install a child
restraint, stow all ALR seat belts that are not being used by
other occupants or being used to secure child restraints. An
unused belt could injure a child if they play with it and
accidentally lock the seat belt retractor. Before installing a
child restraint using the LATCH system, buckle the seat
belt behind the child restraint and out of the child’s reach.
If the buckled seat belt interferes with the child restraint
installation, instead of buckling it behind the child re-
straint, route the seat belt through the child restraint belt
path and then buckle it. Do not lock the seat belt. Remind
all children in the vehicle that the seat belts are not toys and
that they should not play with them.
Page 243 of 626
Installing A Child Restraint With A Switchable
Automatic Locking Retractor (ALR):
Child restraint systems are designed to be secured in
vehicle seats by lap belts or the lap belt portion of a
lap/shoulder belt.
Page 248 of 626
Whenever a change is noticed in the sound of the exhaust
system, when exhaust fumes can be detected inside the
vehicle, or when the underside or rear of the vehicle is
damaged, have a competent mechanic inspect the complete
exhaust system and adjacent body areas for broken, dam-
aged, deteriorated, or mispositioned parts. Open seams or
loose connections could permit exhaust fumes to seep into
the passenger compartment. In addition, inspect the ex-
haust system each time the vehicle is raised for lubrication
or oil change. Replace as required.
Safety Checks You Should Make Inside The Vehicle
Seat Belts
Inspect the seat belt system periodically, checking for cuts,
frays, and loose parts. Damaged parts must be replaced
immediately. Do not disassemble or modify the system.
Front seat belt assemblies must be replaced after a collision.
Rear seat belt assemblies must be replaced after a collision
if they have been damaged (i.e., bent retractor, torn web-
bing, etc.). If there is any question regarding seat belt or
retractor condition, replace the seat belt.
Air Bag Warning Light
The Air Bag warning lightwill turn on for four to
eight seconds as a bulb check when the ignition switch is first turned to ON/RUN. If the light is either not on
during starting, stays on, or turns on while driving,
have the system inspected at an authorized dealer as
soon as possible. After the bulb check, this light will
illuminate with a single chime when a fault with the Air
Bag System has been detected. It will stay on until the
fault is removed. If the light comes on intermittently or
remains on while driving, have an authorized dealer
service the vehicle immediately.
Refer to “Occupant Restraint Systems” in “Safety” for
further information.
Defroster
Check operation by selecting the defrost mode and place
the blower control on high speed. You should be able to
feel the air directed against the windshield. See an autho-
rized dealer for service if your defroster is inoperable.
Floor Mat Safety Information
Always use floor mats designed to fit your vehicle. Only
use a floor mat that does not interfere with the operation of
the accelerator, brake or clutch pedals. Only use a floor mat
that is securely attached using the floor mat fasteners so it
cannot slip out of position and interfere with the accelera-
tor, brake or clutch pedals or impair safe operation of your
vehicle in other ways.
246 SAFETY
Page 249 of 626
WARNING!
An improperly attached, damaged, folded, or stacked
floor mat, or damaged floor mat fasteners may cause
your floor mat to interfere with the accelerator, brake,
or clutch pedals and cause a loss of vehicle control. To
prevent SERIOUS INJURY or DEATH:
•ALWAYS securely attach
your floor mat using the
floor mat fasteners. DO NOT install your floor mat
upside down or turn your floor mat over. Lightly pull
to confirm mat is secured using the floor mat fasten-
ers on a regular basis.
• ALWAYS REMOVE THE EXISTING FLOOR MAT
FROM THE VEHICLE
before installing any other
floor mat. NEVER install or stack an additional floor
mat on top of an existing floor mat.
• ONLY install floor mats designed to fit your vehicle.
NEVER install a floor mat that cannot be properly
attached and secured to your vehicle. If a floor mat
needs to be replaced, only use a FCA approved floor
mat for the specific make, model, and year of your
vehicle.
(Continued)
Page 250 of 626
WARNING!(Continued)
•If the vehicle carpet has been removed and re-
installed, always properly attach carpet to the floor
and check the floor mat fasteners are secure to the
vehicle carpet. Fully depress each pedal to check for
interference with the accelerator, brake, or clutch
pedals then re-install the floor mats.
• It is recommended to only use mild soap and water
to clean your floor mats. After cleaning, always check
your floor mat has been properly installed and is
secured to your vehicle using the floor mat fasteners
by lightly pulling mat.
Periodic Safety Checks You Should Make Outside
The Vehicle
Tires
Examine tires for excessive tread wear and uneven wear
patterns. Check for stones, nails, glass, or other objects
lodged in the tread or sidewall. Inspect the tread for cuts
and cracks. Inspect sidewalls for cuts, cracks, and bulges.
Check the wheel nuts for tightness. Check the tires (includ-
ing spare) for proper cold inflation pressure.
Lights
Have someone observe the operation of brake lights and
exterior lights while you work the controls. Check turn
signal and high beam indicator lights on the instrument
panel.
Door Latches
Check for proper closing, latching, and locking.
Fluid Leaks
Check area under the vehicle after overnight parking for
fuel, coolant, oil, or other fluid leaks. Also, if gasoline
fumes are detected or if fuel, or brake fluid leaks are
suspected. The cause should be located and corrected
immediately.
248 SAFETY
Page 279 of 626
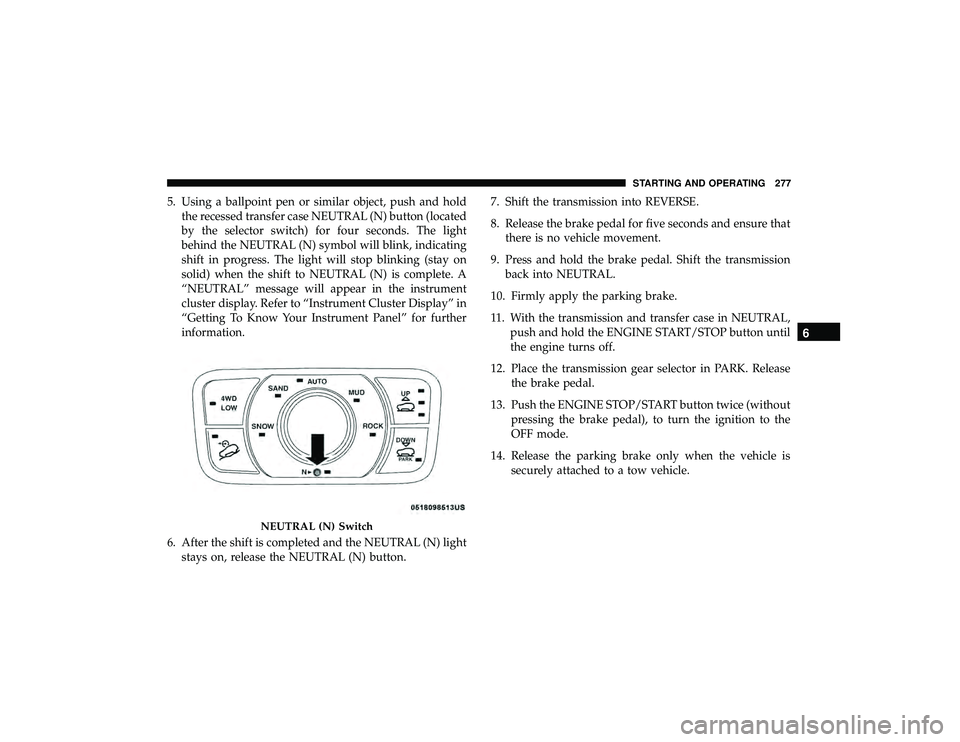
5. Using a ballpoint pen or similar object, push and holdthe recessed transfer case NEUTRAL (N) button (located
by the selector switch) for four seconds. The light
behind the NEUTRAL (N) symbol will blink, indicating
shift in progress. The light will stop blinking (stay on
solid) when the shift to NEUTRAL (N) is complete. A
“NEUTRAL” message will appear in the instrument
cluster display. Refer to “Instrument Cluster Display” in
“Getting To Know Your Instrument Panel” for further
information.
6. After the shift is completed and the NEUTRAL (N) light stays on, release the NEUTRAL (N) button. 7. Shift the transmission into REVERSE.
8. Release the brake pedal for five seconds and ensure that
there is no vehicle movement.
9. Press and hold the brake pedal. Shift the transmission back into NEUTRAL.
10. Firmly apply the parking brake.
11. With the transmission and transfer case in NEUTRAL, push and hold the ENGINE START/STOP button until
the engine turns off.
12. Place the transmission gear selector in PARK. Release the brake pedal.
13. Push the ENGINE STOP/START button twice (without pressing the brake pedal), to turn the ignition to the
OFF mode.
14. Release the parking brake only when the vehicle is securely attached to a tow vehicle.
Page 365 of 626
Rim Size
This is the rim size that is appropriate for the tire size
listed.
Inflation Pressure
This is the cold tire inflation pressure for your vehicle for
all loading conditions up to full GAWR.
Curb Weight
The curb weight of a vehicle is defined as the total weight
of the vehicle with all fluids, including vehicle fuel, at full
capacity conditions, and with no occupants or cargo loaded
into the vehicle. The front and rear curb weight values are
determined by weighing your vehicle on a commercial
scale before any occupants or cargo are added.
Loading
The actual total weight and the weight of the front and rear
of your vehicle at the ground can best be determined by
weighing it when it is loaded and ready for operation.The entire vehicle should first be weighed on a commercial
scale to insure that the GVWR has not been exceeded. The
weight on the front and rear of the vehicle should then be
determined separately to be sure that the load is properly
distributed over the front and rear axle. Weighing the
vehicle may show that the GAWR of either the front or rear
axles has been exceeded but the total load is within the
specified GVWR. If so, weight must be shifted from front to
rear or rear to front as appropriate until the specified
weight limitations are met. Store the heavier items down
low and be sure that the weight is distributed equally. Stow
all loose items securely before driving.
Improper weight distributions can have an adverse effect
on the way your vehicle steers and handles and the way
the brakes operate.
Page 379 of 626
NOTE:
•When towing your vehicle, always follow applicable
state and provincial laws. Contact state and provincial
Highway Safety offices for additional details.
• Vehicles equipped with Quadra-Lift must be placed in
Transport Mode before tying them down (from the
body) on a trailer or flatbed truck. Refer to “Quadra-
Lift” in “Starting and Operating” for more information.
If the vehicle cannot be placed in Transport mode (for
example, engine will not run), tie-downs should be
fastened over the tires using specific straps (not to the
body). Failure to follow these instructions may cause
fault codes to be set and/or cause loss of proper
tie-down tension.
Recreational Towing — Two Wheel Drive Models
DO NOT flat tow this vehicle. Damage to the drivetrain
will result.
Recreational towing (for two-wheel drive models) is al-
lowed ONLY if the rear wheels are OFF the ground. This
may be accomplished using a tow dolly or vehicle trailer. If
using a tow dolly, follow this procedure: 1. Properly secure the dolly to the tow vehicle, following
the dolly manufacturer’s instructions.
NOTE: If vehicle is equipped with Quadra-Lift air suspen-
sion, ensure the vehicle is set to Normal Ride Height.
2. Drive the rear wheels onto the tow dolly.
3. Firmly apply the parking brake. Shift the transmission into PARK.
4. Turn the ignition OFF.
5. Properly secure the rear wheels to the dolly, following the dolly manufacturer ’s instructions.
6. Install a suitable clamping device, designed for towing, to secure the front wheels in the straight position.