Page 114 of 626
Retractable Cargo Area Cover — If Equipped
NOTE:The purpose of this cover is for privacy, not to
secure loads. It will not prevent cargo from shifting or
protect passengers from loose cargo.
To cover the cargo area:
1. Grasp the cover at the center handle. Pull it over the cargo area.
2. Insert the pins on the ends of the cover into the slots in the pillar trim cover. 3. The liftgate may be opened with the cargo cover in
place.
Rear Lower Storage Bins
Rear Cargo Cover
112 GETTING TO KNOW YOUR VEHICLE
Page 115 of 626
Rear Cargo Tie-Downs
The rear cargo tie-downs, located on the cargo area floor,
should be used to safely secure loads when the vehicle is
moving.
Page 116 of 626

WARNING!(Continued)
•Place as much cargo as possible in front of the rear
axle. Too much weight or improperly placed weight
over or behind the rear axle can cause the rear of the
vehicle to sway.
• Do not pile luggage or cargo higher than the top of
the seatback. This could impair visibility or become
a dangerous projectile in a sudden stop or accident.
GARAGE DOOR OPENER — IF EQUIPPED
HomeLink replaces up to three hand-held transmitters that
operate devices such as garage door openers, motorized
gates, lighting or home security systems. The HomeLink
unit is powered by your vehicle’s 12 Volt battery.
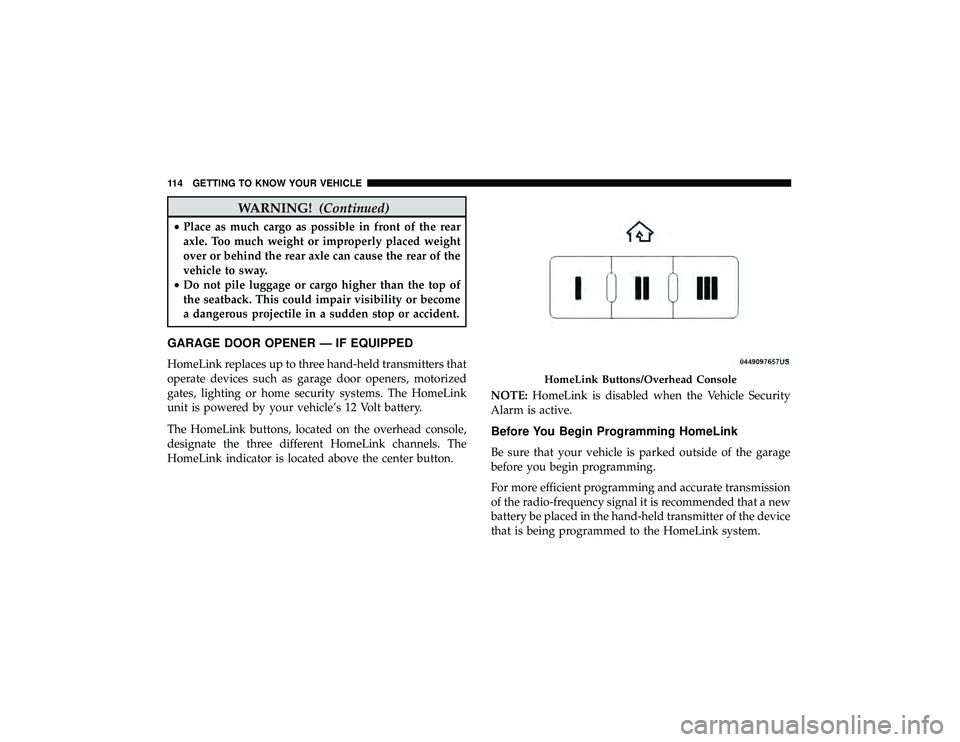
The HomeLink buttons, located on the overhead console,
designate the three different HomeLink channels. The
HomeLink indicator is located above the center button. NOTE:
HomeLink is disabled when the Vehicle Security
Alarm is active.
Before You Begin Programming HomeLink
Be sure that your vehicle is parked outside of the garage
before you begin programming.
For more efficient programming and accurate transmission
of the radio-frequency signal it is recommended that a new
battery be placed in the hand-held transmitter of the device
that is being programmed to the HomeLink system.
Page 120 of 626

2. Place the hand-held transmitter 1 to 3 inches (3 to 8 cm)away from the HomeLink button you wish to program
while keeping the HomeLink indicator light in view.
3. Continue to press and hold the HomeLink button, while you press and release (“cycle”) your hand-held trans-
mitter every two seconds until HomeLink has success-
fully accepted the frequency signal. The indicator light
will flash slowly and then rapidly when fully trained.
4. Watch for the HomeLink indicator to change flash rates. When it changes, it is programmed. It may take up to 30
seconds or longer in rare cases. The garage door may
open and close while you are programming.
5. Press and hold the programmed HomeLink button and observe the indicator light.
NOTE: •If the indicator light stays on constantly, programming
is complete and the garage door/device should acti-
vate when the HomeLink button is pressed.
• To program the two remaining HomeLink buttons,
repeat each step for each remaining button. DO NOT
erase the channels. If you unplugged the garage door opener/device for
programming, plug it back in at this time.
Reprogramming A Single HomeLink Button (Canadian/
Gate Operator)
To reprogram a channel that has been previously trained,
follow these steps:
1. Cycle the ignition to the ON/RUN position.
2. Press and hold the desired HomeLink button until the
indicator light begins to flash after 20 seconds. Do not
release the button.
3. Without releasing the button, proceed with “Canadian/ Gate Operator Programming” step 2 and follow all
remaining steps.
Using HomeLink
To operate, push and release the programmed HomeLink
button. Activation will now occur for the programmed
device (i.e. garage door opener, gate operator, security
system, entry door lock, home/office lighting, etc.). The
hand-held transmitter of the device may also be used at
any time.
118 GETTING TO KNOW YOUR VEHICLE
Page 121 of 626
Security
It is advised to erase all channels before you sell or turn in
your vehicle.
To do this, push and hold the two outside buttons for 20
seconds until the orange indicator flashes. Note that all
channels will be erased. Individual channels cannot be
erased.
The HomeLink Universal Transceiver is disabled when the
Vehicle Security Alarm is active.
Troubleshooting Tips
If you are having trouble programming HomeLink, here
are some of the most common solutions:
•Replace the battery in the Garage Door Opener hand-
held transmitter.
• Push the LEARN button on the Garage Door Opener to
complete the training for a Rolling Code.
• Did you unplug the device for programming and re-
member to plug it back in? If you have any problems, or require assistance, please call
toll-free 1-800-355-3515 or, on the Internet at
HomeLink.com for information or assistance.
Page 133 of 626

Distribute cargo weight evenly on the roof rack crossbars.
The roof rack does not increase the total load carrying
capacity of the vehicle. Be sure the total load of cargo inside
the vehicle plus that on the external rack does not exceed
the maximum vehicle load capacity.
To move the crossbars, loosen the attachments, located at
the upper edge of each crossbar, approximately eight turns
using the anti-theft wrench provided with the Mopar
crossbars. Then, move the crossbar to the desired position,
keeping the crossbars parallel to the rack frame. Once the
crossbar is in the desired position, retighten the with the
wrench to lock the crossbar into position.
NOTE:
•To help control wind noise when the crossbars are not in
use, place the front and rear crossbars approximately 24
inches (61 cm) apart. Optimal noise reduction can then
be achieved by adjusting the front crossbar forward or
aft using increments of 1 inch (2.5 cm). •
If any cargo (or any metallic object) is placed over the
satellite radio antenna (if equipped), you may experi-
ence interruption of satellite radio reception. For im-
proved satellite radio reception, avoid placing the rear
crossbar over the satellite radio antenna.
CAUTION!
•To prevent damage to the roof of your vehicle, do not
carry any loads on the roof rack without the crossbars
installed. The load should be secured and placed on
top of the crossbars, not directly on the roof. If it is
necessary to place the load on the roof, place a
blanket or some other protection between the load
and the roof surface.
(Continued)
3
GETTING TO KNOW YOUR VEHICLE 131
Page 134 of 626
CAUTION!(Continued)
•To avoid damage to the roof rack and vehicle, do not
exceed the maximum roof rack load capacity of 150 lb
(68 kg). Always distribute heavy loads as evenly as
possible and secure the load appropriately.
• Long loads which extend over the windshield, such
as wood panels or surfboards, or loads with large
frontal area should be secured to both the front and
rear of the vehicle.
• Place a blanket or other protection between the
surface of the roof and the load.
• Travel at reduced speeds and turn corners carefully
when carrying large or heavy loads on the roof rack.
Wind forces, due to natural causes or nearby truck
traffic, can add sudden upward lift to a load. This is
especially true on large flat loads and may result in
damage to the cargo or your vehicle.
• The use of Sport Mode is not recommended when
using the Roof Luggage Rack to carry a load.
132 GETTING TO KNOW YOUR VEHICLE
Page 150 of 626

After a trip:
•Check if any aftermarket equipment was installed (ad-
ditional lights, upfitter electrical accessories, audio sys-
tems, alarms) and review specifications if any (load and
Ignition Off Draw currents).
• Evaluate the latest driving cycles (distance, driving time
and parking time).
• The vehicle should have service performed if the mes-
sage is still present during consecutive trips and the
evaluation of the vehicle and driving pattern did not
help to identify the cause.
TRIP COMPUTER
Push and release the up or down arrow button until the
Trip A or Trip B icon is highlighted in the instrument
cluster display (Toggle left or right to select Trip A or Trip
B). Push and release the OK button to display the Trip
information. Trip A
•
Shows the total distance traveled for Trip A since the last
reset.
• Shows the elapsed time traveled for Trip A since the last
reset.
Trip B
• Shows the total distance traveled for Trip B since the last
reset.
• Shows the elapsed time traveled for Trip B since the last
reset.
Elapsed Time
Shows the total elapsed time of travel since the last reset
when the ignition switch is in the ACC position. Elapsed
time will increment when the ignition switch is in the ON
or START position.
To Reset A Trip Function
Reset will only occur while a resettable function is selected
(highlighted). Push and hold the OKbutton to clear the
resettable function being displayed.
148 GETTING TO KNOW YOUR INSTRUMENT PANEL