2019 Hyundai Tucson tyre pressure
[x] Cancel search: tyre pressurePage 541 of 685
6-38
5. Plug the compressor power cord(4) into the vehicle power outlet.
Only use the front passenger side
power outlet when connecting the
power cord.
6. With the ignition switch in the ON position, switch on the compres-
sor and let it run for approximately
5~7 minutes to fill the sealant up
to proper pressure. (refer to the
Tyre and Wheels, chapter 8). The
inflation pressure of the tyre after
filling is unimportant and will be
checked/corrected later.
Be careful not to overinflate the
tyre and stay away from the tyre
when filling it. 7. Switch off the compressor.
8. Detach the hoses from the sealant
bottle connector and from the tyre
valve.
Return the Tyre Mobility Kit to its
storage location in the vehicle.
NOTICE
What to do in an emergency
Tyre pressure
Do not attempt to drive your
vehicle if the tyre pressure is
below 200 kPa (29 psi). This
could result in an accident due
to sudden tyre failure.
CAUTION
Carbon monoxide
Do not leave your vehicle run-
ning in a poorly ventilated area
for extended periods of time.
Carbon monoxide poisoning
and suffocation can occur.
WARNING
TLe UK 6.qxp 5/10/2018 1:22 PM Page 38
Page 542 of 685
6-39
What to do in an emergency
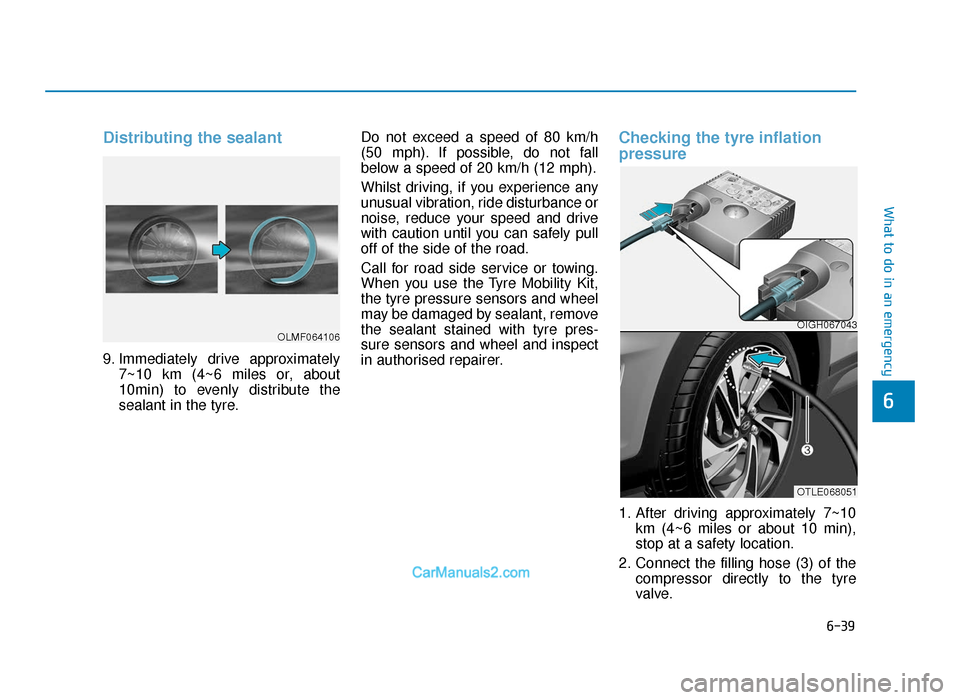
Distributing the sealant
9. Immediately drive approximately7~10 km (4~6 miles or, about
10min) to evenly distribute the
sealant in the tyre. Do not exceed a speed of 80 km/h
(50 mph). If possible, do not fall
below a speed of 20 km/h (12 mph).
Whilst driving, if you experience any
unusual vibration, ride disturbance or
noise, reduce your speed and drive
with caution until you can safely pull
off of the side of the road.
Call for road side service or towing.
When you use the Tyre Mobility Kit,
the tyre pressure sensors and wheel
may be damaged by sealant, remove
the sealant stained with tyre pres-
sure sensors and wheel and inspect
in authorised repairer.
Checking the tyre inflation
pressure
1. After driving approximately 7~10
km (4~6 miles or about 10 min),
stop at a safety location.
2. Connect the filling hose (3) of the compressor directly to the tyre
valve.
6
OLMF064106OIGH067043
OTLE068051
TLe UK 6.qxp 5/10/2018 1:22 PM Page 39
Page 543 of 685
6-40
3. Plug the compressor power cordinto the vehicle power outlet.
4. Adjust the tyre inflation pressure to the recomended tyre inflation.
With the ignition swithched on, proceed as follows.
- To increase the inflation pres- sure: Switch on the compressor.
To check the current inflation
pressure setting, briefly switch
off the compressor.
- To reduce the inflation pres- sure: Press the button (9) on the
compressor.
Do not let the compressor run for
more than 10 minutes, otherwise
the device will overheat and may
be damaged.Information
The pressure gauge may show higher
than actual reading when the com-
pressor is running. To get an accurate
tyre reading, the compressor needs to
be turned off.
i
NOTICE
What to do in an emergency
The tyre inflation pressure must
be at least 220 kPa (32 psi). If it
is not, do not continue driving.
Call for road side service or tow-
ing.
WARNING
If the inflation pressure is not
maintained, drive the vehicle a
second time, refer to Distributing
the sealant. Then repeat steps 1
to 4.
Use of the TMK may be ineffec-
tual for tyre damage larger than
approximately 4 mm (0.16 in).
We recommend that you contact
a HYUNDAI authorised repairer if
the tyre cannot be made road-
worthy with the Tyre Mobility Kit.
CAUTION
TLe UK 6.qxp 5/10/2018 1:22 PM Page 40
Page 544 of 685
6-41
What to do in an emergency
6
Tyre pressure sensor
The sealant on the tyre pres-
sure sensor and wheel should
be removed when you replace
the tyre with a new one and
inspect the tyre pressure sen-
sors at an authorised repairer.
When reinstalling the repaired
or replaced tyre and wheel on
the vehicle, tighten the wheel
lug nut to 11~13 kgf·m (79~94
lbf·ft).
CAUTION
TLe UK 6.qxp 5/10/2018 1:22 PM Page 41
Page 549 of 685
6-46
What to do in an emergency
Your vehicle is equipped with emer-
gency commodities to help you
respond to emergency situation.
Fire extinguisher
If there is small fire and you know how
to use the fire extinguisher, follow
these steps carefully.
1. Pull out the safety pin at the top of the extinguisher that keeps the han-
dle from being accidentally pressed.
2. Aim the nozzle towards the base of the fire.
3. Stand approximately 2.5 m (8 ft) away from the fire and squeeze
the handle to discharge the extin-
guisher. If you release the handle,
the discharge will stop.
4. Sweep the nozzle back and forth at the base of the fire. After the fire
appears to be out, watch carefully
since it may re-ignite.
First aid kit
Supplies for use in giving first aid
such as scissors, bandage and
adhesive tape, etc. are provided.
Triangle reflector
Place the triangle reflector on the
road to warn oncoming vehicles dur-
ing emergencies, such as when the
vehicle is parked by the roadside due
to problems.
Tyre pressure gauge
(if equipped)
Tyres normally lose some air in day-
to-day use, and you may have to add
a air periodically and usually it is not
a sign of a leaking tyre, but of normal
wear. Always check tyre pressure
when the tyres are cold because tyre
pressure increases with temperature. To check the tyre pressure, take the
following steps:
1. Unscrew the inflation valve cap
that is located on the rim of the
tyre.
2. Press and hold the gauge against the tyre valve. Some air will leak as
you begin and more will leak if you
don't press the gauge in firmly.
3. A firm non-leaking push will acti- vate the gauge.
4. Read the tyre pressure on the gauge to see whether the tyre pres-
sure is low or high.
5. Adjust the tyre pressure to the specified pressure. Refer to “Tyres
and Wheels” in chapter 8.
6. Reinstall the inflation valve cap.
EMERGENCY COMMODITY (IF EQUIPPED)
TLe UK 6.qxp 5/10/2018 1:22 PM Page 46
Page 550 of 685
7
Maintenance
7
Maintenance
Engine compartment .............................................7-3
Maintenance services ...........................................7-6
Owner's responsibility ......................................................7-6
Owner maintenance precautions ..................................7-6
Owner maintenance ...............................................7-8
Owner maintenance schedule ........................................7-9
Scheduled maintenance services ......................7-11
Explanation of scheduled maintenance items .7-12
Engine oil ..............................................................7-15
Checking the engine oil level (Petrol Engine)..........7-15
Checking the engine oil level (Diesel Engine)..........7-17
Checking the engine oil and filter ..............................7-18
Engine coolant......................................................7-20
Checking the engine coolant level..............................7-20
Changing the engine coolant .......................................7-23
Brake/clutch fluid ................................................7-24
Checking the brake/clutch fluid level ........................7-24
Washer fluid .........................................................7-25
Checking the washer fluid level ..................................7-25
Parking brake .......................................................7-25
Checking the parking brake .........................................7-25
Fuel filter (For Diesel) ........................................7-26
Draining water from fuel filter ....................................7-26
Fuel filter cartridge replacement ................................7-26
Air cleaner ............................................................7-27
Filter replacement ...........................................................7-27
Climate control air filter .....................................7-29
Filter inspection ...............................................................7-29
Filter replacement ...........................................................7-29
Wiper blades .........................................................7-30
Blade inspection ..............................................................7-30
Blade replacement ..........................................................7-30
Battery...................................................................7-33
For best battery service................................................7-33
Battery capacity label ....................................................7-35
Battery recharging .........................................................7-35
Reset items .......................................................................7\
-36
Tyres and wheels .................................................7-37
Tyre care ........................................................................\
...7-37
Recommended cold tyre inflation pressures ...........7-37
Checking tyre inflation pressure.................................7-39
Tyre rotation ....................................................................7-40\
Wheel alignment and tyre balance.............................7-41
Tyre replacement ............................................................7-41
Wheel replacement ........................................................7-43
Tyre traction .....................................................................7-4\
3
Tyre maintenance ...........................................................7-43
Tyre sidewall labelling ....................................................7-43
Low aspect ratio tyre.....................................................7-48
7
TLe UK 7.qxp 5/10/2018 1:31 PM Page 1
Page 558 of 685
7-9
7
Maintenance
Owner maintenance schedule
When you stop for fuel:
• Check the engine oil level.
• Check coolant level in the enginecoolant reservoir.
• Check the windscreen washer fluid level.
• Check for low or under-inflated tyres.
Whilst operating your vehicle:
• Note any changes in the sound of the exhaust or any smell of exhaust
fumes in the vehicle.
• Check for vibrations in the steering wheel. Notice if there is any
increased steering effort or loose-
ness in the steering wheel, or
change in its straight-ahead position.
• Notice if your vehicle constantly turns slightly or “pulls” to one side when
travelling on smooth, level road.
• When stopping, listen and check for unusual sounds, pulling to one side,
increased brake pedal travel or
“hard-to-push” brake pedal.
• If any slipping or changes in the operation of your transaxle occurs,
check the transaxle fluid level.
• Check the automatic transaxle/ dual clutch transmission P (Park)
function.
• Check the parking brake.
• Check for fluid leaks under your vehicle (water dripping from the air
conditioning system during or after
use is normal).
Be careful when checking your
engine coolant level when the
engine is hot. This may result in
coolant being blown out of the
opening and cause serious
burns and other injuries.
WARNING
Diesel Engine
Never manipulate or modify the
injection system whilst running
the diesel engine or within 30
seconds after turning OFF the
diesel engine. The high-pres-
sure pump, high-pressure
pipes, rail, and injectors are still
subject to the high pressure
right after stopping the diesel
engine.
When the fuel leakage vents
out, it may cause serious body
injury. Any people, who are
implemented with the artificial
cardiac pacemaker, should
remain away from the ECU or
the wiring harness by at least 30
cm, whilst running the diesel
engine. The high currents of the
electric engine control system
produce a considerable amount
of magnetic fields.
WARNING
TLe UK 7.qxp 5/10/2018 1:32 PM Page 9
Page 559 of 685
7-10
Maintenance
At least monthly:
• Check coolant level in the enginecoolant reservoir.
• Check the operation of all exterior lights, including the stoplights, turn
signals and hazard warning flashers.
• Check the inflation pressures of all tyres including the spare for tyres
that are worn, show uneven wear,
or are damaged.
• Check for loose wheel lug nuts.
At least twice a year: (i.e., every Spring and Fall)
• Check radiator, heater and air condi-
tioning hoses for leaks or damage.
• Check windscreen washer spray and wiper operation. Clean wiper
blades with clean cloth dampened
with washer fluid.
• Check headlamp alignment.
• Check muffler, exhaust pipes, shields and clamps.
• Check the seat belts for wear and function.
At least once a year:
• Clean body and door drain holes.
• Lubricate door hinges and bonnethinges.
• Lubricate door and bonnet locks and latches.
• Lubricate door rubber weather strips.
• Check the air conditioning system.
• Inspect and lubricate automatic transaxle linkage and controls.
• Clean the battery and terminals.
• Check the brake fluid level.
TLe UK 7.qxp 5/10/2018 1:32 PM Page 10