2019 Hyundai Tucson ECU
[x] Cancel search: ECUPage 351 of 685
5-27
Driving your vehicle
5
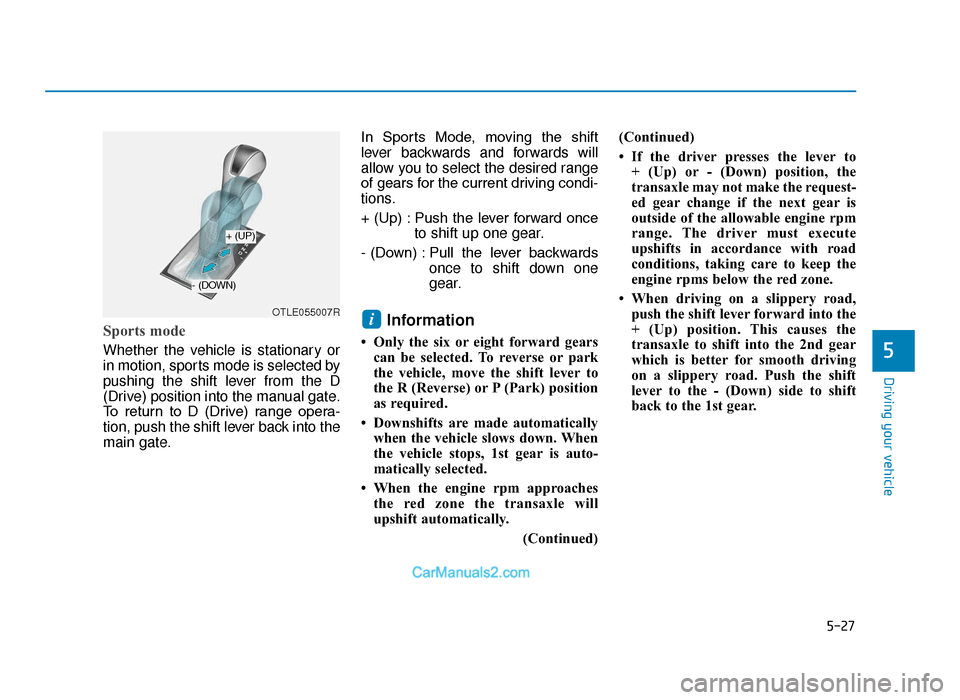
Sports mode
Whether the vehicle is stationary or
in motion, sports mode is selected by
pushing the shift lever from the D
(Drive) position into the manual gate.
To return to D (Drive) range opera-
tion, push the shift lever back into the
main gate.In Sports Mode, moving the shift
lever backwards and forwards will
allow you to select the desired range
of gears for the current driving condi-
tions.
+ (Up) : Push the lever forward once
to shift up one gear.
- (Down) : Pull the lever backwards once to shift down one
gear.
Information
• Only the six or eight forward gearscan be selected. To reverse or park
the vehicle, move the shift lever to
the R (Reverse) or P (Park) position
as required.
• Downshifts are made automatically when the vehicle slows down. When
the vehicle stops, 1st gear is auto-
matically selected.
• When the engine rpm approaches the red zone the transaxle will
upshift automatically.
(Continued)(Continued)
• If the driver presses the lever to
+ (Up) or - (Down) position, the
transaxle may not make the request-
ed gear change if the next gear is
outside of the allowable engine rpm
range. The driver must execute
upshifts in accordance with road
conditions, taking care to keep the
engine rpms below the red zone.
• When driving on a slippery road, push the shift lever forward into the
+ (Up) position. This causes the
transaxle to shift into the 2nd gear
which is better for smooth driving
on a slippery road. Push the shift
lever to the - (Down) side to shift
back to the 1st gear.
iOTLE055007R
+ (UP)
- (DOWN)
TLe UK 5.qxp 5/10/2018 12:20 PM Page 27
Page 364 of 685
5-40
Driving your vehicle
Information
• Only the seven forward gears can beselected. To reverse or park the
vehicle, move the shift lever to the R
(Reverse) or P (Park) position as
required.
• Downshifts are made automatically when the vehicle slows down. When
the vehicle stops, 1st gear is auto-
matically selected.
• When the engine rpm approaches the red zone the transmission will
upshift automatically.
• If the driver presses the lever to + (Up) or - (Down) position, the
transmission may not make the
requested gear change if the next
gear is outside of the allowable
engine rpm range. The driver must
execute upshifts in accordance with
road conditions, taking care to keep
the engine rpms below the red zone.
Shift-lock system
For your safety, the dual clutch trans-
mission has a shift-lock system
which prevents shifting the transmis-
sion from P (Park) into R (Reverse)
unless the brake pedal is depressed.
To shift the transmission from P
(Park) into R (Reverse):
1. Depress and hold the brake pedal.
2. Start the engine or place the igni- tion switch in the ON position.
3. Move the shift lever.
Shift-lock release
If the shift lever cannot be moved
from the P (Park) position into R
(Reverse) position with the brake
pedal depressed, continue depress-
ing the brake, and then do the follow-
ing: 1. Place the ignition switch in the
LOCK/OFF position.
2. Apply the parking brake.
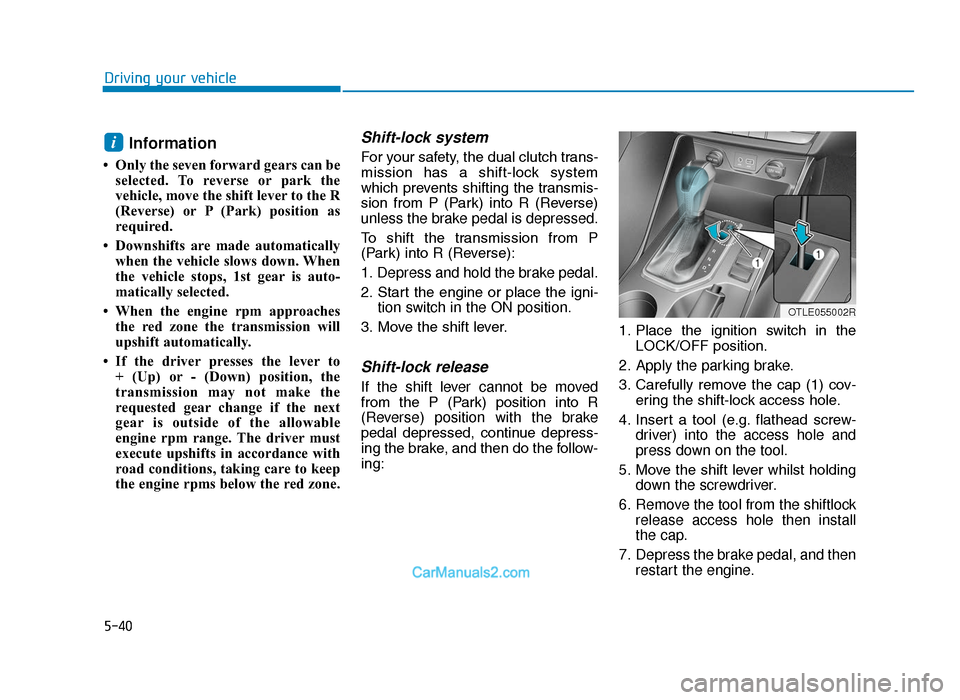
3. Carefully remove the cap (1) cov- ering the shift-lock access hole.
4. Insert a tool (e.g. flathead screw- driver) into the access hole and
press down on the tool.
5. Move the shift lever whilst holding down the screwdriver.
6. Remove the tool from the shiftlock release access hole then install
the cap.
7. Depress the brake pedal, and then restart the engine.
i
OTLE055002R
TLe UK 5.qxp 5/10/2018 12:21 PM Page 40
Page 417 of 685
5-93
Driving your vehicle
5
(Continued)
•Even if there is any problem
with the brake control function
of the FCA system, the vehi-
cle's basic braking perform-
ance will operate normally.
However, brake control func-
tion for avoiding collision will
not activate.
•If the vehicle in front stops
suddenly, you may have less
control of the brake system.
Therefore, always keep a safe
distance between your vehicle
and the vehicle in front of you.
•The FCA system may activate
during braking and the vehi-
cle may stop suddenly shift-
ing loose objects toward the
passengers. Always keep
loose objects secured.
•The FCA system may not acti-
vate if the driver applies the
brake pedal to avoid a colli-
sion.(Continued)
(Continued)
•The brake control may be
insufficient, possibly causing
a collision, if a vehicle in front
abruptly stops. Always pay
extreme caution.
•Occupants may get injured, if
the vehicle abruptly stops by
the activated FCA system. Pay
extreme caution.
•The FCA system operates
only to detect vehicle or
pedestrian in front of the vehi-
cle.
•The FCA system does not
operate when the vehicle is in
reverse.
•The FCA system is not
designed to detect other
objects on the road such as
animals.
•The FCA system does not
detect vehicles in the oppo-
site lane.
•The FCA system does not
detect cross traffic vehicles
that are approaching.
•The FCA system cannot
detect the driver approaching
the side view of a parked vehi-
cle (for example on a dead
end street.)
In these cases, you must main-
tain a safe braking distance,
and if necessary, depress the
brake pedal to reduce the driv-
ing speed in order to maintain a
safe distance.
WARNING
TLe UK 5.qxp 5/10/2018 12:25 PM Page 93
Page 498 of 685
5-174
Driving your vehicle
Trailer brakes
If your trailer is equipped with a brak-
ing system, make sure it conforms
your country’s regulations and that it
is properly installed and operating
correctly.
If your trailer weighs more than the
maximum trailer weight without trail-
er brakes loaded, then it needs its
own brakes and they must be ade-
quate. Be sure to read and follow the
instructions for the trailer brakes so
you’ll be able to install, adjust and
maintain them properly. Be sure not
to tap into your vehicle's brake sys-
tem.
Driving with a trailer
Towing a trailer requires a certain
amount of experience. Before setting
out for the open road, you must get
to know your trailer. Acquaint your-
self with the feel of handling and
braking with the added weight of the
trailer. And always keep in mind that
the vehicle you are driving is now
longer and not nearly as responsive
as your vehicle is by itself.
Before you start, check the trailer
towbar and platform, safety chains,
electrical connector(s), lights, tyres
and brakes.
During your trip, occasionally check
to be sure that the load is secure,
and that the lights and trailer brakes
are still working.
Distance
Stay at least twice as far behind the
vehicle ahead as you would when
driving your vehicle without a trailer.
This can help you avoid situations
that require heavy braking and sud-
den turns.
Passing
You will need more passing distance
up ahead when you’re towing a trail-
er. And, because of the increased
vehicle length, you’ll need to go
much farther beyond the passed
vehicle before you can return to your
lane.
Do not use a trailer with its own
brakes unless you are absolute-
ly certain that you have proper-
ly set up the brake system. This
is not a task for amateurs. Use
an experienced, competent trail-
er shop for this work.
WARNING
TLe UK 5.qxp 5/10/2018 12:32 PM Page 174
Page 524 of 685
6-21
What to do in an emergency
6
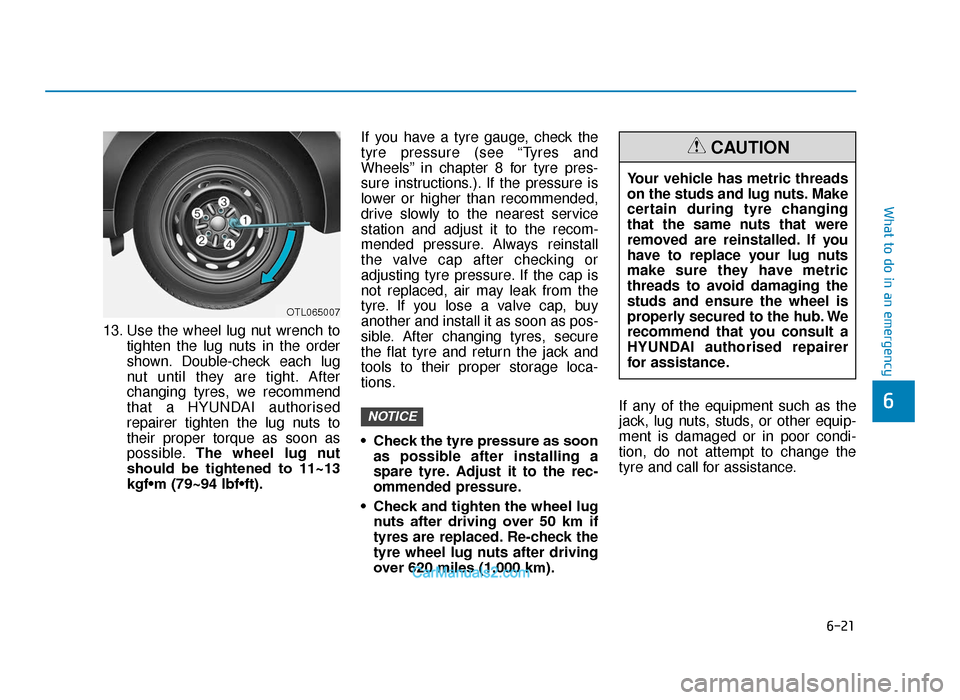
13. Use the wheel lug nut wrench totighten the lug nuts in the order
shown. Double-check each lug
nut until they are tight. After
changing tyres, we recommend
that a HYUNDAI authorised
repairer tighten the lug nuts to
their proper torque as soon as
possible. The wheel lug nut
should be tightened to 11~13
kgf•m (79~94 lbf•ft). If you have a tyre gauge, check the
tyre pressure (see “Tyres and
Wheels” in chapter 8 for tyre pres-
sure instructions.). If the pressure is
lower or higher than recommended,
drive slowly to the nearest service
station and adjust it to the recom-
mended pressure. Always reinstall
the valve cap after checking or
adjusting tyre pressure. If the cap is
not replaced, air may leak from the
tyre. If you lose a valve cap, buy
another and install it as soon as pos-
sible. After changing tyres, secure
the flat tyre and return the jack and
tools to their proper storage loca-
tions.
• Check the tyre pressure as soon
as possible after installing a
spare tyre. Adjust it to the rec-
ommended pressure.
• Check and tighten the wheel lug nuts after driving over 50 km if
tyres are replaced. Re-check the
tyre wheel lug nuts after driving
over 620 miles (1,000 km). If any of the equipment such as the
jack, lug nuts, studs, or other equip-
ment is damaged or in poor condi-
tion, do not attempt to change the
tyre and call for assistance.
NOTICE
OTL065007
Your vehicle has metric threads
on the studs and lug nuts. Make
certain during tyre changing
that the same nuts that were
removed are reinstalled. If you
have to replace your lug nuts
make sure they have metric
threads to avoid damaging the
studs and ensure the wheel is
properly secured to the hub. We
recommend that you consult a
HYUNDAI authorised repairer
for assistance.
CAUTION
TLe UK 6.qxp 5/10/2018 1:21 PM Page 21
Page 532 of 685
6-29
What to do in an emergency
6
Using the Tyre Mobility Kit
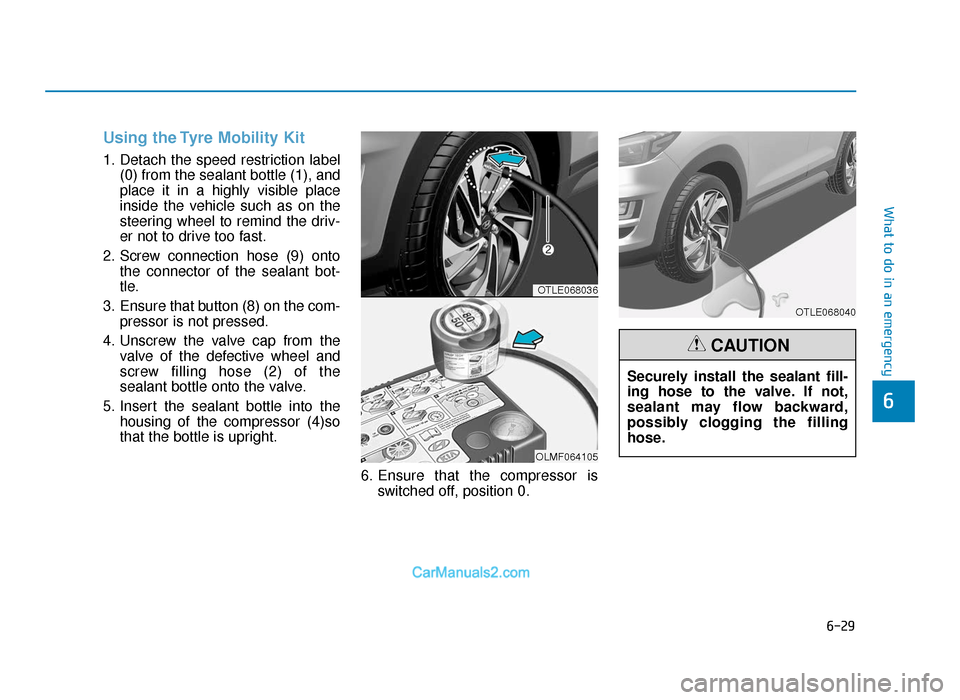
1. Detach the speed restriction label(0) from the sealant bottle (1), and
place it in a highly visible place
inside the vehicle such as on the
steering wheel to remind the driv-
er not to drive too fast.
2. Screw connection hose (9) onto the connector of the sealant bot-
tle.
3. Ensure that button (8) on the com- pressor is not pressed.
4. Unscrew the valve cap from the valve of the defective wheel and
screw filling hose (2) of the
sealant bottle onto the valve.
5. Insert the sealant bottle into the housing of the compressor (4)so
that the bottle is upright.
6. Ensure that the compressor isswitched off, position 0.
OTLE068036
OLMF064105
OTLE068040
Securely install the sealant fill-
ing hose to the valve. If not,
sealant may flow backward,
possibly clogging the filling
hose.
CAUTION
TLe UK 6.qxp 5/10/2018 1:21 PM Page 29
Page 540 of 685
6-37
What to do in an emergency
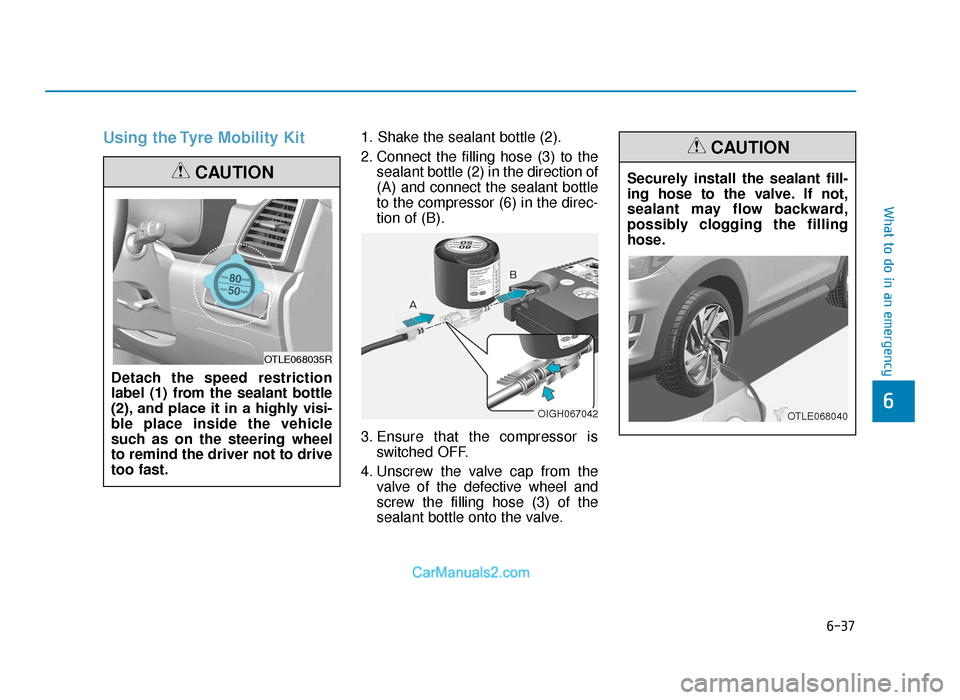
Using the Tyre Mobility Kit1. Shake the sealant bottle (2).
2. Connect the filling hose (3) to thesealant bottle (2) in the direction of
(A) and connect the sealant bottle
to the compressor (6) in the direc-
tion of (B).
3. Ensure that the compressor is switched OFF.
4. Unscrew the valve cap from the valve of the defective wheel and
screw the filling hose (3) of the
sealant bottle onto the valve.
6
Detach the speed restriction
label (1) from the sealant bottle
(2), and place it in a highly visi-
ble place inside the vehicle
such as on the steering wheel
to remind the driver not to drive
too fast.
CAUTION
OTLE068035R
OIGH067042
Securely install the sealant fill-
ing hose to the valve. If not,
sealant may flow backward,
possibly clogging the filling
hose.
CAUTION
OTLE068040
TLe UK 6.qxp 5/10/2018 1:22 PM Page 37
Page 546 of 685
6-43
What to do in an emergency
6
When towing your vehicle in an
emergency without wheel dollies:
1. Place the ignition switch in theACC position.
2. Place the shift lever in N (Neutral).
3. Release the parking brake.
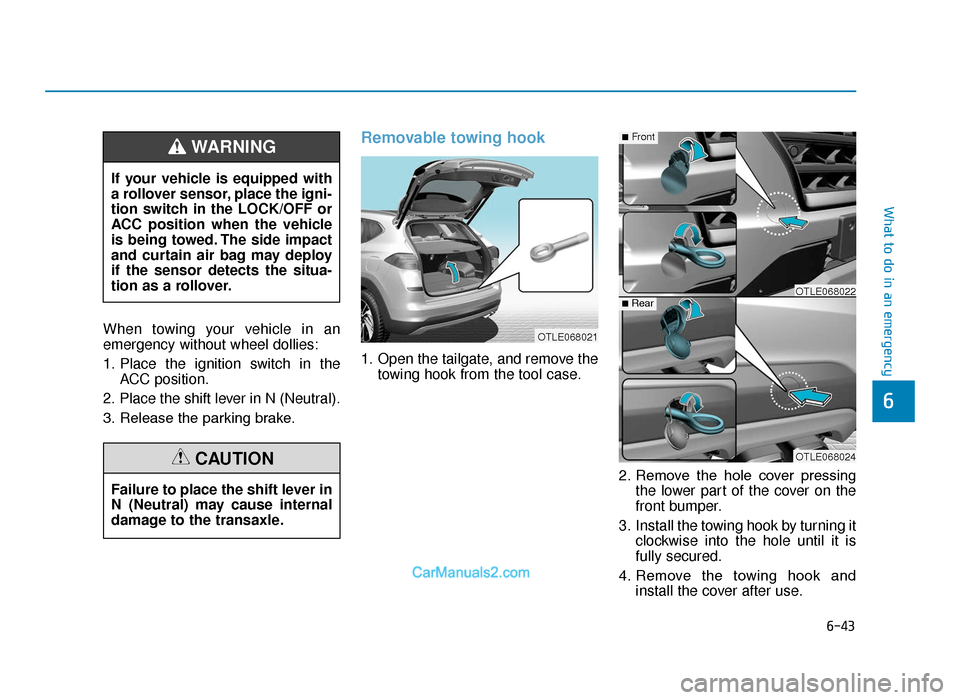
Removable towing hook
1. Open the tailgate, and remove the towing hook from the tool case.
2. Remove the hole cover pressingthe lower part of the cover on the
front bumper.
3. Install the towing hook by turning it clockwise into the hole until it is
fully secured.
4. Remove the towing hook and install the cover after use.
Failure to place the shift lever in
N (Neutral) may cause internal
damage to the transaxle.
CAUTION
OTLE068021
OTLE068022
OTLE068024
■Front
■Rear
If your vehicle is equipped with
a rollover sensor, place the igni-
tion switch in the LOCK/OFF or
ACC position when the vehicle
is being towed. The side impact
and curtain air bag may deploy
if the sensor detects the situa-
tion as a rollover.
WARNING
TLe UK 6.qxp 5/10/2018 1:22 PM Page 43