2019 Hyundai Tucson ABS
[x] Cancel search: ABSPage 470 of 685
5-146
Driving your vehicle
Smart Cruise Control will betemporarily cancelled when:
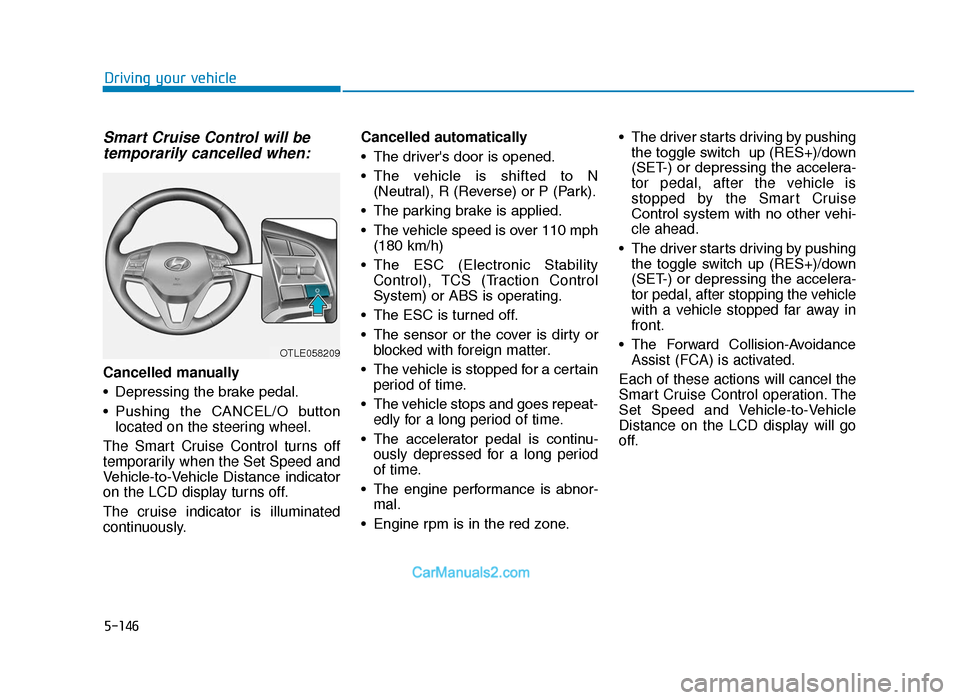
Cancelled manually
• Depressing the brake pedal.
• Pushing the CANCEL/O button
located on the steering wheel.
The Smart Cruise Control turns off
temporarily when the Set Speed and
Vehicle-to-Vehicle Distance indicator
on the LCD display turns off.
The cruise indicator is illuminated
continuously. Cancelled automatically
• The driver's door is opened.
• The vehicle is shifted to N
(Neutral), R (Reverse) or P (Park).
• The parking brake is applied.
• The vehicle speed is over 110 mph (180 km/h)
• The ESC (Electronic Stability Control), TCS (Traction Control
System) or ABS is operating.
• The ESC is turned off.
• The sensor or the cover is dirty or blocked with foreign matter.
• The vehicle is stopped for a certain period of time.
• The vehicle stops and goes repeat- edly for a long period of time.
• The accelerator pedal is continu- ously depressed for a long period
of time.
• The engine performance is abnor- mal.
• Engine rpm is in the red zone. • The driver starts driving by pushing
the toggle switch up (RES+)/down
(SET-) or depressing the accelera-
tor pedal, after the vehicle is
stopped by the Smart Cruise
Control system with no other vehi-
cle ahead.
• The driver starts driving by pushing the toggle switch up (RES+)/down
(SET-) or depressing the accelera-
tor pedal, after stopping the vehicle
with a vehicle stopped far away in
front.
• The Forward Collision-Avoidance Assist (FCA) is activated.
Each of these actions will cancel the
Smart Cruise Control operation. The
Set Speed and Vehicle-to-Vehicle
Distance on the LCD display will go
off.
OTLE058209
TLe UK 5.qxp 5/10/2018 12:30 PM Page 146
Page 498 of 685
5-174
Driving your vehicle
Trailer brakes
If your trailer is equipped with a brak-
ing system, make sure it conforms
your country’s regulations and that it
is properly installed and operating
correctly.
If your trailer weighs more than the
maximum trailer weight without trail-
er brakes loaded, then it needs its
own brakes and they must be ade-
quate. Be sure to read and follow the
instructions for the trailer brakes so
you’ll be able to install, adjust and
maintain them properly. Be sure not
to tap into your vehicle's brake sys-
tem.
Driving with a trailer
Towing a trailer requires a certain
amount of experience. Before setting
out for the open road, you must get
to know your trailer. Acquaint your-
self with the feel of handling and
braking with the added weight of the
trailer. And always keep in mind that
the vehicle you are driving is now
longer and not nearly as responsive
as your vehicle is by itself.
Before you start, check the trailer
towbar and platform, safety chains,
electrical connector(s), lights, tyres
and brakes.
During your trip, occasionally check
to be sure that the load is secure,
and that the lights and trailer brakes
are still working.
Distance
Stay at least twice as far behind the
vehicle ahead as you would when
driving your vehicle without a trailer.
This can help you avoid situations
that require heavy braking and sud-
den turns.
Passing
You will need more passing distance
up ahead when you’re towing a trail-
er. And, because of the increased
vehicle length, you’ll need to go
much farther beyond the passed
vehicle before you can return to your
lane.
Do not use a trailer with its own
brakes unless you are absolute-
ly certain that you have proper-
ly set up the brake system. This
is not a task for amateurs. Use
an experienced, competent trail-
er shop for this work.
WARNING
TLe UK 5.qxp 5/10/2018 12:32 PM Page 174
Page 501 of 685
5-177
Driving your vehicle
5
Parking on hills
Generally, if you have a trailer
attached to your vehicle, you should
not park your vehicle on a hill.
However, if you ever have to park
your trailer on a hill, here's how to do
it:
1. Pull the vehicle into the parkingspace.
Turn the steering wheel in the direction of the kerb (left if headed
down hill, right if headed up hill).
2. Shift the vehicle to P (Park, for automatic transaxle/dual clutch
transmission vehicle) or neutral
(for manual transaxle vehicle).
3. Set the parking brake and shut off the vehicle.
4. Place wheel chocks under the trailer wheels on the down hill side
of the wheels.
5. Start the vehicle, hold the brakes, shift to neutral, release the park-
ing brake and slowly release the
brakes until the trailer chocks
absorb the load. 6. Reapply the brakes and parking
brakes.
7. Move the shift lever to P (Park, for automatic transaxle/dual clutch
transmission vehicle) or 1st gear
when the vehicle is parked on a
uphill grade and in R (Reverse) on
a downhill (for manual transaxle
vehicle).
8. Shut off the vehicle and release the vehicle brakes but leave the
parking brake set.
Ready to leave after parking ona hill
1. With the shift lever to P (Park, for
automatic transaxle/dual clutch
transmission vehicle) or neutral (for
manual transaxle vehicle), apply
your brakes and hold the brake
pedal down whilst you:
• Start your engine;
• Shift into gear; and
• Release the parking brake.
2. Slowly remove your foot from the brake pedal.
3. Drive slowly until the trailer is clear of the chocks.
4. Stop and have someone pick up and store the chocks.
To prevent serious or fatal
injury:
•Do not get out of the vehicle
without the parking brake
firmly set. If you have left the
engine running, the vehicle
can move suddenly. You and
others could be seriously or
fatally injured.
•Do not apply the accelerator
pedal to hold the vehicle on
an uphill.
WARNING
TLe UK 5.qxp 5/10/2018 12:33 PM Page 177
Page 584 of 685
7-35
7
Maintenance
Battery capacity label
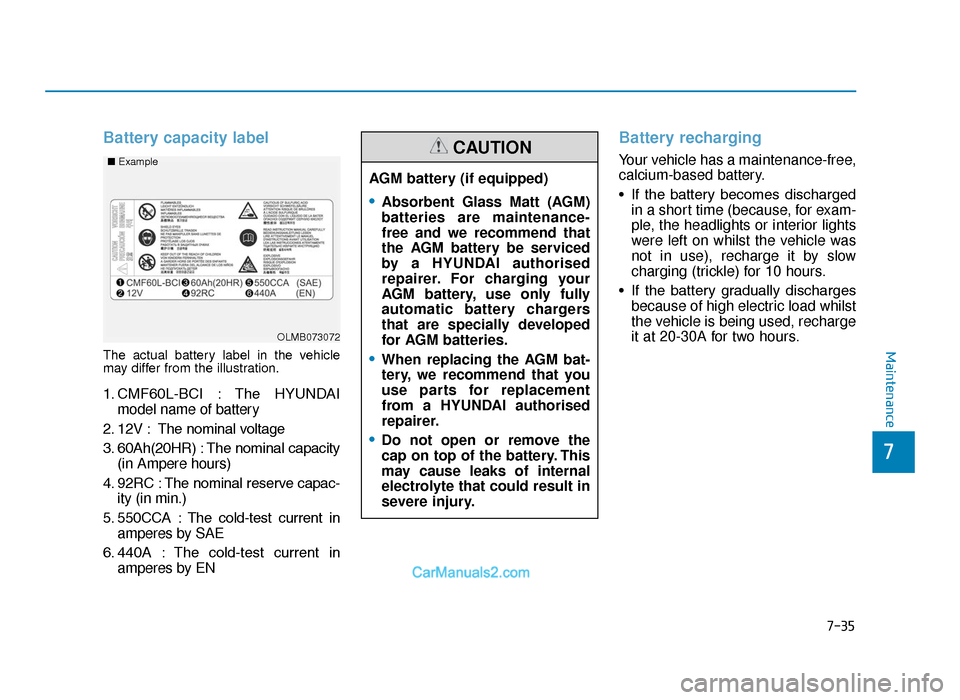
The actual battery label in the vehicle
may differ from the illustration.
1. CMF60L-BCI : The HYUNDAImodel name of battery
2. 12V : The nominal voltage
3. 60Ah(20HR) : The nominal capacity (in Ampere hours)
4. 92RC : The nominal reserve capac- ity (in min.)
5. 550CCA : The cold-test current in amperes by SAE
6. 440A : The cold-test current in amperes by EN
Battery recharging
Your vehicle has a maintenance-free,
calcium-based battery.
• If the battery becomes dischargedin a short time (because, for exam-
ple, the headlights or interior lights
were left on whilst the vehicle was
not in use), recharge it by slow
charging (trickle) for 10 hours.
• If the battery gradually discharges because of high electric load whilst
the vehicle is being used, recharge
it at 20-30A for two hours.
OLMB073072
■
Example
AGM battery (if equipped)
•Absorbent Glass Matt (AGM)
batteries are maintenance-
free and we recommend that
the AGM battery be serviced
by a HYUNDAI authorised
repairer. For charging your
AGM battery, use only fully
automatic battery chargers
that are specially developed
for AGM batteries.
•When replacing the AGM bat-
tery, we recommend that you
use parts for replacement
from a HYUNDAI authorised
repairer.
•Do not open or remove the
cap on top of the battery. This
may cause leaks of internal
electrolyte that could result in
severe injury.
CAUTION
TLe UK 7.qxp 5/10/2018 1:34 PM Page 35
Page 591 of 685
7-42
Maintenance
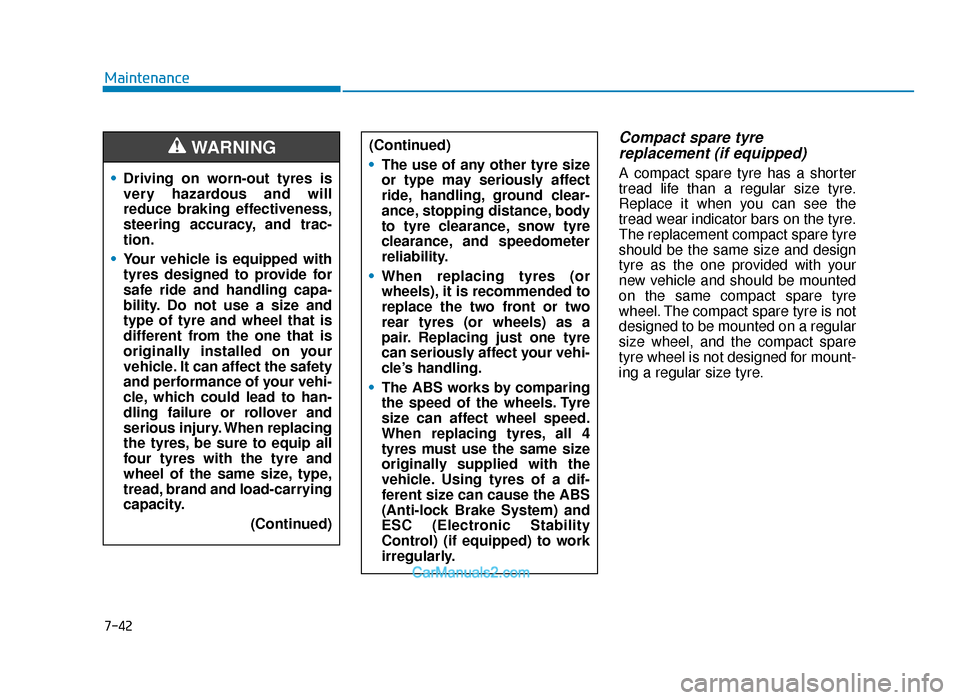
Compact spare tyre replacement (if equipped)
A compact spare tyre has a shorter
tread life than a regular size tyre.
Replace it when you can see the
tread wear indicator bars on the tyre.
The replacement compact spare tyre
should be the same size and design
tyre as the one provided with your
new vehicle and should be mounted
on the same compact spare tyre
wheel. The compact spare tyre is not
designed to be mounted on a regular
size wheel, and the compact spare
tyre wheel is not designed for mount-
ing a regular size tyre.
(Continued)
•
The use of any other tyre size
or type may seriously affect
ride, handling, ground clear-
ance, stopping distance, body
to tyre clearance, snow tyre
clearance, and speedometer
reliability.
• When replacing tyres (or
wheels), it is recommended to
replace the two front or two
rear tyres (or wheels) as a
pair. Replacing just one tyre
can seriously affect your vehi-
cle’s handling.
• The ABS works by comparing
the speed of the wheels. Tyre
size can affect wheel speed.
When replacing tyres, all 4
tyres must use the same size
originally supplied with the
vehicle. Using tyres of a dif-
ferent size can cause the ABS
(Anti-lock Brake System) and
ESC (Electronic Stability
Control) (if equipped) to work
irregularly.•Driving on worn-out tyres is
very hazardous and will
reduce braking effectiveness,
steering accuracy, and trac-
tion.
• Your vehicle is equipped with
tyres designed to provide for
safe ride and handling capa-
bility. Do not use a size and
type of tyre and wheel that is
different from the one that is
originally installed on your
vehicle. It can affect the safety
and performance of your vehi-
cle, which could lead to han-
dling failure or rollover and
serious injury. When replacing
the tyres, be sure to equip all
four tyres with the tyre and
wheel of the same size, type,
tread, brand and load-carrying
capacity.
(Continued)
WARNING
TLe UK 7.qxp 5/10/2018 1:35 PM Page 42
Page 609 of 685
7-60
Maintenance
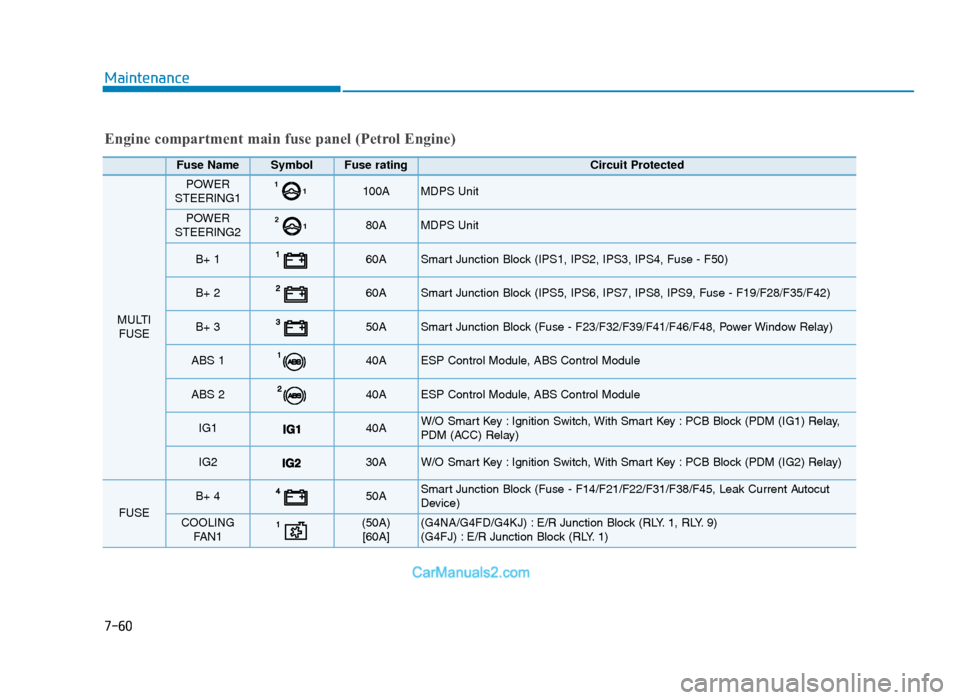
Engine compartment main fuse panel (Petrol Engine)
Fuse Name SymbolFuse ratingCircuit Protected
MULTIFUSE
POWER
STEERING111100AMDPS Unit
POWER
STEERING21280AMDPS Unit
B+ 1 60A Smart Junction Block (IPS1, IPS2, IPS3, IPS4, Fuse - F50)
B+ 2 60A Smart Junction Block (IPS5, IPS6, IPS7, IPS8, IPS9, Fuse - F19/F28/F35/F42)
B+ 3 50A Smart Junction Block (Fuse - F23/F32/F39/F41/F46/F48, Power Window Relay)
ABS 1 40A ESP Control Module, ABS Control Module
ABS 2 40A ESP Control Module, ABS Control Module
IG1 40A W/O Smart Key : Ignition Switch, With Smart Key : PCB Block (PDM (IG1) Relay,
PDM (ACC) Relay)
IG2 30A W/O Smart Key : Ignition Switch, With Smart Key : PCB Block (PDM (IG2) Relay)
FUSE
B+ 4 50A Smart Junction Block (Fuse - F14/F21/F22/F31/F38/F45, Leak Current Autocut
Device)
COOLING FAN1(50A)[60A](G4NA/G4FD/G4KJ) : E/R Junction Block (RLY. 1, RLY. 9)
(G4FJ) : E/R Junction Block (RLY. 1)
TLe UK 7.qxp 5/10/2018 1:37 PM Page 60
Page 611 of 685
Maintenance
7-62
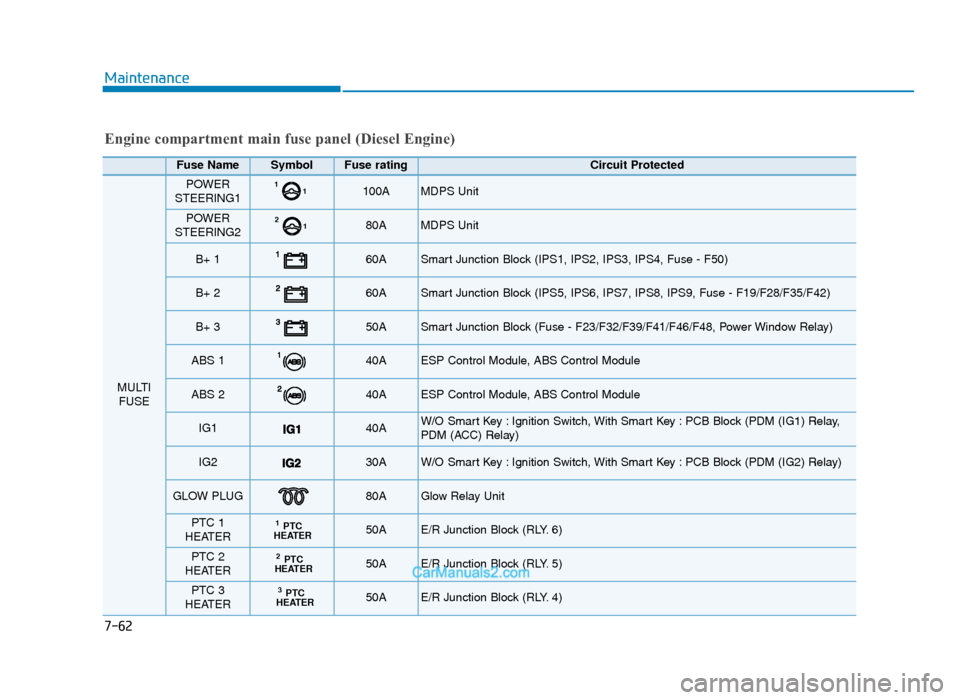
Engine compartment main fuse panel (Diesel Engine)
Fuse Name SymbolFuse ratingCircuit Protected
MULTIFUSE
POWER
STEERING111100AMDPS Unit
POWER
STEERING21280AMDPS Unit
B+ 1 60A Smart Junction Block (IPS1, IPS2, IPS3, IPS4, Fuse - F50)
B+ 2 60A Smart Junction Block (IPS5, IPS6, IPS7, IPS8, IPS9, Fuse - F19/F28/F35/F42)
B+ 3 50A Smart Junction Block (Fuse - F23/F32/F39/F41/F46/F48, Power Window Relay)
ABS 1 40A ESP Control Module, ABS Control Module
ABS 2 40A ESP Control Module, ABS Control Module
IG1 40A W/O Smart Key : Ignition Switch, With Smart Key : PCB Block (PDM (IG1) Relay,
PDM (ACC) Relay)
IG2 30A W/O Smart Key : Ignition Switch, With Smart Key : PCB Block (PDM (IG2) Relay)
GLOW PLUG80AGlow Relay Unit
PTC 1
HEATERPTCHEATER150AE/R Junction Block (RLY. 6)
PTC 2
HEATERPTCHEATER250AE/R Junction Block (RLY. 5)
PTC 3
HEATERPTCHEATER350AE/R Junction Block (RLY. 4)
TLe UK 7.qxp 5/10/2018 1:37 PM Page 62
Page 615 of 685
Maintenance
7-66
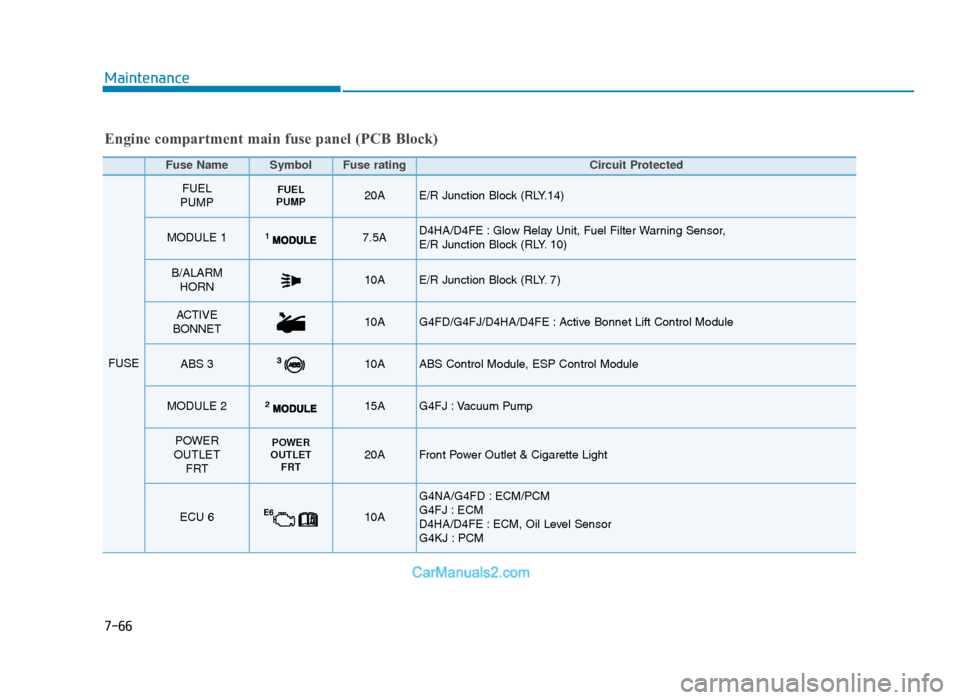
Fuse Name SymbolFuse ratingCircuit Protected
FUSE
FUEL
PUMPFUEL
PUMP20A E/R Junction Block (RLY.14)
MODULE 17.5A D4HA/D4FE : Glow Relay Unit, Fuel Filter Warning Sensor,
E/R Junction Block (RLY. 10)
B/ALARM HORN10A E/R Junction Block (RLY. 7)
ACTIVE
BONNET10AG4FD/G4FJ/D4HA/D4FE : Active Bonnet Lift Control Module
ABS 310A ABS Control Module, ESP Control Module
MODULE 215A G4FJ : Vacuum Pump
POWER
OUTLET FRTPOWER
OUTLET FRT20AFront Power Outlet & Cigarette Light
ECU 610A
G4NA/G4FD : ECM/PCM
G4FJ : ECM
D4HA/D4FE : ECM, Oil Level Sensor
G4KJ : PCM
Engine compartment main fuse panel (PCB Block)
TLe UK 7.qxp 5/10/2018 1:38 PM Page 66