Page 619 of 685
7-70
Maintenance
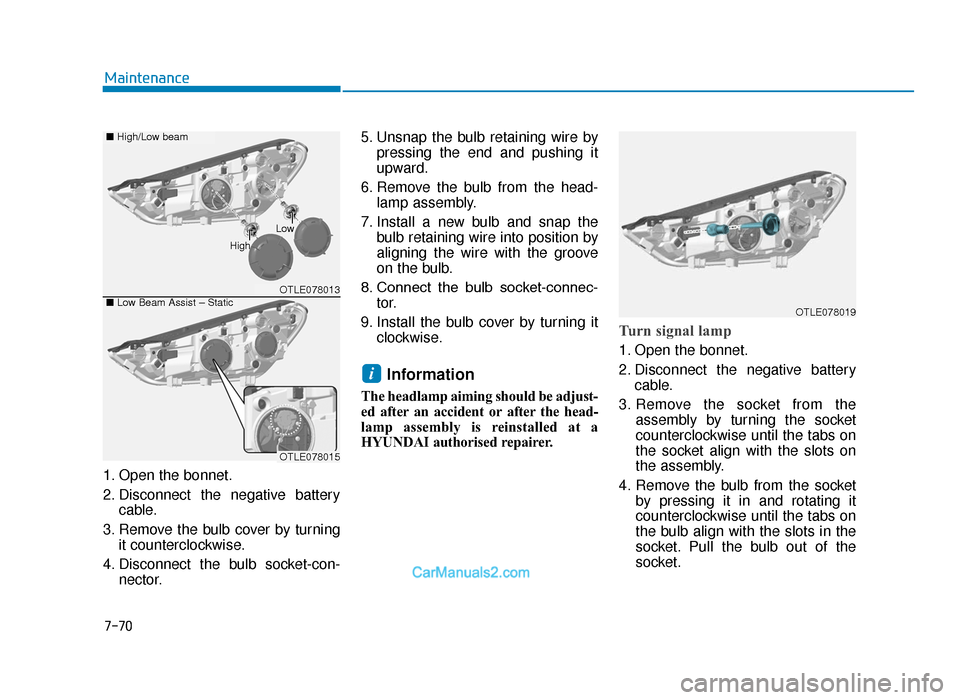
1. Open the bonnet.
2. Disconnect the negative battery cable.
3. Remove the bulb cover by turning it counterclockwise.
4. Disconnect the bulb socket-con- nector. 5. Unsnap the bulb retaining wire by
pressing the end and pushing it
upward.
6. Remove the bulb from the head- lamp assembly.
7. Install a new bulb and snap the bulb retaining wire into position by
aligning the wire with the groove
on the bulb.
8. Connect the bulb socket-connec- tor.
9. Install the bulb cover by turning it clockwise.
Information
The headlamp aiming should be adjust-
ed after an accident or after the head-
lamp assembly is reinstalled at a
HYUNDAI authorised repairer.
Turn signal lamp
1. Open the bonnet.
2. Disconnect the negative batterycable.
3. Remove the socket from the assembly by turning the socket
counterclockwise until the tabs on
the socket align with the slots on
the assembly.
4. Remove the bulb from the socket by pressing it in and rotating it
counterclockwise until the tabs on
the bulb align with the slots in the
socket. Pull the bulb out of the
socket.
i
OTLE078013
OTLE078015
■Low Beam Assist – Static
■High/Low beam
Low
High
OTLE078019
TLe UK 7.qxp 5/10/2018 1:38 PM Page 70
Page 620 of 685
7-71
7
Maintenance
5. Insert a new bulb by inserting itinto the socket and rotating it until
it locks into place.
6. Install the socket in the assembly by aligning the tabs on the socket
with the slots in the assembly.
7. Push the socket into the assembly and turn the socket clockwise.
Position lamp/Daytime running lamp
If the LED lamp does not operate, we
recommend you to have the vehicle
checked by a HYUNDAI authorised
repairer.
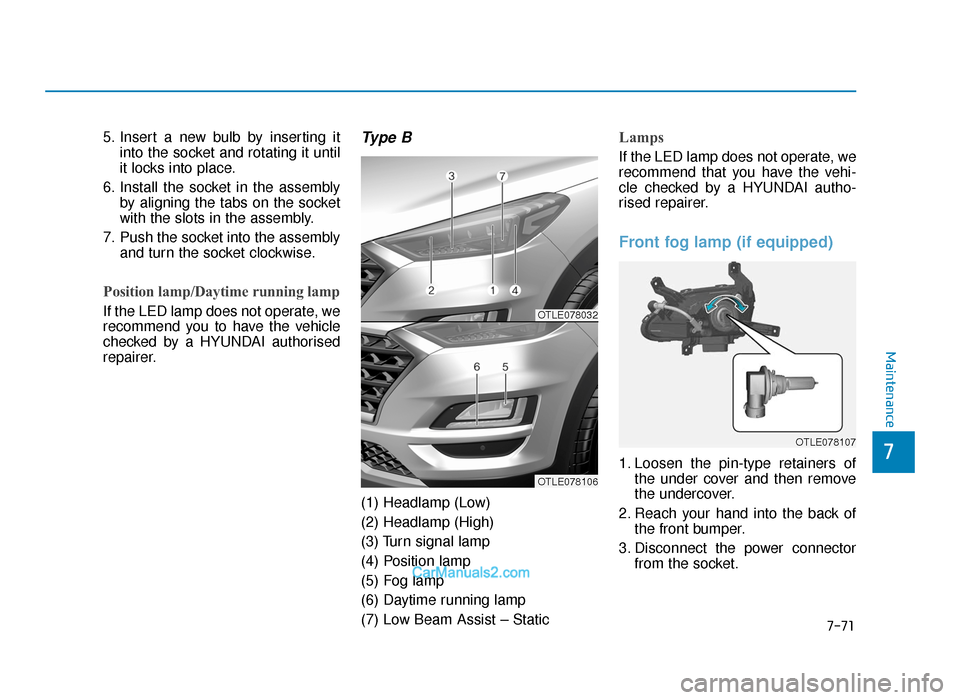
Type B
(1) Headlamp (Low)
(2) Headlamp (High)
(3) Turn signal lamp
(4) Position lamp
(5) Fog lamp
(6) Daytime running lamp
(7) Low Beam Assist – Static
Lamps
If the LED lamp does not operate, we
recommend that you have the vehi-
cle checked by a HYUNDAI autho-
rised repairer.
Front fog lamp (if equipped)
1. Loosen the pin-type retainers ofthe under cover and then remove
the undercover.
2. Reach your hand into the back of the front bumper.
3. Disconnect the power connector from the socket.
OTLE078107
OTLE078032
OTLE078106
TLe UK 7.qxp 5/10/2018 1:38 PM Page 71
Page 621 of 685
7-72
Maintenance
4. Remove the bulb-socket from the housing by turning the socket
counterclockwise until the tabs on
the socket align with the slots of
the housing.
5. Install a new bulb-socket into the housing by aligning the tabs on the
socket with the slots in the housing.
Push the socket into the housing
and turn the socket clockwise.
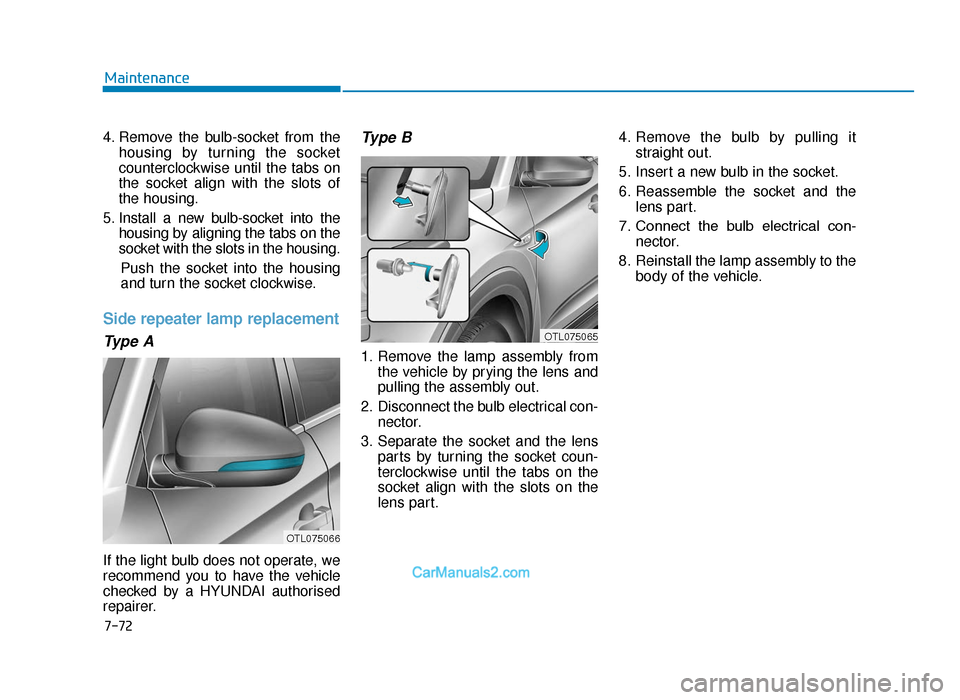
Side repeater lamp replacement
Type A
If the light bulb does not operate, we
recommend you to have the vehicle
checked by a HYUNDAI authorised
repairer.
Type B
1. Remove the lamp assembly from the vehicle by prying the lens and
pulling the assembly out.
2. Disconnect the bulb electrical con- nector.
3. Separate the socket and the lens parts by turning the socket coun-
terclockwise until the tabs on the
socket align with the slots on the
lens part. 4. Remove the bulb by pulling it
straight out.
5. Insert a new bulb in the socket.
6. Reassemble the socket and the lens part.
7. Connect the bulb electrical con- nector.
8. Reinstall the lamp assembly to the body of the vehicle.
OTL075065
OTL075066
TLe UK 7.qxp 5/10/2018 1:39 PM Page 72
Page 627 of 685
7-78
Maintenance
[A] : Stop/tail lamp , [B] : Turn signal lamp
5. Remove the socket from theassembly by turning the socket
counterclockwise until the tabs on
the socket align with the slots on
the assembly.
6. Remove the bulb from the socket by pressing it in and rotating it
counterclockwise until the tabs on
the bulb align with the slots in the
socket. Pull the bulb out of the
socket.
7. Insert a new bulb by inserting it into the socket and rotating it until it
locks into place. 8. Install the socket in the assembly
by aligning the tabs on the socket
with the slots in the assembly.
Push the socket into the assembly
and turn the socket clockwise.
9. Reinstall the lamp assembly to the body of the vehicle.
Stop/tail lamp, tail lamp
(Type B, LED)
If the LED lamp does not operate, we
recommend you to have the vehicle
checked by a HYUNDAI authorised
repairer.
OTLE078037
TLe UK 7.qxp 5/10/2018 1:39 PM Page 78
Page 628 of 685
7-79
7
Maintenance
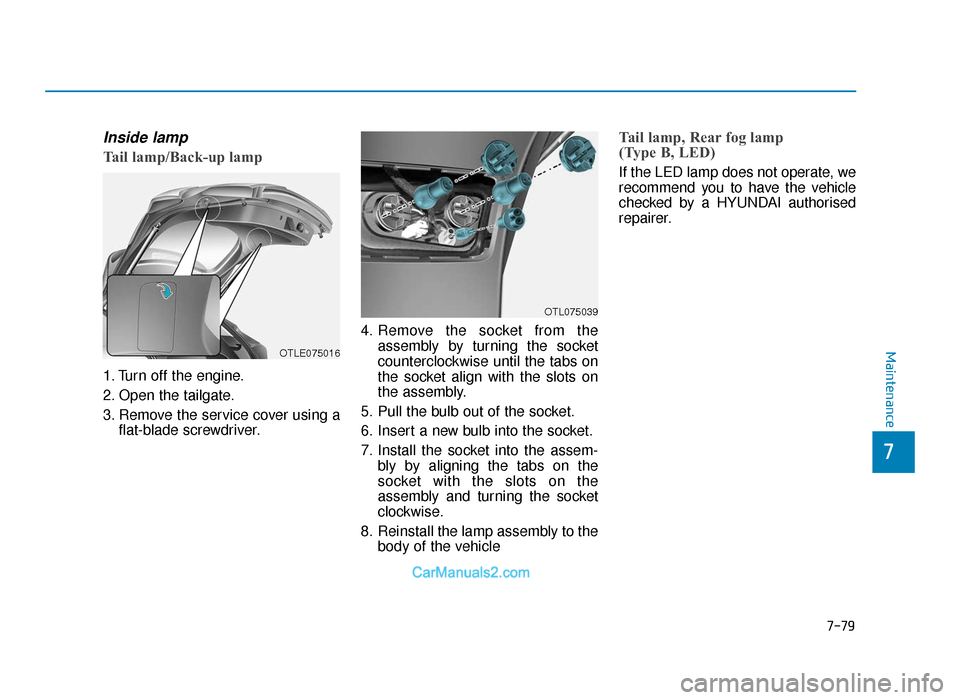
Inside lamp
Tail lamp/Back-up lamp
1. Turn off the engine.
2. Open the tailgate.
3. Remove the service cover using aflat-blade screwdriver. 4. Remove the socket from the
assembly by turning the socket
counterclockwise until the tabs on
the socket align with the slots on
the assembly.
5. Pull the bulb out of the socket.
6. Insert a new bulb into the socket.
7. Install the socket into the assem- bly by aligning the tabs on the
socket with the slots on the
assembly and turning the socket
clockwise.
8. Reinstall the lamp assembly to the body of the vehicle
Tail lamp, Rear fog lamp
(Type B, LED)
If the LED lamp does not operate, we
recommend you to have the vehicle
checked by a HYUNDAI authorised
repairer.
OTLE075016
OTL075039
TLe UK 7.qxp 5/10/2018 1:39 PM Page 79
Page 629 of 685
7-80
Maintenance
Rear fog lamp (if equipped)
1. Remove the socket from theassembly by turning the socket
counterclockwise until the tabs on
the socket align with the slots on
the assembly.
2. Remove the bulb from the socket by pressing it in and rotating it
counterclockwise until the tabs on
the bulb align with the slots in the
socket. Pull the bulb out of the
socket.
3. Insert a new bulb in the socket.
4. Reinstall the light assembly to the body of the vehicle.
High mounted stop lamp
replacement
If the high mounted stop lamp does not
operate, we recommend that you con-
tact a HYUNDAI authorised repairer.
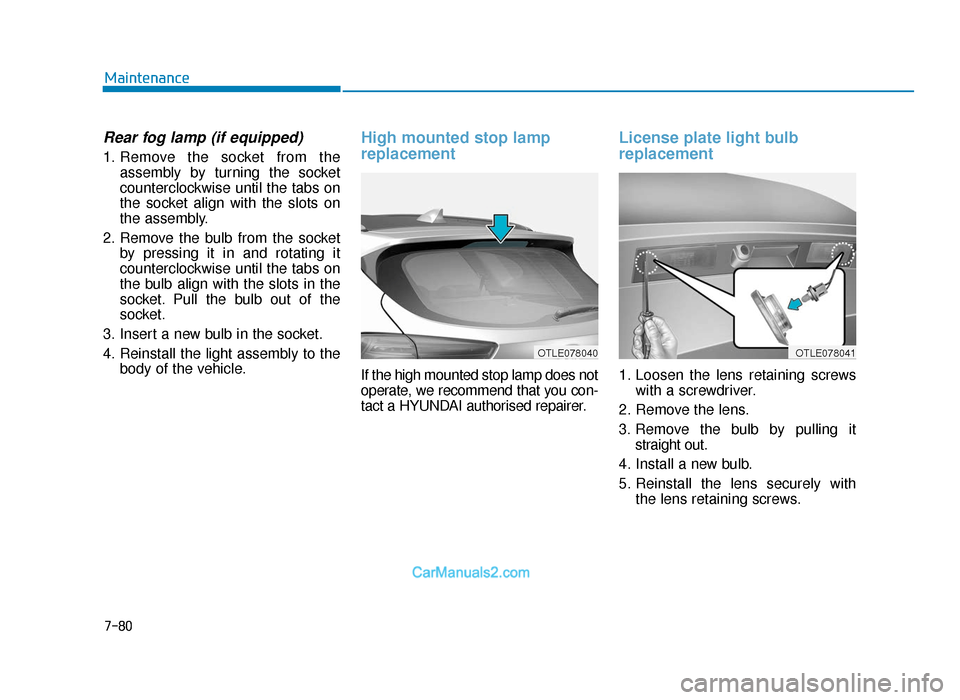
License plate light bulb
replacement
1. Loosen the lens retaining screwswith a screwdriver.
2. Remove the lens.
3. Remove the bulb by pulling it straight out.
4. Install a new bulb.
5. Reinstall the lens securely with the lens retaining screws.
OTLE078040OTLE078041
TLe UK 7.qxp 5/10/2018 1:39 PM Page 80
Page 631 of 685
7-82
Maintenance
1. Using a flat-head screwdriver, gently pry the lens from the interi-
or light housing.
2. Remove the bulb by pulling it straight out.
3. Install a new bulb in the socket.
4. Align the lens tabs with the interior light housing notches and snap
the lens into place. Be careful not to damage the cover,
tab, and plastic housing.
NOTICE
OTLE078046R
■
Glove box lamp
TLe UK 7.qxp 5/10/2018 1:40 PM Page 82
Page 639 of 685
7-90
Maintenance• Caring for the leather seats- Vacuum the seat periodically toremove dust and sand on the seat.
It will prevent abrasion or damage
of the leather and maintain its qual-
ity.
- Wipe the natural leather seat cover often with dry or soft cloth.
- Use of proper leather protective may prevent abrasion of the cover
and helps maintain the colour. Be
sure to read the instructions and
consult a specialist when using
leather coating or protective agent.
- Light coloured (beige, cream beige) leather is easily contaminat-
ed and the stain is noticeable.
Clean the seats frequently.
- Avoid wiping with wet cloth. It may cause the surface to crack. • Cleaning the leather seats
- Remove all contaminations instant-ly. Refer to instructions below for
removal of each contaminant.
- Cosmetic products (sunscreen, foundation, etc.)
Apply cleansing cream on a cloth
and wipe the contaminate spot.
Wipe off the cream with a wet cloth
and remove water with a dry cloth.
- Beverages (coffee, soft drink, etc.) Apply a small amount of neutral
detergent and wipe until contami-
nations do not smear.
- Oil Remove oil instantly with
absorbable cloth and wipe with
stain remover used only for natu-
ral leather.
- Chewing gum Harden the gum with ice and
remove gradually.
•Wrinkles or abrasions which
appear naturally from usage
are not covered by warranty.
•Belts with metallic acces-
sories, zippers or keys inside
the back pocket may damage
the seat fabric.
•Make sure not to wet the seat.
It may change the nature of
natural leather.
•Jeans or clothes which could
bleach may contaminate the
surface of the seat covering
fabric.
CAUTION
TLe UK 7.qxp 5/10/2018 1:40 PM Page 90