Page 36 of 685
2-16
Safety system of your vehicleTo prevent damage, NEVER hit or
pull on the head restraints.
Front seat head restraints
The driver’s and front passenger’s
seats are equipped with adjustable
head restraints for the passengers
safety and comfort.
NOTICE
When there is no occupant in
the rear seats, adjust the height
of the head restraint to the low-
est position. The rear seat head
restraint can reduce the visibili-
ty of the rear area.
CAUTION
(Continued)
•
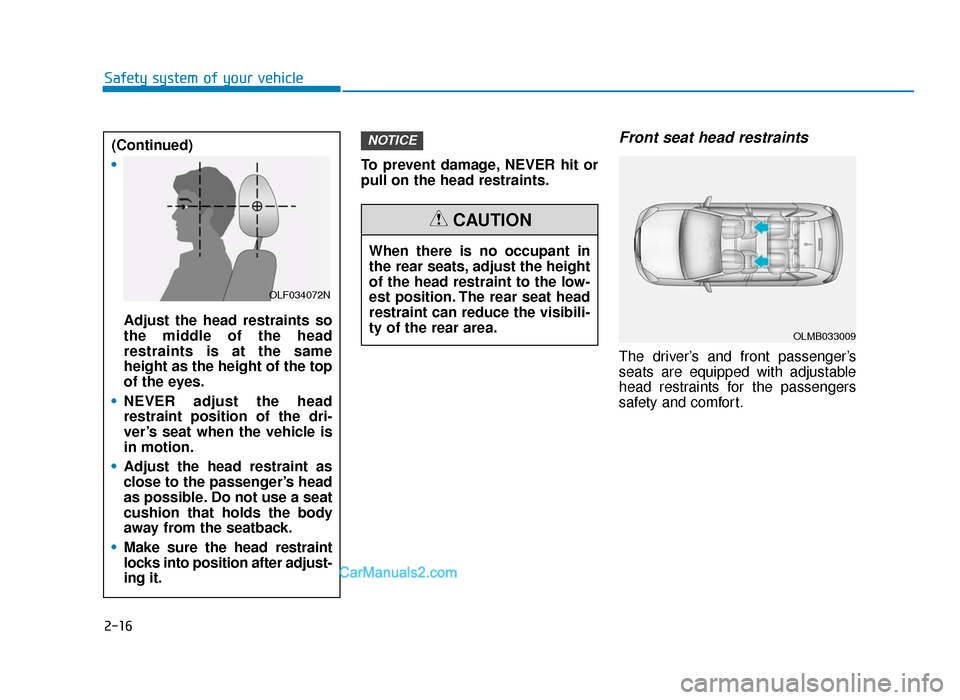
Adjust the head restraints so
the middle of the head
restraints is at the same
height as the height of the top
of the eyes.
• NEVER adjust the head
restraint position of the dri-
ver’s seat when the vehicle is
in motion.
• Adjust the head restraint as
close to the passenger’s head
as possible. Do not use a seat
cushion that holds the body
away from the seatback.
• Make sure the head restraint
locks into position after adjust-
ing it.
OLF034072N
OLMB033009
TLe UK 2.qxp 6/12/2018 2:04 PM Page 16
Page 39 of 685
2-19
Safety system of your vehicle
2
3. Adjust the head restraint to theappropriate height.
4. Recline the seatback (4) with the seatback angle knob or switch (3).Rear seat head restraints
The rear seats are equipped with
head restraints in all the seating
positions for the passenger’s safety
and comfort.
Adjusting the height up and down
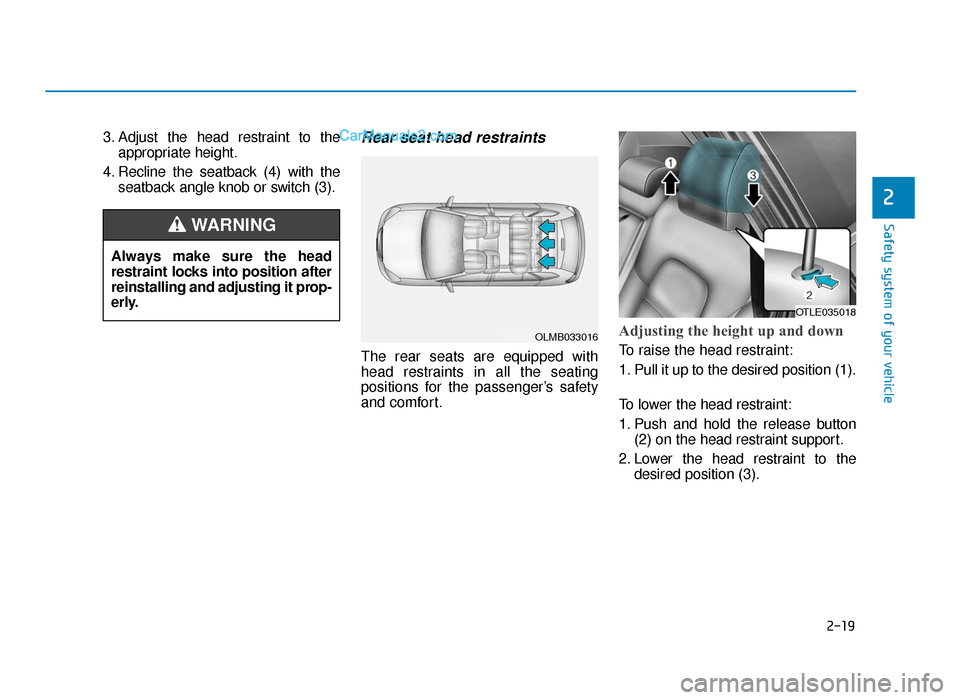
To raise the head restraint:
1. Pull it up to the desired position (1).
To lower the head restraint:
1. Push and hold the release button(2) on the head restraint support.
2. Lower the head restraint to the desired position (3).
OLMB033016
Always make sure the head
restraint locks into position after
reinstalling and adjusting it prop-
erly.
WARNING
OTLE035018
TLe UK 2.qxp 6/12/2018 2:05 PM Page 19
Page 42 of 685
2-22
Safety system of your vehicle
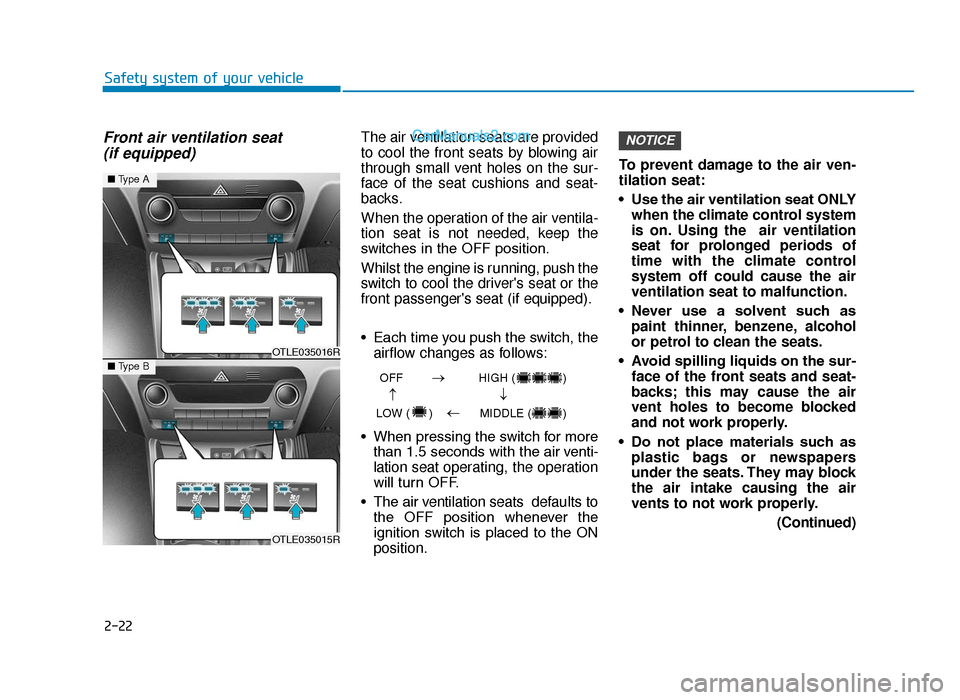
Front air ventilation seat (if equipped)The air ventilation seats are provided
to cool the front seats by blowing air
through small vent holes on the sur-
face of the seat cushions and seat-
backs.
When the operation of the air ventila-
tion seat is not needed, keep the
switches in the OFF position.
Whilst the engine is running, push the
switch to cool the driver's seat or the
front passenger's seat (if equipped).
• Each time you push the switch, the
airflow changes as follows:
• When pressing the switch for more than 1.5 seconds with the air venti-
lation seat operating, the operation
will turn OFF.
• The air v entilation seats def aults to
the OFF position whenever the
ignition switch is placed to the ON
position. To prevent damage to the air ven-
tilation seat:
• Use the air ventilation seat ONLY
when the climate control system
is on. Using the air ventilation
seat for prolonged periods of
time with the climate control
system off could cause the air
ventilation seat to malfunction.
• Never use a solvent such as paint thinner, benzene, alcohol
or petrol to clean the seats.
• Avoid spilling liquids on the sur- face of the front seats and seat-
backs; this may cause the air
vent holes to become blocked
and not work properly.
• Do not place materials such as plastic bags or newspapers
under the seats. They may block
the air intake causing the air
vents to not work properly.
(Continued)NOTICE
OTLE035016R
OTLE035015R
■Type A
■Type BOFF HIGH ( )
LOW ( ) MIDDLE ( )
→→
→
→
TLe UK 2.qxp 6/12/2018 2:05 PM Page 22
Page 48 of 685
2-28
Safety system of your vehicle
Seat belt restraint system
Lap/shoulder belt
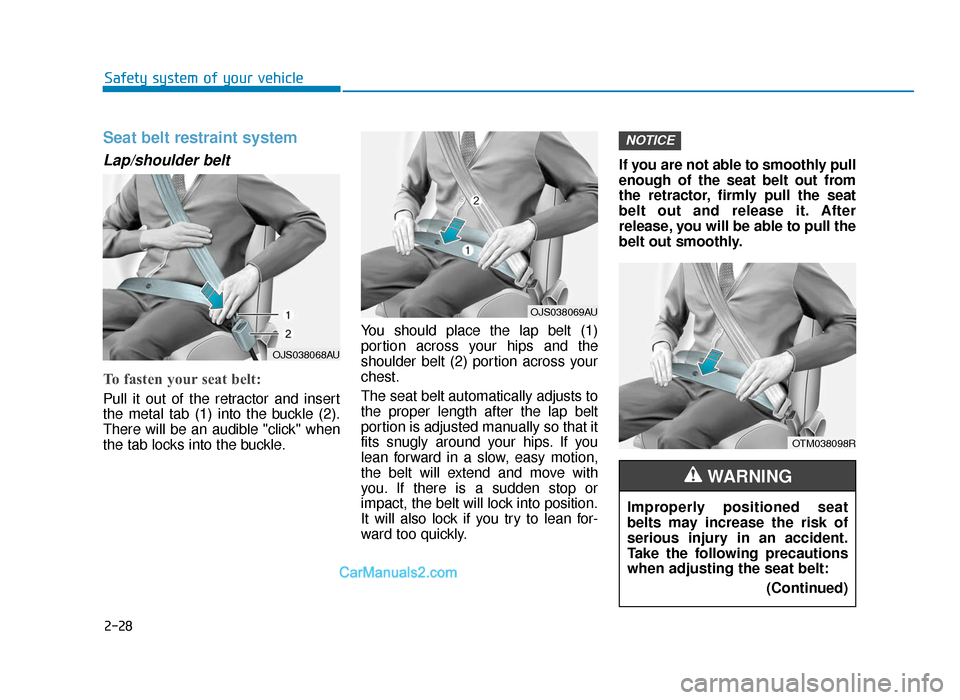
To fasten your seat belt:
Pull it out of the retractor and insert
the metal tab (1) into the buckle (2).
There will be an audible "click" when
the tab locks into the buckle.You should place the lap belt (1)
portion across your hips and the
shoulder belt (2) portion across your
chest.
The seat belt automatically adjusts to
the proper length after the lap belt
portion is adjusted manually so that it
fits snugly around your hips. If you
lean forward in a slow, easy motion,
the belt will extend and move with
you. If there is a sudden stop or
impact, the belt will lock into position.
It will also lock if you try to lean for-
ward too quickly.If you are not able to smoothly pull
enough of the seat belt out from
the retractor, firmly pull the seat
belt out and release it. After
release, you will be able to pull the
belt out smoothly.
NOTICE
OJS038068AU
OTM038098R
Improperly positioned seat
belts may increase the risk of
serious injury in an accident.
Take the following precautions
when adjusting the seat belt:
(Continued)
WARNING
OJS038069AU
TLe UK 2.qxp 6/12/2018 2:06 PM Page 28
Page 49 of 685
2-29
Safety system of your vehicle
2
Height adjustment
You can adjust the height of the
shoulder belt anchor to one of the
four different positions for maximum
comfort and safety.
The shoulder portion should be
adjusted so it lies across your chest
and midway over your shoulder near-
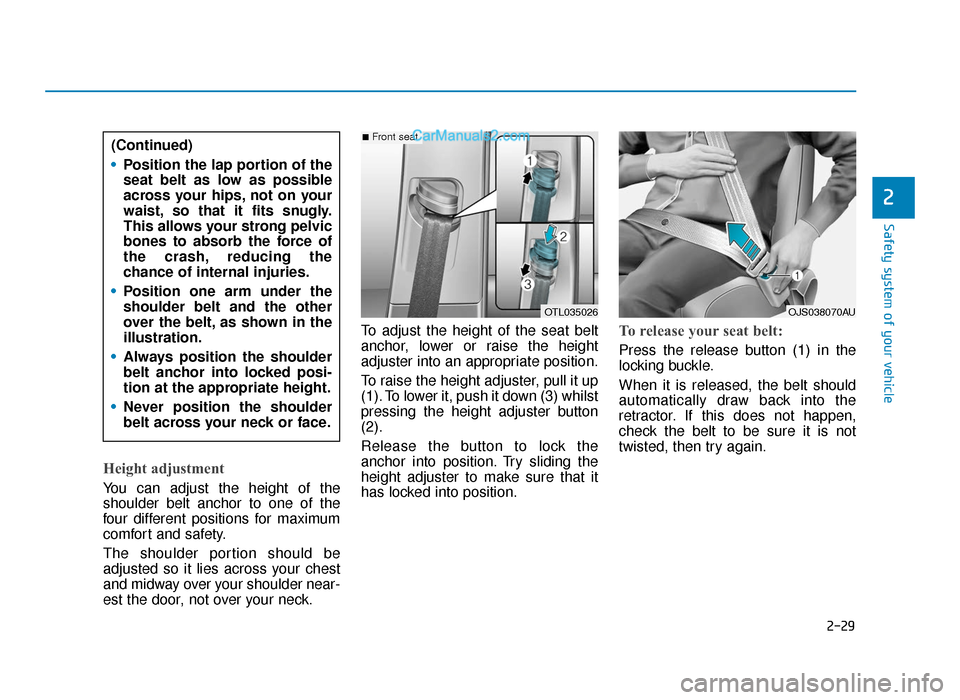
est the door, not over your neck.To adjust the height of the seat belt
anchor, lower or raise the height
adjuster into an appropriate position.
To raise the height adjuster, pull it up
(1). To lower it, push it down (3) whilst
pressing the height adjuster button
(2).
Release the button to lock the
anchor into position. Try sliding the
height adjuster to make sure that it
has locked into position.
To release your seat belt:
Press the release button (1) in the
locking buckle.
When it is released, the belt should
automatically draw back into the
retractor. If this does not happen,
check the belt to be sure it is not
twisted, then try again.
OTL035026
■Front seat(Continued)
•
Position the lap portion of the
seat belt as low as possible
across your hips, not on your
waist, so that it fits snugly.
This allows your strong pelvic
bones to absorb the force of
the crash, reducing the
chance of internal injuries.
• Position one arm under the
shoulder belt and the other
over the belt, as shown in the
illustration.
• Always position the shoulder
belt anchor into locked posi-
tion at the appropriate height.
• Never position the shoulder
belt across your neck or face.
OJS038070AU
TLe UK 2.qxp 6/12/2018 2:06 PM Page 29
Page 50 of 685
2-30
Safety system of your vehicle
Rear centre seatbelt (3-point rear centre seat belt)
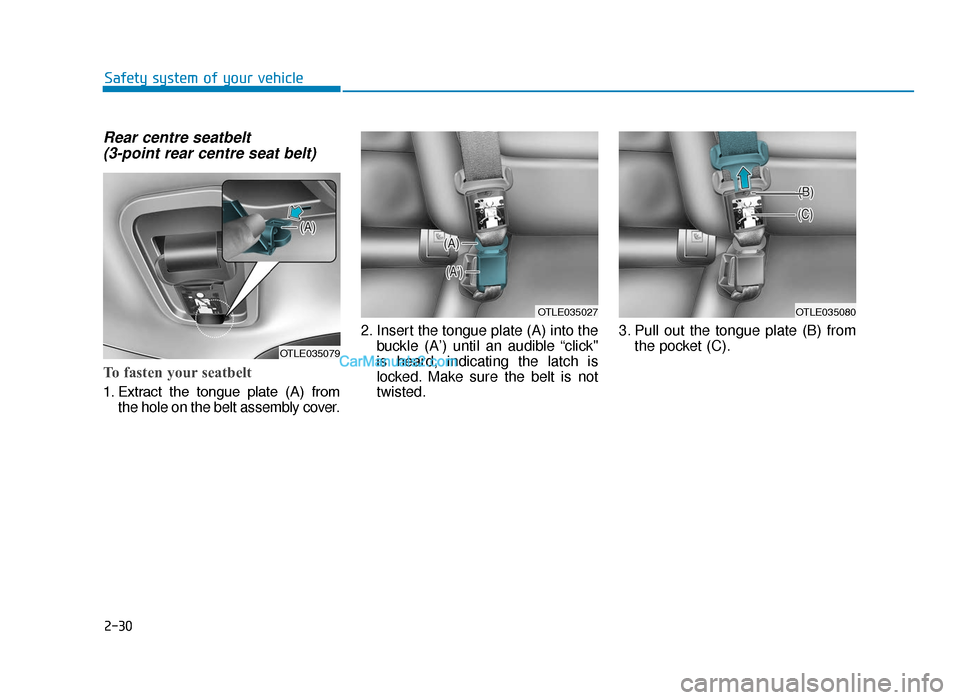
To fasten your seatbelt
1. Extract the tongue plate (A) from
the hole on the belt assembly cover. 2. Insert the tongue plate (A) into the
buckle (A’) until an audible “click"
is heard, indicating the latch is
locked. Make sure the belt is not
twisted. 3. Pull out the tongue plate (B) from
the pocket (C).
OTLE035079
OTLE035027OTLE035080
TLe UK 2.qxp 6/12/2018 2:06 PM Page 30
Page 51 of 685
2-31
Safety system of your vehicle
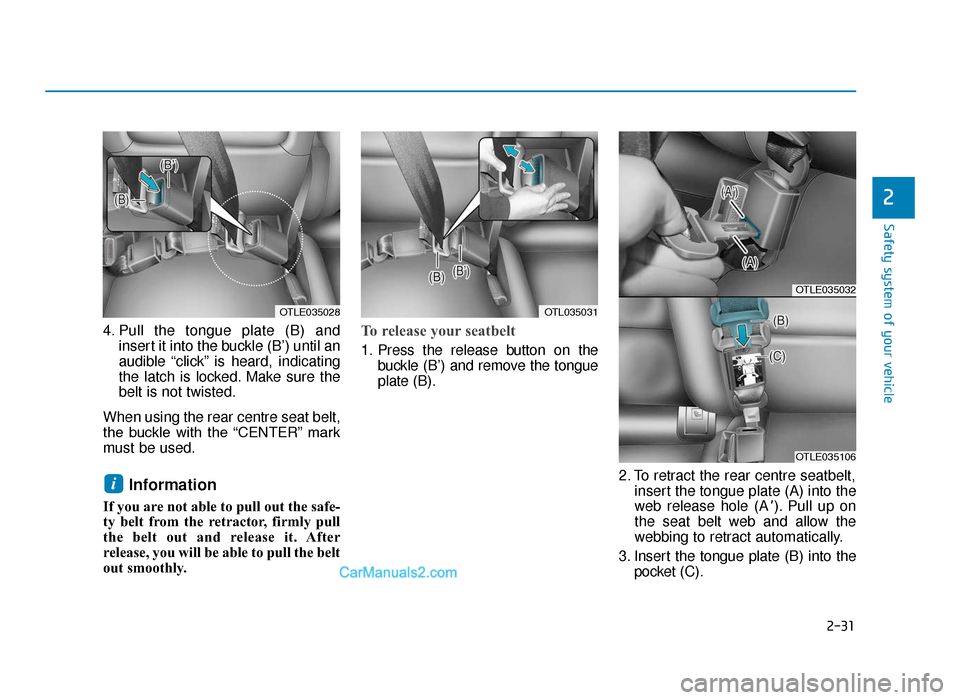
4. Pull the tongue plate (B) andinsert it into the buckle (B’) until an
audible “click” is heard, indicating
the latch is locked. Make sure the
belt is not twisted.
When using the rear centre seat belt,
the buckle with the “CENTER” mark
must be used.
Information
If you are not able to pull out the safe-
ty belt from the retractor, firmly pull
the belt out and release it. After
release, you will be able to pull the belt
out smoothly.
To release your seatbelt
1. Press the release button on the buckle (B’) and remove the tongue
plate (B).
2. To retract the rear centre seatbelt,insert the tongue plate (A) into the
web release hole (A
'). Pull up on
the seat belt web and allow the
webbing to retract automatically.
3. Insert the tongue plate (B) into the pocket (C).
i
2
OTLE035028OTL035031
OTLE035032
OTLE035106
TLe UK 2.qxp 6/12/2018 2:06 PM Page 31
Page 52 of 685
2-32
Safety system of your vehicle
4. Insert the tongue plate (A) into the hole on the belt assembly cover.
Pre-tensioner seat belt
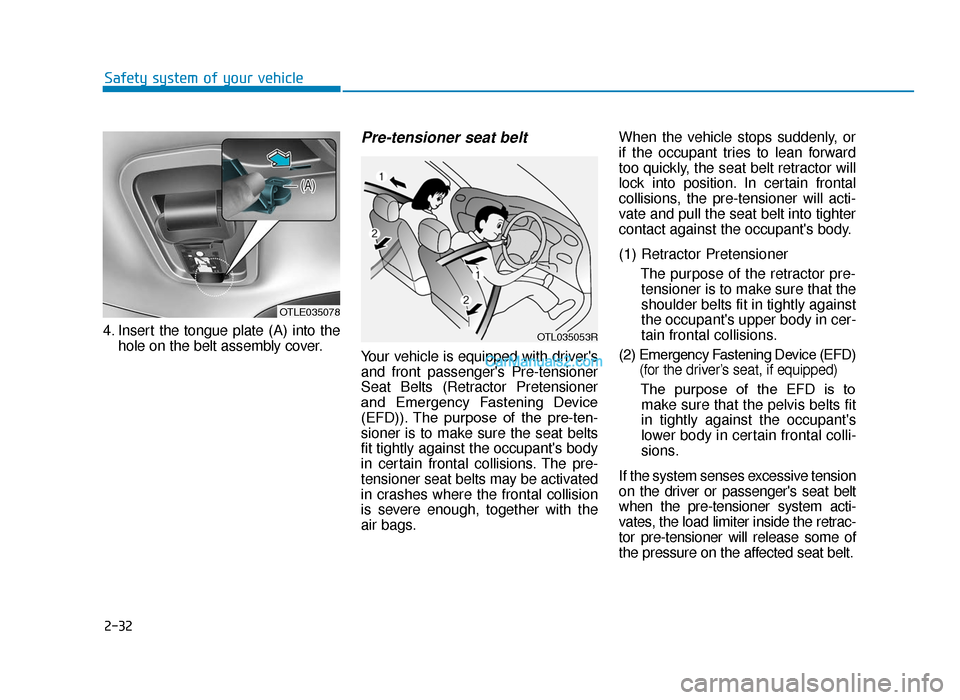
Your vehicle is equipped with driver's
and front passenger's Pre-tensioner
Seat Belts (Retractor Pretensioner
and Emergency Fastening Device
(EFD)). The purpose of the pre-ten-
sioner is to make sure the seat belts
fit tightly against the occupant's body
in certain frontal collisions. The pre-
tensioner seat belts may be activated
in crashes where the frontal collision
is severe enough, together with the
air bags. When the vehicle stops suddenly, or
if the occupant tries to lean forward
too quickly, the seat belt retractor will
lock into position. In certain frontal
collisions, the pre-tensioner will acti-
vate and pull the seat belt into tighter
contact against the occupant's body.
(1) Retractor Pretensioner
The purpose of the retractor pre-tensioner is to make sure that the
shoulder belts fit in tightly against
the occupant's upper body in cer-
tain frontal collisions.(2) Emergency Fastening Device (EFD) (for the driver’s seat, if equipped)
The purpose of the EFD is tomake sure that the pelvis belts fit
in tightly against the occupant's
lower body in certain frontal colli-
sions.
If the system senses excessive tension
on the driver or passenger's seat belt
when the pre-tensioner system acti-
vates, the load limiter inside the retrac-
tor pre-tensioner will release some of
the pressure on the affected seat belt.
OTL035053R
OTLE035078
TLe UK 2.qxp 6/12/2018 2:06 PM Page 32