2019 Hyundai Santa Fe buttons
[x] Cancel search: buttonsPage 114 of 682
3-23
Convenient features of your vehicle
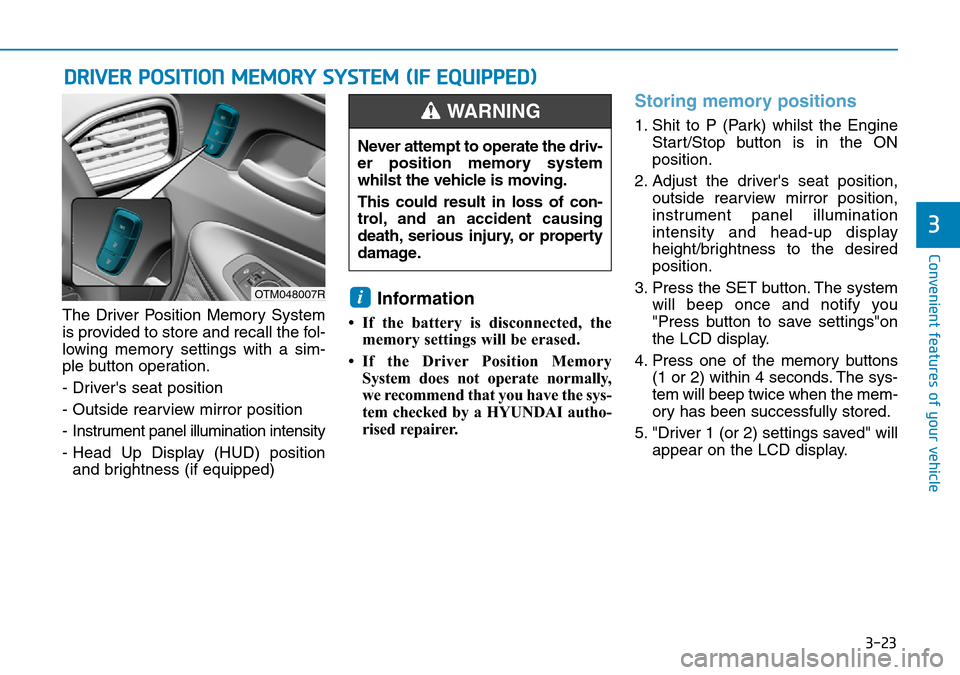
The Driver Position Memory System
is provided to store and recall the fol-
lowing memory settings with a sim-
ple button operation.
- Driver's seat position
- Outside rearview mirror position
- Instrument panel illumination intensity
- Head Up Display (HUD) position
and brightness (if equipped)Information
• If the battery is disconnected, the
memory settings will be erased.
• If the Driver Position Memory
System does not operate normally,
we recommend that you have the sys-
tem checked by a HYUNDAI autho-
rised repairer.
Storing memory positions
1. Shit to P (Park) whilst the Engine
Start/Stop button is in the ON
position.
2. Adjust the driver's seat position,
outside rearview mirror position,
instrument panel illumination
intensity and head-up display
height/brightness to the desired
position.
3. Press the SET button. The system
will beep once and notify you
"Press button to save settings"on
the LCD display.
4. Press one of the memory buttons
(1 or 2) within 4 seconds. The sys-
tem will beep twice when the mem-
ory has been successfully stored.
5. "Driver 1 (or 2) settings saved" will
appear on the LCD display.
i
DRIVER POSITION MEMORY SYSTEM (IF EQUIPPED)
3
OTM048007R
Never attempt to operate the driv-
er position memory system
whilst the vehicle is moving.
This could result in loss of con-
trol, and an accident causing
death, serious injury, or property
damage.
WARNING
Page 115 of 682
3-24
Recalling memory position
1. Shit to P (Park) whilst the Engine
Start/Stop button is in the ON
position.
2. Press the desired memory button
(1 or 2). The system will beep
once, and then the driver's seat
position, outside rearview mirror
position, instrument panel illumi-
nation intensity and head-up dis-
play height/brightness will auto-
matically adjust to the stored posi-
tions.
3. "Driver 1 (or 2) settings applied"
will appear on the LCD display.
Information
• Whilst recalling the "1" memory
position, pressing the SET or 1 but-
ton temporarily stops the adjust-
ment of the recalled memory posi-
tion. Pressing the 2 button recalls
the "2" memory position.
• Whilst recalling the "2" memory
position, pressing the SET or 2 but-
ton temporarily stops the adjust-
ment of the recalled memory posi-
tion. Pressing the 1 button recalls
the "1" memory position.
• Whilst recalling the stored positions,
pressing one of the control buttons
for the driver's seat, outside
rearview mirror, steering wheel,
instrument panel illumination or
head-up display will cause the
movement of that component to stop
and move in the direction that the
control button is pressed.
Easy access function
The system will move the driver's seat
and steering wheel automatically as
follows:
• Exiting the vehicle:
The driver’s seat will move rear-
ward and the steering wheel will
move upward when the driver’s
door is opened and the Engine
Start/Stop button is in the OFF
positon with the gear in P (Park).
However, the driver’s seat may not
move rearward if there is not
enough space between the driver’s
seat and the rear seats.
Also, on a regular basis, the steer-
ing wheel will also move forward to
adjust its location by itself.
• Entering the vehicle:
The driver’s seat and steering
wheel will move back to its original
position when the Engine Start/Stop
button is in the OFF position and
the driver’s door is closed with the
smart key in possession or when
the Engine Start/Stop button is
changed to the ACC/ON/START
position from the OFF position.
i
Convenient features of your vehicle
Page 182 of 682
3-91
Convenient features of your vehicle
3
LCD display control
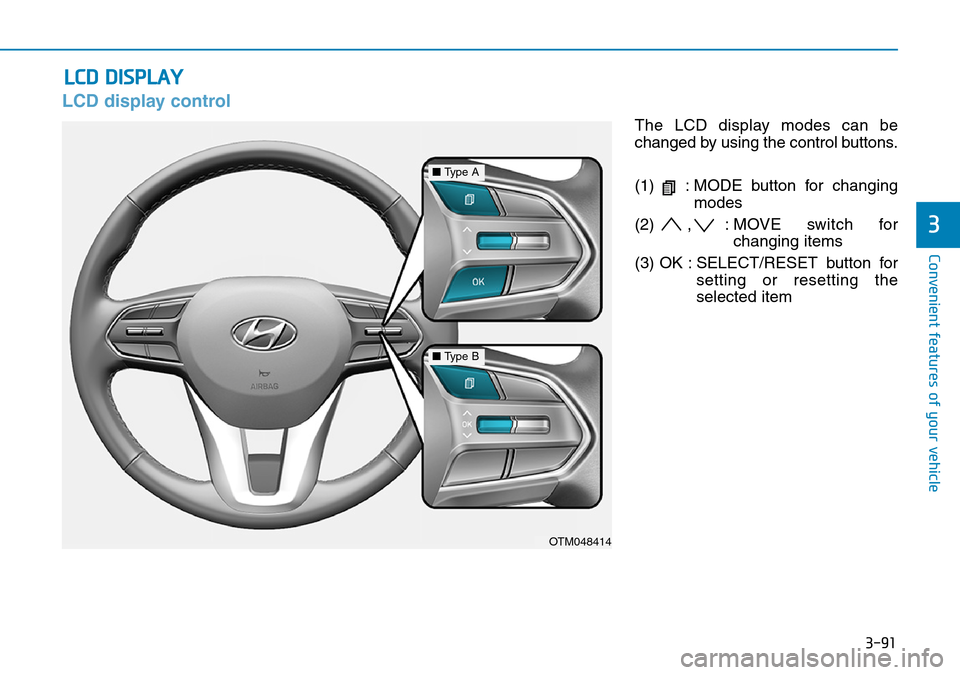
The LCD display modes can be
changed by using the control buttons.
(1) : MODE button for changing
modes
(2) , : MOVE switch for
changing items
(3) OK : SELECT/RESET button for
setting or resetting the
selected item
LCD DISPLAY
OTM048414
■Type A
■Type B
Page 213 of 682
3-122
Interior lights
Do not use the interior lights for
extended periods when the engine
is turned off otherwise the battery
will discharge.
Interior lamp AUTO cut
The interior lamps will automatically
go off approximately 20 minutes after
the engine is turned off and the
doors are closed. If a door is opened,
the lamp will go off 40 minutes after
the engine is turned off. If the doors
are locked and the vehicle enters the
armed stage of the theft alarm sys-
tem, the lamps will go off five sec-
onds later.
Front lamps
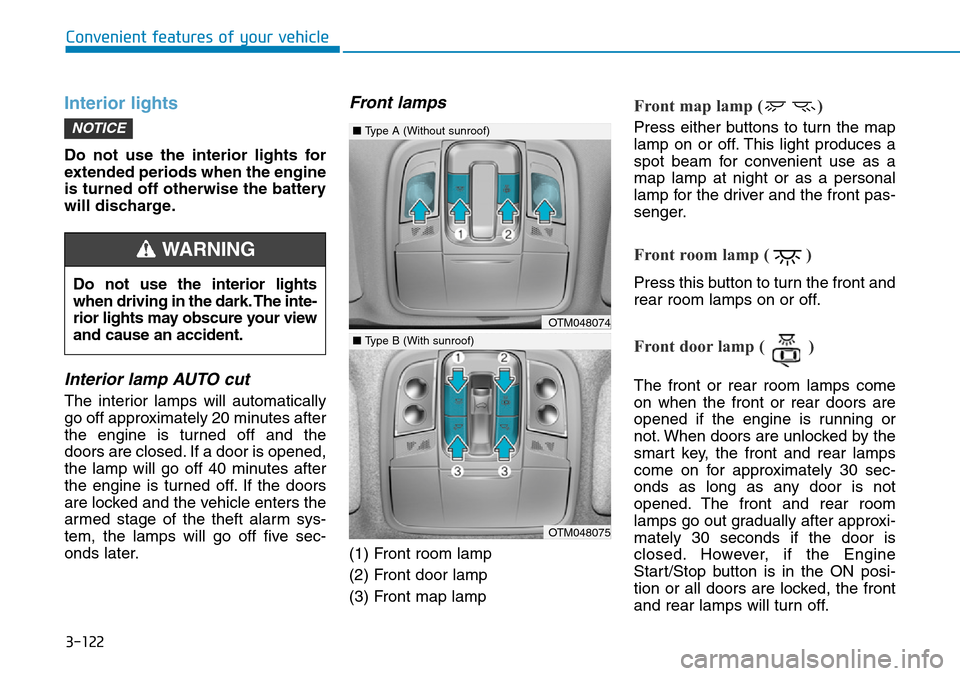
(1) Front room lamp
(2) Front door lamp
(3) Front map lamp
Front map lamp ( )
Press either buttons to turn the map
lamp on or off. This light produces a
spot beam for convenient use as a
map lamp at night or as a personal
lamp for the driver and the front pas-
senger.
Front room lamp ( )
Press this button to turn the front and
rear room lamps on or off.
Front door lamp ( )
The front or rear room lamps come
on when the front or rear doors are
opened if the engine is running or
not. When doors are unlocked by the
smart key, the front and rear lamps
come on for approximately 30 sec-
onds as long as any door is not
opened. The front and rear room
lamps go out gradually after approxi-
mately 30 seconds if the door is
closed. However, if the Engine
Start/Stop button is in the ON posi-
tion or all doors are locked, the front
and rear lamps will turn off.
NOTICE
Convenient features of your vehicle
Do not use the interior lights
when driving in the dark. The inte-
rior lights may obscure your view
and cause an accident.
WARNING
OTM048074
OTM048075
■Type A (Without sunroof)
■Type B (With sunroof)
Page 263 of 682
3-172
Convenient features of your vehicle
Automatic heating and air con-
ditioning
The Automatic Climate Control
System is controlled by setting the
desired temperature.
1. Press the AUTO button (4).
The modes, fan speeds, air intake
and air-conditioning will be controlled
automatically by the temperature set-
ting you select.
2. Turn the temperature control knob
(1, 2) to the desired temperature. If
the temperature is set to the low-
est setting (Lo), the air condition-
ing system will operate continu-
ously. After the interior has cooled
sufficiently, adjust the knob to a
higher temperature set point
whenever possible.
To turn the automatic operation off,
select any button of the following:
- Mode selection button
- Front windscreen defroster button
(Press the button one more time to
deselect the front windscreen
defroster function. The 'AUTO' sign
will illuminate on the information
display once again.)- Fan speed control button
The selected function will be con-
trolled manually whilst other func-
tions operate automatically.
For your convenience and to improve
the effectiveness of the climate con-
trol, use the AUTO button and set the
temperature to 23°C (73°F).
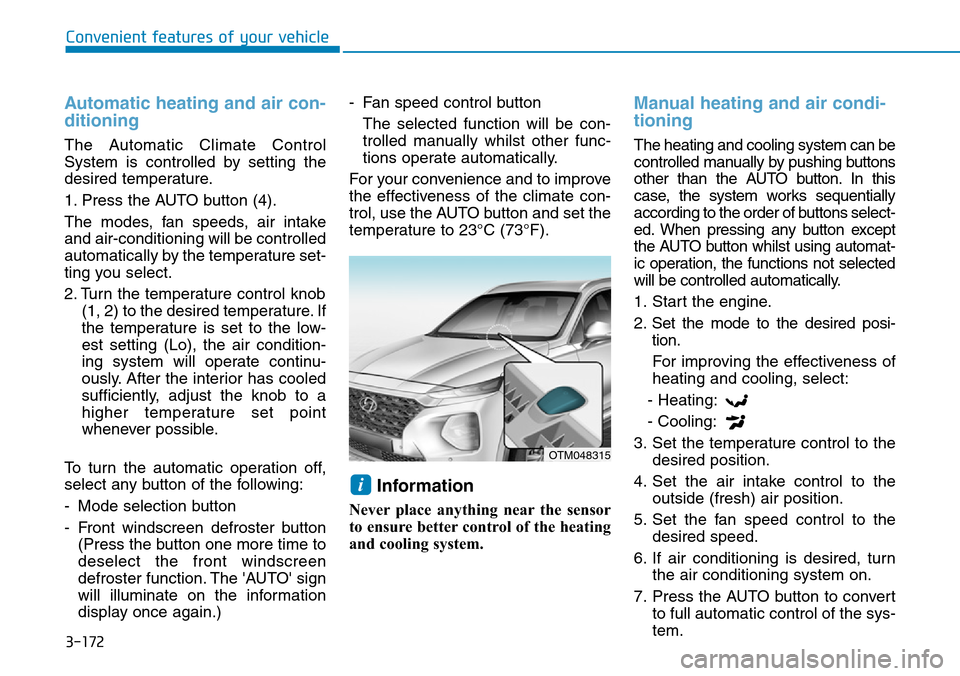
Information
Never place anything near the sensor
to ensure better control of the heating
and cooling system.
Manual heating and air condi-
tioning
The heating and cooling system can be
controlled manually by pushing buttons
other than the AUTO button. In this
case, the system works sequentially
according to the order of buttons select-
ed. When pressing any button except
the AUTO button whilst using automat-
ic operation, the functions not selected
will be controlled automatically.
1. Start the engine.
2. Set the mode to the desired posi-
tion.
For improving the effectiveness of
heating and cooling, select:
- Heating:
- Cooling:
3. Set the temperature control to the
desired position.
4. Set the air intake control to the
outside (fresh) air position.
5. Set the fan speed control to the
desired speed.
6. If air conditioning is desired, turn
the air conditioning system on.
7. Press the AUTO button to convert
to full automatic control of the sys-
tem.
i
OTM048315
Page 267 of 682
3-176
Convenient features of your vehicle
Information
Using the system in the fresh air posi-
tion is recommended.
Prolonged operation of the heater in
the recirculated air position (without
air conditioning selected) can cause
fogging of the windscreen and side
windows and the air within the passen-
ger compartment will become stale.
In addition, prolonged use of the air
conditioning with the recirculated air
position selected will result in exces-
sively dry air in the passenger com-
partment.
Fan speed control (8)
The fan speed can be set as desired
by pushing the fan speed control but-
ton.
More air is delivered with higher fan
speeds.
Pressing the OFF button turns off the
fan.
Operating the fan when the ignition
switch is in the ON position could
cause the battery to discharge.
Operate the fan when the engine is
running.
Air conditioning (6)
Push the A/C button to turn the air
conditioning system on (indicator
light will illuminate).
Push the button again to turn the air
conditioning system off.
OFF mode (5)
Push the OFF button to turn the cli-
mate control system off. However,
you can still operate the mode and air
intake buttons as long as the ignition
switch is in the ON position.
NOTICE
i
•Continued climate control
system operation in the recir-
culated air position may allow
humidity to increase inside
the vehicle which may fog the
glass and obscure visibility.
•Do not sleep in a vehicle with
the air conditioning or heating
system on. It may cause seri-
ous harm or death due to a
drop in the oxygen level
and/or body temperature.
•Continued climate control sys-
tem operation in the recirculat-
ed air position can cause
drowsiness or sleepiness, and
loss of vehicle control. Set the
air intake control to the outside
(fresh) air position as much as
possible whilst driving.
WARNING
Page 294 of 682
4-3
Multimedia System
4
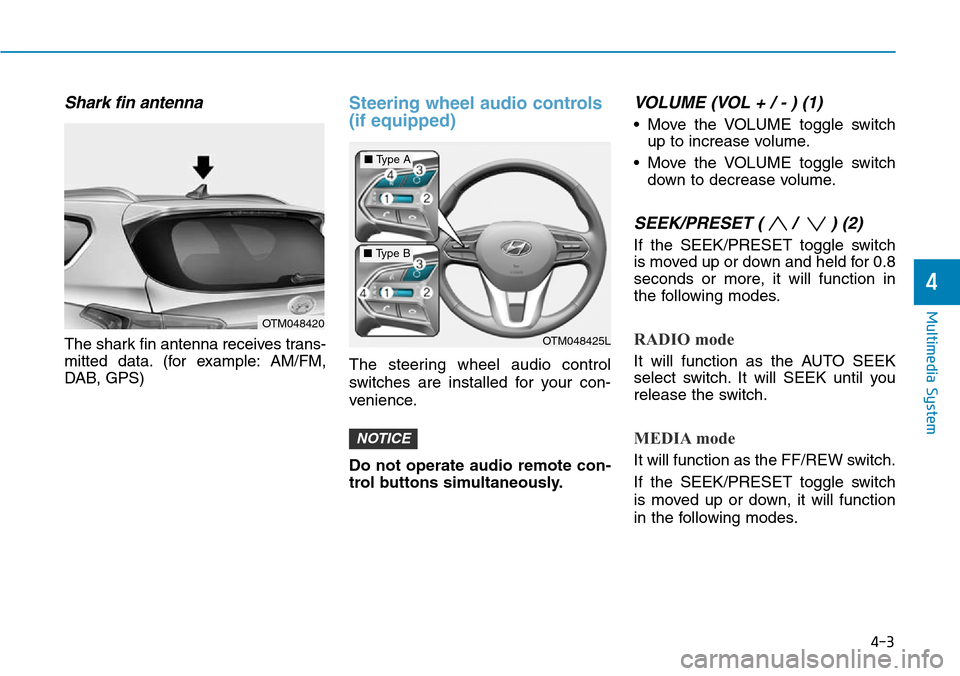
Shark fin antenna
The shark fin antenna receives trans-
mitted data. (for example: AM/FM,
DAB, GPS)
Steering wheel audio controls
(if equipped)
The steering wheel audio control
switches are installed for your con-
venience.
Do not operate audio remote con-
trol buttons simultaneously.
VOLUME (VOL + / - ) (1)
• Move the VOLUME toggle switch
up to increase volume.
• Move the VOLUME toggle switch
down to decrease volume.
SEEK/PRESET ( / ) (2)
If the SEEK/PRESET toggle switch
is moved up or down and held for 0.8
seconds or more, it will function in
the following modes.
RADIO mode
It will function as the AUTO SEEK
select switch. It will SEEK until you
release the switch.
MEDIA mode
It will function as the FF/REW switch.
If the SEEK/PRESET toggle switch
is moved up or down, it will function
in the following modes.
NOTICE
OTM048420
OTM048425L
■Type A
■Type B
Page 295 of 682
RADIO mode
It will function as the PRESET STA-
TION UP/DOWN switch.
MEDIA mode
It will function as the TRACK UP/
DOWN switch.
MODE ( ) (3)
Press the MODE button to select
Radio or AUX.
MUTE ( ) (4)
• Press the button to mute the
sound.
• Press the button again to activate
the sound.
Information
Detailed information for audio control
buttons are described in the following
pages in this chapter.
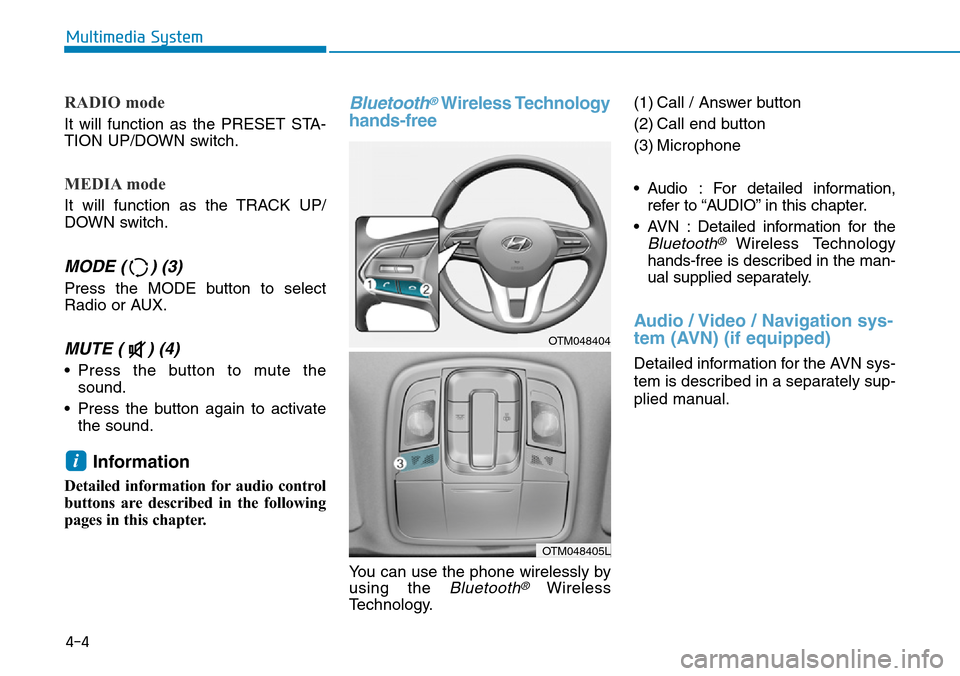
Bluetooth®Wireless Technology
hands-free
You can use the phone wirelessly by
using the
Bluetooth®Wireless
Technology.(1) Call / Answer button
(2) Call end button
(3) Microphone
• Audio : For detailed information,
refer to “AUDIO” in this chapter.
• AVN : Detailed information for the
Bluetooth® Wireless Technology
hands-free is described in the man-
ual supplied separately.
Audio / Video / Navigation sys-
tem (AVN) (if equipped)
Detailed information for the AVN sys-
tem is described in a separately sup-
plied manual.
i
4-4
Multimedia System
OTM048404
OTM048405L