2019 Hyundai Santa Fe service
[x] Cancel search: servicePage 586 of 682
7-11
7
Maintenance
Air cleaner filter
We recommend that the air cleaner
filter be replaced by a HYUNDAI
authorised repairer.
Spark plugs
(for Petrol engine)
Make sure to install new spark plugs
of the correct heat range.
Valve clearance
(for Petrol engine)
Inspect excessive valve noise and/or
engine vibration and adjust if neces-
sary. We recommend that the system
be serviced by a HYUNDAI autho-
rised repairer.
Cooling system
Check the cooling system parts,
such as radiator, coolant reservoir,
hoses and connections for leakage
and damage. Replace any damaged
parts.
Engine coolant
The coolant should be changed at
the intervals specified in the mainte-
nance schedule.
Manual transmission fluid
(if equipped)
Inspect the manual transmission
fluid according to the maintenance
schedule.
Automatic transmission fluid
(if equipped)
Automatic transmission fluid should
not be checked under normal usage
conditions.
We recommend that the automatic
transmission fluid is changed by a
HYUNDAI authorised repairer accord-
ing to the maintenance schedule.
Information
Automatic transmission fluid colour is
red when new.
As the vehicle is driven, the automatic
transmission fluid will begin to look
darker.
This is a normal condition. It does not
need to be replaced based on the
colour change.
The use of a non-specified fluid
could result in transmission mal-
function and failure.
Use only specified automatic
transmission fluid.
(Refer to “Recommended lubri-
cants and capacities” in chapter 8.)
NOTICE
i
Do not disconnect and inspect
spark plugs when the engine is
hot. You may burn yourself.
WARNING
Page 596 of 682
7-21
7
Maintenance
PARKING BRAKE
Checking the parking brake
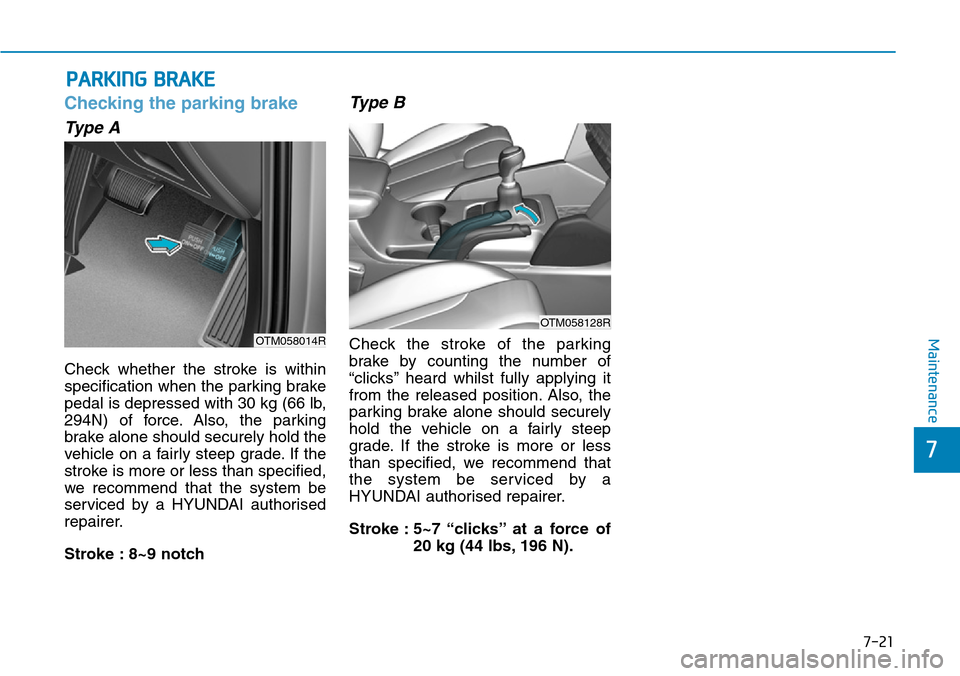
Type A
Check whether the stroke is within
specification when the parking brake
pedal is depressed with 30 kg (66 lb,
294N) of force. Also, the parking
brake alone should securely hold the
vehicle on a fairly steep grade. If the
stroke is more or less than specified,
we recommend that the system be
serviced by a HYUNDAI authorised
repairer.
Stroke : 8~9 notch
Type B
Check the stroke of the parking
brake by counting the number of
“clicks’’ heard whilst fully applying it
from the released position. Also, the
parking brake alone should securely
hold the vehicle on a fairly steep
grade. If the stroke is more or less
than specified, we recommend that
the system be serviced by a
HYUNDAI authorised repairer.
Stroke : 5~7 “clicks’’ at a force of
20 kg (44 lbs, 196 N).
OTM058128R
OTM058014R
Page 600 of 682
7-25
7
Maintenance
WIPER BLADES
Blade inspection
Contamination of either the wind-
screen or the wiper blades with for-
eign matter can reduce the effective-
ness of the windscreen wipers.
Common sources of contamination
are insects, tree sap, and hot wax
treatments used by some commer-
cial car washes. If the blades are not
wiping properly, clean both the win-
dow and the blades with a good
cleaner or mild detergent, and rinse
thoroughly with clean water.
To prevent damage to the wiper
blades, arms or other compo-
nents, do not:
• Use petrol, kerosene, paint thin-
ner, or other solvents on or near
them.
• Attempt to move the wipers
manually.
• Use non-specified wiper blades.
Information
Commercial hot waxes applied by auto-
matic car washes have been known to
make the windscreen difficult to clean.
Information
Wiper blades are a consumable item
and normal wear of the wipers may not
be covered by your vehicle warranty.
Blade replacement
When the wipers no longer clean
adequately, the blades may be worn
or cracked, and require replacement.
To prevent damage to the wiper arms
or other components, do not attempt
to move the wipers manually.
The use of a non-specified wiper
blade could result in wiper mal-
function and failure.
• In order to prevent damage to the
bonnet and the wiper arms, the
wiper arms should only be lifted
when in the top wiping position.
• Always return the wiper arms to
the windscreen before driving.
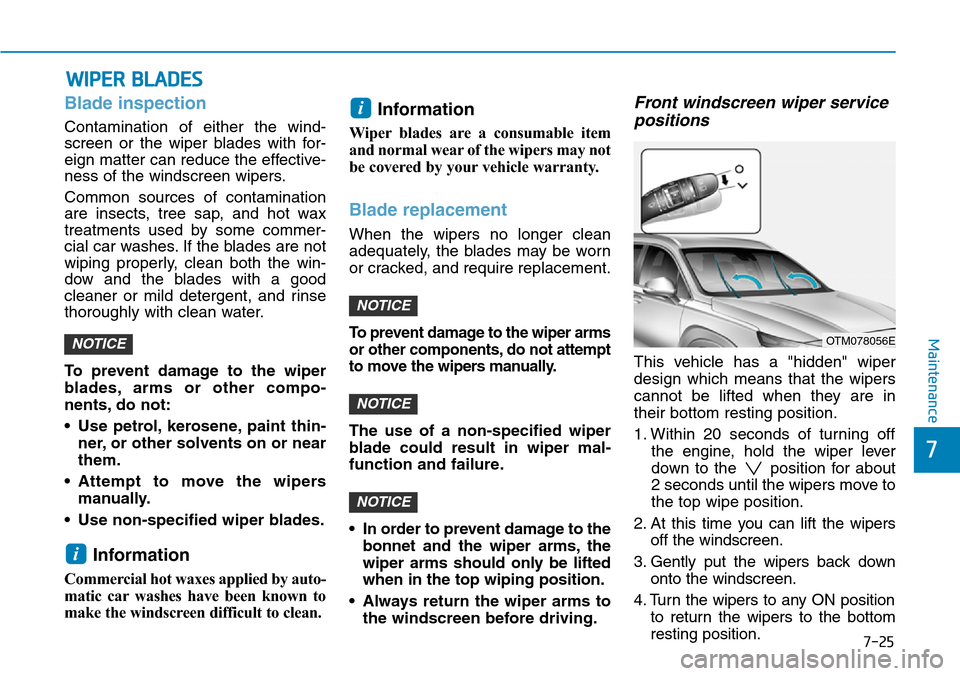
Front windscreen wiper service
positions
This vehicle has a "hidden" wiper
design which means that the wipers
cannot be lifted when they are in
their bottom resting position.
1. Within 20 seconds of turning off
the engine, hold the wiper lever
down to the position for about
2 seconds until the wipers move to
the top wipe position.
2. At this time you can lift the wipers
off the windscreen.
3. Gently put the wipers back down
onto the windscreen.
4. Turn the wipers to any ON position
to return the wipers to the bottom
resting position.
NOTICE
NOTICE
NOTICE
i
i
NOTICEOTM078056E
Page 604 of 682
7-29
7
Maintenance
For best battery service
• Keep the battery securely mounted.
• Keep the battery top clean and dry.
• Keep the terminals and connec-
tions clean, tight, and coated with
petroleum jelly or terminal grease.
• Rinse any spilled electrolyte from
the battery immediately with a
solution of water and baking soda.
• If the vehicle is not going to be
used for an extended time, discon-
nect the battery cables.
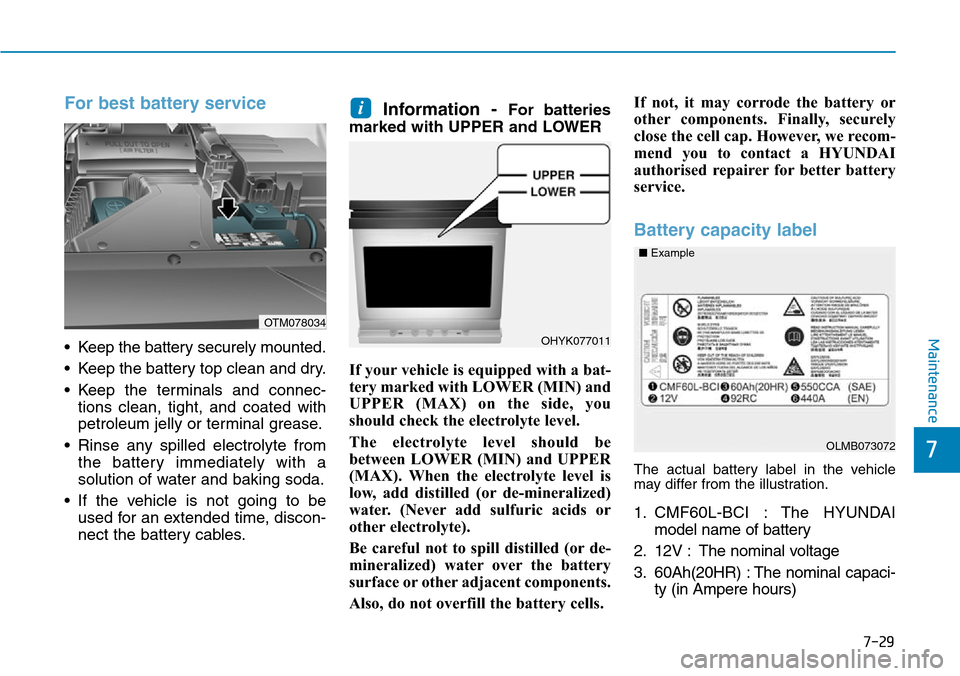
Information - For batteries
marked with UPPER and LOWER
If your vehicle is equipped with a bat-
tery marked with LOWER (MIN) and
UPPER (MAX) on the side, you
should check the electrolyte level.
The electrolyte level should be
between LOWER (MIN) and UPPER
(MAX). When the electrolyte level is
low, add distilled (or de-mineralized)
water. (Never add sulfuric acids or
other electrolyte).
Be careful not to spill distilled (or de-
mineralized) water over the battery
surface or other adjacent components.
Also, do not overfill the battery cells. If not, it may corrode the battery or
other components. Finally, securely
close the cell cap. However, we recom-
mend you to contact a HYUNDAI
authorised repairer for better battery
service.
Battery capacity label
The actual battery label in the vehicle
may differ from the illustration.
1. CMF60L-BCI : The HYUNDAI
model name of battery
2. 12V : The nominal voltage
3. 60Ah(20HR) : The nominal capaci-
ty (in Ampere hours)
i
OHYK077011
OTM078034
OLMB073072 ■Example
Page 606 of 682
7-31
7
Maintenance
By jump starting
After a jump start from a good bat-
tery, drive the vehicle for 20-30 min-
utes before it is shutoff. The vehicle
may not restart if you shut it off
before the battery had a chance to
adequately recharge. See “Jump
Starting” in chapter 6 for more infor-
mation on jump starting procedures.
Information
An inappropriately disposed
of battery can be harmful to
the environment and human
health.
Dispose of the battery according to
your local law(s) or regulations.
Reset items
The following items may need to be
reset after the battery has been dis-
charged or the battery has been dis-
connected.
• Auto up/down window
• Sunroof
• Trip computer
• Climate control system
• Driver position memory system
• Clock
• Audio system
i
AGM battery (if equipped)
•Absorbent Glass Matt (AGM)
batteries are maintenance-
free and we recommend that
the AGM battery be serviced
by a HYUNDAI authorised
repairer. For charging your
AGM battery, use only fully
automatic battery chargers
that are specially developed
for AGM batteries.
•When replacing the AGM bat-
tery, we recommend that you
use parts for replacement
from a HYUNDAI authorised
repairer.
•Do not open or remove the
cap on top of the battery. This
may cause leaks of internal
electrolyte that could result in
severe injury.
CAUTION
Page 611 of 682
7-36
Maintenance
Tyre replacement
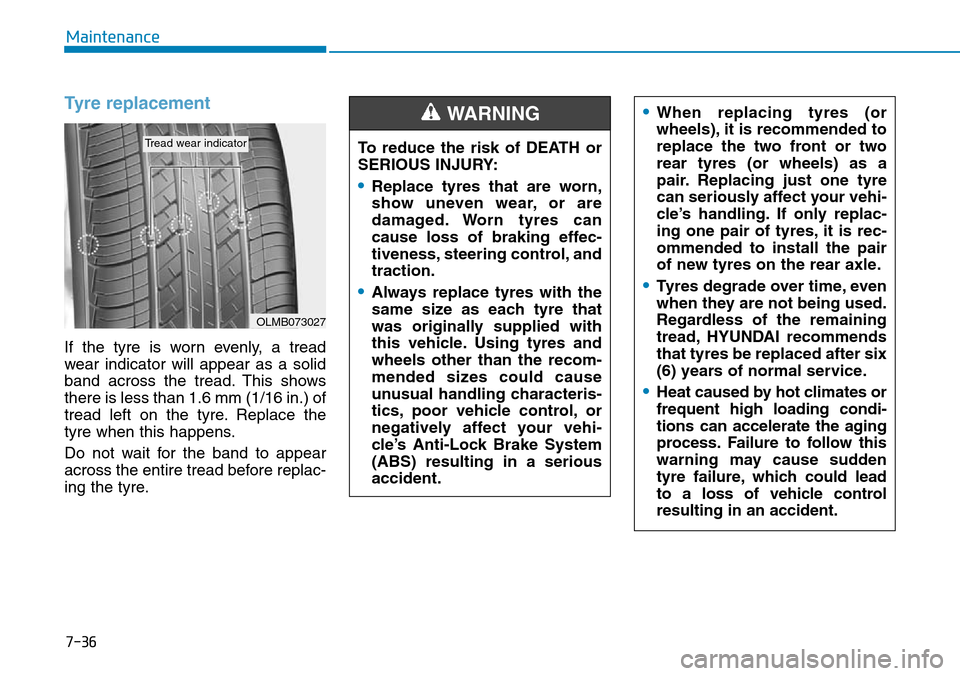
If the tyre is worn evenly, a tread
wear indicator will appear as a solid
band across the tread. This shows
there is less than 1.6 mm (1/16 in.) of
tread left on the tyre. Replace the
tyre when this happens.
Do not wait for the band to appear
across the entire tread before replac-
ing the tyre.
OLMB073027
Tread wear indicatorTo reduce the risk of DEATH or
SERIOUS INJURY:
•Replace tyres that are worn,
show uneven wear, or are
damaged. Worn tyres can
cause loss of braking effec-
tiveness, steering control, and
traction.
•Always replace tyres with the
same size as each tyre that
was originally supplied with
this vehicle. Using tyres and
wheels other than the recom-
mended sizes could cause
unusual handling characteris-
tics, poor vehicle control, or
negatively affect your vehi-
cle’s Anti-Lock Brake System
(ABS) resulting in a serious
accident.
WARNING •When replacing tyres (or
wheels), it is recommended to
replace the two front or two
rear tyres (or wheels) as a
pair. Replacing just one tyre
can seriously affect your vehi-
cle’s handling. If only replac-
ing one pair of tyres, it is rec-
ommended to install the pair
of new tyres on the rear axle.
•Tyres degrade over time, even
when they are not being used.
Regardless of the remaining
tread, HYUNDAI recommends
that tyres be replaced after six
(6) years of normal service.
•Heat caused by hot climates or
frequent high loading condi-
tions can accelerate the aging
process. Failure to follow this
warning may cause sudden
tyre failure, which could lead
to a loss of vehicle control
resulting in an accident.
Page 615 of 682
7-40
Maintenance
6. Maximum load rating
This number indicates the maximum
load in kilograms and pounds that
can be carried by the tyre. When
replacing the tyres on the vehicle,
always use a tyre that has the same
load rating as the factory installed
tyre.
7. Uniform tyre quality grading
Quality grades can be found where
applicable on the tyre sidewall
between tread shoulder and maxi-
mum section width.
For example:
TREAD WEAR 200
TRACTION AA
TEMPERATURE A
Tread wear
The tread wear grade is a compara-
tive rating based on the wear rate of
the tyre when tested under controlled
conditions on a specified govern-
ment test course. For example, a tyre
graded 150 would wear one-and-a-
half times (1½) as well on the gov-
ernment course as a tyre graded
100.
The relative performance of tyres
depends upon the actual conditions
of their use, however, and may
depart significantly from the norm
due to variations in driving habits,
service practices and differences in
road characteristics and climate.
These grades are molded on the
sidewalls of passenger vehicle tyres.
The tyres available as standard or
optional equipment on your vehicle
may vary with respect to grade.
Traction - AA, A, B & C
The traction grades, from highest to
lowest, are AA, A, B and C. Those
grades represent the tyre’s ability to
stop on wet pavement as measured
under controlled conditions on spec-
ified government test surfaces of
asphalt and concrete. A tyre marked
C may have poor traction perform-
ance.
The traction grade assigned to
this tyre is based on straight-
ahead braking traction tests,
and does not include accelera-
tion, cornering, hydroplaning,
or peak traction characteristics.
WARNING
Page 645 of 682
7-70
Maintenance
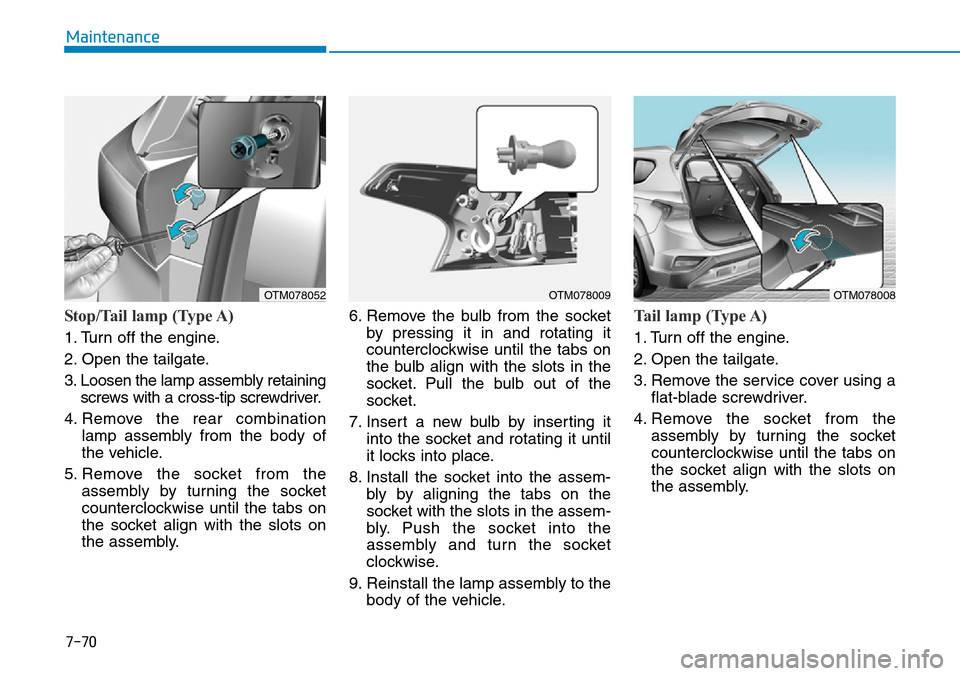
Stop/Tail lamp (Type A)
1. Turn off the engine.
2. Open the tailgate.
3. Loosen the lamp assembly retaining
screws with a cross-tip screwdriver.
4. Remove the rear combination
lamp assembly from the body of
the vehicle.
5. Remove the socket from the
assembly by turning the socket
counterclockwise until the tabs on
the socket align with the slots on
the assembly.6. Remove the bulb from the socket
by pressing it in and rotating it
counterclockwise until the tabs on
the bulb align with the slots in the
socket. Pull the bulb out of the
socket.
7. Insert a new bulb by inserting it
into the socket and rotating it until
it locks into place.
8. Install the socket into the assem-
bly by aligning the tabs on the
socket with the slots in the assem-
bly. Push the socket into the
assembly and turn the socket
clockwise.
9. Reinstall the lamp assembly to the
body of the vehicle.
Tail lamp (Type A)
1. Turn off the engine.
2. Open the tailgate.
3. Remove the service cover using a
flat-blade screwdriver.
4. Remove the socket from the
assembly by turning the socket
counterclockwise until the tabs on
the socket align with the slots on
the assembly.
OTM078008OTM078052OTM078009