2019 Hyundai Kona lock
[x] Cancel search: lockPage 116 of 526
3-34
Convenient features of your vehicle
Emergency tailgate safetyrelease
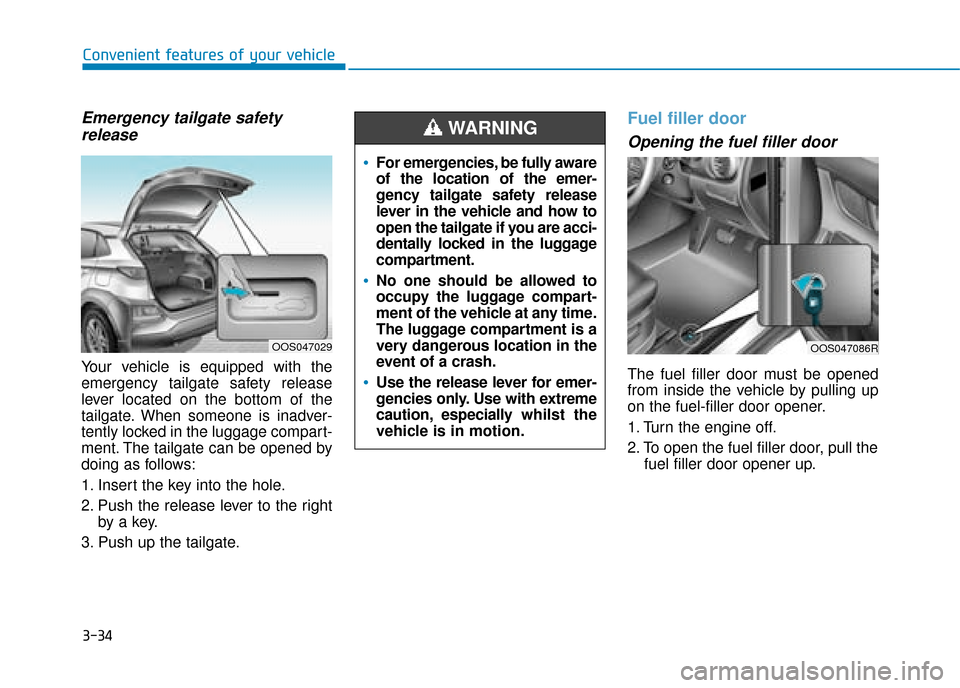
Your vehicle is equipped with the
emergency tailgate safety release
lever located on the bottom of the
tailgate. When someone is inadver-
tently locked in the luggage compart-
ment. The tailgate can be opened by
doing as follows:
1. Insert the key into the hole.
2. Push the release lever to the right
by a key.
3. Push up the tailgate.
Fuel filler door
Opening the fuel filler door
The fuel filler door must be opened
from inside the vehicle by pulling up
on the fuel-filler door opener.
1. Turn the engine off.
2. To open the fuel filler door, pull the fuel filler door opener up.
OOS047086ROOS047029
For emergencies, be fully aware
of the location of the emer-
gency tailgate safety release
lever in the vehicle and how to
open the tailgate if you are acci-
dentally locked in the luggage
compartment.
No one should be allowed to
occupy the luggage compart-
ment of the vehicle at any time.
The luggage compartment is a
very dangerous location in the
event of a crash.
Use the release lever for emer-
gencies only. Use with extreme
caution, especially whilst the
vehicle is in motion.
WARNING
Page 117 of 526
3-35
Convenient features of your vehicle
3
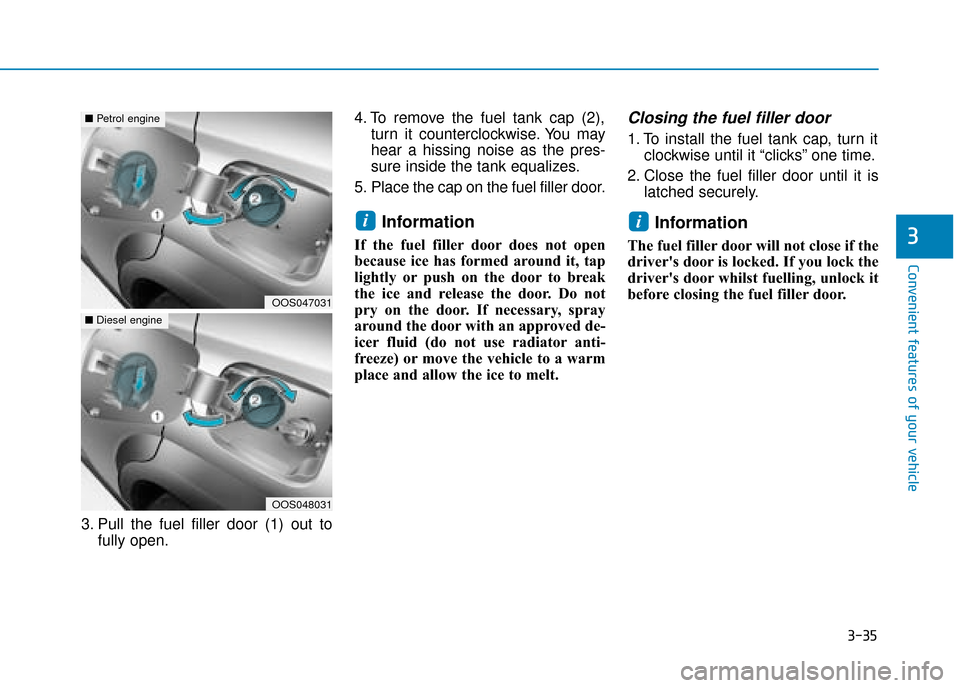
3. Pull the fuel filler door (1) out tofully open. 4. To remove the fuel tank cap (2),
turn it counterclockwise. You may
hear a hissing noise as the pres-
sure inside the tank equalizes.
5. Place the cap on the fuel filler door.
Information
If the fuel filler door does not open
because ice has formed around it, tap
lightly or push on the door to break
the ice and release the door. Do not
pry on the door. If necessary, spray
around the door with an approved de-
icer fluid (do not use radiator anti-
freeze) or move the vehicle to a warm
place and allow the ice to melt.
Closing the fuel filler door
1. To install the fuel tank cap, turn it clockwise until it “clicks” one time.
2. Close the fuel filler door until it is latched securely.
Information
The fuel filler door will not close if the
driver's door is locked. If you lock the
driver's door whilst fuelling, unlock it
before closing the fuel filler door.
ii
OOS047031
■Petrol engine
OOS048031
■Diesel engine
Page 118 of 526
3-36
Convenient features of your vehicle
When refuelling, always move
the shift lever to the P (Park,
for dual clutch transmission)
or first gear or R (Reverse, for
manual transmission) posi-
tion, set the parking brake, and
place the ignition switch to the
LOCK/OFF position. Sparks
produced by electrical compo-
nents related to the engine can
ignite fuel
vapourscausing a
fire.
When using an approved
portable fuel container, be
sure to place the container on
the ground prior to refuelling.
Static electricity discharge
from the container can ignite
fuel vapours causing a fire.
Once refuelling has begun,
contact between your bare
hand and the vehicle should
be maintained until the filling
is complete.
Do not use mobile phones
whilst refuelling. Electric cur-
rent and/or electronic interfer-
ence from mobile phones can
potentially ignite fuel vapours
and cause a fire.
Do not get back into a vehicle
once you have begun refu-
elling. You can generate a
build-up of static electricity by
touching, rubbing or sliding
against any item or fabric
capable of producing static
electricity.
Static electricity discharge
can ignite fuel vapours caus-
ing a fire. If you must re-enter
the vehicle, you should once
again eliminate potentially
dangerous static electricity
discharge by touching a metal
part of the vehicle, away from
the fuel filler neck, nozzle or
other petrol source, with your
bare hand.
Petrol is highly flammable and
explosive. Failure to follow
these guidelines may result in
SERIOUS INJURY or DEATH:
Read and follow all warnings
posted at the gas station.
Before refuelling, note the
location of the Emergency
Petrol Shut-Off, if available, at
the gas station.
Before touching the fuel noz-
zle, you should eliminate the
potential build-up of static
electricity by touching a metal
part of the vehicle, a safe dis-
tance away from the fuel filler
neck, nozzle, or other gas
source, with your bare hand.
WARNING
Page 128 of 526
3-46
Convenient features of your vehicle
If the brake fluid level in the reser-
voir is low:
1. Drive carefully to the nearest safelocation and stop your vehicle.
2. With the engine stopped, check the brake fluid level immediately and
add fluid as required (For more
details, refer to “Brake Fluid” in
chapter 7). After adding brake
fluid, check all brake components
for fluid leaks. If a brake fluid leak is
found, or if the warning light
remains on, or if the brakes do not
operate properly, do not drive the
vehicle. We recommend that you
have the vehicle inspected by a
HYUNDAI authorised repairer.
Dual-diagonal braking system
Your vehicle is equipped with dual-
diagonal braking systems. This
means you still have braking on two
wheels even if one of the dual sys-
tems should fail.
With only one of the dual systems
working, more than normal pedal
travel and greater pedal pressure are
required to stop the vehicle. Also, the vehicle will not stop in as
short a distance with only a portion
of the brake system working.
If the brakes fail whilst you are driv-
ing, shift to a lower gear for addition-
al engine braking and stop the vehi-
cle as soon as it is safe to do so.
Anti-lock Brake System
(ABS) Warning Light
This warning light illuminates:
When you set the ignition switch or
the Engine Start/Stop button to the
ON position.
- It illuminates for approximately 3seconds and then goes off.
When there is a malfunction with the ABS (The normal braking sys-
tem will still be operational without
the assistance of the anti-lock
brake system).
In this case, we recommend that
you have the vehicle inspected by
a HYUNDAI authorised repairer.
Parking Brake & Brake Fluid
Warning Light
Driving the vehicle with a warn-
ing light ON is dangerous. If the
Parking Brake & Brake Fluid
Warning Light illuminates with
the parking brake released, it
indicates that the brake fluid
level is low.
In this case, we recommend
that you have the vehicle
inspected by a HYUNDAI autho-
rised repairer.
WARNING
Page 135 of 526
3-53
Convenient features of your vehicle
Glow Indicator Light(for diesel engine)
This indicator light illuminates:
When the engine is being preheat-
ed with the ignition switch or
Engine Start/Stop button in the ON
position.
- The engine can be started afterthe glow indicator light goes off.
- The illumination time varies depending on the with the engine
coolant temperature, air tempera-
ture, and battery condition.
If the indicator light remains on or
blinks after the engine has warmed
up or whilst driving, there may be a
malfunction with the engine preheat-
ing system.
In this case, we recommend that you
have the vehicle inspected by a
HYUNDAI authorised repairer.
Information
If the engine does not start within 10
seconds after the preheating is com-
pleted, set the ignition switch or
Engine Start/Stop Button to the
LOCK or OFF position for 10 seconds
and then to the ON position in order
to preheat the engine again.
SCR warning light (Diesel Engine,if equipped)
This warning light illuminates:
When the urea solution tank is
nearly empty.
- If the urea solution tank is nearlyempty:
Refill urea solution as soon as pos- sible.
For more details, refer to "Low
urea solution warning message"
in the chapter 7.
i
3
Page 139 of 526
3-57
Convenient features of your vehicle
3
Light ON IndicatorLight
This indicator light illuminates:
When the tail lights or headlamps
are on.
Front Fog IndicatorLight (if equipped)
This indicator light illuminates:
When the front fog lights are on.
Rear Fog IndicatorLight
This indicator light illuminates:
When the rear fog lights are on.
LED Headlamp WarningLight (if equipped)
This warning light illuminates:
When you turn the ignition switch
or the Engine Start/Stop button to
the ON position.
When there is a malfunction with the LED headlamp.
In this case, we recommend that you
have the vehicle inspected by an a
HYUNDAI authorised repairer.
This warning light blinks:
When there is a malfunction with a
LED headlamp related part.
In this case, we recommend that you
have the vehicle inspected by an a
HYUNDAI authorised repairer.
Continuous driving with the LED
Headlamp Warning Light on or
blinking can reduce LED head-
lamp life.
4 Wheel Drive (4WD) LOCK Indicator Light(if equipped)
This indicator light illuminates:
Once you set the ignition switch or
Engine Start/Stop Button to the ON
position.
- It illuminates for approximately 3seconds and then goes off.
When you select 4WD Lock mode by pressing the 4WD LOCK button.
- The 4WD LOCK mode is toincrease the drive power when
driving on wet pavement, snow
covered roads and/or off-road.
Do not use 4WD LOCK mode on
dry paved roads or highway, it can
cause noise, vibration or damage
of 4WD related parts.
NOTICE
NOTICE
Page 142 of 526
3-60
Convenient features of your vehicle
Icy Road Warning Light(if equipped)
This warning light is to warn the driver
the road may be icy.
When the temperature on the out-
side temperature gauge is approxi-
mately below 4°C (40°F), the Icy
Road Warning Light and Outside
Temperature Gauge blinks and then
illuminates. Also, the warning chime
sounds 1 time.
Information
If the icy road warning light appears
whilst driving, you should drive more
attentively and safely, refraining from
over-speeding, rapid acceleration, sud-
den braking or sharp turning, etc.
LCD display messages
Shift to P (for smart key systemand dual clutch transmission)
This warning message is displayed if
you try to turn off the engine without
the shift lever in P (Park) position.
At this time, the Engine Start/Stop
button turns to the ACC position (If
you press the Engine Start/Stop but-
ton once more, it will turn to the ON
position).
Low key battery (for smart key system)
This warning message is displayed if
the battery of the smart key is dis-
charged whilst changing the Engine
Start/Stop button to the OFF position.
Press START button while turn-ing wheel (for smart key system)
This warning message is displayed if
the steering wheel does not unlock
normally when the Engine Start/Stop
button is pressed. You should press the Engine Start/Stop
button whilst turning the steering wheel
right and left.
Steering wheel unlocked
(for smart key system)
This warning message is displayed if
the steering wheel is not locked
whilst the Engine Start/Stop button
changes to the OFF position.
Check steering wheel lock System (for smart key system)
This warning message is displayed if
the steering wheel does not lock nor-
mally whilst the Engine Start/Stop but-
ton changes to the OFF position.
Press brake pedal to start engine(for smart key system and dualclutch transmission)
This warning message is displayed if
the Engine Start/Stop button changes
to the ACC position by pressing the
button repeatedly without depressing
the brake pedal.
You can start the vehicle by depressing
the brake pedal.
i
Page 153 of 526
3-71
Convenient features of your vehicle
3
FCW (Forward Collision Warning)- Late/Normal/Early
To adjust the initial warning alert time
for Forward Collision-Avoidance
Assist (FCA) system.
For more information, refer to
"Forward Collision-Avoidance
Assist (FCA) system" in chapter 5.
BCW sound (Blind-Spot Collision Warning)
To activate or deactivate the Blind-
Spot Collision Warning (BCW) sound.
For more information, refer to "
Blind-Spot Collision Warning
(BCW) system" in chapter 5.
BCW (Blind-Spot Collision Warning)
To activate or deactivate the Blind-
Spot Collision Warning (BCW) sys-
tem.
For more information, refer to
"Blind-Spot Collision Warning
(BCW) system" in chapter 5. 3. Door
- Disable: The auto door lock opera-
tion will be cancelled.
- Enable on speed: All doors will be automatically locked when the vehi-
cle speed exceeds 9mph (15km/h).
- Enable on shift: All doors will be automatically locked if the dual
clutch transmission shift lever is
shifted from the P (Park) position to
the R (Reverse), N (Neutral), or D
(Drive) position.
- Disable: The auto door unlock oper- ation will be cancelled.
- Vehicle Off: All doors will be auto- matically unlocked when the
Engine Start/Stop button is set to
the OFF position. (if equipped with
smart key) - On key out: All doors will be auto-
matically unlocked when the igni-
tion key is removed from the igni-
tion switch. (if equipped with remote
key)
- On shift to P: All doors will be auto- matically unlocked if the dual clutch
transmission shift lever is shifted to
the P (Park) position.
- Driver door unlock: All doors will be automatically unlocked when the
driver’s door is opened.
To activate or deactivate the horn
feedback.
If the horn feedback is activated,
after locking the door by pressing the
lock button on the remote key, and
pressing it again within 4 seconds,
the horn feedback sound will operate
once to indicate that all doors are
locked. (if equipped with remote key)