2019 Hyundai Kona wheel torque
[x] Cancel search: wheel torquePage 295 of 526

5-40
Driving your vehicle
The ESC OFF indicator light comes
on when the ESC is turned off with
the button.
Driving with wheels and tyres with
different sizes may cause the ESC
system to malfunction. Before
replacing tyres, make sure all four
tyres and wheels are the same
size. Never drive the vehicle with
different sized wheels and tyres
installed.
ESC OFF usage
When Driving
The ESC OFF mode should only be
used briefly to help free the vehicle if
stuck in snow or mud, by temporarily
stopping operation of the ESC, to
maintain wheel torque.
To turn ESC off whilst driving, press
the ESC OFF button whilst driving on
a flat road surface. To prevent damage to the trans-
mission:
Do not allow wheel(s) of one
axle to spin excessively whilst
the ESC, ABS, and parking brake
warning lights are displayed.
The repairs would not be cov-
ered by the vehicle warranty.
Reduce engine power and do
not spin the wheel(s) excessive-
ly whilst these lights are dis-
played.
When operating the vehicle on a dynamometer, make sure the
ESC is turned off (ESC OFF light
illuminated).
Information
Turning the ESC off does not affect
ABS or standard brake system opera-
tion.
i
NOTICE
NOTICE
When the ESC is blinking, this
indicates the ESC is active:
Drive slowly and NEVER attempt
to accelerate. NEVER turn the
ESC off whilst the ESC indicator
light is blinking or you may lose
control of the vehicle resulting in
an accident.
WARNING
Page 335 of 526
5-80
Driving your vehicle
L
LA
A N
N E
E
K
K E
EE
EP
P I
IN
N G
G
A
A S
SS
SI
IS
S T
T
(
( L
L K
K A
A )
)
S
S Y
Y S
ST
T E
EM
M
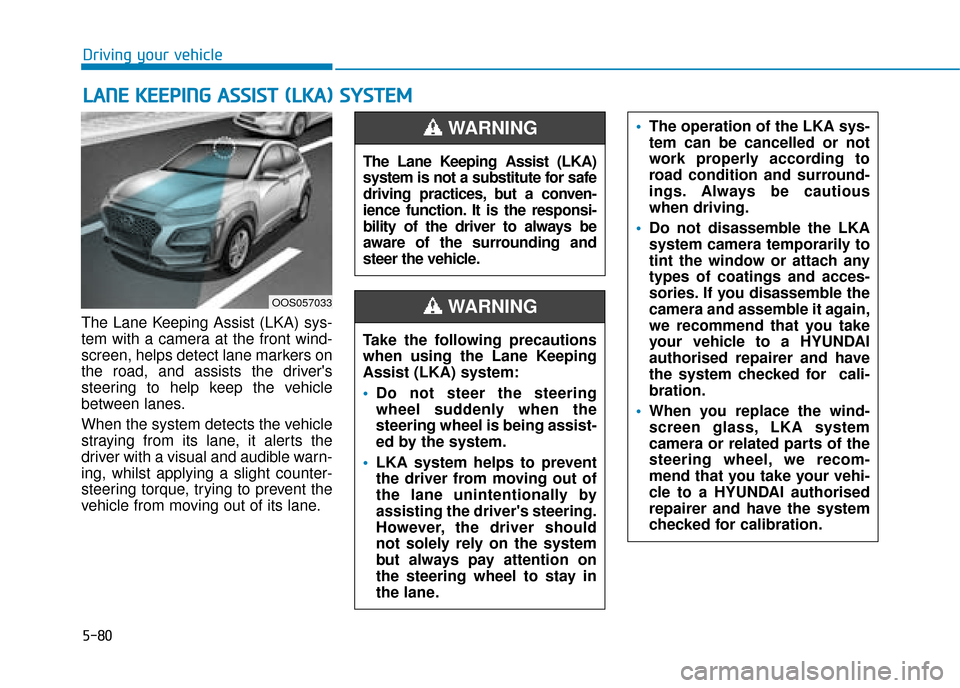
The Lane Keeping Assist (LKA) sys-
tem with a camera at the front wind-
screen, helps detect lane markers on
the road, and assists the driver's
steering to help keep the vehicle
between lanes.
When the system detects the vehicle
straying from its lane, it alerts the
driver with a visual and audible warn-
ing, whilst applying a slight counter-
steering torque, trying to prevent the
vehicle from moving out of its lane.
OOS057033
The Lane Keeping Assist (LKA)
system is not a substitute for safe
driving practices, but a conven-
ience function. It is the responsi-
bility of the driver to always be
aware of the surrounding and
steer the vehicle.
WARNING
Take the following precautions
when using the Lane Keeping
Assist (LKA) system:
Do not steer the steering
wheel suddenly when the
steering wheel is being assist-
ed by the system.
LKA system helps to prevent
the driver from moving out of
the lane unintentionally by
assisting the driver's steering.
However, the driver should
not solely rely on the system
but always pay attention on
the steering wheel to stay in
the lane.
WARNING
The operation of the LKA sys-
tem can be cancelled or not
work properly according to
road condition and surround-
ings. Always be cautious
when driving.
Do not disassemble the LKA
system camera temporarily to
tint the window or attach any
types of coatings and acces-
sories. If you disassemble the
camera and assemble it again,
we recommend that you take
your vehicle to a HYUNDAI
authorised repairer and have
the system checked for cali-
bration.
When you replace the wind-
screen glass, LKA system
camera or related parts of the
steering wheel, we recom-
mend that you take your vehi-
cle to a HYUNDAI authorised
repairer and have the system
checked for calibration.
Page 336 of 526
5-81
Driving your vehicle
5
LKA operation
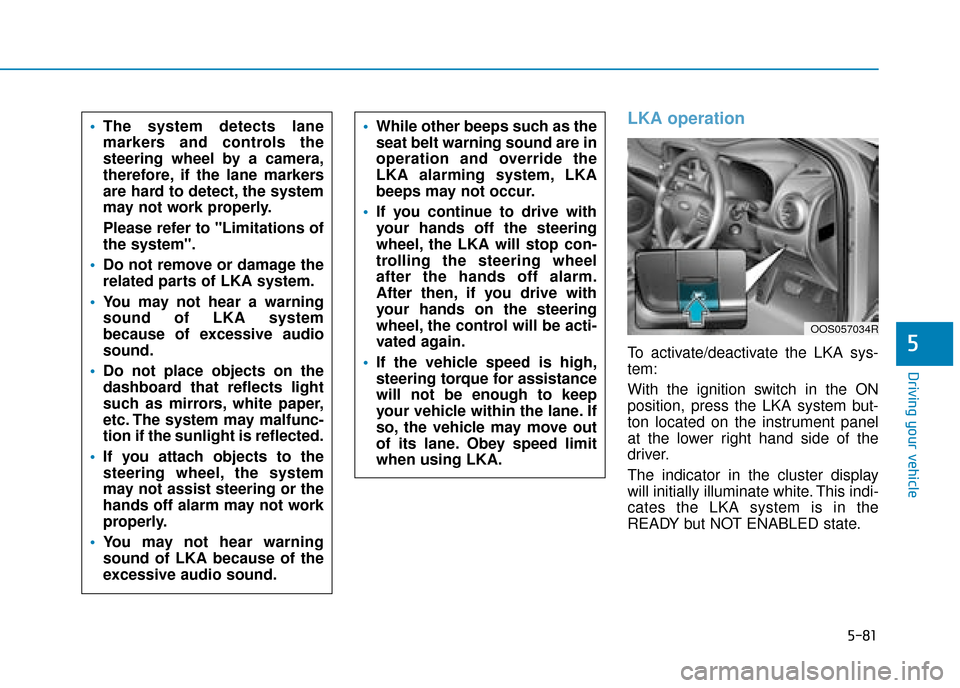
To activate/deactivate the LKA sys-
tem:
With the ignition switch in the ON
position, press the LKA system but-
ton located on the instrument panel
at the lower right hand side of the
driver.
The indicator in the cluster display
will initially illuminate white. This indi-
cates the LKA system is in the
READY but NOT ENABLED state.
The system detects lane
markers and controls the
steering wheel by a camera,
therefore, if the lane markers
are hard to detect, the system
may not work properly.
Please refer to "Limitations of
the system".
Do not remove or damage the
related parts of LKA system.
You may not hear a warning
sound of LKA system
because of excessive audio
sound.
Do not place objects on the
dashboard that reflects light
such as mirrors, white paper,
etc. The system may malfunc-
tion if the sunlight is reflected.
If you attach objects to the
steering wheel, the system
may not assist steering or the
hands off alarm may not work
properly.
You may not hear warning
sound of LKA because of the
excessive audio sound.
While other beeps such as the
seat belt warning sound are in
operation and override the
LKA alarming system, LKA
beeps may not occur.
If you continue to drive with
your hands off the steering
wheel, the LKA will stop con-
trolling the steering wheel
after the hands off alarm.
After then, if you drive with
your hands on the steering
wheel, the control will be acti-
vated again.
If the vehicle speed is high,
steering torque for assistance
will not be enough to keep
your vehicle within the lane. If
so, the vehicle may move out
of its lane. Obey speed limit
when using LKA.
OOS057034R
Page 395 of 526
6-23
What to do in an emergency
6
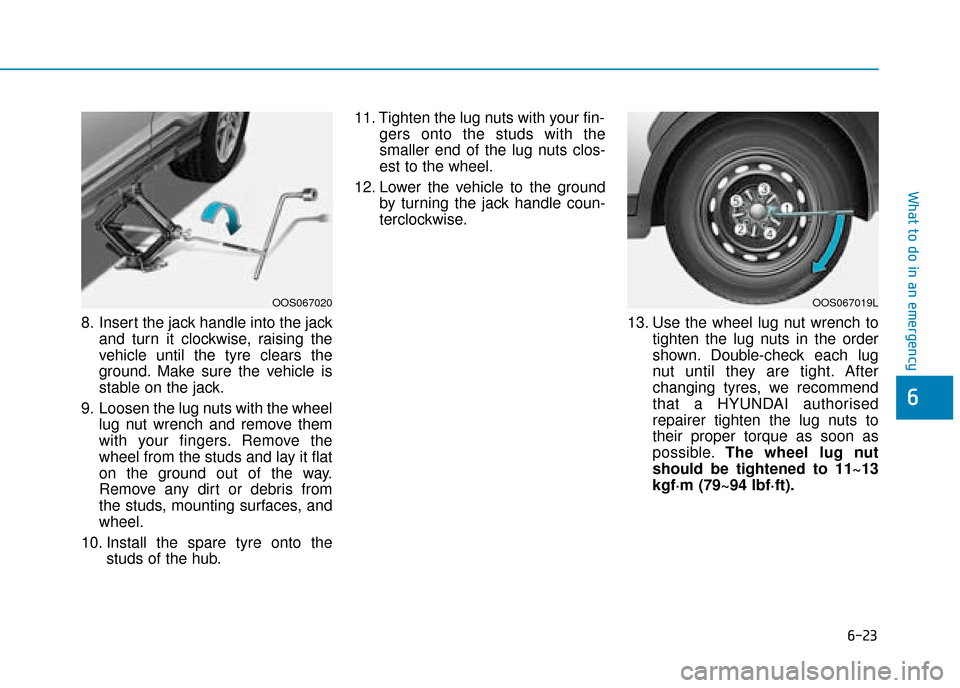
8. Insert the jack handle into the jackand turn it clockwise, raising the
vehicle until the tyre clears the
ground. Make sure the vehicle is
stable on the jack.
9. Loosen the lug nuts with the wheel lug nut wrench and remove them
with your fingers. Remove the
wheel from the studs and lay it flat
on the ground out of the way.
Remove any dirt or debris from
the studs, mounting surfaces, and
wheel.
10. Install the spare tyre onto the studs of the hub. 11. Tighten the lug nuts with your fin-
gers onto the studs with the
smaller end of the lug nuts clos-
est to the wheel.
12. Lower the vehicle to the ground by turning the jack handle coun-
terclockwise.
13. Use the wheel lug nut wrench totighten the lug nuts in the order
shown. Double-check each lug
nut until they are tight. After
changing tyres, we recommend
that a HYUNDAI authorised
repairer tighten the lug nuts to
their proper torque as soon as
possible. The wheel lug nut
should be tightened to 11~13
kgf·m (79~94 lbf·ft).
OOS067020OOS067019L
Page 397 of 526
6-25
What to do in an emergency
6
When driving with the compact spare
tyre mounted to your vehicle:
Check the tyre pressure afterinstalling the compact spare tyre.
The compact spare tyre should be
inflated to 420 kPa (60 psi).
Do not take this vehicle through an automatic car wash whilst the com-
pact spare tyre is installed.
Do not use the compact spare tyre on any other vehicle because this
tyre has been designed especially
for your vehicle.
The compact spare tyre’s tread life is shorter than a regular tyre.
Inspect your compact spare tyre
regularly and replace worn compact
spare tyres with the same size and
design, mounted on the same
wheel.
Do not use more than one compact spare tyre at a time.
Do not tow a trailer whilst the com- pact spare tyre is installed. When the original tyre and wheel
are repaired and reinstalled on the
vehicle, the lug nut torque must be
set correctly. The correct lug nut
tightening torque is 11~13 kgf·m
(79~94 lbf·ft).NOTICE
To prevent damaging the com-
pact spare tyre and your vehi-
cle:
Drive slowly enough for the
road conditions to avoid all
hazards, such as a potholes
or debris.
Avoid driving over obstacles.
The compact spare tyre diam-
eter is smaller than the diame-
ter of a conventional tyre and
reduces the ground clearance
approximately 25 mm (1 inch).
Do not use tyre chains on the
compact spare tyre. Because
of the smaller size, a tyre
chain will not fit properly.
Do not use the compact spare
tyre on any other wheels, nor
should standard tyres, snow
tyres, wheel covers or trim
rings be used with the com-
pact spare wheel.
CAUTION
Page 428 of 526
7-11
7
Maintenance
Dual clutch transmission fluid
(if equipped)
Inspect the dual clutch transmission
fluid according to the maintenance
schedule.
Brake hoses and lines
Visually check for proper installation,
chafing, cracks, deterioration and
any leakage. Replace any deteriorat-
ed or damaged parts immediately.
Brake/Clutch fluid
(if equipped)
Check the brake/clutch fluid level in
the brake fluid reservoir. The level
should be between “MIN” and “MAX”
marks on the side of the reservoir.
Use only hydraulic brake fluid con-
forming to DOT 3 or DOT 4 specifi-
cation.
Parking brake
Inspect the parking brake system
including the parking brake lever and
cables.
Brake pads, calipers and
rotors
Check the pads for excessive wear,
discs for run out and wear, and
calipers for fluid leakage.
For more information on checking
the pads or lining wear limit, refer to
the HYUNDAI web site.
(http://ser
vice.hyundai-motor.com)
Suspension mounting bolts
Check the suspension connections
for looseness or damage. Retighten
to the specified torque.
Steering gear box, linkage &
boots/lower arm ball joint
With the vehicle stopped and engine
off, check for excessive free-play in
the steering wheel.
Check the linkage for bends or dam-
age. Check the dust boots and ball
joints for deterioration, cracks, or
damage. Replace any damaged
parts.
Drive shafts and boots
Check the drive shafts, boots and
clamps for cracks, deterioration, or
damage. Replace any damaged
parts and, if necessary, repack the
grease.
Air conditioning refrigerant/
compressor
Check the air conditioning lines and
connections for leakage and dam-
age.
Page 451 of 526
7-34
Maintenance
Check tyre inflation pressure
Check your tyres, including the spare
tyre, once a month or more.
How to check
Use a good quality tyre pressure
gauge to check tyre pressure. You
can not tell if your tyres are properly
inflated simply by looking at them.
Radial tyres may look properly inflat-
ed when they are under-inflated.
Remove the valve cap from the tyre
valve stem. Press the tyre gauge
firmly onto the valve to get a pres-
sure measurement. If the cold tyre
inflation pressure matches the rec-
ommended pressure on the tyre and
loading information label, no further
adjustment is necessary. If the pres-
sure is low, add air until you reach
the recommended pressure. Make
sure to put the valve caps back on
the valve stems. Without the valve
cap, dirt or moisture could get into
the valve core and cause air leakage.
If a valve cap is missing, install a new
one as soon as possible.If you overfill the tyre, release air by
pushing on the metal stem in the
centre of the tyre valve. Recheck the
tyre pressure with the tyre gauge. Be
sure to put the valve caps back on
the valve stems. Without the valve
cap, dirt or moisture could get into
the valve core and cause air leakage.
If a valve cap is missing, install a new
one as soon as possible.
Tyre rotation
To equalise tread wear, HYUNDAI
recommends that the tyres be rotat-
ed every 7,500 miles (12,000 km) or
sooner if irregular wear develops.
During rotation, check the tyres for
correct balance.
When rotating tyres, check for
uneven wear and damage. Abnormal
wear is usually caused by incorrect
tyre pressure, improper wheel align-
ment, out-of-balance wheels, severe
braking or severe cornering. Look for
bumps or bulges in the tread or side
of the tyre. Replace the tyre if you
find any of these conditions. Replace
the tyre if fabric or cord is visible.
After rotation, be sure to bring the
front and rear tyre pressures to spec-
ification and check lug nut tightness
(proper torque is 11~13 kgf·m
[79~94 lbf·ft]).
Page 516 of 526
8-4
Specifications & Consumer information
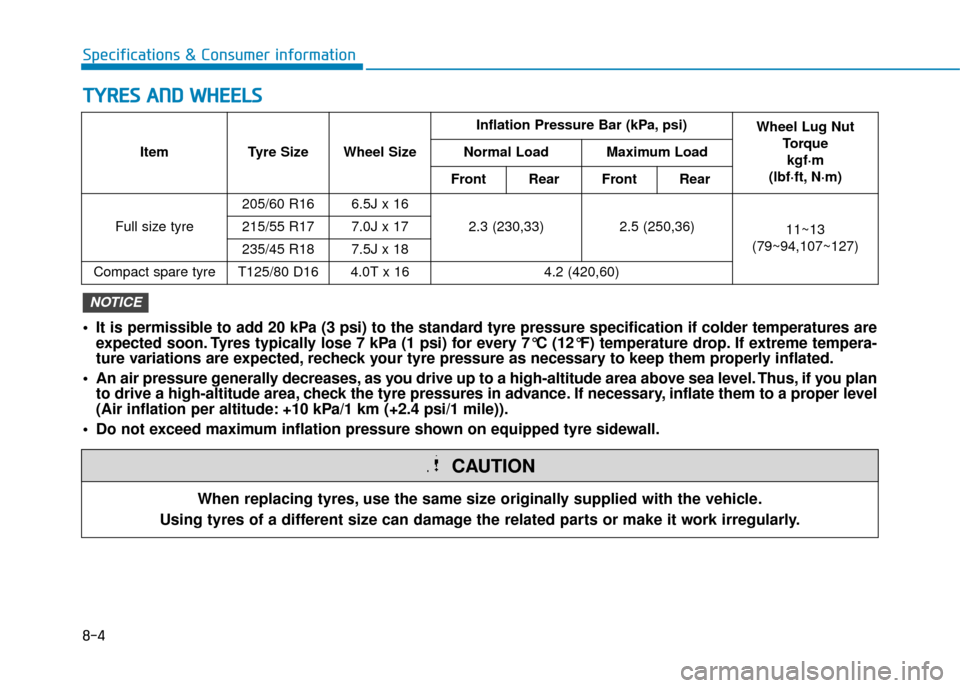
ItemTyre Size Wheel Size Inflation Pressure Bar (kPa, psi)
Wheel Lug Nut
Torque kgf·m
(lbf·ft, N·m)
Normal Load Maximum Load
Front Rear Front Rear
Full size tyre 205/60 R16 6.5J x 16
2.3 (230,33)2.5 (250,36)
11~13
(79~94,107~127)
215/55 R17 7.0J x 17
235/45 R18 7.5J x 18
Compact spare tyre T125/80 D16 4.0T x 16 4.2 (420,60)
T TY
Y R
RE
ES
S
A
A N
N D
D
W
W H
HE
EE
EL
LS
S
When replacing tyres, use the same size originally supplied with the vehicle.
Using tyres of a different size can damage the related parts or make it work irregularly.
CAUTION
It is permissible to add 20 kPa (3 psi) to the standard tyre pressure specification if colder temperatures are expected soon. Tyres typically lose 7 kPa (1 psi) for every 7°C (12°F) temperature drop. If extreme tempera-
ture variations are expected, recheck your tyre pressure as necessary to keep them properly inflated.
An air pressure generally decreases, as you drive up to a high-altitude area above sea level. Thus, if you plan to drive a high-altitude area, check the tyre pressures in advance. If necessary, inflate them to a proper level
(Air inflation per altitude: +10 kPa/1 km (+2.4 psi/1 mile)).
Do not exceed maximum inflation pressure shown on equipped tyre sidewall.
NOTICE