2019 Hyundai Ioniq Electric lamp
[x] Cancel search: lampPage 233 of 526
3-86
Convenient features of your vehicle
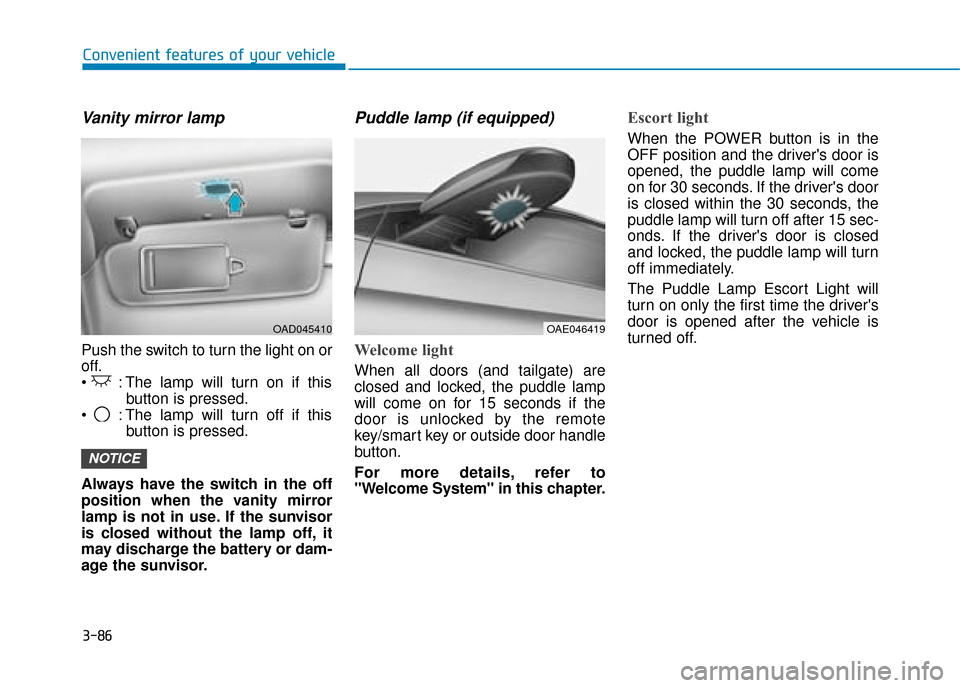
Vanity mirror lamp
Push the switch to turn the light on or
off.
: The lamp will turn on if thisbutton is pressed.
: The lamp will turn off if this button is pressed.
Always have the switch in the off
position when the vanity mirror
lamp is not in use. If the sunvisor
is closed without the lamp off, it
may discharge the battery or dam-
age the sunvisor.
Puddle lamp (if equipped)
Welcome light
When all doors (and tailgate) are
closed and locked, the puddle lamp
will come on for 15 seconds if the
door is unlocked by the remote
key/smart key or outside door handle
button.
For more details, refer to
"Welcome System" in this chapter.
Escort light
When the POWER button is in the
OFF position and the driver's door is
opened, the puddle lamp will come
on for 30 seconds. If the driver's door
is closed within the 30 seconds, the
puddle lamp will turn off after 15 sec-
onds. If the driver's door is closed
and locked, the puddle lamp will turn
off immediately.
The Puddle Lamp Escort Light will
turn on only the first time the driver's
door is opened after the vehicle is
turned off.
NOTICE
OAD045410OAE046419
Page 276 of 526
4-2
Multimedia System
Information
• If you install an aftermarket HIDheadlamp, your vehicle’s audio and
electronic device may malfunction.
• Prevent chemicals such as perfume, cosmetic oil, sun cream, hand clean-
er, and air freshener from contacting
the interior parts because they may
cause damage or discolouration.
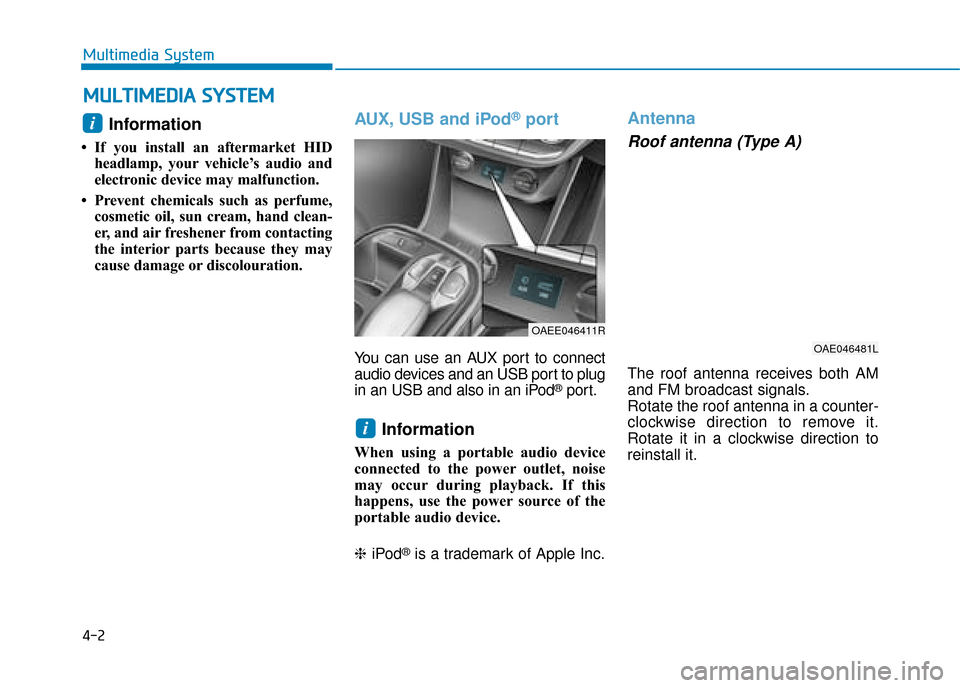
AUX, USB and iPod®port
You can use an AUX port to connect
audio devices and an USB port to plug
in an USB and also in an iPod
®port.
Information
When using a portable audio device
connected to the power outlet, noise
may occur during playback. If this
happens, use the power source of the
portable audio device.
❈ iPod
®is a trademark of Apple Inc.
Antenna
Roof antenna (Type A)
The roof antenna receives both AM
and FM broadcast signals.
Rotate the roof antenna in a counter-
clockwise direction to remove it.
Rotate it in a clockwise direction to
reinstall it.
i
OAEE046411R
i
M
MU
UL
LT
T I
IM
M E
ED
D I
IA
A
S
S Y
Y S
ST
T E
EM
M
OAE046481L
Page 325 of 526
5-9
Driving your vehicle
5
To prevent damage to the vehicle:
If the " " indicator turns offwhilst you are in motion, do not
attempt to shift to the P (Park)
position.
If traffic and road conditions
permit, you may shift to the N
(Neutral) position whilst the
vehicle is still moving and press
the POWER button in an attempt
to restart the vehicle.
Do not push or tow your vehicle to start the vehicle. To prevent damage to the vehicle:
Do not press the POWER button
for more than 10 seconds except
when the stop lamp fuse is blown.
When the stop lamp fuse is blown,
you cannot normally start the
vehicle. Replace the fuse with a
new one. If you are not able to
replace the fuse, you can start the
vehicle by pressing and holding
the POWER button for 10 seconds
with the POWER button in the ACC
position.
For your safety always depress
the brake pedal before starting the
vehicle.
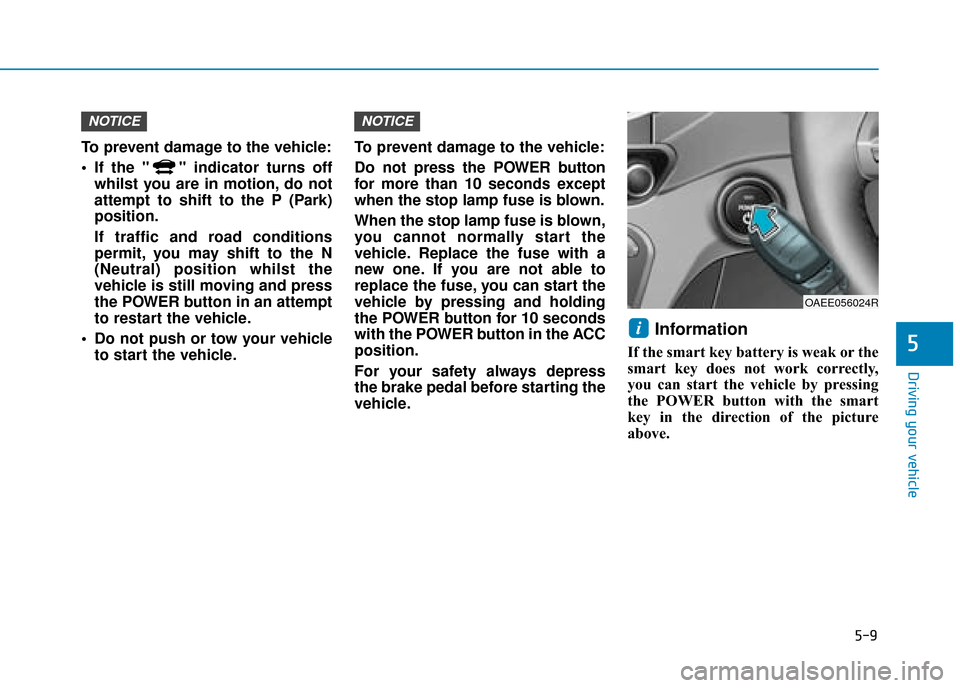
Information
If the smart key battery is weak or the
smart key does not work correctly,
you can start the vehicle by pressing
the POWER button with the smart
key in the direction of the picture
above.
i
NOTICENOTICE
OAEE056024R
Page 382 of 526
5-66
Driving your vehicle
The vehicle is driven on a steep incline.
The steering wheel is turned sud- denly.
Limitations of the System
The LKA system may operate pre-
maturely even if the vehicle does not
depart from the intended lane, OR,
the LKA system may not assist your
steering or warn you if the vehicle
leaves the intended lane under the
following circumstances:
When the lane and road condi-
tions are poor
It is difficult to distinguish the lanemarking from the road surface or
the lane marking is faded or not
clearly marked.
It is difficult to distinguish the colour of the lane marker from the
road.
There are markings on the road surface that look like a lane marker
that is inadvertently being detected
by the camera. The lane marker is merged or
divided. (e.g. tollgate)
The lane number increases or decreases or the lane marker are
crossing complicatedly.
There are more than two lane markers on the road in front of you.
The lane marker is very thick or thin.
The lanes ahead are not visible due to rain, snow, water on the
road, damaged or stained road
surface, or other factors.
The shadow is on the lane marker by a median strip, trees, etc.
The lanes are incomplete or the area is in a construction zone.
There are crosswalk signs or other symbols on the road.
The lane marker in a tunnel is stained with oil, etc.
The lane suddenly disappears such as at the intersection. When external condition is inter-
vened
The brightness outside changes
suddenly such as when entering or
exiting a tunnel, or when passing
under a bridge.
The brightness outside is too low such as when the headlamps are
not on at night or the vehicle is
going through a tunnel.
There is a boundary structure in the roadway such as a concrete
barrier, guardrail and reflector post
that is inadvertently being detected
by the camera.
When light coming from a street light or an oncoming vehicle is
reflected on a wet road surface
such as a puddle in the road.
The field of view in front is obstructed by sun glare.
There is not enough distance between you and the vehicle in
front to be able to detect the lane
marker or the vehicle ahead is driv-
ing on the lane marker.
Page 415 of 526
5-99
Driving your vehicle
5
Information
The ESC system (if equipped) must be
turned OFF before rocking the vehi-
cle.
If you are still stuck after rocking
the vehicle a few times, have the
vehicle pulled out by a tow vehicle
to avoid vehicle overheating, pos-
sible damage to the reduction
gear and tyre damage. See
"Towing" in chapter 6.
Smooth cornering
Avoid braking or gear changing in
corners, especially when roads are
wet. Ideally, corners should always
be taken under gentle acceleration.
Driving at night
Night driving presents more hazards
than driving in the daylight. Here are
some important tips to remember:
Slow down and keep more dis-tance between you and other vehi-
cles, as it may be more difficult to
see at night, especially in areas
where there may not be any street
lights.
Adjust your mirrors to reduce the glare from other driver's head-
lamps.
Keep your headlamps clean and properly aimed. Dirty or improperly
aimed headlamps will make it
much more difficult to see at night.
Avoid staring directly at the head- lamps of oncoming vehicles. You
could be temporarily blinded, and it
will take several seconds for your
eyes to readjust to the darkness.
Driving in the rain
Rain and wet roads can make driving
dangerous. Here are a few things to
consider when driving in the rain or
on slick pavement:
Slow down and allow extra follow-ing distance. A heavy rainfall
makes it harder to see and increas-
es the distance needed to stop
your vehicle.
Turn OFF your Cruise Control. (if equipped)
Replace your windscreen wiper blades when they show signs of
streaking or missing areas on the
windscreen.
Be sure your tyres have enough tread. If your tyres do not have
enough tread, making a quick stop
on wet pavement can cause a skid
and possibly lead to an accident.
See "Tyre Tread" in chapter 7 .
Turn on your headlamps to make it easier for others to see you.
Driving too fast through large pud- dles can affect your brakes. If you
must go through puddles, try to
drive through them slowly.
NOTICE
i
Page 450 of 526
Tyres and wheels .................................................7-23
Tyre care ........................................................................\
...7-23
Recommended cold tyre inflation pressures ...........7-24
Check tyre inflation pressure ......................................7-25
Tyre rotation ....................................................................7-26\
Wheel alignment and tyre balance.............................7-27
Tyre replacement ............................................................7-27
Wheel replacement .........................................................7-28
Tyre traction .....................................................................7-2\
8
Tyre maintenance ...........................................................7-28
Tyre sidewall labeling ................................................... 7-28
Low aspect ratio tyres...................................................7-32
Fuses ......................................................................7-\
34
Instrument panel fuse replacement ...........................7-35
Motor compartment panel fuse replacement ..........7-36
Fuse/relay panel description .......................................7-37
Light bulbs.............................................................7-49
Headlamp, position lamp, turn signal lamp
bulb replacement .............................................................7-50
Headlamp aiming .............................................................7-54
Daytime running lamp ....................................................7-57
Side repeater lamp replacement .................................7-57
Rear combination lamp bulb replacement ................7-57
Rear fog lamp ..................................................................7-60
High mounted stop lamp ...............................................7-60
License plate light bulb replacement .........................7-60
Interior light bulb replacement ....................................7-60
Appearance care ..................................................7-62
Exterior care ....................................................................7-62\
Interior care......................................................................7-\
67
Page 454 of 526
7-6
Maintenance
Whilst operating your vehicle:
Check for vibrations in the steeringwheel. Notice if there is any
increased steering effort or loose-
ness in the steering wheel, or
change in its straight-ahead posi-
tion.
Notice if your vehicle constantly turns slightly or “pulls” to one side
when travelling on smooth, level
road.
When stopping, listen and check for unusual sounds, pulling to one
side, increased brake pedal travel
or “hard-to-push” brake pedal.
If any slipping or changes in the operation of your reduction gear
occurs, check the reduction gear
fluid level.
Check the reduction gear P (Park) function.
Check the parking brake.
Check for fluid leaks under your vehicle (water dripping from the air
conditioning system during or after
use is normal).
At least monthly:
Check coolant level in the coolantreservoir.
Check the operation of all exterior lights, including the stoplights, turn
signals and hazard warning flashers.
Check the inflation pressures of all tyres including the spare for tyres
that are worn, show uneven wear,
or are damaged.
Check for loose wheel lug nuts.
At least twice a year: (i.e., every Spring and Fall)
Check radiator, heater and air condi-
tioning hoses for leaks or damage.
Check windscreen washer spray and wiper operation. Clean wiper
blades with clean cloth dampened
with washer fluid.
Check headlamp alignment.
Check the seat belts for wear and function.
At least once a year:
Clean body and door drain holes.
Lubricate door hinges and bonnethinges.
Lubricate door and bonnet locks and latches.
Lubricate door rubber weather strips.
Check the air conditioning system.
Inspect and lubricate reduction gear linkage and controls.
Clean the battery and terminals.
Check the brake fluid level.
Page 456 of 526
7-8
Maintenance
E
EX
X P
PL
LA
A N
N A
AT
TI
IO
O N
N
O
O F
F
S
S C
C H
H E
ED
D U
U L
LE
E D
D
M
M A
AI
IN
N T
TE
EN
N A
AN
N C
CE
E
I
IT
T E
EM
M S
S
Cooling system
Check cooling system components,
such as radiator, coolant reservoir,
hoses and connections for leakage
and damage. Replace any damaged
parts.
Coolant
The coolant should be changed at
the intervals specified in the mainte-
nance schedule.
Reduction gear fluid
The reduction gear fluid should be
inspected according to the intervals
specified in the maintenance sched-
ule.
Brake hoses and lines
Visually check for proper installation,
chafing, cracks, deterioration and
any leakage. Replace any deteriorat-
ed or damaged parts immediately.
Brake fluid
Check brake fluid level in the brake
fluid reservoir. The level should be
between the MIN and the MAX
marks on the side of the reservoir.
Use only hydraulic brake fluid con-
forming to DOT 3 or DOT 4 specifi-
cation.
Brake discs, pads, calipers
and rotors
Check the pads, the disc, and the
rotor for any excessive wear-out.
Inspect calipers for any fluid leakage.
For more information on checking
the pads or lining wear limit, refer to
the HYUNDAI web site.
(http://ser
vice.hyundai-motor.com)
Suspension mounting bolts
Check the suspension connections
for looseness or damage. Retighten
to the specified torque.
Steering gear box, linkage &
boots/lower arm ball joint
With the vehicle stopped and the
hybrid system off, check for exces-
sive free-play in the steering wheel.
Check the linkage for bends or dam-
age. Check the dust boots and ball
joints for deterioration, cracks, or
damage.
Replace any damaged parts.
Drive shafts and boots
Check the drive shafts, boots and
clamps for cracks, deterioration, or
damage. Replace any damaged
parts and, if necessary, repack the
grease.
Air conditioning refrigerant
Check the air conditioning lines and
connections for leakage and damage.