Page 523 of 624

521
uuBefore Performing Maintenance uSafety When Performing Maintenance
Maintenance
Safety When Performing Maintenance
Some of the most important safe ty precautions are given here.
However, we cannot warn you of every conceivable hazard that can arise in
performing maintenance. Only you can decide whether you should perform a given
task.
• To reduce the possibility of fire or explos ion, keep cigarettes, sparks, and flames
away from the battery and all fuel related parts.
• Never leave rags, towels, or other flammable objects under the hood.
u Heat from the engine and exhaust can ignite them, causing a fire.
• To clean parts, use a co mmercially available degreaser or parts cleaner, not
gasoline.
• Wear eye protection and prot ective clothing when working with the battery or
compressed air.
• Engine exhaust contains carbon monoxide, which is poisonous and can kill you.
u Only operate the engine if th ere is sufficient ventilation.
• The vehicle must be in a stationary condition.
u Make sure your vehicle is parked on le vel ground, the parking brake is set, and
the engine is off.
• Be aware that hot parts can burn you.
u Make sure to let the engine and exhaust system cool thoroughly before
touching vehicle parts.
• Be aware that moving parts can injure you.
u Do not start the engine unless instruct ed, and keep your hands and limbs away
from moving parts.
■Maintenance Safety
■Vehicle Safety
1 Safety When Performing Maintenance
3WARNING
Improperly maintaining this vehicle or
failing to correct a pr oblem before driving
can cause a crash in which you can be
seriously hurt or killed.
Always follow the inspection and
maintenance recommendations according
to the schedules in this owner’s manual.
3WARNING
Failure to properly follow maintenance
instructions and prec autions can cause you
to be seriously hurt or killed.
Always follow the procedures and
precautions in this owner’s manual.
Page 527 of 624

525
uuMaintenance MinderTMuTo Use Maintenance MinderTM
Continued
Maintenance
■Maintenance Service Items1Maintenance Service Items
•Independent of the maintenance message in the
multi-information display, replace the brake fluid
every 3 years.
•Adjust the valves during services A, B, 1, 2, or 3 if
they are noisy.
Maintenance Minder MessageSystem Message
Indicator
Sub Items
Main
Item
*1: If the message
Maintenance Due Now does not appear more than 12 months after the display
is reset, change the engine oil every year.
# : See information on maintenance and emissions warranty in the first column on page 609.
*2: If you drive in dusty conditions, replace the air cleaner element every 15,000 miles (24,000 km).
*3: If you drive primarily in urban areas that have high concentrations of soot in the air from industry and
from diesel-powered vehicles, replace every 15,000 miles (24,000 km).
CODEMaintenance Main Items
A
●Replace engine oil*1
B●Replace engine oil*1 and oil filter●Inspect front and rear brakes●Check parking brake adjustment●Inspect tie rod ends, steering gearbox, and boots●Inspect suspension components●Inspect driveshaft boots●Inspect brake hoses and li nes (Including ABS/VSA)●Inspect all fluid levels and condition of fluids●Inspect exhaust system#
●Inspect fuel lines and connections#
*4: If you drive regularly in very high temperatures (over 110°F, 43°C), in very low temperatures (under
-20°F, -29°C), or towing a trailer, replace every 60,000 miles (U.S.) / 100,000 km (Canada).
*5: Driving in mountainous areas at very low vehicle speeds or trailer towing results in higher level of mechanical (Shear) stress to fluid. This requires differential fluid changes more frequently than
recommended by the Maintenance Minder. If you regularly drive your vehicle under these conditions,
have the differential fluid changed at 7,500 miles (12,000 km), then every 15,000 miles (24,000 km).
CODEMaintenance Sub Items
1
●Rotate tires
2●Replace air cleaner element*2
●Replace dust and pollen filter*3
●Inspect drive belt
3
●Replace transmission fl uid and transfer fluid*
4●Replace spark plugs●Replace timing belt and inspect water pump*4
●Inspect valve clearance
5
●Replace engine coolant
6●Replace rear differential fluid*, *5
* Not available on all models
Page 529 of 624
527
Maintenance
Maintenance Under the Hood
Maintenance Items Under the Hood
Brake Fluid
(Black Cap)
Washer Fluid
Radiator Cap
Engine Coolant
Reserve Tank Engine Oil Dipstick
(Orange) Engine Oil Fill Cap
Battery
Automatic Transmission Fluid Dipstick
Page 530 of 624

528
uuMaintenance Under the Hood uOpening the Hood
Maintenance
Opening the Hood
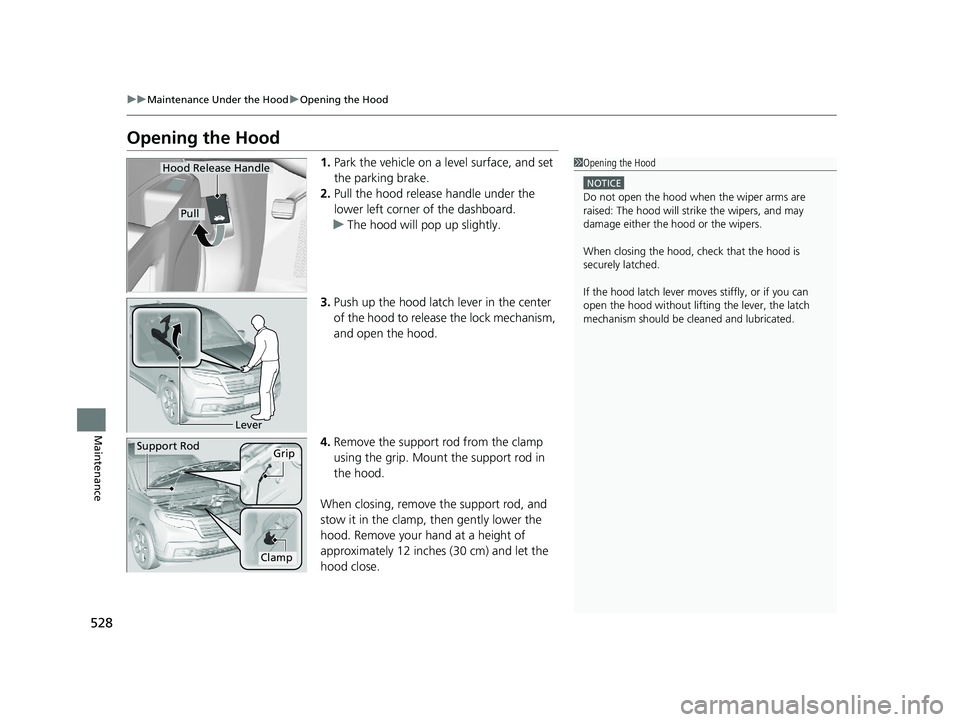
1. Park the vehicle on a level surface, and set
the parking brake.
2. Pull the hood release handle under the
lower left corner of the dashboard.
u The hood will pop up slightly.
3. Push up the hood latch lever in the center
of the hood to release the lock mechanism,
and open the hood.
4. Remove the support rod from the clamp
using the grip. Mount the support rod in
the hood.
When closing, remove the support rod, and
stow it in the clamp, then gently lower the
hood. Remove your hand at a height of
approximately 12 inches (30 cm) and let the
hood close.1 Opening the Hood
NOTICE
Do not open the hood when the wiper arms are
raised: The hood will stri ke the wipers, and may
damage either the hood or the wipers.
When closing the hood, check that the hood is
securely latched.
If the hood latch lever moves stiffly, or if you can
open the hood without lifti ng the lever, the latch
mechanism should be cl eaned and lubricated.
Hood Release Handle
Pull
Lever
Support RodGrip
Clamp
Page 540 of 624

538
uuMaintenance Under the Hood uBrake Fluid
Maintenance
Brake Fluid
The fluid level should be between the MIN
and MAX marks on the side of the reserve
tank.
Refilling Window Washer Fluid
Check the amount of window washer fluid.
If the level is low, fill the washer reservoir.
If the washer fluid is low, a message appears on the multi-information display.
Pour the washer fluid carefully. Do not overflow the reservoir.
Specified fluid: Honda Heavy Duty Brake Fluid DOT 3
■Checking the Brake Fluid
1Brake Fluid
NOTICE
Brake fluid marked DOT 5 is not compatible with your
vehicle’s braking system and can cause extensive
damage.
If the specified brake fluid is not available, you should
use only DOT 3 or DOT 4 fluid from a sealed
container as a temporary replacement.
Using any non-Honda brake fluid can cause corrosion
and decrease the longevity of the system. Have the
brake system flushed and re filled with Honda Heavy
Duty Brake Fluid DOT 3 as soon as possible.
If the brake fluid level is at or below the MIN mark,
have a dealer inspect the vehicle for leaks or worn
brake pads as soon as possible.
Brake Reservoir
MIN
MAX
1 Refilling Window Washer Fluid
NOTICE
Do not use engine antifreeze or a vinegar/water
solution in the windshield washer reservoir.
Antifreeze can damage y our vehicle’s paint. A
vinegar/water solution ca n damage the windshield
washer pump.
Models without washer level sensor
Models with washer level sensor
Page 545 of 624
543
uuReplacing Light Bulbs uRear Turn Signal and Back-Up Light Bulbs
Maintenance
Rear Turn Signal and Back-Up Light Bulbs
When replacing, use the following bulbs.
1.Use a Phillip-head screwdriver to remove
the screws.
2. Pull the light assembly out of the rear pillar.
3. Turn the socket counter-clockwise and
remove it. Remove the old bulb.
4. Insert a new bulb and turn clockwise.
5. Slide the light assembly onto the guide on
the body.
6. Align the pins with the body grommets,
then push in until they fully seat.
Brake/Taillight and Rear Side Marker Lights
Brake/taillight and rear side marker lights are LED type. Have an authorized Honda
dealer inspect and replace the light assembly.
Back-Up Light: 21 W
Rear Turn Signal Light: 21 W
Screws
Bulb
Socket Bulb
Socket
Page 546 of 624
544
uuReplacing Light Bulbs uRear License Plate Lights
Maintenance
Rear License Plate Lights
When replacing, use the following bulbs.
1.Remove the license plate light assembly by
pulling it towards you, and then pulling the
front edge upward.
2. Turn the socket counter-clockwise and
remove it. Remove the old bulb.
3. Insert a new bulb and turn clockwise.
High-Mount Brake Light
High-mount brake light is LED type. Have an authorized Honda dealer inspect and
replace the light assembly.
Rear License Plate Lights:5W
Bulb
Socket
Page 557 of 624

555
uuChecking and Maintaining Tires uWinter Tires
Maintenance
Winter Tires
If driving on snowy or frozen roads, mount all season marked “M+S” tires, snow
tires, or tire chains; reduce speed; and main tain sufficient distance between vehicles
when driving.
Be particularly careful wh en operating the steering wheel or brakes to prevent
skidding.
Use tire chains, snow tires, or all season tires when necessary or according to the law.
When mounting, refer to the following points.
For winter tires:
• Select the size and load ranges that are the same as the original tires.
• Mount the tires to all four wheels.
For tire chains:
• Install them on the front tires only.
• Because your vehicle has limited tire clea rance, we strongly recommend using the
chains listed below:
• Follow the chain manufactur er’s instruction when installing. Mount them as
tightly as you can.
• Check that the chains do not touch the brake lines or suspension.
• Drive slowly.
Cable-type: SCC Super Z LT-ZT735
1Winter Tires
NOTICE
Traction devices that are th e wrong size or improperly
installed can damage your vehicle’s brake lines,
suspension, body, and wheels. Stop driving if they are
hitting any part of the vehicle.
When tire chains are mounted, follow the chain
manufacturer’s instructi ons regarding vehicle
operational limits.
If your vehicle is equipp ed with summer tires, be
aware that these tires are not designed for winter
driving conditions. For more information, contact a
dealer.
3WARNING
Using the wrong chains, or not properly
installing chains, can damage the brake
lines and cause a crash in which you can be
seriously injured or killed.
Follow all instruction s in this owner’s
manual regarding the selection and use of
tire chains.