2019 FORD F650/750 transmission
[x] Cancel search: transmissionPage 210 of 387
DRAINING THE FUEL FILTER
WATER TRAP - 6.7L DIESEL
Your vehicle is equipped with a diesel fuel
conditioner module located on the
frame-rail under the driver-side floorboard
near the transmission.
You should drain water from the
module assembly whenever the
warning light comes on and the
message center directs you to drain the
water separator. This will occur when
approximately 8.45 fl oz (250 ml) of water
accumulates in the module. If you allow
the water level to exceed this level, the
water may pass through to the engine and
may cause fuel injection equipment
damage.
Draining the Diesel Fuel
Conditioner Module (DFCM) WARNING: Do not drain the
water-in-fuel separator while the engine
is running. Failure to follow this warning
may result in fire, serious injury, death or
property damage.
Note: If you drain the diesel fuel conditioner
module while the system is running air will
enter into the fuel system. The engine will
not operate properly if air enters the system.
Note: With fuel tank levels above 3⁄4 tank
it may be necessary to loosen the bowl three
turns before opening the drain. This will
actuate an anti-siphon valve at the fuel and
water separator inlet and prevent the fuel
from siphoning out of the tank.
Note: A loose drain valve can allow air to
enter the fuel system and cause drivetrain
issues. The engine will not operate properly.
Be sure that you fully tighten the drain valve.
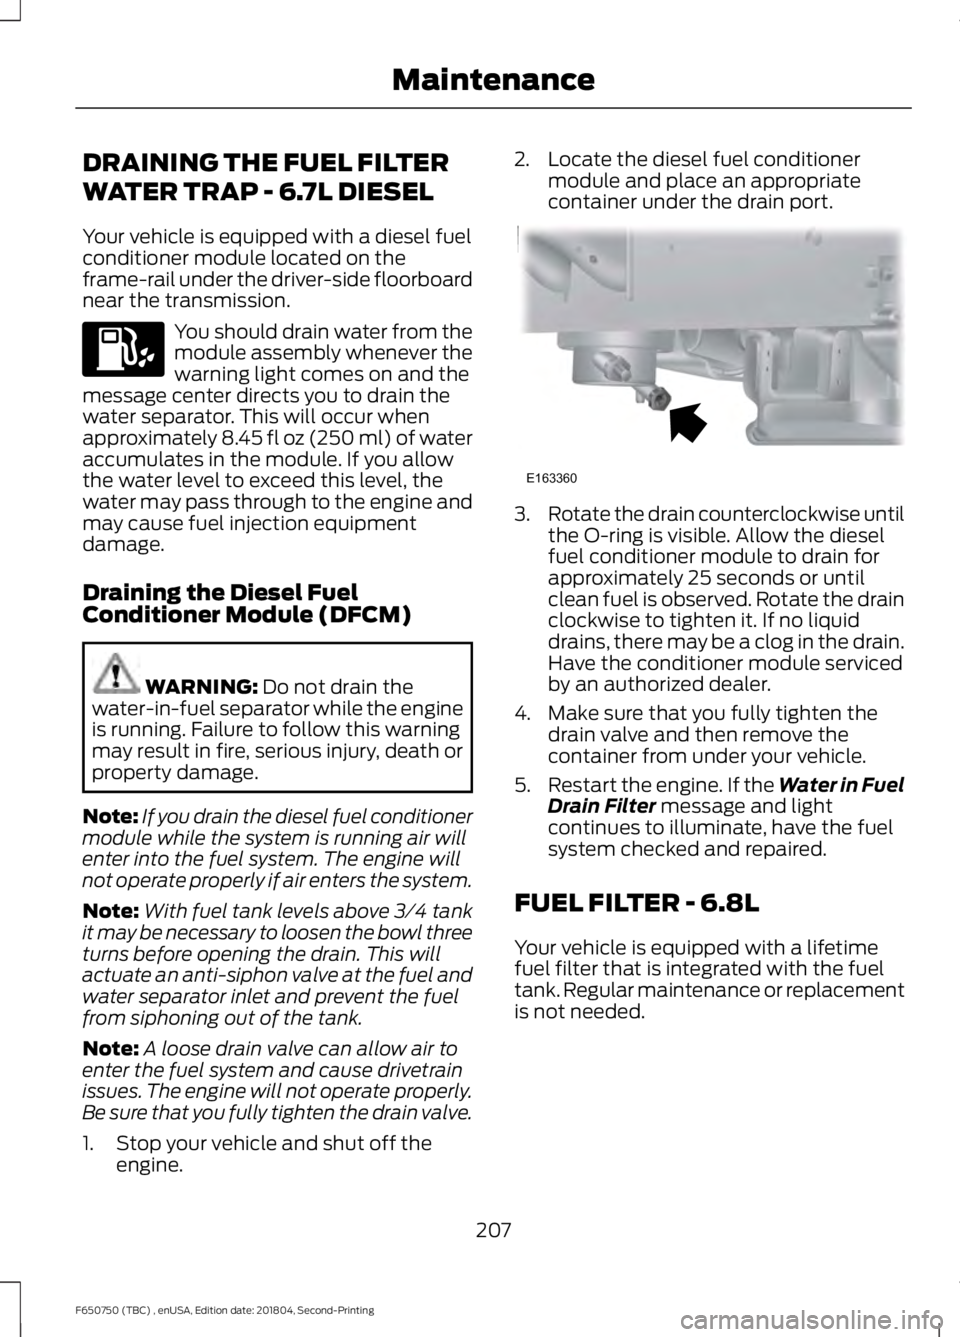
1. Stop your vehicle and shut off the engine. 2. Locate the diesel fuel conditioner
module and place an appropriate
container under the drain port. 3.
Rotate the drain counterclockwise until
the O-ring is visible. Allow the diesel
fuel conditioner module to drain for
approximately 25 seconds or until
clean fuel is observed. Rotate the drain
clockwise to tighten it. If no liquid
drains, there may be a clog in the drain.
Have the conditioner module serviced
by an authorized dealer.
4. Make sure that you fully tighten the drain valve and then remove the
container from under your vehicle.
5. Restart the engine. If the Water in Fuel
Drain Filter
message and light
continues to illuminate, have the fuel
system checked and repaired.
FUEL FILTER - 6.8L
Your vehicle is equipped with a lifetime
fuel filter that is integrated with the fuel
tank. Regular maintenance or replacement
is not needed.
207
F650750 (TBC) , enUSA, Edition date: 201804, Second-Printing Maintenance E163360
Page 224 of 387
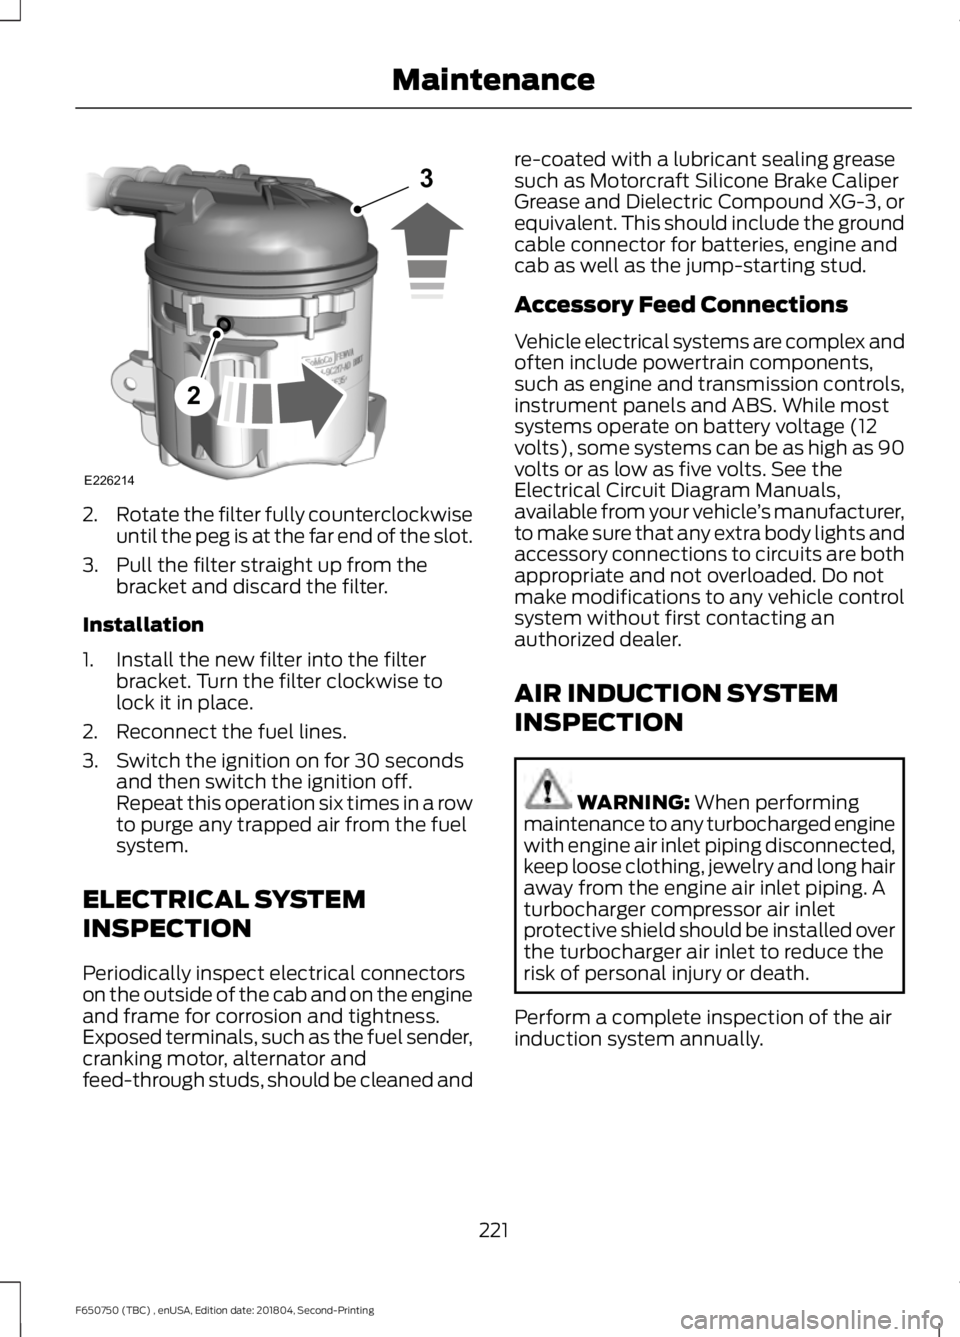
2.
Rotate the filter fully counterclockwise
until the peg is at the far end of the slot.
3. Pull the filter straight up from the bracket and discard the filter.
Installation
1. Install the new filter into the filter bracket. Turn the filter clockwise to
lock it in place.
2. Reconnect the fuel lines.
3. Switch the ignition on for 30 seconds and then switch the ignition off.
Repeat this operation six times in a row
to purge any trapped air from the fuel
system.
ELECTRICAL SYSTEM
INSPECTION
Periodically inspect electrical connectors
on the outside of the cab and on the engine
and frame for corrosion and tightness.
Exposed terminals, such as the fuel sender,
cranking motor, alternator and
feed-through studs, should be cleaned and re-coated with a lubricant sealing grease
such as Motorcraft Silicone Brake Caliper
Grease and Dielectric Compound XG-3, or
equivalent. This should include the ground
cable connector for batteries, engine and
cab as well as the jump-starting stud.
Accessory Feed Connections
Vehicle electrical systems are complex and
often include powertrain components,
such as engine and transmission controls,
instrument panels and ABS. While most
systems operate on battery voltage (12
volts), some systems can be as high as 90
volts or as low as five volts. See the
Electrical Circuit Diagram Manuals,
available from your vehicle
’s manufacturer,
to make sure that any extra body lights and
accessory connections to circuits are both
appropriate and not overloaded. Do not
make modifications to any vehicle control
system without first contacting an
authorized dealer.
AIR INDUCTION SYSTEM
INSPECTION WARNING: When performing
maintenance to any turbocharged engine
with engine air inlet piping disconnected,
keep loose clothing, jewelry and long hair
away from the engine air inlet piping. A
turbocharger compressor air inlet
protective shield should be installed over
the turbocharger air inlet to reduce the
risk of personal injury or death.
Perform a complete inspection of the air
induction system annually.
221
F650750 (TBC) , enUSA, Edition date: 201804, Second-Printing MaintenanceE226214
2
3
Page 230 of 387
SUSPENSION SYSTEM
INSPECTION
Note:
Do not adjust air suspension height
to any setting other than the specified
setting. Altering the height setting changes
the driveline angle and may result in
unwarrantable component damage, such
as transmission component damage.
Verify drive axle air suspension height and
height control valve performance at engine
oil change intervals.
Periodically check:
• Condition of spring leaves for evidence
of fatigue, bending or breakage.
• Condition of suspension mounting
brackets and bushings.
• Torque rod mounting fasteners for
tightness.
• For proper suspension alignment.
Maintain proper alignment at all times.
• U-bolts. After the chassis has been
operating under load for 1,000 mi
(1,600 km) or six months (whichever
comes first), the U-bolt nuts must be
re-torqued. Re-torque the U-bolt nuts
every
37,000 mi (60,000 km)
thereafter. Clean and lubricate the
U-bolt and nut threads and seats to
make sure a like new condition when
re-torqueing. See
Spring U-Bolt
Check (page 228).
FRAME AND TOW HOOK
INSPECTION
Your vehicle's chassis is manufactured
with frame rails of either HSLA steel or
heat-treated steel. Handle each in a
specific manner to make sure maximum
service life. Consult the service manual or
an authorized dealer before attempting
frame repair or modification. It is important, particularly on vehicles that
use tow hooks frequently, to inspect the
front and rear tow hooks for damage or a
loose mounting.
REAR AXLE FLUID CHECK
Your rear axle may have an optional
synthetic lubricant that allows the use of
extended service intervals. A tag on the
filler plug identifies the use of the synthetic
lubricant.
Only use a lubricant that meets
manufacturer specifications. Only use a
lubricant that meets manufacturer
specifications. Use of a non-approved rear
axle lubricant may cause internal axle
component damage. See Capacities and
Specifications
(page 261).
Checking the Fluid Level
1. Park your vehicle on level ground.
2. Set the parking brake and shift into position neutral (N) or park (P). Turn
the engine off.
3. Clean any dirt from around the axle filler plug.
4. Remove the filler plug and inspect the lubricant level. It should be at the
bottom of the filler plug opening.
5. Add lubricant, if necessary, through the
filler plug opening.
6. Clean and install the filler plug securely.
Changing the Fluid
Note: Drain the rear axle while the lubricant
is warm.
1. Park your vehicle on level ground.
2. Set the parking brake and shift into position neutral (N) or park (P). Turn
the engine off.
3. Clean any dirt from around the axle filler and drain plugs.
227
F650750 (TBC) , enUSA, Edition date: 201804, Second-Printing Maintenance
Page 254 of 387
USING SNOW CHAINS
WARNING: Snow tires must be
the same size, load index, and speed
rating as those originally provided by
Ford. Use of any tire or wheel not
recommended by Ford can affect the
safety and performance of your vehicle,
which could result in an increased risk of
loss of vehicle control, vehicle rollover,
personal injury, and death. Additionally,
the use of non-recommended tires and
wheels could cause steering, suspension,
axle, transfer case, or power transfer unit
failure. It is also strongly advised to
follow the Ford recommended tire
inflation pressure found on the Safety
Compliance Certification Label (affixed
to either the door hinge pillar, door-latch
post, or the door edge that meets the
door-latch post, next to the driver ’s
seating position), or Tire Label which is
located on the B-Pillar or the edge of the
driver door. Failure to follow the tire
pressure recommendations can cause
uneven treadwear patterns and
adversely affect the way your vehicle
handles.
The tires on your vehicle have all-weather
treads to provide traction in rain and snow.
However, in some climates, you may need
to use snow tires and cables. If you need
to use cables, it is recommended that steel
wheels (of the same size and
specifications) be used, as cables may chip
aluminum wheels.
Note: The suspension insulation and
bumpers help prevent vehicle damage. Do
not remove these components from your
vehicle when using snow tires and chains.
Follow these guidelines when using snow
tires and chains: •
If possible, avoid fully loading your
vehicle.
• Use only SAE Class S chains.
• Install chains securely, verifying that
the chains do not touch any wiring,
brake lines or fuel lines.
• Drive cautiously. If you hear the chains
rub or bang against your vehicle, stop
and retighten the chains. If this does
not work, remove the chains to prevent
damage to your vehicle.
• Remove the tire chains when they are
no longer needed. Do not use tire
chains on dry roads.
If you have any questions regarding snow
chains or cables, please contact your
authorized dealer.
CHANGING A ROAD WHEEL
If you get a flat tire while driving, do not
apply the brake heavily. Instead, gradually
decrease your speed. Hold the steering
wheel firmly and slowly move to a safe
place on the side of the road.
Tire Change Procedure WARNING:
When one of the front
wheels is off the ground, the
transmission alone will not prevent the
vehicle from moving or slipping off the
jack, even if the transmission is in park
(P). WARNING:
To help prevent the
vehicle from moving when you change
a tire, be sure to place the transmission
in park (P), set the parking brake and
block (in both directions) the wheel that
is diagonally opposite (other side and
end of the vehicle) to the tire being
changed.
251
F650750 (TBC) , enUSA, Edition date: 201804, Second-Printing Wheels and Tires
Page 260 of 387
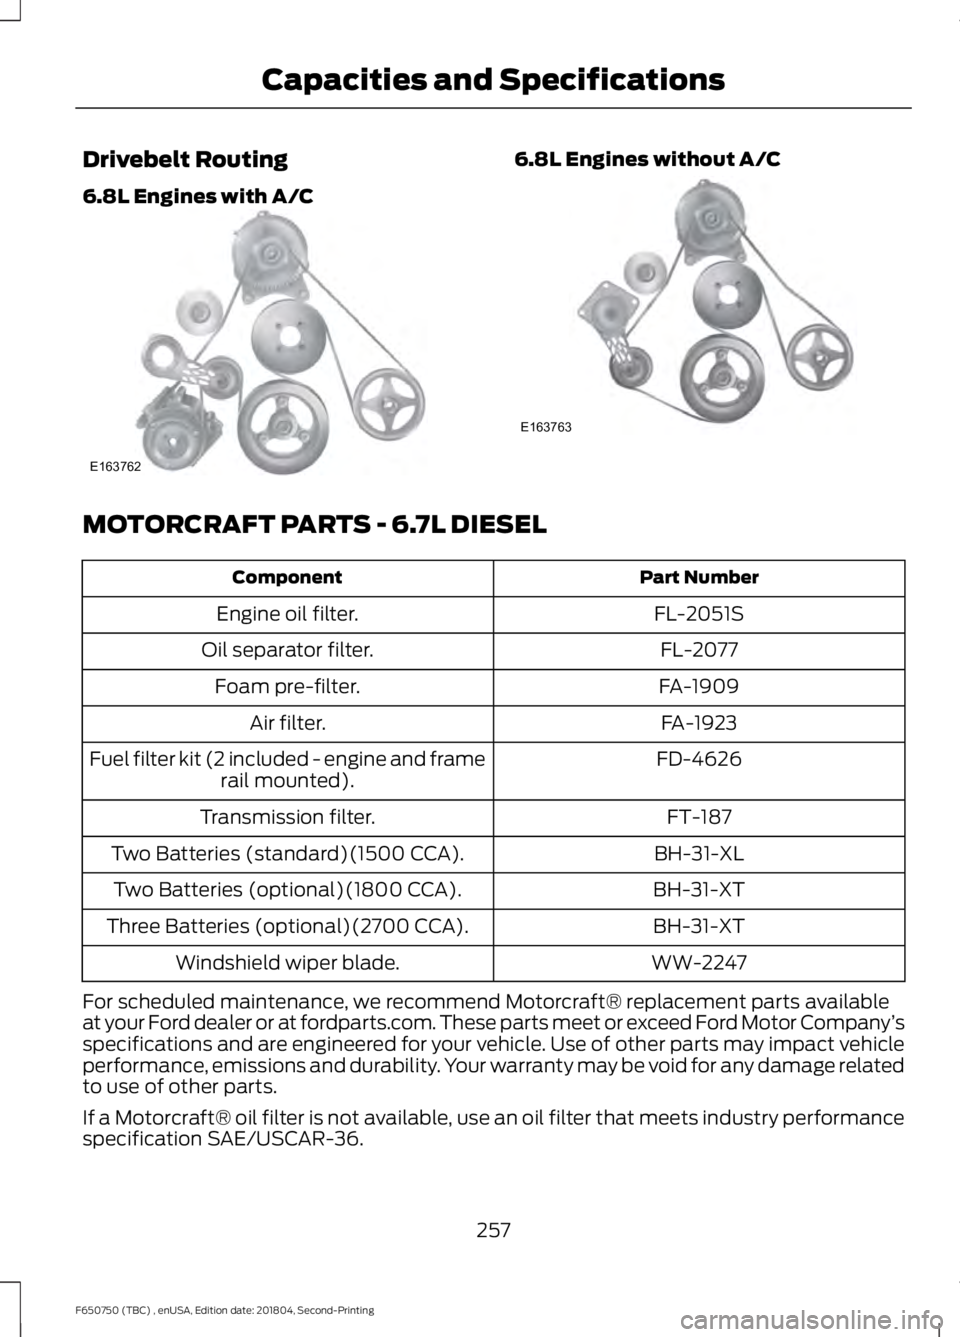
Drivebelt Routing
6.8L Engines with A/C 6.8L Engines without A/C
MOTORCRAFT PARTS - 6.7L DIESEL
Part Number
Component
FL-2051S
Engine oil filter.
FL-2077
Oil separator filter.
FA-1909
Foam pre-filter.
FA-1923
Air filter.
FD-4626
Fuel filter kit (2 included - engine and frame
rail mounted).
FT-187
Transmission filter.
BH-31-XL
Two Batteries (standard)(1500 CCA).
BH-31-XT
Two Batteries (optional)(1800 CCA).
BH-31-XT
Three Batteries (optional)(2700 CCA).
WW-2247
Windshield wiper blade.
For scheduled maintenance, we recommend Motorcraft® replacement parts available
at your Ford dealer or at fordparts.com. These parts meet or exceed Ford Motor Company ’s
specifications and are engineered for your vehicle. Use of other parts may impact vehicle
performance, emissions and durability. Your warranty may be void for any damage related
to use of other parts.
If a Motorcraft® oil filter is not available, use an oil filter that meets industry performance
specification SAE/USCAR-36.
257
F650750 (TBC) , enUSA, Edition date: 201804, Second-Printing Capacities and SpecificationsE163762 E163763
Page 263 of 387
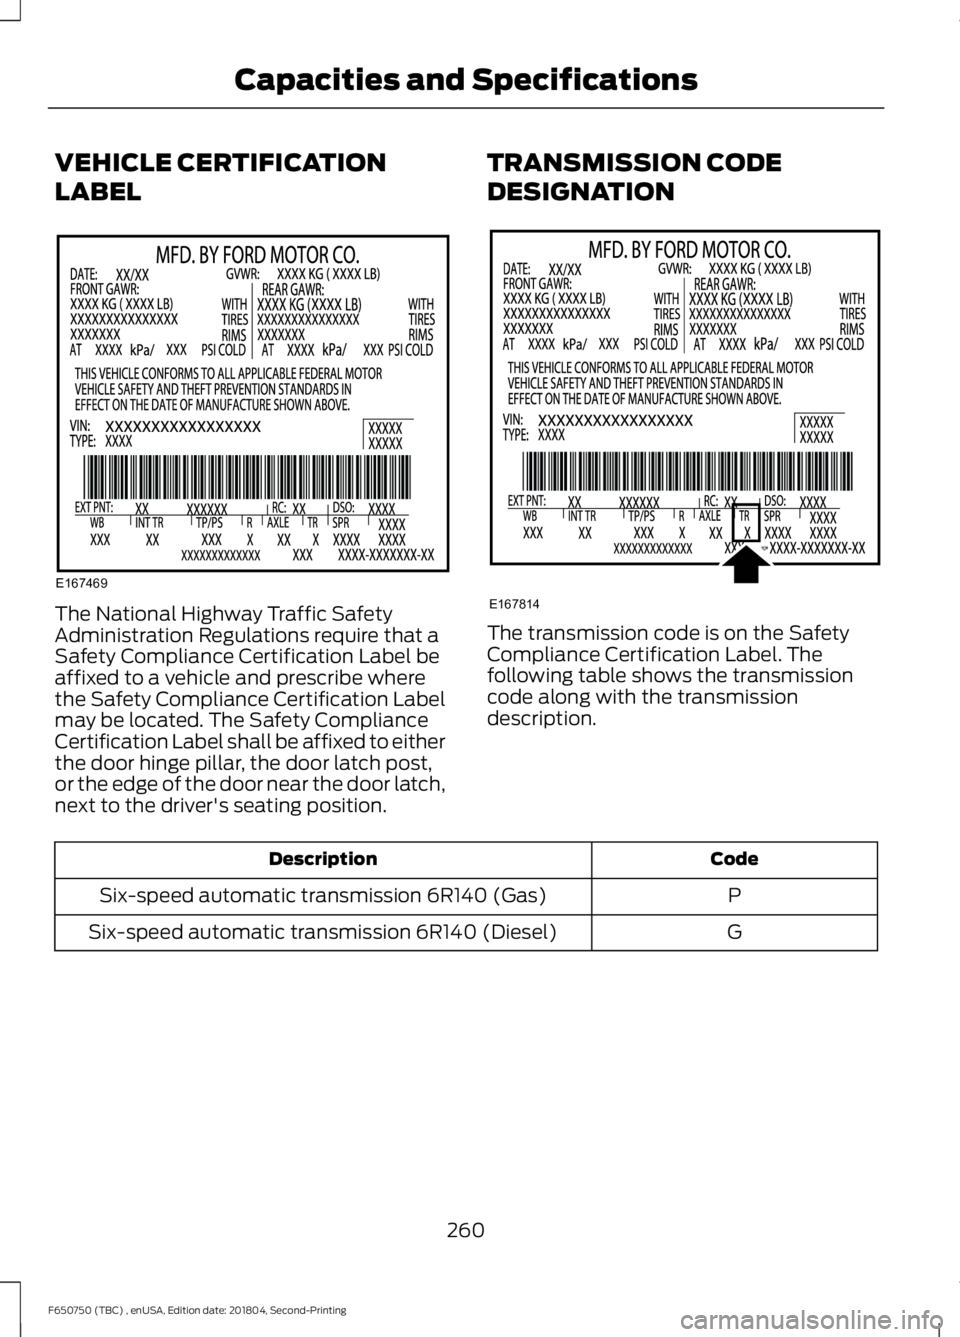
VEHICLE CERTIFICATION
LABEL
The National Highway Traffic Safety
Administration Regulations require that a
Safety Compliance Certification Label be
affixed to a vehicle and prescribe where
the Safety Compliance Certification Label
may be located. The Safety Compliance
Certification Label shall be affixed to either
the door hinge pillar, the door latch post,
or the edge of the door near the door latch,
next to the driver's seating position.
TRANSMISSION CODE
DESIGNATION The transmission code is on the Safety
Compliance Certification Label. The
following table shows the transmission
code along with the transmission
description.
Code
Description
P
Six-speed automatic transmission 6R140 (Gas)
G
Six-speed automatic transmission 6R140 (Diesel)
260
F650750 (TBC) , enUSA, Edition date: 201804, Second-Printing Capacities and SpecificationsE167469 E167814
Page 265 of 387
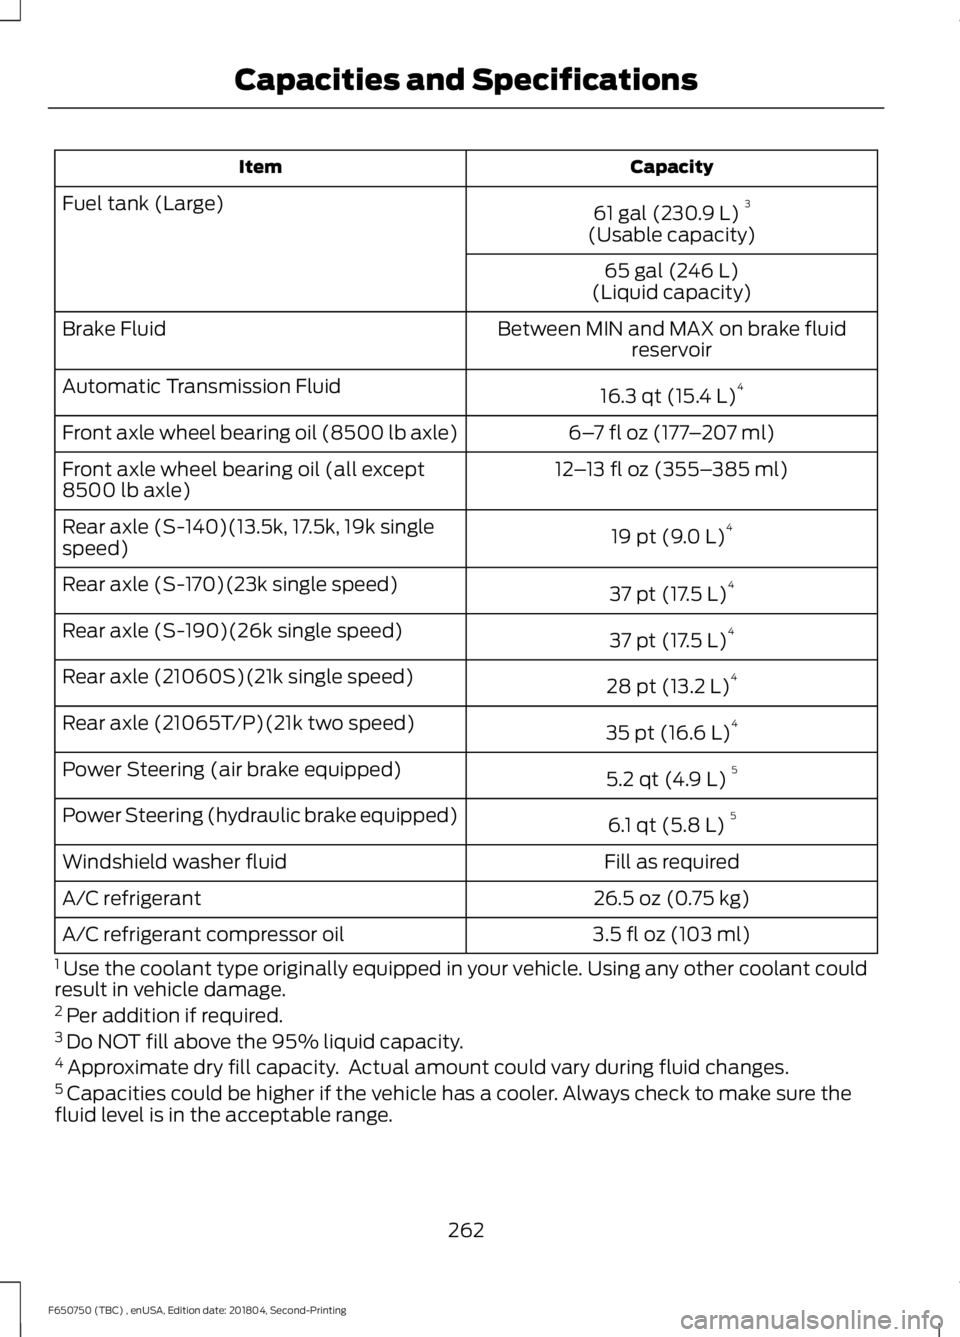
Capacity
Item
61 gal (230.9 L)3
Fuel tank (Large)
(Usable capacity)
65 gal (246 L)
(Liquid capacity)
Between MIN and MAX on brake fluid reservoir
Brake Fluid
16.3 qt (15.4 L)4
Automatic Transmission Fluid
6–7 fl oz (177 –207 ml)
Front axle wheel bearing oil (8500 lb axle)
12–13 fl oz (355– 385 ml)
Front axle wheel bearing oil (all except
8500 lb axle)
19 pt (9.0 L)4
Rear axle (S-140)(13.5k, 17.5k, 19k single
speed)
37 pt (17.5 L)4
Rear axle (S-170)(23k single speed)
37 pt (17.5 L)4
Rear axle (S-190)(26k single speed)
28 pt (13.2 L)4
Rear axle (21060S)(21k single speed)
35 pt (16.6 L)4
Rear axle (21065T/P)(21k two speed)
5.2 qt (4.9 L)5
Power Steering (air brake equipped)
6.1 qt (5.8 L)5
Power Steering (hydraulic brake equipped)
Fill as required
Windshield washer fluid
26.5 oz (0.75 kg)
A/C refrigerant
3.5 fl oz (103 ml)
A/C refrigerant compressor oil
1 Use the coolant type originally equipped in your vehicle. Using any other coolant could
result in vehicle damage.
2 Per addition if required.
3 Do NOT fill above the 95% liquid capacity.
4 Approximate dry fill capacity. Actual amount could vary during fluid changes.
5 Capacities could be higher if the vehicle has a cooler. Always check to make sure the
fluid level is in the acceptable range.
262
F650750 (TBC) , enUSA, Edition date: 201804, Second-Printing Capacities and Specifications
Page 267 of 387
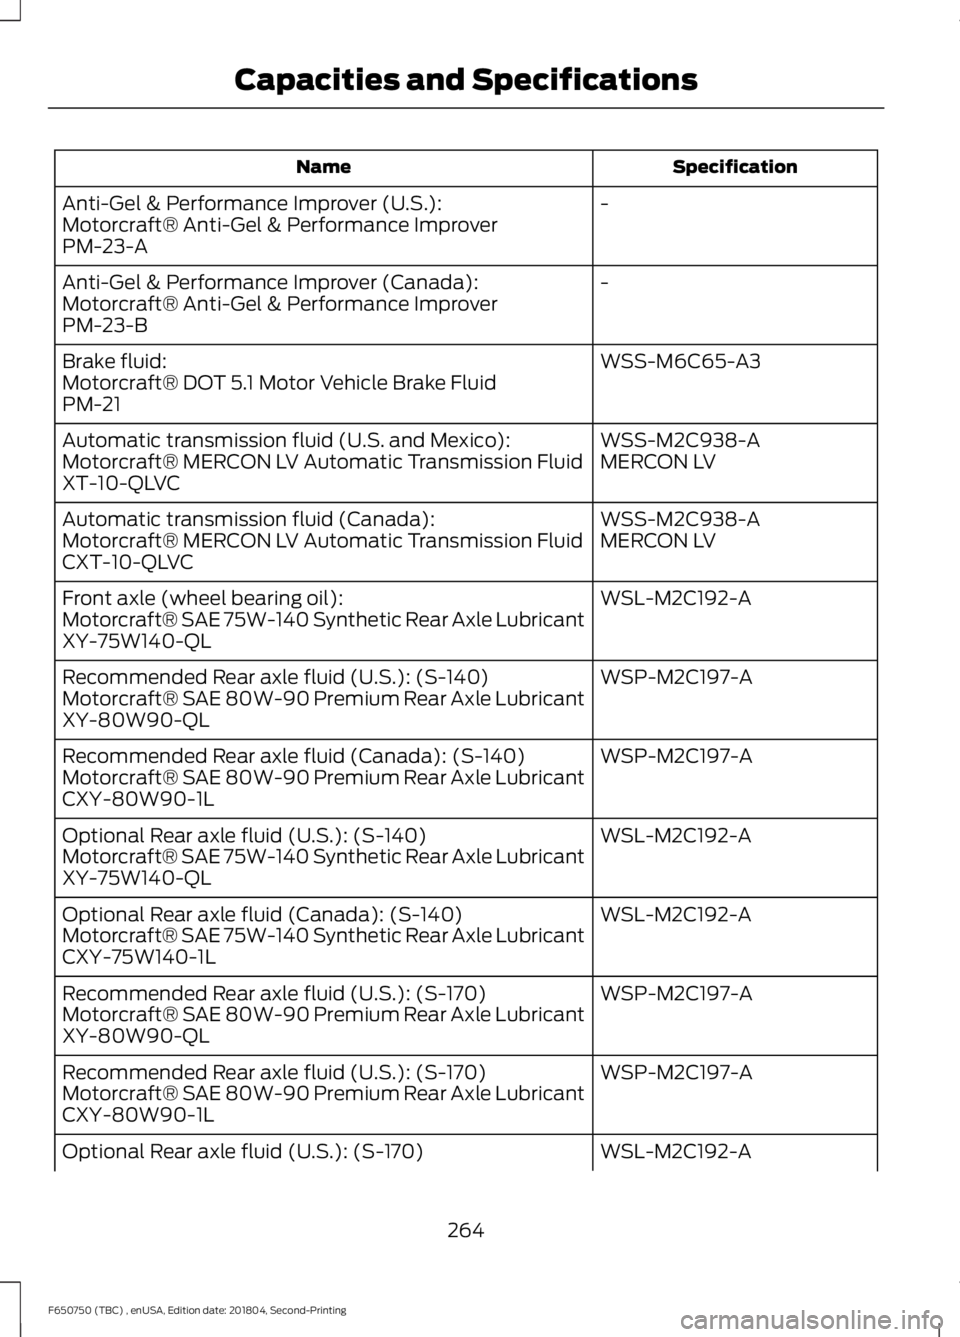
Specification
Name
-
Anti-Gel & Performance Improver (U.S.):
Motorcraft® Anti-Gel & Performance Improver
PM-23-A
-
Anti-Gel & Performance Improver (Canada):
Motorcraft® Anti-Gel & Performance Improver
PM-23-B
WSS-M6C65-A3
Brake fluid:
Motorcraft® DOT 5.1 Motor Vehicle Brake Fluid
PM-21
WSS-M2C938-A
Automatic transmission fluid (U.S. and Mexico):
MERCON LV
Motorcraft® MERCON LV Automatic Transmission Fluid
XT-10-QLVC
WSS-M2C938-A
Automatic transmission fluid (Canada):
MERCON LV
Motorcraft® MERCON LV Automatic Transmission Fluid
CXT-10-QLVC
WSL-M2C192-A
Front axle (wheel bearing oil):
Motorcraft® SAE 75W-140 Synthetic Rear Axle Lubricant
XY-75W140-QL
WSP-M2C197-A
Recommended Rear axle fluid (U.S.): (S-140)
Motorcraft® SAE 80W-90 Premium Rear Axle Lubricant
XY-80W90-QL
WSP-M2C197-A
Recommended Rear axle fluid (Canada): (S-140)
Motorcraft® SAE 80W-90 Premium Rear Axle Lubricant
CXY-80W90-1L
WSL-M2C192-A
Optional Rear axle fluid (U.S.): (S-140)
Motorcraft® SAE 75W-140 Synthetic Rear Axle Lubricant
XY-75W140-QL
WSL-M2C192-A
Optional Rear axle fluid (Canada): (S-140)
Motorcraft® SAE 75W-140 Synthetic Rear Axle Lubricant
CXY-75W140-1L
WSP-M2C197-A
Recommended Rear axle fluid (U.S.): (S-170)
Motorcraft® SAE 80W-90 Premium Rear Axle Lubricant
XY-80W90-QL
WSP-M2C197-A
Recommended Rear axle fluid (U.S.): (S-170)
Motorcraft® SAE 80W-90 Premium Rear Axle Lubricant
CXY-80W90-1L
WSL-M2C192-A
Optional Rear axle fluid (U.S.): (S-170)
264
F650750 (TBC) , enUSA, Edition date: 201804, Second-Printing Capacities and Specifications