2019 FORD F650/750 ECU
[x] Cancel search: ECUPage 139 of 387
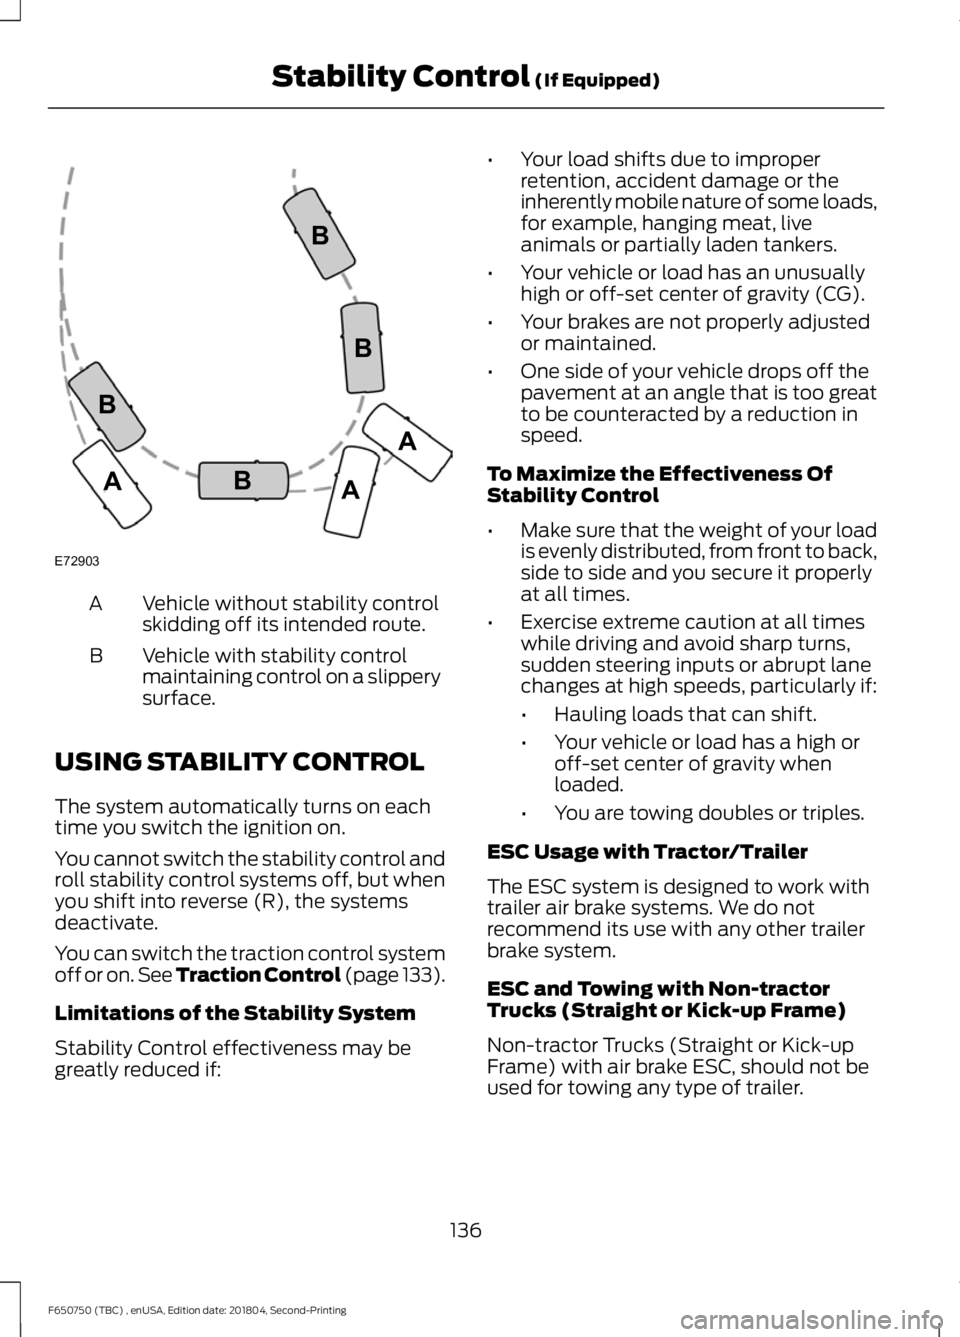
Vehicle without stability control
skidding off its intended route.
A
Vehicle with stability control
maintaining control on a slippery
surface.
B
USING STABILITY CONTROL
The system automatically turns on each
time you switch the ignition on.
You cannot switch the stability control and
roll stability control systems off, but when
you shift into reverse (R), the systems
deactivate.
You can switch the traction control system
off or on. See Traction Control (page 133).
Limitations of the Stability System
Stability Control effectiveness may be
greatly reduced if: •
Your load shifts due to improper
retention, accident damage or the
inherently mobile nature of some loads,
for example, hanging meat, live
animals or partially laden tankers.
• Your vehicle or load has an unusually
high or off-set center of gravity (CG).
• Your brakes are not properly adjusted
or maintained.
• One side of your vehicle drops off the
pavement at an angle that is too great
to be counteracted by a reduction in
speed.
To Maximize the Effectiveness Of
Stability Control
• Make sure that the weight of your load
is evenly distributed, from front to back,
side to side and you secure it properly
at all times.
• Exercise extreme caution at all times
while driving and avoid sharp turns,
sudden steering inputs or abrupt lane
changes at high speeds, particularly if:
•Hauling loads that can shift.
• Your vehicle or load has a high or
off-set center of gravity when
loaded.
• You are towing doubles or triples.
ESC Usage with Tractor/Trailer
The ESC system is designed to work with
trailer air brake systems. We do not
recommend its use with any other trailer
brake system.
ESC and Towing with Non-tractor
Trucks (Straight or Kick-up Frame)
Non-tractor Trucks (Straight or Kick-up
Frame) with air brake ESC, should not be
used for towing any type of trailer.
136
F650750 (TBC) , enUSA, Edition date: 201804, Second-Printing Stability Control (If Equipped)E72903A
AA
B
BB
B
Page 150 of 387
•
Shift to a lower gear when driving down
a long or steep hill. Do not apply the
brakes continuously, as they may
overheat and become less effective.
• If your transmission is equipped with
the Tow/Haul feature, use this feature
when towing. This provides engine
braking and helps eliminate excessive
transmission shifting for optimum fuel
economy and transmission cooling.
• Allow more distance for stopping with
a trailer attached. Anticipate stops and
brake gradually.
FIFTH WHEEL OPERATION WARNING: Failure to follow the
fifth wheel manufacturer ’s instructions
for hooking and unhooking as well as
sliding the fifth wheel could result in an
accident, personal injury or death. WARNING:
When the tractor and
trailer are parked unattended, the trailer
brake hand control should never be used
to apply the brake, since air may leak
from the system, allowing vehicle
movement, resulting in possible property
damage, personal injury or death.
Before hook-up, make sure:
• The fifth wheel jaws are fully open.
• The fifth wheel is fully tilted back to
prevent body damage when the tractor
is backed under a trailer.
• You block the trailer wheels and adjust
and apply the trailer spring brakes.
Never chase a trailer.
• The brake hoses and light cords are
clear of the fifth wheel. Hook-up
1. Back the tractor squarely under the
trailer, engaging the fifth-wheel jaws
on the kingpin. Always back up slowly;
make sure the trailer is neither too high
nor too low. Avoid backing under the
trailer from an angle.
2. Connect the service and emergency brake hoses and trailer light connector.
3. Inspect the jaws of the fifth wheel to be sure they have fully closed on the
trailer kingpin and the trailer plate is
resting securely on the fifth wheel.
4. Make sure the coupler release lever is in the locked position.
5. Charge the trailer brake system. Set the trailer brakes, with either the hand
valve or tractor protection valve. Pull
against the trailer for an extra check of
proper hook-up. Do not pull hard
enough to damage or strain the
equipment.
6. Set the tractor parking brakes and fully
raise the trailer landing gear.
7. Check the operation of all trailer lights
and correct any lights that may be
faulty.
Un-hook
1. Try to keep the tractor and trailer in a straight line.
2. Apply the parking brakes.
3. Lower the trailer landing gear, making sure it is on solid, level ground. The
weight of the trailer is to be on the
landing gear.
4. Block the trailer wheels.
5. Disconnect the brake hoses and light cords. Be sure hoses and cords are
clear.
6. Pull coupler release lever to disengage
the fifth wheel jaws.
147
F650750 (TBC) , enUSA, Edition date: 201804, Second-Printing Towing
Page 165 of 387
In the case of 1 or 2 above, the consumer
must also notify the manufacturer of the
need for the repair of the nonconformity
at the following address:
Ford Motor Company
16800 Executive Plaza Drive
Mail Drop 3NE-B
Dearborn, MI 48126
You are required to submit your warranty
dispute to BBB AUTO LINE before asserting
in court any rights or remedies conferred
by California Civil Code Section 1793.22(b).
You are also required to use BBB AUTO
LINE before exercising rights or seeking
remedies created by the Federal
Magnuson-Moss Warranty Act, 15 U.S.C.
sec. 2301 et seq. If you choose to seek
redress by pursuing rights and remedies
not created by California Civil Code Section
1793.22(b) or the Magnuson-Moss
Warranty Act, resort to BBB AUTO LINE is
not required by those statutes.
THE BETTER BUSINESS
BUREAU (BBB) AUTO LINE
PROGRAM (U.S. ONLY)
Your satisfaction is important to Ford
Motor Company and to your dealer. If a
warranty concern has not been resolved
using the three-step procedure outlined
earlier in this chapter in the Getting the
Services you need section, you may be
eligible to participate in the BBB AUTO
LINE program.
The BBB AUTO LINE program consists of
two parts – mediation and arbitration.
During mediation, a representative of the
BBB will contact both you and Ford Motor
Company to explore options for settlement
of the claim. If an agreement is not reached
during mediation or you do not want to
participate in mediation, and if your claim
is eligible, you may participate in the
arbitration process. An arbitration hearing
will be scheduled so that you can present
your case in an informal setting before an
impartial person. The arbitrator will
consider the testimony provided and make
a decision after the hearing.
Disputes submitted to the BBB AUTO LINE
program are usually decided within forty
days after you file your claim with the BBB.
You are not bound by the decision, and
may reject the decision and proceed to
court where all findings of the BBB Auto
Line dispute, and decision, are admissible
in the court action. Should you choose to
accept the BBB AUTO LINE decision, Ford
is then bound by the decision, and must
comply with the decision within 30 days
of receipt of your acceptance letter.
BBB AUTO LINE Application: Using the
information provided below, please call or
write to request a program application.
You will be asked for your name and
address, general information about your
new vehicle, information about your
warranty concerns, and any steps you have
already taken to try to resolve them. A
Customer Claim Form will be mailed that
will need to be completed, signed and
returned to the BBB along with proof of
ownership. Upon receipt, the BBB will
review the claim for eligibility under the
Program Summary Guidelines.
You can get more information by
calling BBB AUTO LINE at
1-800-955-5100, or writing to:
BBB AUTO LINE
3033 Wilson Boulevard, Suite 600
Arlington, Virginia 22201
BBB AUTO LINE applications can also be
requested by calling the Ford Motor
Company Customer Relationship Center
at 1-800-392-3673.
162
F650750 (TBC) , enUSA, Edition date: 201804, Second-Printing Customer Assistance
Page 168 of 387
Obtaining a French Owner
’s
Manual
French Owner ’s Manual can be obtained
from your authorized dealer or by
contacting Helm, Incorporated using the
contact information listed previously in this
section.
REPORTING SAFETY DEFECTS
(U.S. ONLY)
If you believe that your vehicle has
a defect which could cause a
crash or could cause injury or
death, you should immediately
inform the National Highway
Traffic Safety Administration
(NHTSA) in addition to notifying
Ford Motor Company.
If NHTSA receives similar
complaints, it may open an
investigation, and if it finds that a
safety defect exists in a group of
vehicles, it may order a recall and
remedy campaign. However,
NHTSA cannot become involved
in individual problems between
you, your dealer, or Ford Motor
Company. To contact NHTSA, you may call
the Vehicle Safety Hotline
toll-free at 1-888-327-4236 (TTY:
1-800-424-9153); go to
http://www.safercar.gov; or write
to:
Administrator
1200 New Jersey Avenue,
Southeast
Washington, D.C. 20590
You can also obtain other
information about motor vehicle
safety from
http://www.safercar.gov.
REPORTING SAFETY DEFECTS
(CANADA ONLY)
If you believe that your vehicle has a defect
which could cause a crash or could cause
injury or death, you should immediately
inform Transport Canada and Ford of
Canada.
Transport Canada Contact Information
http://www.tc.gc.ca/eng/motorvehiclesafety/reporting-defects-motor-
vehicles.html (English)
Website
http://www.tc.gc.ca/fra/securiteautomobile/signaler-defauts-vehicules-
automobiles.html (French)
Website
1–800–333–0510
Phone
165
F650750 (TBC) , enUSA, Edition date: 201804, Second-Printing Customer Assistance
Page 185 of 387
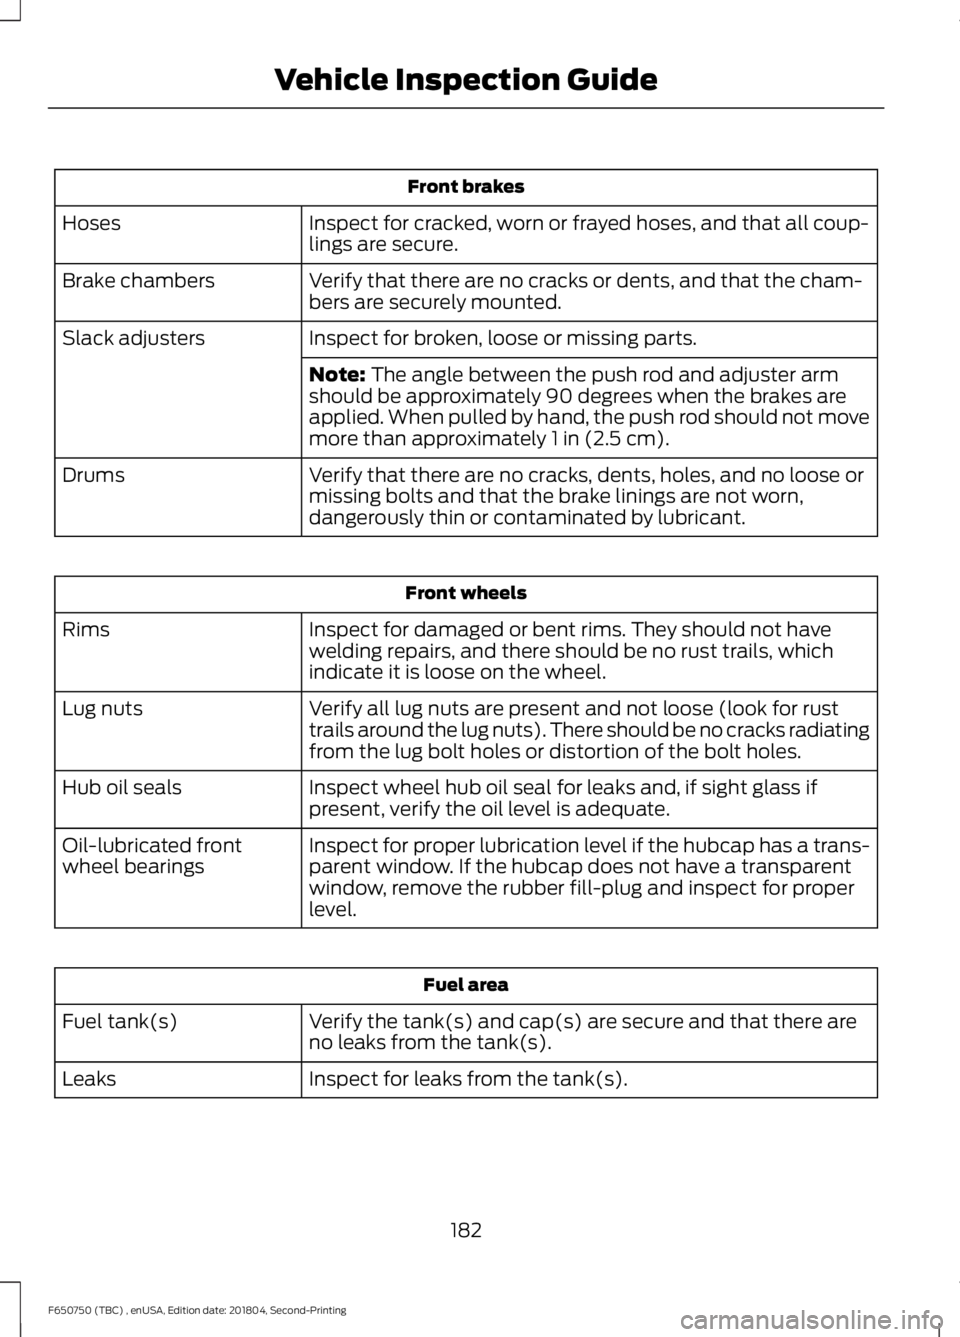
Front brakes
Inspect for cracked, worn or frayed hoses, and that all coup-
lings are secure.
Hoses
Verify that there are no cracks or dents, and that the cham-
bers are securely mounted.
Brake chambers
Inspect for broken, loose or missing parts.
Slack adjusters
Note: The angle between the push rod and adjuster arm
should be approximately 90 degrees when the brakes are
applied. When pulled by hand, the push rod should not move
more than approximately
1 in (2.5 cm).
Verify that there are no cracks, dents, holes, and no loose or
missing bolts and that the brake linings are not worn,
dangerously thin or contaminated by lubricant.
Drums Front wheels
Inspect for damaged or bent rims. They should not have
welding repairs, and there should be no rust trails, which
indicate it is loose on the wheel.
Rims
Verify all lug nuts are present and not loose (look for rust
trails around the lug nuts). There should be no cracks radiating
from the lug bolt holes or distortion of the bolt holes.
Lug nuts
Inspect wheel hub oil seal for leaks and, if sight glass if
present, verify the oil level is adequate.
Hub oil seals
Inspect for proper lubrication level if the hubcap has a trans-
parent window. If the hubcap does not have a transparent
window, remove the rubber fill-plug and inspect for proper
level.
Oil-lubricated front
wheel bearings Fuel area
Verify the tank(s) and cap(s) are secure and that there are
no leaks from the tank(s).
Fuel tank(s)
Inspect for leaks from the tank(s).
Leaks
182
F650750 (TBC) , enUSA, Edition date: 201804, Second-Printing Vehicle Inspection Guide
Page 186 of 387

Diesel Exhaust Fluid (DEF) area
Verify the tanks and caps are secure and that there are no
leaks from the tanks.
DEF tanks
Inspect for leaks from the tanks.
Leaks Underbody
Verify that the driveshaft is not bent or cracked and that all
driveshaft couplings are secure.
Driveshaft
Verify that the visible outside parts are securely mounted and
that there are no cracks, holes or severe dents.
Exhaust system
Inspect for cracks or bends in longitudinal frame members.
Verify there are no loose, cracked, bent, broken or missing
crossmembers or crossmember fasteners.
Frame Rear of vehicle
Verify there are no cuts, cracks, chafing or wear on the air
hoses and electrical line insulation. Listen for audible air leaks.
Air hoses and electrical
lines
Verify air and electrical lines are not tangled, crimped or
pinched or being dragged against any truck parts. None of
the air or electrical line should be spliced or taped.
Inspect for corrosion on pins and in electrical sockets to verify
continuity and reduced heat build-up potential.
Verify the deck plate is clean, bolted securely to the frame
and is clear of loose objects.
Deck plate
Verify that both brake lights illuminate when the pedal is
applied, each signal flashes and that the four-way flashers
work properly.
Turns signals, brake
lights and flashers
Verify all exterior lights illuminate and are clean.
Lights and reflectors
Verify reflectors are clean, unbroken and of proper color (red
on rear, amber elsewhere).
Verify running lights are clean and unbroken.
Note: Inspect rear running lights separately from signal,
flasher and brake lights.
183
F650750 (TBC) , enUSA, Edition date: 201804, Second-Printing Vehicle Inspection Guide
Page 188 of 387
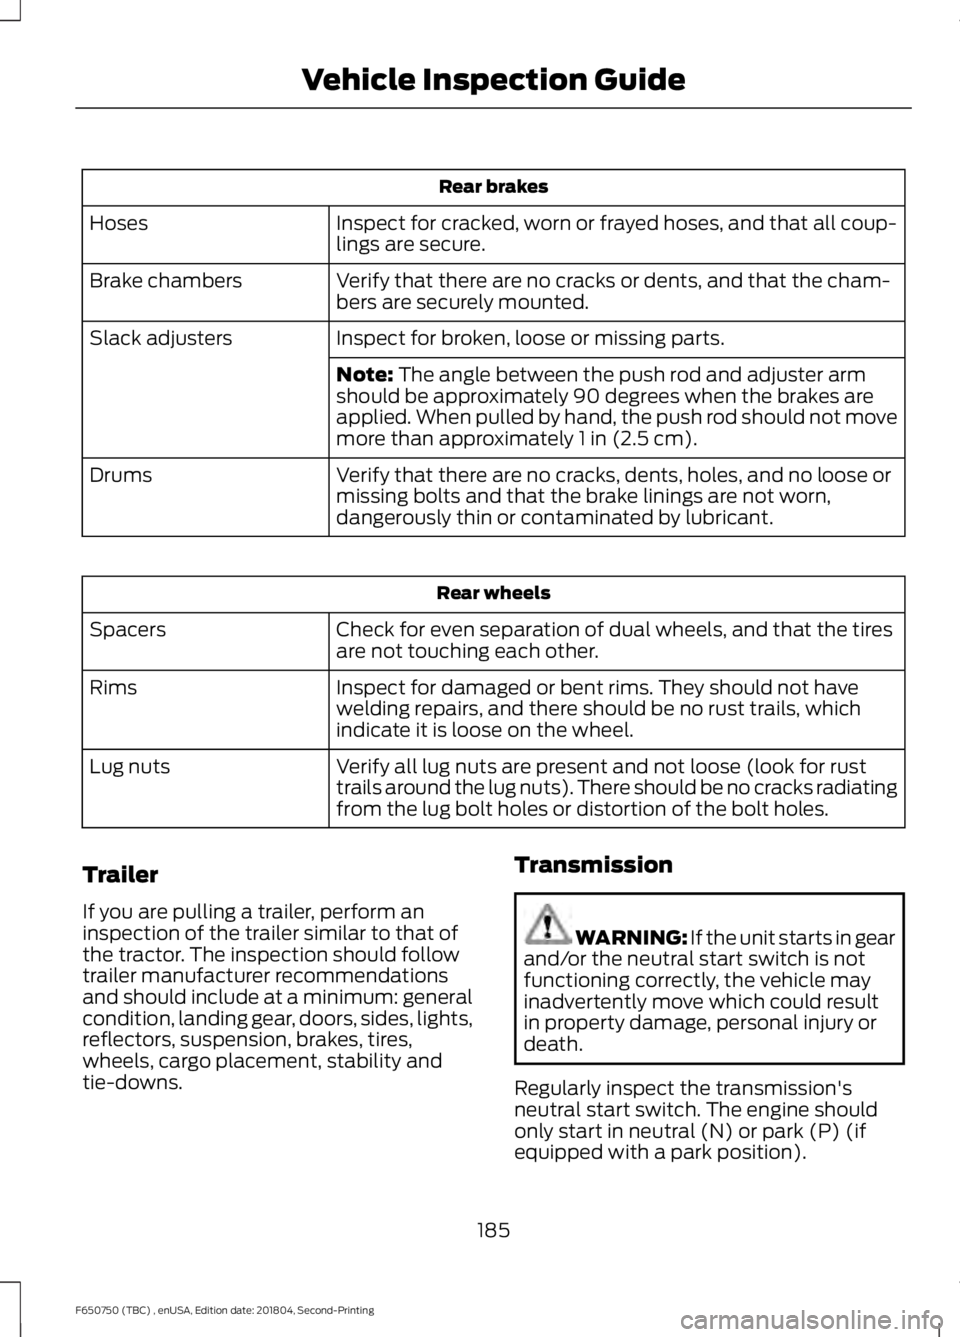
Rear brakes
Inspect for cracked, worn or frayed hoses, and that all coup-
lings are secure.
Hoses
Verify that there are no cracks or dents, and that the cham-
bers are securely mounted.
Brake chambers
Inspect for broken, loose or missing parts.
Slack adjusters
Note: The angle between the push rod and adjuster arm
should be approximately 90 degrees when the brakes are
applied. When pulled by hand, the push rod should not move
more than approximately
1 in (2.5 cm).
Verify that there are no cracks, dents, holes, and no loose or
missing bolts and that the brake linings are not worn,
dangerously thin or contaminated by lubricant.
Drums Rear wheels
Check for even separation of dual wheels, and that the tires
are not touching each other.
Spacers
Inspect for damaged or bent rims. They should not have
welding repairs, and there should be no rust trails, which
indicate it is loose on the wheel.
Rims
Verify all lug nuts are present and not loose (look for rust
trails around the lug nuts). There should be no cracks radiating
from the lug bolt holes or distortion of the bolt holes.
Lug nuts
Trailer
If you are pulling a trailer, perform an
inspection of the trailer similar to that of
the tractor. The inspection should follow
trailer manufacturer recommendations
and should include at a minimum: general
condition, landing gear, doors, sides, lights,
reflectors, suspension, brakes, tires,
wheels, cargo placement, stability and
tie-downs. Transmission WARNING: If the unit starts in gear
and/or the neutral start switch is not
functioning correctly, the vehicle may
inadvertently move which could result
in property damage, personal injury or
death.
Regularly inspect the transmission's
neutral start switch. The engine should
only start in neutral (N) or park (P) (if
equipped with a park position).
185
F650750 (TBC) , enUSA, Edition date: 201804, Second-Printing Vehicle Inspection Guide
Page 219 of 387
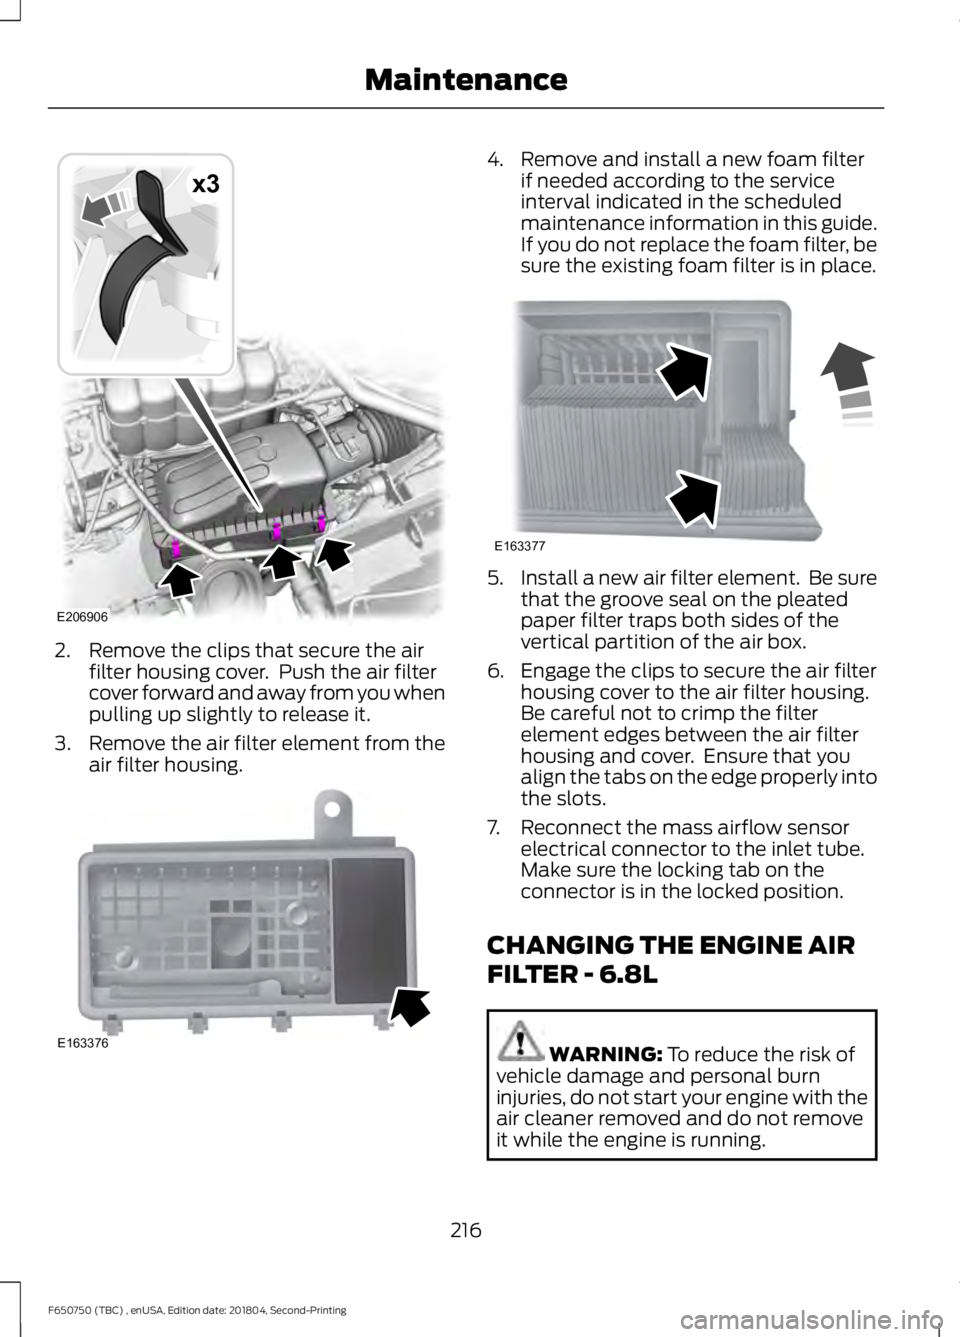
2. Remove the clips that secure the air
filter housing cover. Push the air filter
cover forward and away from you when
pulling up slightly to release it.
3. Remove the air filter element from the
air filter housing. 4. Remove and install a new foam filter
if needed according to the service
interval indicated in the scheduled
maintenance information in this guide.
If you do not replace the foam filter, be
sure the existing foam filter is in place. 5.
Install a new air filter element. Be sure
that the groove seal on the pleated
paper filter traps both sides of the
vertical partition of the air box.
6. Engage the clips to secure the air filter housing cover to the air filter housing.
Be careful not to crimp the filter
element edges between the air filter
housing and cover. Ensure that you
align the tabs on the edge properly into
the slots.
7. Reconnect the mass airflow sensor electrical connector to the inlet tube.
Make sure the locking tab on the
connector is in the locked position.
CHANGING THE ENGINE AIR
FILTER - 6.8L WARNING: To reduce the risk of
vehicle damage and personal burn
injuries, do not start your engine with the
air cleaner removed and do not remove
it while the engine is running.
216
F650750 (TBC) , enUSA, Edition date: 201804, Second-Printing MaintenanceE206906
x3 E163376 E163377