2019 FORD F650/750 ECU
[x] Cancel search: ECUPage 36 of 387
•
Height adjuster at the front outboard
seating positions.
• Safety belt pretensioner at the front
outboard seating positions. •
Safety belt warning light and chime.
FASTENING THE SEATBELTS
The front outboard and rear safety
restraints in the vehicle are combination
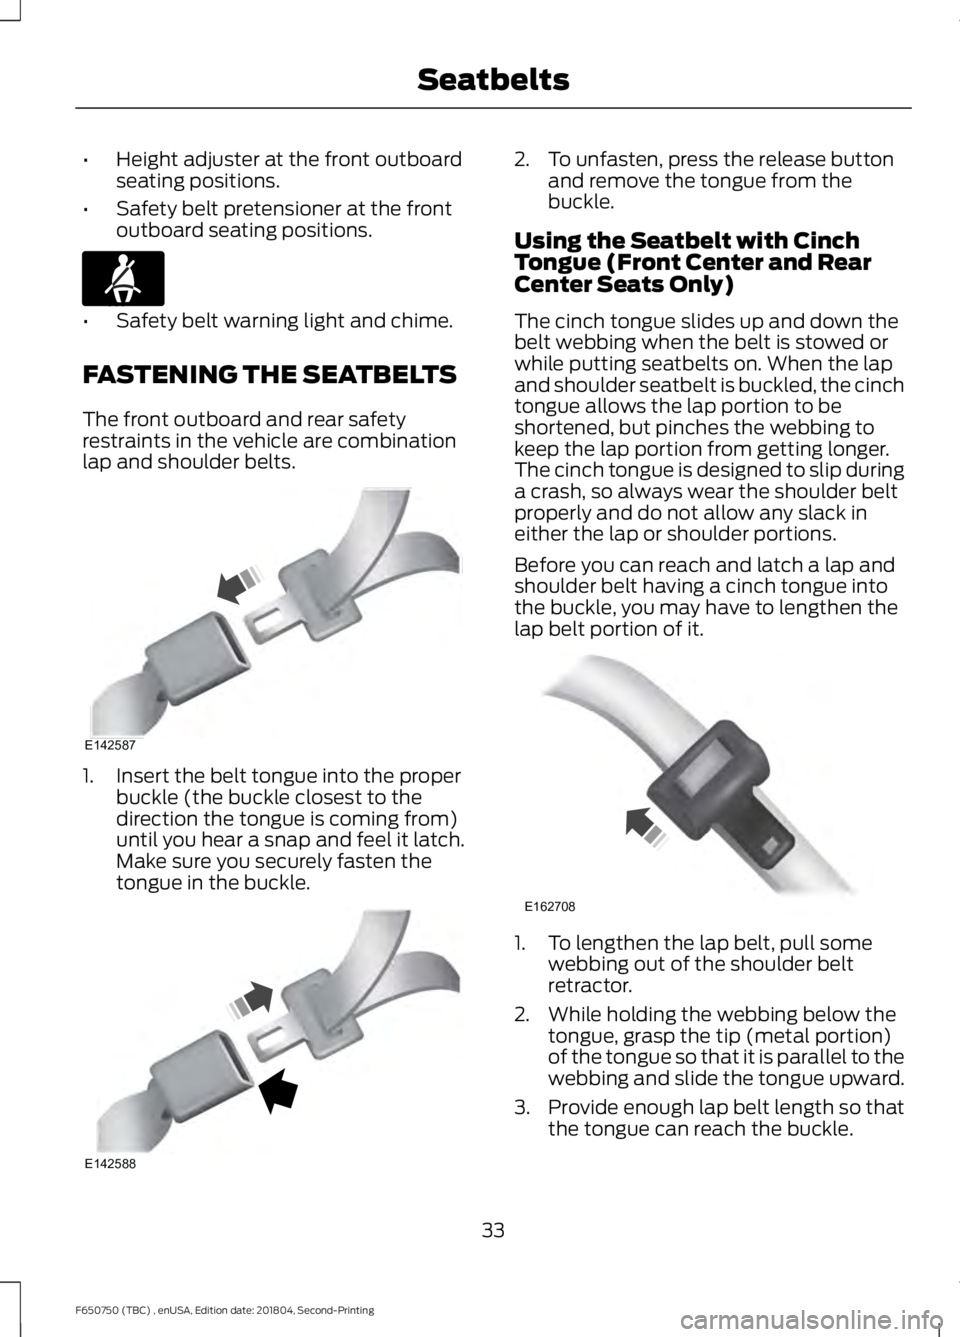
lap and shoulder belts. 1. Insert the belt tongue into the proper
buckle (the buckle closest to the
direction the tongue is coming from)
until you hear a snap and feel it latch.
Make sure you securely fasten the
tongue in the buckle. 2. To unfasten, press the release button
and remove the tongue from the
buckle.
Using the Seatbelt with Cinch
Tongue (Front Center and Rear
Center Seats Only)
The cinch tongue slides up and down the
belt webbing when the belt is stowed or
while putting seatbelts on. When the lap
and shoulder seatbelt is buckled, the cinch
tongue allows the lap portion to be
shortened, but pinches the webbing to
keep the lap portion from getting longer.
The cinch tongue is designed to slip during
a crash, so always wear the shoulder belt
properly and do not allow any slack in
either the lap or shoulder portions.
Before you can reach and latch a lap and
shoulder belt having a cinch tongue into
the buckle, you may have to lengthen the
lap belt portion of it. 1. To lengthen the lap belt, pull some
webbing out of the shoulder belt
retractor.
2. While holding the webbing below the tongue, grasp the tip (metal portion)
of the tongue so that it is parallel to the
webbing and slide the tongue upward.
3. Provide enough lap belt length so that
the tongue can reach the buckle.
33
F650750 (TBC) , enUSA, Edition date: 201804, Second-Printing SeatbeltsE71880 E142587 E142588 E162708
Page 37 of 387
Fastening the Cinch Tongue
WARNING: Always drive and ride
with your seatback upright and the lap
belt snug and low across the hips.
1. Pull the lap and shoulder belt from the
retractor so that the shoulder belt
portion of the seatbelt crosses your
shoulder and chest.
2. Be sure the belt is not twisted. If the belt is twisted, remove the twist.
3. Insert the belt tongue into the proper buckle for your seating position until
you hear a snap and feel it latch.
4. Make sure the tongue is securely fastened to the buckle by pulling on
the tongue.
While you are fastened in the seatbelt, the
lap and shoulder belt with a cinch tongue
adjusts to your movement. However, if you
brake hard, turn hard, or if your vehicle
receives an impact of
5 mph (8 km/h) or
more, the seatbelt will become locked and
help reduce your forward movement.
Lap Belts WARNING:
Always drive and ride
with your seatback upright and the lap
belt snug and low across the hips.
The front center lap belt does not adjust
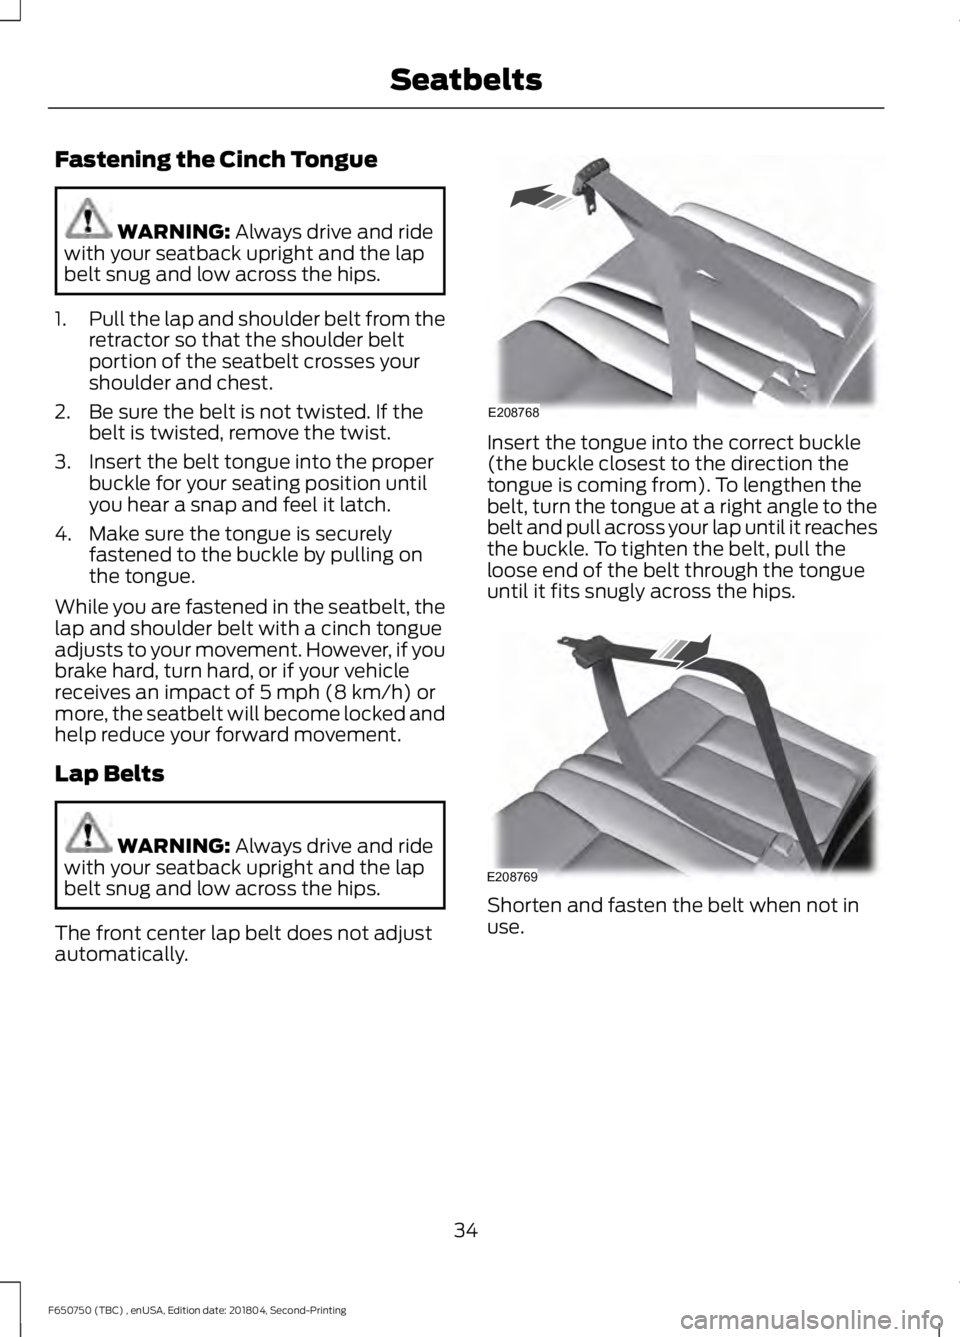
automatically. Insert the tongue into the correct buckle
(the buckle closest to the direction the
tongue is coming from). To lengthen the
belt, turn the tongue at a right angle to the
belt and pull across your lap until it reaches
the buckle. To tighten the belt, pull the
loose end of the belt through the tongue
until it fits snugly across the hips.
Shorten and fasten the belt when not in
use.
34
F650750 (TBC) , enUSA, Edition date: 201804, Second-Printing SeatbeltsE208768 E208769
Page 43 of 387

GENERAL INFORMATION ON
RADIO FREQUENCIES
This device complies with Part 15 of the
FCC Rules and with Licence exempt RSS
Standards of Industry Canada. Operation
is subject to the following two conditions:
•
This device may not cause harmful
interference, and
• This device must accept any
interference received, including
interference that may cause undesired
operation. WARNING: Changes or
modifications not expressively approved
by the party responsible for compliance
could void the user's authority to operate
the equipment. The term "IC:" before the
radio certification number only signifies
that Industry Canada technical
specifications were met.
The typical operating range for your
transmitter is approximately
33 ft (10 m).
Vehicles with the remote start feature will
have a greater range. One of the following
could cause a decrease in operating range:
• Weather conditions.
• Nearby radio towers.
• Structures around the vehicle.
• Other vehicles parked next to your
vehicle.
Other short distance radio transmissions,
for example amateur radios, medical
equipment, wireless headphones, remote
controls and alarm systems can also use
the radio frequency used by your remote
control. If the frequencies are jammed, you
will not be able to use your remote control.
You can lock and unlock the doors with the
key. Note:
Make sure to lock your vehicle before
leaving it unattended.
Note: If you are in range, the remote control
will operate if you press any button
unintentionally.
Note: The remote control contains sensitive
electrical components. Exposure to moisture
or impact may cause permanent damage.
REMOTE CONTROL
(IF EQUIPPED)
Integrated Keyhead Transmitter Use the key blade to start your vehicle and
unlock or lock the driver door from outside
your vehicle. The integrated keyhead
transmitter functions as a programmed
ignition key that operates all the locks and
starts your vehicle, as well as a remote
control.
Note:
Your vehicle keys came with a
security label that provides important key
cut information. Keep the label in a safe
place for future reference.
40
F650750 (TBC) , enUSA, Edition date: 201804, Second-Printing Keys and Remote ControlsE163046 E163047
Page 47 of 387
PASSIVE ANTI-THEFT
SYSTEM
Note:
The system is not compatible with
non-Ford aftermarket remote start systems.
Use of these systems may result in engine
starting problems and a loss of security
protection.
Note: Metallic objects, electronic devices
or a second coded key on the same key
chain may result in vehicle starting
problems, especially if they are too close to
the key when starting your vehicle. Prevent
these objects from touching the coded key
when starting your vehicle. Switch the
ignition off, move all objects on the key
chain away from the coded key and restart
your vehicle if a problem occurs.
Note: Do not leave a duplicate coded key
in your vehicle. Always take your keys and
lock all doors when leaving your vehicle.
SecuriLock®
The system helps prevent the engine from
starting unless you use a coded key
programmed to your vehicle. Using the
wrong key may prevent your vehicle from
starting. A message may appear in the
information display.
If you are unable to start your vehicle with
a coded key, it is not operating correctly.
A message may appear in the information
display.
Automatic Arming
The system arms when you switch the
ignition off.
Automatic Disarming
The system disarms when you switch the
ignition on with a coded key. Replacement Keys
Note:
Your vehicle may have two integrated
keyhead transmitters.
The integrated keyhead transmitter
functions as a programmed ignition key
that operates all the locks and starts your
vehicle, as well as a remote control.
If your programmed transmitters or
standard SecuriLock coded keys are lost
or stolen and you do not have an extra
coded key, you will need to have your
vehicle towed to an authorized dealer. You
need to erase the key codes from your
vehicle and program new coded keys.
Store an extra programmed key away from
your vehicle in a safe place. Contact an
authorized dealer to purchase additional
spare or replacement keys.
Programming a Spare Key
Note: You can program a maximum of six
keys to your vehicle.
You can program your own integrated
keyhead transmitter or standard
SecuriLock coded keys to your vehicle.
This procedure programs both the vehicle
immobilizer keycode and the remote
control to your vehicle.
Only use integrated keyhead transmitters
or standard SecuriLock keys.
You must have two previously
programmed coded keys and the new
unprogrammed key readily accessible.
Contact an authorized dealer to have the
spare key programmed if two previously
programmed keys are not available.
Read and understand the entire procedure
before you begin.
1. Insert the first previously programmed
coded key into the ignition.
2. Switch the ignition from off to on. Keep
the ignition on for at least 3 seconds,
but no more than 10 seconds.
44
F650750 (TBC) , enUSA, Edition date: 201804, Second-Printing Security
Page 48 of 387
3.
Switch the ignition off and remove the
first coded key from the ignition.
4. After at least 3 seconds but within 10 seconds of switching the ignition off,
insert the second previously coded key
into the ignition.
5. Switch the ignition from off to on. Keep
the ignition on for at least 3 seconds,
but no more than 10 seconds.
6. Switch the ignition off and remove the
second previously programmed coded
key from the ignition.
7. After at least 3 seconds but within 10 seconds of switching the ignition off
and removing the previously
programmed coded key, insert the new
unprogrammed key into the ignition.
8. Switch the ignition from off to on. Keep
the ignition on for at least six seconds.
9. Remove the newly programmed coded
key from the ignition.
The doors lock then unlock to confirm that
programming was successful. If you have
successfully programmed the new
integrated keyhead transmitter, it will start
your vehicle and operate the remote entry
system.
If programming was unsuccessful, wait 20
seconds and repeat Steps 1 through 8. If
you are still unsuccessful, take your vehicle
to an authorized dealer.
45
F650750 (TBC) , enUSA, Edition date: 201804, Second-Printing Security
Page 118 of 387
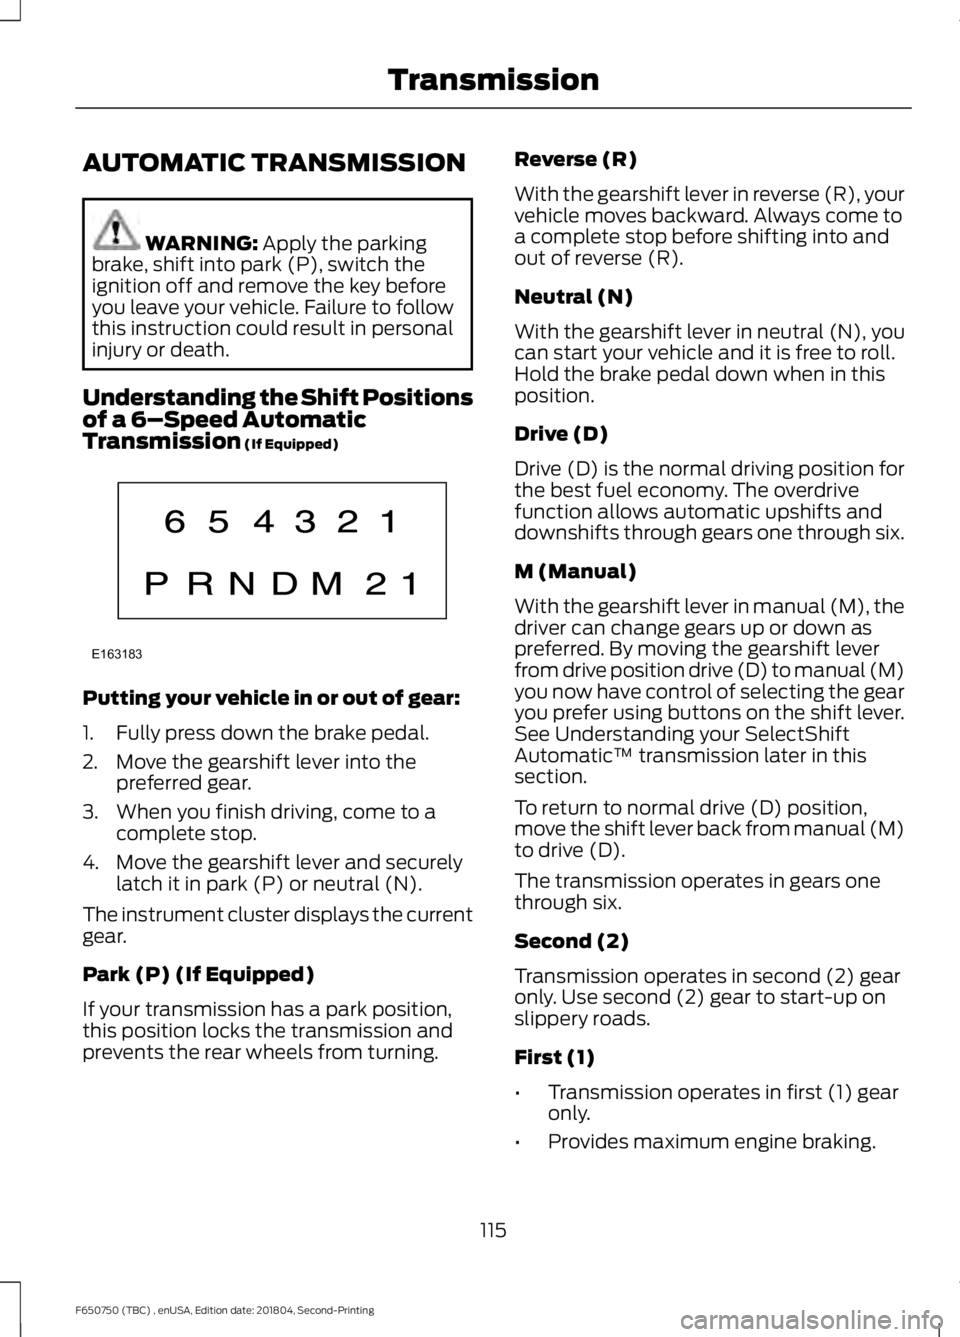
AUTOMATIC TRANSMISSION
WARNING: Apply the parking
brake, shift into park (P), switch the
ignition off and remove the key before
you leave your vehicle. Failure to follow
this instruction could result in personal
injury or death.
Understanding the Shift Positions
of a 6– Speed Automatic
Transmission
(If Equipped) Putting your vehicle in or out of gear:
1. Fully press down the brake pedal.
2. Move the gearshift lever into the
preferred gear.
3. When you finish driving, come to a complete stop.
4. Move the gearshift lever and securely latch it in park (P) or neutral (N).
The instrument cluster displays the current
gear.
Park (P) (If Equipped)
If your transmission has a park position,
this position locks the transmission and
prevents the rear wheels from turning. Reverse (R)
With the gearshift lever in reverse (R), your
vehicle moves backward. Always come to
a complete stop before shifting into and
out of reverse (R).
Neutral (N)
With the gearshift lever in neutral (N), you
can start your vehicle and it is free to roll.
Hold the brake pedal down when in this
position.
Drive (D)
Drive (D) is the normal driving position for
the best fuel economy. The overdrive
function allows automatic upshifts and
downshifts through gears one through six.
M (Manual)
With the gearshift lever in manual (M), the
driver can change gears up or down as
preferred. By moving the gearshift lever
from drive position drive (D) to manual (M)
you now have control of selecting the gear
you prefer using buttons on the shift lever.
See Understanding your SelectShift
Automatic
™ transmission later in this
section.
To return to normal drive (D) position,
move the shift lever back from manual (M)
to drive (D).
The transmission operates in gears one
through six.
Second (2)
Transmission operates in second (2) gear
only. Use second (2) gear to start-up on
slippery roads.
First (1)
• Transmission operates in first (1) gear
only.
• Provides maximum engine braking.
115
F650750 (TBC) , enUSA, Edition date: 201804, Second-Printing TransmissionE163183
Page 121 of 387
Automatic Transmission Adaptive
Learning
This feature's design is to increase
durability and provide consistent shift feel
over the life of your vehicle. A new vehicle
or transmission could have firm shifts, soft
shifts or both. This operation is normal and
does not affect function or durability of the
transmission. Over time, the adaptive
learning process fully updates transmission
operation. Additionally, whenever you
disconnect the battery or install a new
battery, the system must relearn the
strategy.
Brake-Shift Interlock
WARNING: Do not drive your
vehicle until you verify that the
stoplamps are working. WARNING:
When doing this
procedure, you need to take the
transmission out of park (P) which
means your vehicle can roll freely. To
avoid unwanted vehicle movement,
always fully apply the parking brake prior
to doing this procedure. Use wheels
chocks if appropriate. WARNING:
If the parking brake is
fully released, but the brake warning
lamp remains illuminated, the brakes
may not be working properly. Have your
vehicle checked as soon as possible.
Your vehicle is equipped with a brake-shift
interlock feature that prevents the
gearshift lever from moving from park (P)
when the ignition is in the 3 (on) position
and the brake pedal is not pressed. If you cannot move the gearshift lever out
of park (P) position with the ignition in the
4 (on) position and the brake pedal
pressed, a malfunction could have
occurred. It is possible that a fuse has
blown or your vehicle
’s brake lamps are
not operating properly.
See Fuse
Specification Chart (page 167).
If the fuse is not blown and the brake
lamps are working properly, the following
procedure allows you to move the gearshift
lever from park (P):
1. Apply the parking brake. Switch the ignition key to 1 (off), then remove the
key.
2. Move the steering column to the full down and full rearward position
(toward the driver ’s seat).
3. Remove the gearshift lever boot.
4. Place fingers into hole where you removed the gearshift lever boot and
pull top half of shroud up and forward
to separate it from the lower half of the
shroud. There is a hinge at the forward
edge of the top shroud. Roll the top
half of the shroud upward on the hinge
point to clear the hazard flasher button,
then pull straight rearward toward the
driver ’s seat to remove.
5. Remove the top half of the shroud.
6. Remove the three fasteners under the column that secure the lower shroud
half to the column.
118
F650750 (TBC) , enUSA, Edition date: 201804, Second-Printing Transmission
Page 129 of 387
5. Tighten the nut until the spring is fully
caged and brakes released. Do not
loosen or remove the release stud and
nut unless you completely assemble
and securely clamp the brake chamber.
6. After restoring the air pressure, unscrew and remove the release stud
and install in the carrying pocket. Install
the access plug.
AIR BRAKES (IF EQUIPPED) WARNING:
Do not drive or
continue to drive if the low air pressure
buzzer is sounding or the brake warning
light is lit. These warnings indicate that
air pressure is not to normal operating
level. Continued use of the vehicle could
result in loss of braking ability. WARNING:
Avoid repeated light
application of the brake pedal. This
depletes air pressure faster and could
result in loss of braking capability. WARNING:
Do not move the
vehicle when the air pressure is
insufficient because the brake system
may be inoperative.
After starting the engine, give the air
compressor time to build up the air
pressure to
60 psi (414 kPa) before moving
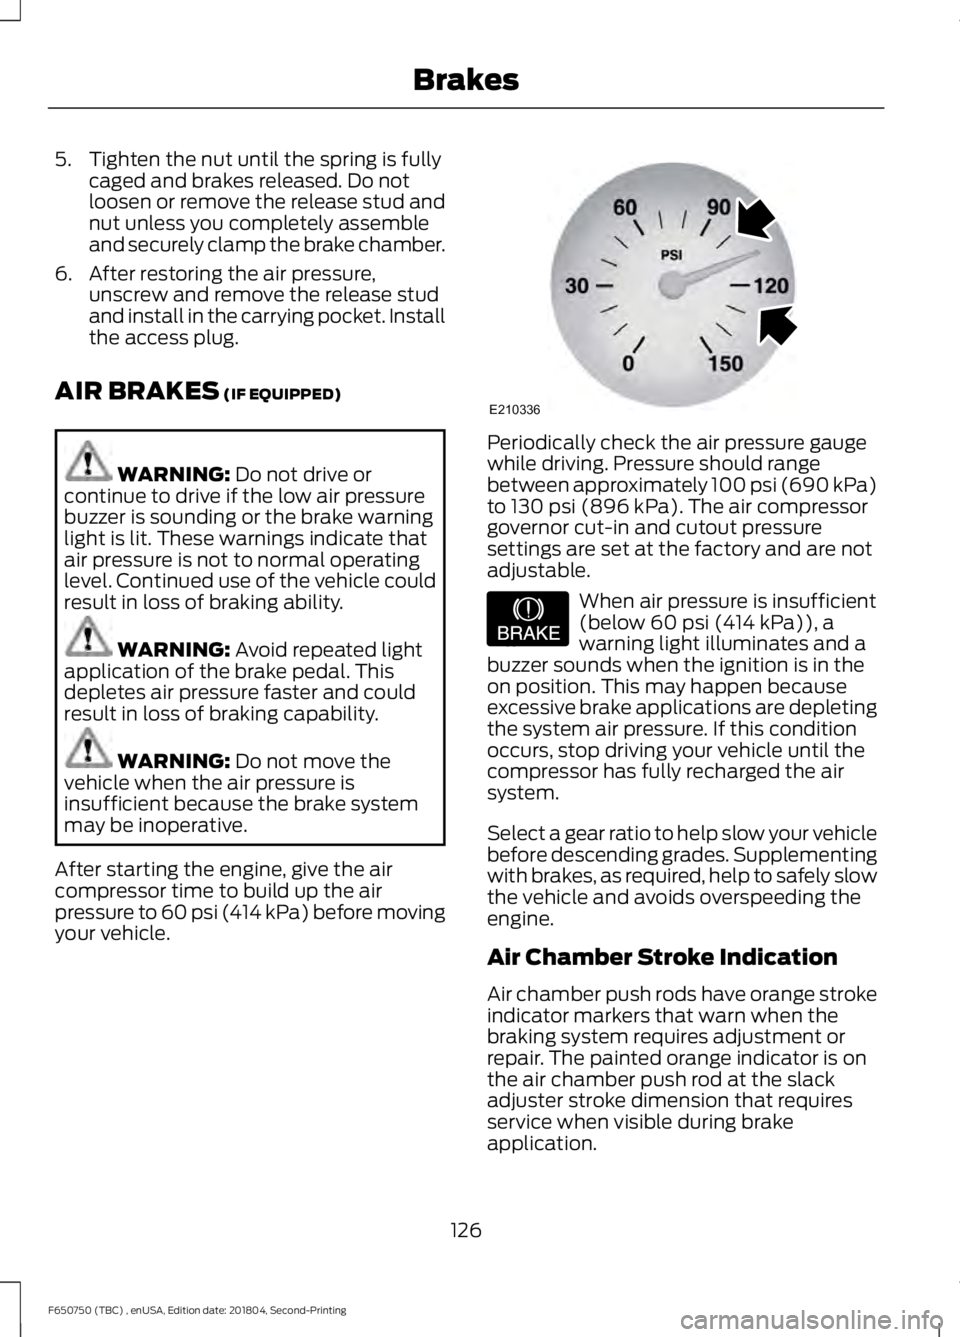
your vehicle. Periodically check the air pressure gauge
while driving. Pressure should range
between approximately 100 psi (690 kPa)
to
130 psi (896 kPa). The air compressor
governor cut-in and cutout pressure
settings are set at the factory and are not
adjustable. When air pressure is insufficient
(below
60 psi (414 kPa)), a
warning light illuminates and a
buzzer sounds when the ignition is in the
on position. This may happen because
excessive brake applications are depleting
the system air pressure. If this condition
occurs, stop driving your vehicle until the
compressor has fully recharged the air
system.
Select a gear ratio to help slow your vehicle
before descending grades. Supplementing
with brakes, as required, help to safely slow
the vehicle and avoids overspeeding the
engine.
Air Chamber Stroke Indication
Air chamber push rods have orange stroke
indicator markers that warn when the
braking system requires adjustment or
repair. The painted orange indicator is on
the air chamber push rod at the slack
adjuster stroke dimension that requires
service when visible during brake
application.
126
F650750 (TBC) , enUSA, Edition date: 201804, Second-Printing BrakesE210336 E206772