2019 FORD F-450 ECO mode
[x] Cancel search: ECO modePage 217 of 666
N (Neutral)
Only used when towing the vehicle. No
power to front or rear wheels.
4L (4X4 Low)
Uses extra gearing to provide maximum
power to all four wheels at reduced
speeds. Intended only for off road
applications such as deep sand, steep
grades or pulling heavy objects.
Shifting between system modes
Note:
Do not perform these operations if
the rear wheels are slipping or when
applying the accelerator pedal.
Note: Some noise may be heard as the 4x4
system shifts or engages. This is normal. In
order to reduce engagement noise, it is
recommended that all shifts be performed
at speeds below3 mph (5 km/h).
Note: The vehicle should not be driven in
4X4 High with the hub locks disengaged as
this condition may damage driveline system
components.
Engage the locking hubs by rotating the
hub lock control from FREE to LOCK, then
move the transfer case lever from 2H to
4H at a stop or a vehicle speed below
3 mph (5 km/h)
.
Move the transfer case lever from 4H to
2H at a stop or a vehicle speed below
3 mph (5 km/h)
, then disengage the
locking hubs (optional) by rotating the hub
lock control from LOCK to FREE.
For proper operation, make sure that both
hubs are set to either FREE or LOCK.
Shifting to or from 4L (4X4 Low)
1. Bring the vehicle to a stop or a speed below
3 mph (5 km/h).
2. Place the transmission in N (Neutral). 3. Move the transfer case shift lever
through N (Neutral) directly to the
desired position.
4. If the transfer case does not, or only partially moves to the desired position,
perform a shift with the transmission
in N (Neutral) and the vehicle rolling at
a speed below
3 mph (5 km/h).
5. If shifting to 2H with the vehicle at a complete stop, disengage the locking
hubs (optional) by rotating the hub
lock control from LOCK to FREE.
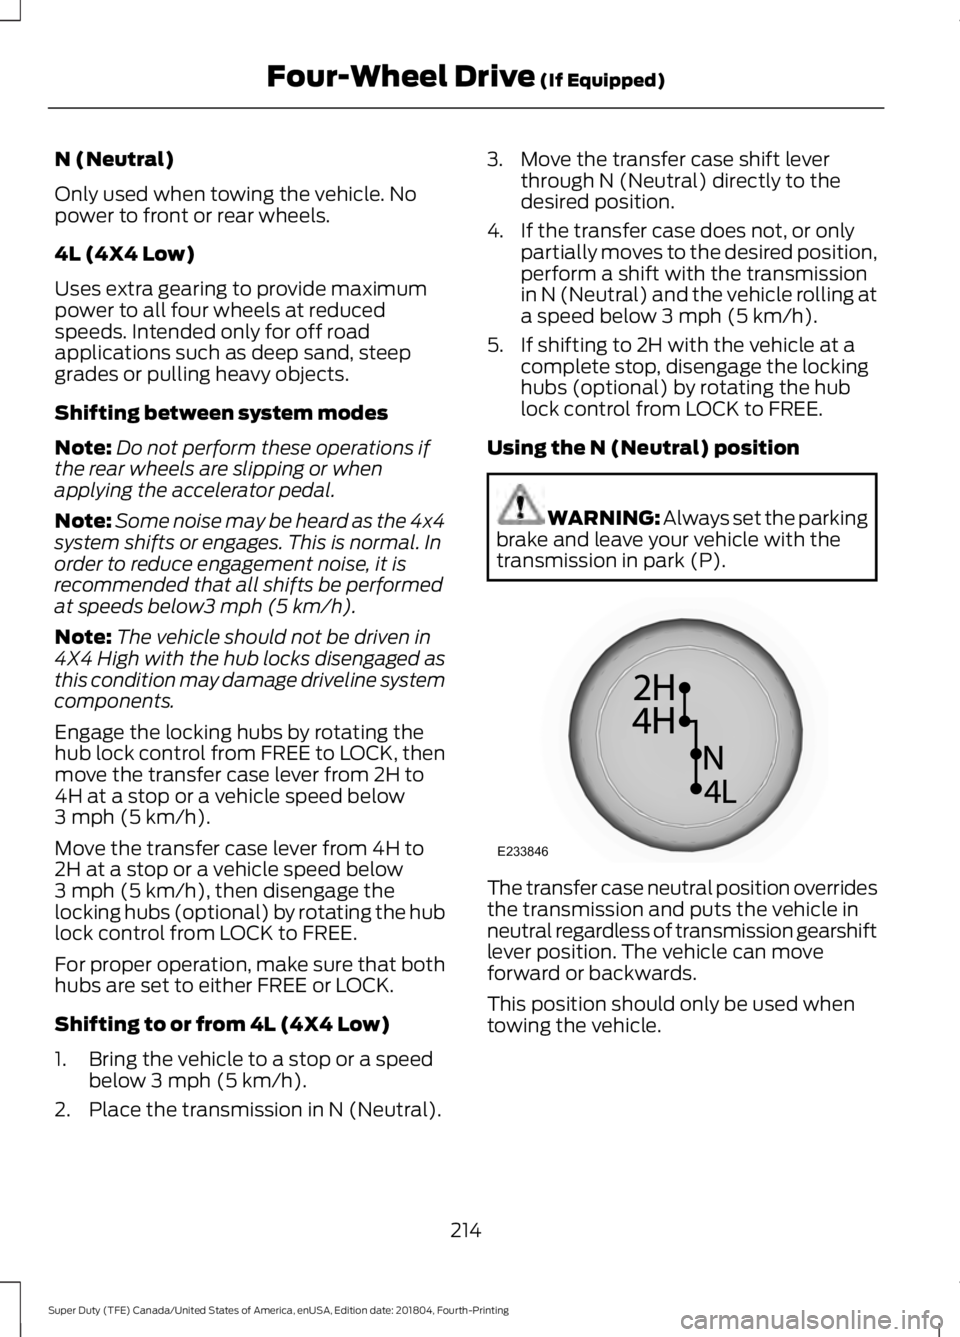
Using the N (Neutral) position WARNING:
Always set the parking
brake and leave your vehicle with the
transmission in park (P). The transfer case neutral position overrides
the transmission and puts the vehicle in
neutral regardless of transmission gearshift
lever position. The vehicle can move
forward or backwards.
This position should only be used when
towing the vehicle.
214
Super Duty (TFE) Canada/United States of America, enUSA, Edition date: 201804, Fourth-Printing Four-Wheel Drive
(If Equipped)E233846
Page 218 of 666

Using the Electronic Shift on the
Fly 4WD system (If Equipped)
2H (4X2)
For general on-road driving. Sends power
to the rear wheels only and should be used
for street and highway driving. Provides
optimal smoothness and fuel economy at
high speeds.
4H (4X4 HIGH)
Provides mechanically locked four-wheel
drive power to both the front and rear
wheels for use in off-road or winter
conditions such as deep snow, sand or
mud. This mode is not for use on dry
pavement.
4L (4X4 LOW)
Provides mechanically locked four-wheel
drive power to both the front and rear
wheels for use on low traction surfaces,
but does so with additional gearing for
increased torque multiplication. Intended
only for off-road applications such as deep
sand, steep grades, or pulling heavy
objects. 4L (4X4 low) will not engage while
your vehicle is moving above
3 mph
(5 km/h); this is normal and should be no
reason for concern. Refer to Shifting to or
from 4L (4X4 low) for proper operation. Shifting between system modes
Note:
Momentarily releasing the accelerator
pedal when a shift in progress message
displays improves engagement or
disengagement performance.
Note: Do not perform this operation if the
rear wheels are slipping or when applying
the accelerator pedal.
Note: Some noise may be heard as the
system shifts or engages; this is normal.
Note: 4X4 high mode is not intended for
use on dry pavement.
You can move the control from 2H or 4H
at a stop or while driving. The information
display may display a message indicating
a 4X4 shift is in progress. Once the shift is
complete the message center will then
display the system mode selected.
Shifting to or from 4L (4X4 low)
Note: Some noise may be heard as the
system shifts or engages; this is normal.
Note: 4x4 low mode is not intended for use
on dry pavement.
1. Bring the vehicle to a speed of
3 mph
(5 km/h) or less.
2. Place the transmission in N (Neutral).
3. Move the 4WD control to the desired position.
The information display will display a
message indicating a 4X4 shift is in
progress. The information display will then
display the system mode selected. If any
of the above shift conditions are not met,
the shift will not occur and the information
display will display information guiding the
driver through the proper shifting
procedures.
215
Super Duty (TFE) Canada/United States of America, enUSA, Edition date: 201804, Fourth-Printing Four-Wheel Drive
(If Equipped)E191851
Page 219 of 666
If Shift Delayed Pull Forward appears in
the information display, transfer case gear
tooth blockage is present. To alleviate this
condition, place the transmission in a
forward gear, move the vehicle forward
approximately
5 ft (1.5 m), and shift the
transmission back to neutral to allow the
transfer case to complete the range shift.
How Your Vehicle Differs From
Other Vehicles WARNING: Vehicles with a higher
center of gravity (utility and four-wheel
drive vehicles) handle differently than
vehicles with a lower center of gravity
(passenger cars). Avoid sharp turns,
excessive speed and abrupt steering in
these vehicles. Failure to drive cautiously
increases the risk of losing control of your
vehicle, vehicle rollover, personal injury
and death.
Truck and utility vehicles can differ from
some other vehicles. Your vehicle may be
higher to allow it to travel over rough
terrain without getting hung up or
damaging underbody components.
The differences that make your vehicle so
versatile also make it handle differently
than an ordinary passenger car.
Maintain steering wheel control at all
times, especially in rough terrain. Since
sudden changes in terrain can result in
abrupt steering wheel motion, make sure
you grip the steering wheel from the
outside. Do not grip the spokes.
Drive cautiously to avoid vehicle damage
from concealed objects such as rocks and
stumps. You should either know the terrain or
examine maps of the area before driving.
Map out your route before driving in the
area. To maintain steering and braking
control of your vehicle, you must have all
four wheels on the ground and they must
be rolling, not sliding or spinning.
Driving Off-Road With Truck and
Utility Vehicles
Note:
On some models, the initial shift from
two-wheel drive to four-wheel drive while
the vehicle is moving can cause some
momentary clunk and ratcheting sounds.
This is the front drivetrain coming up to
speed and the automatic locking hubs
engaging and is not cause for concern.
Note: Your vehicle may be equipped with
a front air dam that can become damaged
(due to reduced ground clearance) when
taking your vehicle off-road. This air dam
can be taken off by removing 15 bolts.
Four-wheel drive vehicles are specially
equipped for driving on sand, snow, mud
and rough terrain and have operating
characteristics that are somewhat
different from conventional vehicles, both
on and off the road.
Power is supplied to all four wheels
through a transfer case. On four-wheel
drive vehicles, the transfer case allows you
to select 4WD when necessary.
Information on transfer case operation and
shifting procedures can be found in this
chapter. Information on transfer case
maintenance can be found in the
Maintenance chapter. You should become
thoroughly familiar with this information
before you operate your vehicle.
Four-wheel drive (when you select a 4WD
mode) uses all four wheels to power the
vehicle. This increases traction, enabling
you to drive over terrain and road
conditions that a conventional two-wheel
drive vehicle cannot.
216
Super Duty (TFE) Canada/United States of America, enUSA, Edition date: 201804, Fourth-Printing Four-Wheel Drive
(If Equipped)
Page 220 of 666
Basic Operating Principles
•
Drive slower in strong crosswinds which
can affect the normal steering
characteristics of your vehicle.
• When driving your vehicle on surfaces
made slippery by loose sand, water,
gravel, snow or ice proceed with care.
• Do not use 4H or 4L on dry, hard
surfaced roads. Doing so will produce
excessive noise, increase tire wear and
may damage drive components. 4H or
4L modes are only intended for
consistently slippery or loose surfaces.
If Your Vehicle leaves the Road
If your vehicle leaves the road, reduce your
vehicle speed and avoid severe braking.
When your vehicle speed has been reduced
ease your vehicle back onto the road. Do
not turn the steering wheel sharply while
returning your vehicle to the road.
It may be safer to stay on the shoulder of
the road and slow down gradually before
returning to the road. You may lose control
if you do not slow down or if you turn the
steering wheel too sharply or abruptly.
It may be less risky to strike small objects,
such as freeway reflectors, with minor
damage to your vehicle rather than
attempt a sudden return to the road which
could cause your vehicle to slide sideways
out of control or roll over. Remember, your
safety and the safety of others should be
your primary concern.
Emergency Maneuvers
In an unavoidable emergency situation
where a sudden sharp turn must be made,
remember to avoid over-driving your
vehicle (i.e. turn the steering wheel only as
rapidly and as far as required to avoid the
emergency). Excessive steering can result
in loss of vehicle control. Apply smooth
pressure to the accelerator pedal or brake
pedal when changes in vehicle speed are required. Avoid abrupt steering,
acceleration and braking. This could result
in an increased risk of vehicle roll over, loss
of vehicle control and personal injury. Use
all available road surface to bring your
vehicle to a safe direction of travel.
In the event of an emergency stop, avoid
skidding the tires and do not attempt any
sharp steering wheel movements.
If your vehicle goes from one type of
surface to another (i.e. from concrete to
gravel) there will be a change in the way
your vehicle responds to a maneuver (i.e.
steering, acceleration or braking).
Sand
When driving over sand, try to keep all four
wheels on the most solid area of the trail.
Avoid reducing the tire pressures but shift
to a lower gear and drive steadily through
the terrain. Apply the accelerator slowly
and avoid excessive wheel slip.
When driving at slow speeds in deep sand
under high outside temperatures, use a low
gear when possible. Low gear operation
will maximize the engine and transmission
cooling capability.
Avoid driving at excessive speeds, this
causes vehicle momentum to work against
you and your vehicle could become stuck
to the point that assistance may be
required from another vehicle. Remember,
you may be able to back out the way you
came if you proceed with caution.
Mud and Water
Mud
Be cautious of sudden changes in vehicle
speed or direction when you are driving in
mud. Even four-wheel drive vehicles can
lose traction in slick mud. If your vehicle
does slide, steer in the direction of the slide
until you regain control of your vehicle.
217
Super Duty (TFE) Canada/United States of America, enUSA, Edition date: 201804, Fourth-Printing Four-Wheel Drive (If Equipped)
Page 224 of 666
LIMITED SLIP DIFFERENTIAL
This axle provides added traction on
slippery surfaces, particularly when one
wheel is on a poor traction surface. Under
normal conditions, the limited-slip axle
functions like a standard rear axle. The axle
may exhibit a slight noise or vibration
during tight turns with low vehicle speed.
This is normal behavior and indicates the
axle is working.
ELECTRONIC LOCKING
DIFFERENTIAL (IF EQUIPPED)
Note: The electronic locking differential is
for off-road use only and is not for use on
dry pavement. Using the electronic locking
differential on dry pavement will result in
increased tire wear, noise and vibration.
The electronic locking differential is a
device housed in the rear axle that allows
both rear wheels to turn at the same
speed. The electronic locking differential
can provide additional traction should your
vehicle become stuck. You can activate
the differential electronically and shift it
on the fly within the differential operating
speed range. The differential is for use in
mud, rocks, sand, or any off-road condition
where you need maximum traction. It is
not for use on dry pavement.
The following conditions will affect the
electronic locking differential:
• The electronic locking differential will
not engage if your vehicle speed is
above
20 mph (32 km/h) in 4x2 or 4x4
High modes.
• The electronic locking differential will
not engage if your vehicle speed is
above or
56 mph (90 km/h) in 4X4
Low. •
The electronic locking differential may
not engage if you press your
accelerator pedal during an
engagement attempt. A message may
display in the instrument display
guiding you to release the accelerator
pedal.
• In 4x2 or 4x4 High modes, the
electronic locking differential will
automatically disengage at speeds
above
25 mph (41 km/h) and will
automatically reengage at speeds
below
20 mph (32 km/h).
• In 4L (4X4 low), the electronic locking
differential will automatically
disengage at speeds above
62 mph
(100 km/h) and will automatically
reengage at speeds below 56 mph
(90 km/h).
• The AdvanceTrac system has the
ability to take over control of the
electronic locking differential and
disable it during driving maneuvers
when necessary.
When you switch the system on, if you do
not meet the required conditions for
electronic locking differential activation,
the instrument cluster will display the
appropriate information guiding you
through the proper activation process.
Activating the Electronic Locking
Differential
Note: Do not use electronic locking
differential on dry, hard surfaced roads.
Doing so will produce excessive noise,
vibration and increase tire wear.
Note: If the electronic locking differential
has difficulty disengaging, release the
accelerator pedal and turn the steering
wheel in the opposite direction while rolling.
221
Super Duty (TFE) Canada/United States of America, enUSA, Edition date: 201804, Fourth-Printing Rear Axle
Page 227 of 666
This feature increases engine braking at
higher engine speeds to provide better
grade descent control with less brake and
transmission wear and tear.
Note:
Use this when driving downhill and
carrying heavy loads or trailering.
Benefits of engine braking are:
• Lower brake temperature.
• Reduced brake fade.
• Longer brake life.
• Improved driving and trailering control. Press the button on the switch
bank next to the audio unit to
switch the system on or off.
There are two engine brake modes, manual
and automatic.
Manual Engine Braking
1. Press the button to switch on manual engine braking.
2. Release the accelerator pedal to maximize engine braking.
3. Apply the brakes. The transmission downshifts to lower gears.
Note: The engine braking feature only
functions when you release the accelerator.
Note: You can shift the transmission to
lower gears with progressive range selection
(PRS) or manual shifting independent of
pressing the brakes.
Note: You can also use manual engine
braking with cruise control to improve grade
descent control.
Note: If your vehicle has Adaptive Cruise
Control, the speed control system uses the
selected engine brake mode, transmission
gears, and brakes to maintain the set speed
and distance to the vehicle being followed. Automatic Engine Braking
1. Press the button twice to switch on
automatic engine braking.
2. Release the accelerator or brake pedal.
The system remembers your vehicle
speed.
Note: This feature offers smoother, less
aggressive engine braking during downhill
descents. It may not apply braking if the
vehicle speed is not increasing, although it
will apply full engine braking force when
needed to prevent acceleration. The system
automatically activates the engine brake
and, if necessary, downshifts the
transmission to lower gears to not exceed
your vehicle's set speed when the brake or
accelerator were last released.
Warning Lamp Conditions
• Illuminates when this feature is
switched on and the system is
operating properly. See Warning
Lamps and Indicators (page 107).
• Flashes when the engine brake is
disabled due to a fault or the engine
does not meet the required braking
conditions.
• Does not illuminate when the switch
or indicator is faulty.
You can switch the system on at anytime.
The system becomes active once the
braking conditions are met.
Braking Conditions
• Your vehicle is in a forward gear.
• The engine speed is above about 1500
RPM.
• Your foot is off the accelerator.
224
Super Duty (TFE) Canada/United States of America, enUSA, Edition date: 201804, Fourth-Printing BrakesE171217
Page 245 of 666

Note:
If you accelerate by pressing only the
accelerator pedal, the set speed does not
change. When you release the accelerator
pedal, your vehicle returns to the speed you
previously set.
Canceling the Set Speed Press and release the button, or
tap the brake pedal to cancel the
set speed.
Note: The system remembers the set
speed.
Resuming the Set Speed Press and release to resume the
set speed.
Switching Cruise Control Off For vehicles without Speed
Limiter, press and release the
button when the system is in
standby mode or switch the ignition off. For vehicles with Speed Limiter,
press and release the button
when the system is in standby
mode or switch the ignition off.
Note: You erase the set speed when you
switch the system off.
USING ADAPTIVE CRUISE
CONTROL WARNING: Always pay close
attention to changing road conditions
when using the system. It does not
replace attentive driving. Failure to
follow this instruction could result in
personal injury or death. WARNING:
Do not use the system
when entering or leaving a highway, on
roads with intersections or roundabouts
or non-vehicular traffic or roads that are
winding, slippery, unpaved, or steep
slopes. WARNING:
Do not use the system
in poor visibility, for example fog, heavy
rain, spray or snow. WARNING:
Do not use the system
when towing a trailer that has
aftermarket electronic trailer brake
controls. Failure to follow this instruction
could result in the loss of control of your
vehicle, personal injury or death. WARNING:
Do not use tire sizes
other than those recommended because
this can affect the normal operation of
the system. Failure to do so may result
in a loss of vehicle control, which could
result in serious injury. WARNING:
The system may not
detect stationary or slow moving
vehicles below
6 mph (10 km/h). WARNING:
The system does not
detect pedestrians or objects in the road. WARNING:
The system does not
detect oncoming vehicles in the same
lane. WARNING:
The system is not a
crash warning or avoidance system. WARNING:
Do not use the system
with a snow plow blade installed.
242
Super Duty (TFE) Canada/United States of America, enUSA, Edition date: 201804, Fourth-Printing Cruise Control
(If Equipped)E265298 E265297 E71340
Page 281 of 666
Step 5: Enter Measurements Using the
Information Display
Using the measurements you recorded,
enter the required data into the system.
Follow the on screen prompts to enter
each of the measurements taken in step
4. Use the up and down arrows to increase
or decrease the numbers as necessary.
Press OK to confirm each measurement.
Once you add the last measurement, the
information display shows all of the
entered measurements. You can choose
to confirm or change the measurements.
Step 6: Confirming the Sticker Location
Check the rear view camera display to see
if the system identifies the sticker. The
system marks the sticker with a red circle.
Confirm that the red circle shows over the
sticker image in the rear view camera
display.
Note:
If the system cannot locate the
sticker, try cleaning the camera lens. Make
sure the sticker is within the zone as
indicated in step 3.
The information display shows a
confirmation message when you
successfully confirm the target.
Calibrating the System
To complete setup, drive your vehicle
straight forward between 4– 24 mph
(6– 39 km/h), as directed by the
information display.
Note: Keep the steering wheel straight
during the calibration process. If the steering
wheel is in a turned position, the calibration
pauses. The information display prompts
you to drive straight forward to complete
the calibration.
The information display shows a message
during calibration and after calibration is
complete Note:
For best results, do not calibrate the
system at night.
Using Trailer Reverse Guidance
1. Shift into reverse (R). Press the rear camera button to expand the menu.
2. Press the trailer icon.
3. Select the applicable trailer in the information display.
4. When in trailer reverse guidance mode,
you can see the camera view on the
side your trailer is moving, or both sides
when the trailer is straight behind you.
When the views change with the trailer
direction, it is called auto mode. For
example, if you turn the trailer to the
right, you see the right side of your
vehicle and trailer. You can switch this
view manually at any time by using the
arrow keys. To return to auto mode,
press the auto button.
Note: Auto mode is the default setting.
Use the view that helps you the most when
reversing your vehicle and trailer. Normal rear view camera view.
Use this feature when you want
to see your trailer hitch or what
is directly behind your vehicle. Straight back-up mode. Use this
feature when you want to keep
your trailer completely in line
with your truck. In this mode, a steering
wheel graphic shows you which way to turn
your steering wheel to keep your trailer
straight.
Note: It may be helpful to shift your vehicle
into drive (D), pull forward and straighten
out the vehicle and trailer before engaging
straight back-up mode.
Left and right arrows let you see other
views regardless of your trailer angle. Use
them to switch views manually.
278
Super Duty (TFE) Canada/United States of America, enUSA, Edition date: 201804, Fourth-Printing TowingE263194 E224484